用eclipse调试uboot工程
----------------------------------------------------------------------
2013-4-7更新:整理的PDF版本,放到这里了:http://download.csdn.net/detail/kangear/5230353
----------------------------------------------------------------------
本文是在ubuntu12.10上调试的。首先保证jlink for linux中的JLinkGDBServer可以用!具体可以参考《(先留着,还没有整理好)》。还要装好arm-linux-gdb安装方法参见这个《arm-linux-gdb的安装》。0。安装 eclipse 插件 Zylin Embedded CDT打开 eclipsec 后,选择 Help->install New Software...在 Work with 位置输入http://com.zylin.cdt.feature 依指示完成安裝
打开上文中的U-boot3工程(可以参考这里《用eclipse导入uboot工程》),保证能正常编译。
1。启动后,先Run-》Debug Configrations 如下图配置:

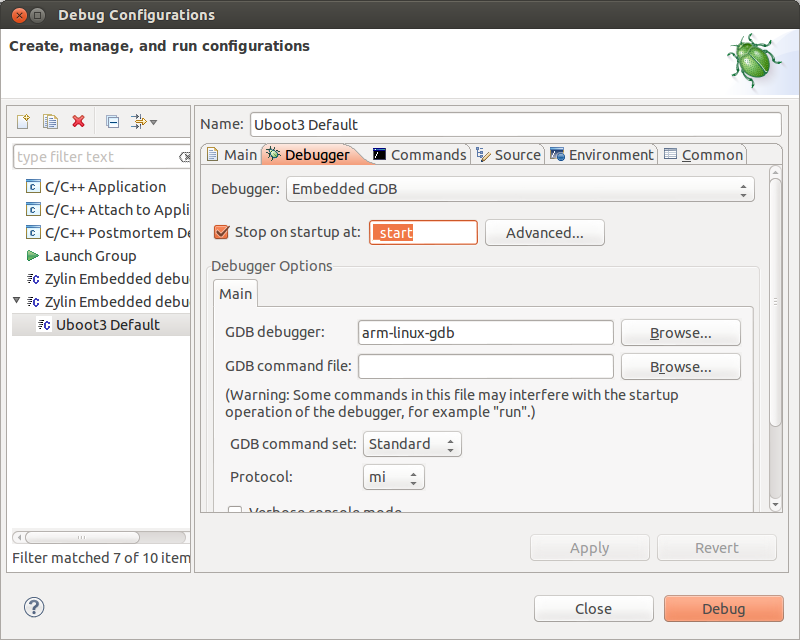
2。点击Debuger,如下配置:
3。点击Commands-》如下配置:(里边填写的内容下附件)

4。依此点击如下图所示:

5。下边是调试窗口:

6。这样单步调度u-boot了。
参考1:《使用JLINK GDBSERVER调试U-BOOT的方法》http://blog.csdn.net/samantha_sun/article/details/6245504
参考2:《图解Ubuntu + Eclipse + JLink + arm-linux-gcc 配置》http://wenku.baidu.com/view/e4f9ad76f242336c1eb95ed2.html
参考3:《JLlink+GDB调试U-Boot 》http://blog.163.com/nesnil@126/blog/static/380812982012223104416462/
附件1:3里边输入的内容在如下:(参考《JLlink+GDB调试U-Boot 》中的.gdbinit)(更新:这个不能启动内核,附件2可以
pasting
- #
- # J-LINK GDB SERVER initialization
- #
- # This connects to a GDB Server listening
- # for commands on localhost at tcp port 2331
- target remote 127.0.0.1:2331 #首先连接主机的GDB Server,端口都是2331。
- #注意主机的GDB Server勾掉"Localhost only"选项,否则连接不上
- # Set JTAG speed to 30 kHz
- monitor speed 30
- # Set GDBServer to little endian
- monitor endian little
- #end
- # Reset the chip to get to a known state.
- monitor reset
- #
- # CPU core initialization
- #
- # Set the processor mode
- monitor reg cpsr = 0xd3
- #disable watchdog
- monitor MemU32 0x53000000 = 0x00000000
- #disable interrupt
- monitor MemU32 0x4A000008 = 0xFFFFFFFF #INTMSK
- monitor MemU32 0x4A00000C = 0x00007FFF #INTSUBMSK
- #set clock
- monitor MemU32 0x4C000000 = 0x00FFFFFF
- monitor MemU32 0x4C000014 = 0x00000005
- monitor MemU32 0x4C000004 = 0x0005C011
- #config sdram
- monitor MemU32 0x48000000 = 0x22011110 #conw
- monitor MemU32 0x48000004 = 0x00000700 #bank0
- monitor MemU32 0x48000008 = 0x00000700 #bank1
- monitor MemU32 0x4800000C = 0x00000700 #bank2
- monitor MemU32 0x48000010 = 0x00000700 #bank3
- monitor MemU32 0x48000014 = 0x00000700 #bank4
- monitor MemU32 0x48000018 = 0x00000700 #bank5
- monitor MemU32 0x4800001C = 0x00018005 #bank6
- monitor MemU32 0x48000020 = 0x00018005 #bank7
- monitor MemU32 0x48000024 = 0x008E04F4 #vREFRESH
- monitor MemU32 0x48000028 = 0xB1 #vBANKSIZE -- 128M/128M --- should
- monitor MemU32 0x4800002c = 0x30 #vMRSRB6
- monitor MemU32 0x48000030 = 0x30 #vMRSRB7
- # Set auto JTAG speed
- monitor speed auto
- # Setup GDB FOR FASTER DOWNLOADS
- set remote memory-write-packet-size 1024
- set remote memory-write-packet-size fixed
- # Load the program executable called "image.elf"
- # load image.elf
- b _start
- load
- continue
附件2:能启动内核的脚本内容:http://my.csdn.net/kangear/code/detail/40157