Linux06 /Python web项目部署
1. 部署方式
-
纯后端代码部署
nginx + uwsgi + crm + mysql+virtualenv+supervisor -
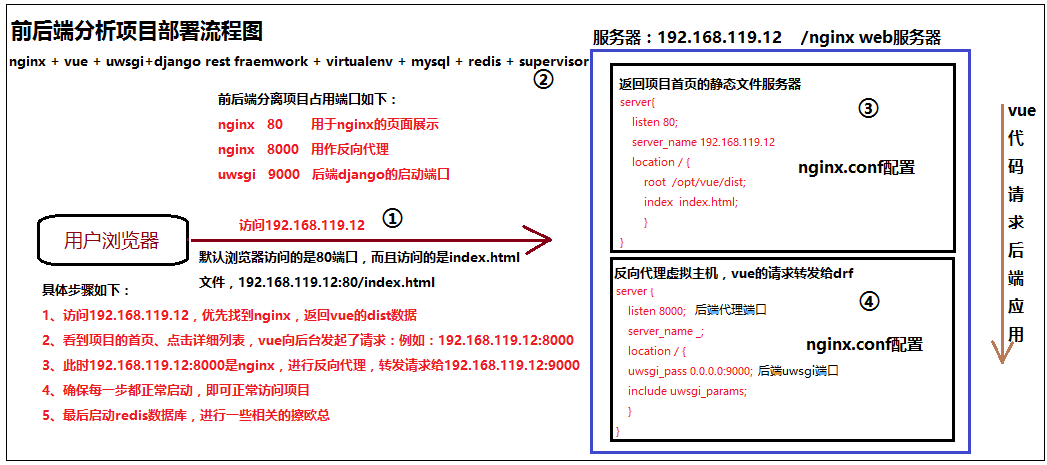
前后端分离项目部署
nginx + vue + uwsgi+django rest fraemwork + virtualenv + mysql + redis + supervisor -
Python的调试启动方式,调用wsgiref单机模块,测试代码是否能够正常运行的,性能低下,单进程,单线程
python3 manage.py runserver
2. 纯后端代码部署/CRM为例
1. 部署方式
- nginx + uwsgi + crm + mysql+virtualenv+supervisor
2. crm项目详细部署步骤
-
创建一个新的虚拟环境,用于运行crm新业务 mkvirtualenv crm
-
上传crm代码到服务器
-
解决代码的模块依赖
pip3 freeze > requirements.txt pip3 install -i https://pypi.douban.com/simple -r requirements.txt -
安装uwsgi工具,启动crm
pip3 install -i https://pypi.douban.com/simple uwsgi -
使用uwsgi的配置文件,启动crm项目
# 在项目的第一级目录,手动创建uwsgi的配置文件
touch uwsgi.ini
[uwsgi] # Django-related settings # the base directory (full path) # 填写项目的完整绝对路径,第一层 chdir = /opt/crm # Django's wsgi file #指定django的wsgi文件路径,填写相对路径 module = crm.wsgi # the virtualenv (full path) # 填写虚拟环境的绝对路径 home = /root/Envs/CRM # process-related settings # master master = true # maximum number of worker processes # 定义程序的多进程数量的,以cpu核数的2倍+1数量填写 2n+1 数量 processes = 3 # the socket (use the full path to be safe # 把uwsgi启动在socket协议上,的8000端口 socket = 0.0.0.0:8000 # 指定http协议的话,用户是可以直接访问到的,不安全的,因此使用socket协议 # http =0.0.0.0:8000 # ... with appropriate permissions - may be needed # chmod-socket = 664 # clear environment on exit vacuum = true -
启动uwsgi的命令
uwsgi --ini uwsgi.ini # 指定配置文件启动 -
配置nginx,进行静态文件解析,以及反向代理crm的动态请求
server { listen 80; server_name _; # 只要在server{}标签中看到root关键字,说明这个虚拟主机是一个静态文件服务器 # 将server_name后面的www.pythoncrm.com 这个域名所有的请求,都分发给uwsgi location / { uwsgi_pass 127.0.0.1:8000; include uwsgi_params; } } -
重新加载nginx,让配置生效
nginx -s reload -
把ip做一个本地的hosts解析,添加一个假的域名(可以不设置)
找到本地机器的hosts文件C:WindowsSystem32driversetc 192.168.16.85 www.s24pythoncrm.com -
收集crm所有的静态文件,交给nginx去处理
# 修改django的settings.py配置文件,添加如下配置 STATIC_URL = '/static/' STATIC_ROOT='/opt/crmstatic' # 通过命令收集django所有的静态文件,就会将项目的所有的静态文件打包放到/opt目录下,以crmstatic作为文件名 python3 manage.py collectstatic -
配置nginx找到crm的静态文件
# 修改配置如下形式 # 配置nginx找到crm所有的静态文件 # 只要是以/static开头的请求,就走如下配置 location /static { # http://www.pythoncrm.com/static/login/css/style.css alias /opt/crmstatic/; } -
重启nginx,查看crm项目(使用本地hosts文件设置的IP)
# 1.重启nginx nginx -s reload # 2.查看crm项目 http://www.pythoncrm.com -
通过supervisor进程管理工具,管理uwsgi的后台,这个工具,其实就是在帮我们执行启动命令,需要下载安装即可
yum install supervisor -
配置supervisor的配置文件
echo_supervisord_conf > /etc/supervisor.conf # 生成配置文件的目录 -
修改配置文件,让supervisor管理uwsgi
vim /etc/supervisord.conf # 注意使用的是supervisord[program:s24crm] command=/root/Envs/CRM/bin/uwsgi --ini /opt/crm/uwsgi.ini ; 程序启动命令 autostart=true ; 在supervisord启动的时候也自动启动 stopasgroup=true ;默认为false,进程被杀死时,是否向这个进程组发送stop信号,包括子进程 killasgroup=true ;默认为false,向进程组发送kill信号,包括子进程 # /root/Envs/CRM/bin/uwsgi:启动项目的uwsgi的位置 # /opt/crm/uwsgi.ini:项目uwsgi配置文件的位置 -
启动supervisord服务端,进入supervisor的管理交互式终端,管理任务
supervisord -c  /etc/supervisord.conf
supervisorctl -c /etc/supervisord.conf
# supervisor的管理命令 status # 查看状态 start all # 启动所有任务 restart all # 重启所有任务 stop 进程名称
3. vue+drf的前后端分离项目部署
1. 部署方式
-
nginx + vue + uwsgi+django rest fraemwork + virtualenv + mysql + redis + supervisor
-
端口划分:
vue+nginx的端口 是81vue向后台发请求,首先发给的是代理服务器,这里模拟是nginx的 9000
drf后台运行在 9005端口上
2. 前端部署过程
-
获取前端代码(前端示例代码)
# 1.下载前端示例代码 wget https://files.cnblogs.com/files/pyyu/07-luffy_project_01.zip # 2.解压缩,准备编译前端代码 unzip 07-luffy_project_01.zip -
下载node源码,配置nodejs编译环境,加入环境变量中
# 1.下载node源码 wget https://nodejs.org/download/release/v8.6.0/node-v8.6.0-linux-x64.tar.gz # 2.解压缩 tar -zxvf node-v8.6.0-linux-x64.tar.gz # 3.编辑配置文件profile vim /etc/profile # 4.将node的bin目录加入到环境变量PATH中 PATH="/opt/python367/bin:/usr/local/sbin:/usr/local/bin:/usr/sbin:/usr/bin:/root/bin:/opt/tbnginx/sbin:/opt/node-v8.6.0-linux-x64/bin" -
修改vue的数据提交地址,修改如下配置文件
# 1.定位到该文件 /opt/07-luffy_project_01/src/restful/api.js # 2.批量替换ip地址信息 sed -i 's/127.0.0.1:8000/192.168.16.85:9000/g' src/restful/api.js -
安装vue代码所需的模块、将前端静态文件打包到dist
# 1.定位到前端项目的一级目录,确认有package.json文件,该文件有vue项目所需的模块 /opt/07-luffy_project_01/ # 2.下载vue所需模块,要在前端项目的一级目录 npm install # 2.始编译前端代码,生成dist静态文件夹,前端所有代码,都打包编译生成了一个dist npm run build -
生成了dist静态文件夹之后,交给nginx去处理
# 返回项目首页的静态文件服务器 server { listen 81; server_name _; # 最低级url匹配,所有请求都走到了这里 location / { root /opt/07-luffy_project_01/dist; index index.html; } } # 反向代理虚拟主机,vue的请求转发给drf server { listen 9000; server_name _; location / { uwsgi_pass 0.0.0.0:9005; include uwsgi_params; } } -
重启nginx
nginx -s reload
2. 后端部署过程
-
整一个新的虚拟环境,然后下载后端示例代码
# 1.创建虚拟环境 mkvirtualenv luffy # 2.下载后端示例代码 wget https://files.cnblogs.com/files/pyyu/luffy_boy.zip -
解决drf运行的模块问题(最好使用requirements.txt文件去处理模块问题)
1、requirements.txt文件处理模块,创建requirements.txt文件并将以下内容写入到文件中
certifi==2018.11.29
chardet==3.0.4
crypto==1.4.1
Django==2.1.4
django-redis==4.10.0
django-rest-framework==0.1.0
djangorestframework==3.9.0
idna==2.8
Naked==0.1.31
pycrypto==2.6.1
pytz==2018.7
PyYAML==3.13
redis==3.0.1
requests==2.21.0
shellescape==3.4.1
urllib3==1.24.1
uWSGI==2.0.17.1
2、手动解决办法如下,根据相应的报错提示,安装相应的模块
pip3 install -i https://pypi.douban.com/simple django==2.1.4 python3 manage.py runserver pip3 install -i https://pypi.douban.com/simple djangorestframework python3 manage.py runserver pip3 install -i https://pypi.douban.com/simple requests python3 manage.py runserver pip3 install -i https://pypi.douban.com/simple django_redis python3 manage.py runserver pip3 install -i https://pypi.douban.com/simple pycrypto -
用uwsgi去启动drf后台,在项目一级目录创建uwsgi.ini文件,写入如下参数
[uwsgi] # Django-related settings # the base directory (full path) # 填写项目的完整绝对路径,第一层 chdir = /opt/luffy_boy # Django's wsgi file # 指定django的wsgi文件路径,填写相对路径 module = luffy_boy.wsgi # the virtualenv (full path) # 填写虚拟环境的绝对路径 home = /root/Envs/luffy # process-related settings # master master = true # maximum number of worker processes # 定义程序的多进程数量的,以cpu核数的2倍+1数量填写 2n+1 数量 processes = 3 # the socket (use the full path to be safe # 把uwsgi启动在socket协议上,的8000端口 socket = 0.0.0.0:9005 # 指定http协议的话,用户是可以直接访问到的,不安全的,因此使用socket协议 # http =0.0.0.0:8000 # ... with appropriate permissions - may be needed # chmod-socket = 664 # clear environment on exit vacuum = true -
使用supervisor进程管理工具,同时管理crm和前后端分离项目的进程
vim /etc/supervisord.conf # 注意使用的是supervisord[program:s24crm] command=/root/Envs/s24crm/bin/uwsgi --ini /s24fuxi/IGnb/uwsgi.ini ; 程序启动命令 autostart=true ; 在supervisord启动的时候也自动启动 stopasgroup=true ;默认为false,进程被杀死时,是否向这个进程组发送stop信号,包括子进程 killasgroup=true ;默认为false,向进程组发送kill信号,包括子进程 [program:s24luffy] command=/root/Envs/luffy/bin/uwsgi --ini /opt/luffy_boy/uwsgi.ini ; 程序启动命令 autostart=true ; 在supervisord启动的时候也自动启动 stopasgroup=true ;默认为false,进程被杀死时,是否向这个进程组发送stop信号,包括子进程 killasgroup=true ;默认为false,向进程组发送kill信号,包括子进程 -
启动项目后台
# 1.先杀掉supervisor和uwsgi所有的进程,注意杀进程时是否会造成影响 pkill -9 supervisor pkill -9 uwsgi # 2.然后重启supervisor supervisord -c /etc/supervisord.conf supervisorctl -c /etc/supervisord.conf -
本项目有用到redis,所以还得启动redis数据库,才能够正常访问项目
# 1.安装redis yum install redis -y # 2.启动redis systemctl start redis # 3.检查redis是否正常 -
访问项目,验证各功能是否正常