1.前言
博客上偶然看到 spring-boot + duboo 开发, 自己一直没有接触过分布式,手痒的做了一次搭建,记录下心得.
2.zookeeper启动
https://www.apache.org/dyn/closer.cgi/zookeeper/ 下载 zookeeper
修改 conf 下的 zoo_sample.cfg 名称为 zoo.cfg
在bin目录下启动 zkServer.cmd 命令脚本.
这样注册中心就搭建好了.
3. dubbo 服务接口
3.1 新建spring boot 项目
名称为
    <groupId>com.example</groupId>
    <artifactId>spring-boot-demo-dubbo-interface</artifactId>
    <version>0.0.1-SNAPSHOT</version>
    <name>spring-boot-demo-dubbo-interface</name>
pom文件 为
<dependencies>
        <dependency>
            <groupId>org.springframework.boot</groupId>
            <artifactId>spring-boot-starter</artifactId>
        </dependency>

        <dependency>
            <groupId>org.springframework.boot</groupId>
            <artifactId>spring-boot-starter-test</artifactId>
            <scope>test</scope>
        </dependency>

        <dependency>
            <groupId>org.springframework.boot</groupId>
            <artifactId>spring-boot-starter-data-jpa</artifactId>
        </dependency>
    </dependencies>
3.2 新建 model 类
package com.dubbo.test.model;
import java.io.Serializable;
import java.util.Objects;
import javax.persistence.Entity;
import javax.persistence.GeneratedValue;
import javax.persistence.Id;
@Entity
public class User implements Serializable {
    private static final long serialVersionUID = 1L;

    @Id
    @GeneratedValue
    private long id;
    private String userName;
    private String password;
    private int age;
}
建议使用 lombok
3.3 建立服务接口
package com.dubbo.test.service;

import com.dubbo.test.model.User;

public interface UserService {

    public void save(User user);

    public String sayHello(String word);
}
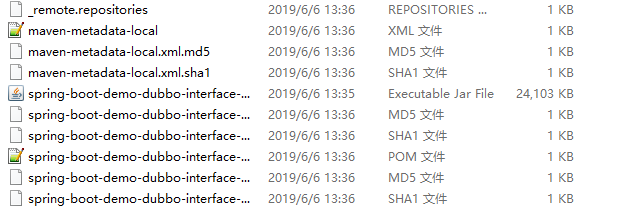
3.4 maven clean + maven install 打包成 jar包
(注意 : 需要删除 src/test/java 下的 默认生成的测试类, 否则会报错. 因为这个差点放弃搭建 )
4. 导入 jar 包到maven 仓库
虽然命令行也可以使用 , 不过我这里推荐使用eclipse导入jar包,图形化界面操控起来方便. 点击 install or deploy an artifact to a Maven repository
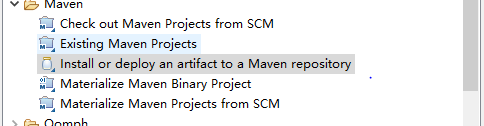

直接导入即可.
5. 搭建生产者
5.1 pom 文件
<dependencies>
        <dependency>
            <groupId>org.springframework.boot</groupId>
            <artifactId>spring-boot-starter-web</artifactId>
        </dependency>

        <dependency>
            <groupId>org.springframework.boot</groupId>
            <artifactId>spring-boot-starter-test</artifactId>
            <scope>test</scope>
        </dependency>
           <!-- 加入springboot与dubbo集成的起步依赖 -->
        <dependency>
            <groupId>com.alibaba.boot</groupId>
            <artifactId>dubbo-spring-boot-starter</artifactId>
            <version>0.2.0</version>
        </dependency>

        <!-- 由于使用了zookeeper作为注册中心,则需要加入zookeeper的客户端jar包: -->
        <dependency>
            <groupId>com.101tec</groupId>
            <artifactId>zkclient</artifactId>
            <version>0.10</version>
        </dependency>

         <!-- spring-data-jpa -->
        <dependency>
            <groupId>org.springframework.boot</groupId>
            <artifactId>spring-boot-starter-data-jpa</artifactId>
        </dependency>

    <dependency>
        <groupId>mysql</groupId>
        <artifactId>mysql-connector-java</artifactId>
        <scope>runtime</scope>
    </dependency>

     <!-- 添加接口服务 -->
        <dependency>
            <groupId>com.example</groupId>
            <artifactId>spring-boot-demo-dubbo-interface</artifactId>
            <version>0.0.1-SNAPSHOT</version>
        </dependency>
    </dependencies>
5.2 application.properties 配置
spring.datasource.driver-class-name=com.mysql.cj.jdbc.Driver
spring.datasource.url=jdbc:mysql://localhost:3306/test_1?serverTimezone=UTC&useUnicode=true&characterEncoding=utf-8&useSSL=true
spring.datasource.username=root
spring.datasource.password=zhongyi2017!

spring.jpa.properties.hibernate.hbm2ddl.auto=create
spring.jpa.properties.hibernate.dialect=org.hibernate.dialect.MySQL5InnoDBDialect
spring.jpa.properties.hibernate.format_sql=true
spring.jpa.show-sql=true

# 访问端口
server.port=8080
# dubbo配置
dubbo.application.name=springboot-dubbo-provider
dubbo.registry.address=zookeeper://61.149.178.123:2181
5.3 新建dao 层
package com.dubbo.test.dao;

import org.springframework.data.jpa.repository.JpaRepository;

import com.dubbo.test.model.User;

public interface UserRepository extends JpaRepository<User, Integer>{

}
5.4 新建 service 实现层
package com.dubbo.test.service;

import org.springframework.beans.factory.annotation.Autowired;
import org.springframework.stereotype.Component;

import com.alibaba.dubbo.config.annotation.Service;
import com.dubbo.test.dao.UserRepository;
import com.dubbo.test.model.User;

@Service
@Component
public class UserServiceImpl implements UserService{
    @Autowired
    private UserRepository userRepository;

    @Override
    public void save(User user) {
        userRepository.save(user);
    }

    @Override
    public String sayHello(String word) {
        return word;
    }

}
@Service 使用的 dubbo提供的注解
5.5 启动类中添加 @EnableDubbo
package com.dubbo.test;

import org.springframework.boot.SpringApplication;
import org.springframework.boot.autoconfigure.SpringBootApplication;

import com.alibaba.dubbo.config.spring.context.annotation.EnableDubbo;
import com.dubbo.test.model.User;

@SpringBootApplication
@EnableDubbo
public class SpringBootDemoDubboProviderApplication {

    public static void main(String[] args) {
        SpringApplication.run(SpringBootDemoDubboProviderApplication.class, args);
    }

}
5.6 启动
6. 搭建消费者
6.1 pom 文件 同 生产者一样
6.2 application.properties 配置
spring.datasource.driver-class-name=com.mysql.cj.jdbc.Driver
spring.datasource.url=jdbc:mysql://localhost:3306/test_1?serverTimezone=UTC&useUnicode=true&characterEncoding=utf-8&useSSL=true
spring.datasource.username=root
spring.datasource.password=zhongyi2017!

# WEBu670Du52A1u7AEFu53E3
server.port=8081
# dubbou914Du7F6E
dubbo.application.name=springboot-dubbo-consumer
dubbo.registry.address=zookeeper://61.149.178.123:2181
6.3 新建 controller 层
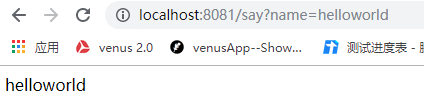
package com.dubbo.test.controller;

import org.springframework.web.bind.annotation.RequestMapping;
import org.springframework.web.bind.annotation.RestController;

import com.alibaba.dubbo.config.annotation.Reference;
import com.dubbo.test.model.User;
import com.dubbo.test.service.UserService;

@RestController
public class UserController {
    @Reference // 该注解是dubbo提供的
    private UserService userService;

    @RequestMapping("/say")
    public String sayHello(String name) {
        return userService.sayHello(name);
    }

    @RequestMapping("/save")
    public void save() {
        User u = new User();
        u.setAge(20);
        u.setPassword("123");
        u.setUserName("zheng");
        userService.save(u);
    }
}
6.4 添加 @EnableDubbo 注解
package com.dubbo.test;

import org.springframework.boot.SpringApplication;
import org.springframework.boot.autoconfigure.SpringBootApplication;

import com.alibaba.dubbo.config.spring.context.annotation.EnableDubbo;

@SpringBootApplication
@EnableDubbo
public class SpringBootDemoDubboConsumerApplication {

    public static void main(String[] args) {
        SpringApplication.run(SpringBootDemoDubboConsumerApplication.class, args);
    }

}
6.5 启动
7. 测试


8.总结
就是一些工具,可能我把分布式想简单了吧,这只是自己写的demo,没有真正经历生产环境.
希望自己能一直保持学习的态度学习下去.