一、WebSocket概述
Http协议是一种基于请求/响应的应用层协议,工作原理是客户端(浏览器)与服务端建立TCP连接->客户端向服务端发送http请求报文->服务端收到请求报文进行处理返回一个响应报文->释放TCP连接->浏览器解析响应报文进行渲染。整个过程中都是由客户端发起的,服务端被动反应。如果我们需要实时获取服务器数据,可以通过ajax轮询来实现,不停的进行请求/响应,不停的建立TCP连接,这就造成的资源的极大浪费,而且做不到服务端向客户端发送信息。
由此诞生了websocket协议,最大的特点就是服务端可以主动向客户端发送信息,客户端也可主动向服务端发送信息,是一个双向平等的协议。工作原理是首先使用http建立一个TCP连接并告诉服务器将http协议升级为websocket协议此时就建立了一个持久连接->此时如果服务器由信息输出则直接传输给客户端,客户端不再询问知道客户端关闭连接为止。
二、SpringBoot整合WebSocket
1、导入pom.xml依赖
<dependency>
  <groupId>org.springframework.boot</groupId>
  <artifactId>spring-boot-starter-websocket</artifactId>
</dependency>
2、编写节点配置类和WebSocket配置类
EndpointConfig.java
public class EndpointConfig extends ServerEndpointConfig.Configurator implements ApplicationContextAware {

    private static volatile BeanFactory context;

    @Override
    public <T> T getEndpointInstance(Class<T> clazz) throws InstantiationException {
        return context.getBean(clazz);
    }

    @Override
    public void setApplicationContext(ApplicationContext applicationContext) throws BeansException {
        EndpointConfig.context = applicationContext;
    }
}
WebSocketConfig.java
@Configuration
public class WebSocketConfig {

    @Bean
    public ServerEndpointExporter serverEndpointConfig() {
        return new ServerEndpointExporter();
    }

    @Bean
    public EndpointConfig newConfig() {
        return new EndpointConfig();
    }
}
3、编写服务端内容
@Component
@ServerEndpoint(value = "/productWebSocket/{userId}", configurator = EndpointConfig.class)
@Slf4j
public class ProductWebSocket {

    //当前在线用户
    private static final AtomicInteger onlineCount = new AtomicInteger(0);

    //存放当前连接的用户
    private static CopyOnWriteArraySet<ProductWebSocket> webSocketSet = new CopyOnWriteArraySet<ProductWebSocket>();

    private Session session;

    /**
     * 连接开启时调用
     * @param userId
     * @param session
     */
    @OnOpen
    public void onOpen(@PathParam("userId") String userId, Session session) {
        log.info("新客户端连入,用户id:" + userId);
        this.session = session;
        webSocketSet.add(this);
        addOnlineCount();
        if (userId != null) {
            List<String> totalPushMsg = new ArrayList<>();
            totalPushMsg.add(userId+"连接成功-"+"-当前在线人数为:"+getOnlineCount());
            if (totalPushMsg != null && !totalPushMsg.isEmpty()) {
                totalPushMsg.forEach(e -> sendMessage(e));
            }
        }
    }

    /**
     * 连接关闭时调用
     */
    @OnClose
    public void onClose() {
        log.info("一个客户端关闭连接");
        webSocketSet.remove(this);
        subOnlineCount();
    }

    /**
     * 服务端接收到信息后调用
     * @param message
     * @param session
     */
    @OnMessage
    public void onMessage(String message, Session session) {
        log.info("用户发送过来的消息为:"+message);
    }

    /**
     * 服务端websocket出错时调用
     * @param session
     * @param error
     */
    @OnError
    public void onError(Session session, Throwable error) {
        log.error("websocket出现错误");
        error.printStackTrace();
    }

    /**
     * 服务端发送信息给客户端
     * @param message
     */
    public void sendMessage(String message) {
        try {this.session.getBasicRemote().sendText(message);
            log.info("推送消息成功,消息为:"+message);
        } catch (IOException e) {
            e.printStackTrace();
        }
    }

    /**
     * 群发自定义消息
     * @param message
     */
    public static void sendInfo(String message) {
        for (ProductWebSocket productWebSocket:webSocketSet) {
            productWebSocket.sendMessage(message);
        }
    }

    public static synchronized int getOnlineCount() {
        return onlineCount.get();
    }

    public static synchronized void addOnlineCount() {
        onlineCount.incrementAndGet();
    }

    public static synchronized void subOnlineCount() {
        onlineCount.decrementAndGet();
    }
}
再编写一个定时任务进行实时推送数据
@Component
public class ProductExpireTask {

    @Scheduled(fixedRate = 2000)
    public void productExpire() {
        String[] strs={"Test随机消息 :30.1123",
                "Test随机消息 :32.1021",
                "Test随机消息 :33.1774",
                "Test随机消息 :33.2372",
                "Test随机消息 :31.0281",
                "Test随机消息 :30.0222",
                "Test随机消息 :32.1322",
                "Test随机消息 :33.3221",
                "Test随机消息 :31.2311",
                "Test随机消息 :32.3112"};

        ProductWebSocket.sendInfo(new Date().toGMTString()+"    Test 消息---->"+RandomStr(strs));
    }

    public static String RandomStr(String[] strs) {
        int random_index = (int)(Math.random()*strs.length);
        return strs[random_index];
    }
}
需要在SpringBoot启动类添加@EnableScheduling注解以开启定时任务
4、编写客户端进行信息接收和发送(html页面)
<!DOCTYPE html>
<html lang="en">
<head>
    <meta charset="UTF-8">
    <title>websocket测试</title>
</head>
<body>
    TestWebSocket
    <input id="text" type="text" />
    <button onclick="send()">SEND MESSAGE</button>
    <button onclick="closeWebSocket()">CLOSE</button>
    <div id="message"></div>
</body>
<script type="text/javascript">
    var websocket = null;

    if ('WebSocket' in window) {
        websocket = new WebSocket("ws://localhost:8080/productWebSocket/001");
    }
    else {
        alert("Not support WebSocket!");
    }

    websocket.onerror = function () {
        setMessageInnerHTML("error");
    };

    websocket.onopen = function () {
        setMessageInnerHTML("open");
    };

    websocket.onmessage = function (e) {
        setMessageInnerHTML(e.data);
    };

    websocket.onclose = function () {
        setMessageInnerHTML("close");
    };

    window.onbeforeunload = function () {
        websocket.close();
    };

    function setMessageInnerHTML(innerHTML) {
        document.getElementById('message').innerHTML += innerHTML+'</br>';
    }

    function closeWebSocket() {
        websocket.close();
    }

    function send() {
        var message = document.getElementById('text').value
        websocket.send(message);
    }
</script>
</html>
5、测试
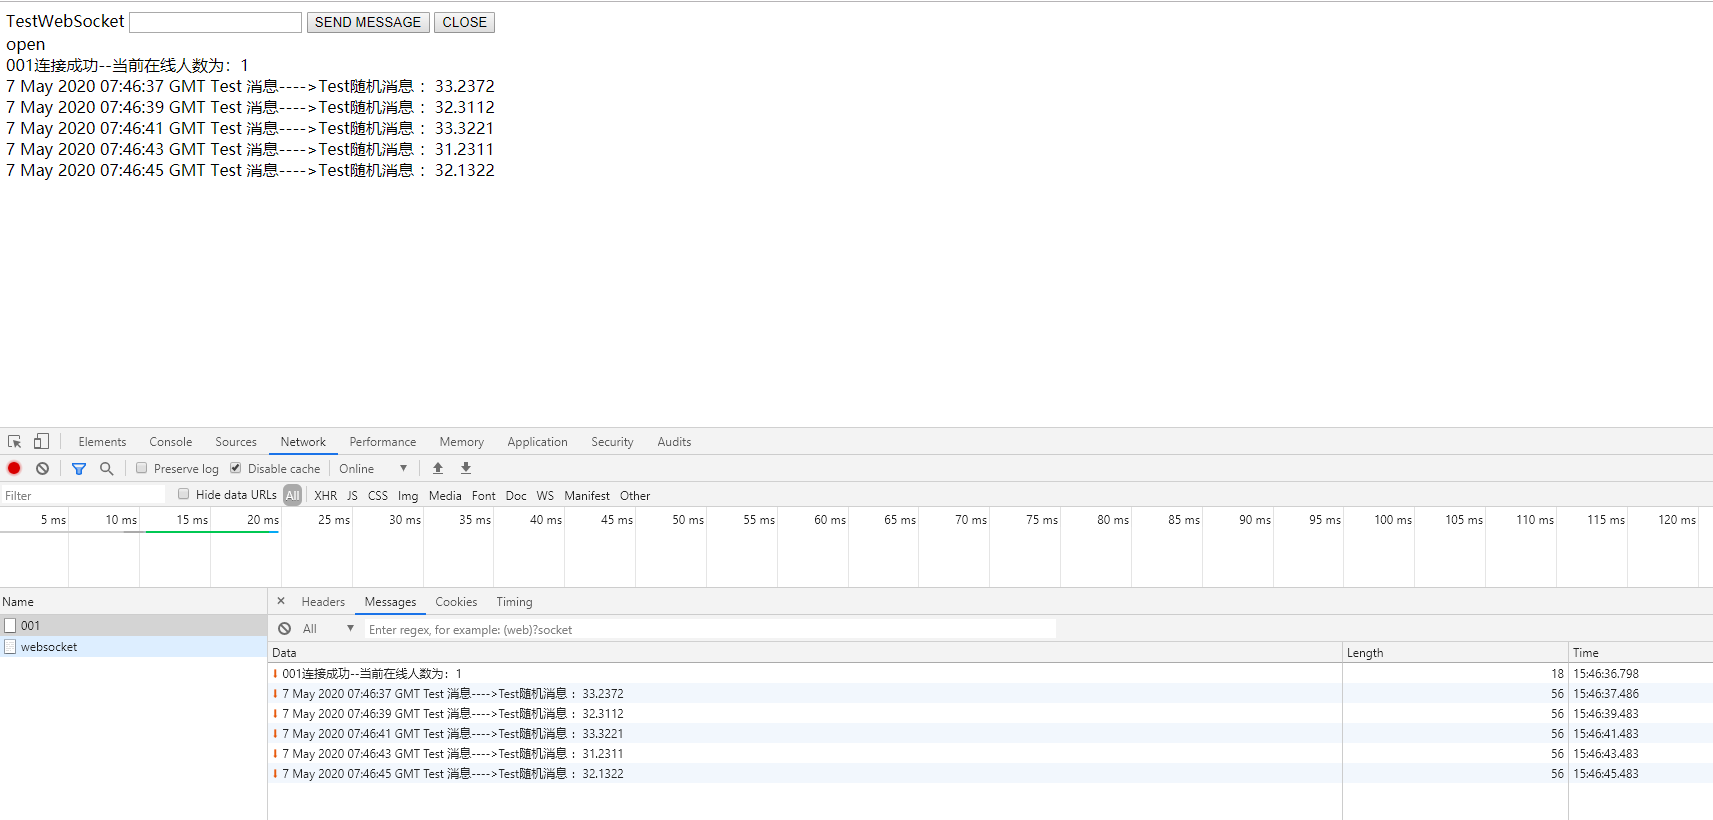
浏览器输入url为http://localhost:8080/websocket,就开启了websocket连接。
客户端输出如下:
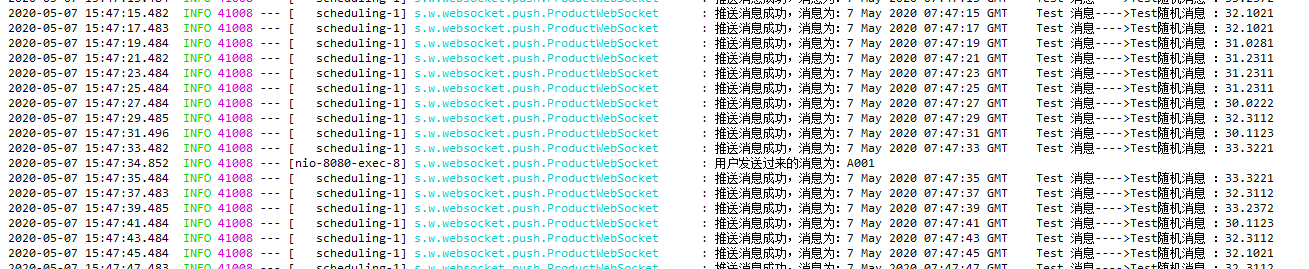
输入框中输入消息并点击发送后查看服务端输出:
以上就是完整的整合过程,在前后端传输信息时也可采用JSON格式。
6、采用JSON进行前后端信息传输
a、客户端发送JSON
修改html页面中send()方法
function send() {
    var message = {
        date: new Date(),
        message: document.getElementById('text').value
    };
    websocket.send(JSON.stringify(message));
}
b、服务端接收JSON
由于接收到JSON信息需要进行转化,新建一个实体类,这里使用lombok
@Data
@AllArgsConstructor
@NoArgsConstructor
public class Message {
    private Date date;
    private String message;
}
修改ProductWebSocket类的onMessage()方法
@OnMessage
public void onMessage(String message, Session session) {
    try {
        log.info("用户发送过来的消息为:"+message);
        Message msg = new ObjectMapper().readValue(message, Message.class);
        System.out.println(msg);
    } catch (JsonProcessingException e) {
        e.printStackTrace();
    }
}
c、服务端发送JSON
修改ProductWebSocket类的sendMessage()方法
public void sendMessage(String message) {
    try {
        Message msg = new Message();
        msg.setDate(new Date());
        msg.setMessage(message);
        this.session.getBasicRemote().sendText(new ObjectMapper().writeValueAsString(msg));
        log.info("推送消息成功,消息为:"+msg);
    } catch (IOException e) {
        e.printStackTrace();
    }
}
d、客户端接收JSON
修改html页面
websocket.onmessage = function (e) {
    var msg = JSON.parse(e.data);
    setMessageInnerHTML(msg.date+", "+msg.message);
};
测试结果:
客户端

服务端
