简介
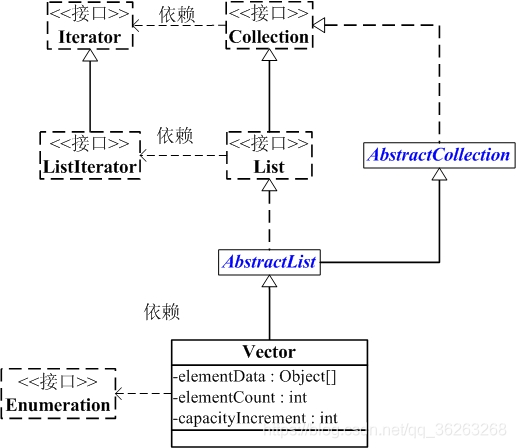
Vector 是矢量队列,它是JDK1.0版本添加的类。继承于AbstractList,实现了List, RandomAccess, Cloneable这些接口。
和ArrayList不同,Vector中的操作是线程安全的。
源码分析
public class Vector<E>
    extends AbstractList<E>
    implements List<E>, RandomAccess, Cloneable, java.io.Serializable{}
实现接口
- List
- RandomAccess
- Cloneable
- java.io.Serializabl
父类
- AbstractList
字段
- elementData :存放实际的元素值。
- elementCount :表示存放的元素数量。
- capacityIncrement :数组的增长系数。也就是每次扩容增加的大小,小于等于0,容量就会增长一倍。
- serialVersionUID:代码版本。
- MAX_ARRAY_SIZE :代表这个集合最多能装元素的数量。
    protected Object[] elementData;
    protected int elementCount;
    protected int capacityIncrement;
    private static final long serialVersionUID = -2767605614048989439L;
    private static final int MAX_ARRAY_SIZE = Integer.MAX_VALUE - 8;
方法
1.构造函数
    public Vector(int initialCapacity, int capacityIncrement) {
        super();
        if (initialCapacity < 0)
            throw new IllegalArgumentException("Illegal Capacity: "+
                                               initialCapacity);
        this.elementData = new Object[initialCapacity];
        this.capacityIncrement = capacityIncrement;
    }

    public Vector(int initialCapacity) {
        this(initialCapacity, 0);
    }

    public Vector() {
        this(10);
    }

    public Vector(Collection<? extends E> c) {
        elementData = c.toArray();
        elementCount = elementData.length;
        // c.toArray might (incorrectly) not return Object[] (see 6260652)
        if (elementData.getClass() != Object[].class)
            elementData = Arrays.copyOf(elementData, elementCount, Object[].class);
    }
2.扩容
	// 给外部使用的扩容函数
    public synchronized void ensureCapacity(int minCapacity) {
        if (minCapacity > 0) {
            modCount++;
            ensureCapacityHelper(minCapacity);
        }
    }

	// 内部需要扩容的时候调用的方法
    private void ensureCapacityHelper(int minCapacity) {
        // 判断是否需要扩容
        if (minCapacity - elementData.length > 0)
            grow(minCapacity);
    }

    private static final int MAX_ARRAY_SIZE = Integer.MAX_VALUE - 8;

	// 真正执行扩容的代码
    private void grow(int minCapacity) {
        // overflow-conscious code
        int oldCapacity = elementData.length;
        // 计算需要扩多大,根据创建对象的时候的扩容系数来确定,如果扩容稀疏大于零,则每次扩容的增加数量就是扩容系数,如果小于等于零,容量就增加一倍。
        int newCapacity = oldCapacity + ((capacityIncrement > 0) ?
                                         capacityIncrement : oldCapacity);
        // 如果重新计算出来的还比原来小,那么就以最小要求的大小为扩容标准
        if (newCapacity - minCapacity < 0)
            newCapacity = minCapacity;
        // 判断边界
        if (newCapacity - MAX_ARRAY_SIZE > 0)
            newCapacity = hugeCapacity(minCapacity);
        // 利用数组拷贝建立新的大小的数组
        elementData = Arrays.copyOf(elementData, newCapacity);
    }

    private static int hugeCapacity(int minCapacity) {
        if (minCapacity < 0) // overflow
            throw new OutOfMemoryError();
        return (minCapacity > MAX_ARRAY_SIZE) ?
            Integer.MAX_VALUE :
            MAX_ARRAY_SIZE;
    }
3.元素查找
	// 根据元素值查找元素位置,从index位置开始正向查找
    public synchronized int indexOf(Object o, int index) {
        if (o == null) {
            for (int i = index ; i < elementCount ; i++)
                if (elementData[i]==null)
                    return i;
        } else {
            for (int i = index ; i < elementCount ; i++)
                if (o.equals(elementData[i]))
                    return i;
        }
        return -1;
    }
4.获取元素
    // 获取对应位置的元素
    public synchronized E get(int index) {
        if (index >= elementCount)
            throw new ArrayIndexOutOfBoundsException(index);

        return elementData(index);
    }
	// 获取对应位置的元素
    public synchronized E elementAt(int index) {
    	// 判断边界
        if (index >= elementCount) {
            throw new ArrayIndexOutOfBoundsException(index + " >= " + elementCount);
        }

        return elementData(index);
    }
	// 返回类型转换之后的值
    E elementData(int index) {
        return (E) elementData[index];
    }
5.设置元素值
	// 将指定位置的元素值替换,返回旧值
    public synchronized E set(int index, E element) {
        if (index >= elementCount)
            throw new ArrayIndexOutOfBoundsException(index);

        E oldValue = elementData(index);
        elementData[index] = element;
        return oldValue;
    }
	// 将指定位置的元素值替换
    public synchronized void setElementAt(E obj, int index) {
        if (index >= elementCount) {
            throw new ArrayIndexOutOfBoundsException(index + " >= " +
                                                     elementCount);
        }
        elementData[index] = obj;
    }
6.删除元素
	// 删除指定位置的元素值
    public synchronized void removeElementAt(int index) {
        modCount++;
        // 边界判断
        if (index >= elementCount) {
            throw new ArrayIndexOutOfBoundsException(index + " >= " +
                                                     elementCount);
        }
        else if (index < 0) {
            throw new ArrayIndexOutOfBoundsException(index);
        }
        // 计算需要向前移动的元素个数
        int j = elementCount - index - 1;
        if (j > 0) {
        	// 将被删位置的元素都向前移动一格,覆盖原有元素
            System.arraycopy(elementData, index + 1, elementData, index, j);
        }
        // 更新容器元素数量
        elementCount--;
        // 将最后的元素值对象回收
        elementData[elementCount] = null; /* to let gc do its work */
    }

	// 删除指定元素对象
    public synchronized boolean removeElement(Object obj) {
        modCount++;
        // 获取该对象的索引
        int i = indexOf(obj);
        if (i >= 0) {
        	//
            removeElementAt(i);
            return true;
        }
        return false;
    }
7.添加元素
	// 在末尾添加元素
    public synchronized void addElement(E obj) {
        modCount++;
        // 扩容判断
        ensureCapacityHelper(elementCount + 1);
        // 元素赋值到数组中
        elementData[elementCount++] = obj;
    }

    public synchronized boolean add(E e) {
        modCount++;
        ensureCapacityHelper(elementCount + 1);
        elementData[elementCount++] = e;
        return true;
    }
8.克隆
	// 克隆方法
    public synchronized Object clone() {
        try {
            @SuppressWarnings("unchecked")
            	// 调用父类的克隆接口函数获得一个父类再做类型转换
                Vector<E> v = (Vector<E>) super.clone();
            // 利用数组复制函数,将当前数组复制到新对象的数组中
            v.elementData = Arrays.copyOf(elementData, elementCount);
            v.modCount = 0;
            return v;
        } catch (CloneNotSupportedException e) {
            // this shouldn't happen, since we are Cloneable
            throw new InternalError(e);
        }
    }
9.转化为数组
	// 无参数转换
    public synchronized Object[] toArray() {
        return Arrays.copyOf(elementData, elementCount);
    }

    // 利用模板数组转换
    public synchronized <T> T[] toArray(T[] a) {
        if (a.length < elementCount)
        	// 如果模板数组太小了,就新建一个数组作为返回
            return (T[]) Arrays.copyOf(elementData, elementCount, a.getClass());

        System.arraycopy(elementData, 0, a, 0, elementCount);

		// 以null结尾,防止与原来的元素进行混淆
        if (a.length > elementCount)
            a[elementCount] = null;

        return a;
    }
总结
源码总结
- Vector和ArrayList一样是通过一个数组去保存数据的。当我们构造Vecotr时;若使用默认构造函数,则Vector的默认容量大小是10。
- 当Vector容量不足以容纳全部元素时,Vector的容量会增加。若容量增加系数 >0,则将容量的值增加“容量增加系数”;否则,将容量大小增加一倍。
- 和ArrayList不同的是,Vector对外部的操作都是加了synchronized 同步阻塞的,这样,当一个线程在操作Vector的时候,其他线程都只能等待。
- 其他操作和ArrayList都是差不多的。
问题总结
与ArrayList的异同:
- 因为内部都是用数组存储数,同样是使用随机访问是最快的,删除中间元素需要移动后面的元素。
- 因为Vector对外部的操作都加了synchronized,所以,开销比ArrayList会大,大在同步机制的额外操作上。