电脑:最好准备两台以上机器进行测试;
mysql数据库配置:
[client]
port=3306
[mysql]
#如果不是修改成UTF8
default-character-set=UTF8
[mysqld]
port=3306
#Path to installation directory. All paths are usually resolved relative to this.
basedir="C:/Program Files/MySQL/MySQL Server 5.5/"
#Path to the database root
datadir="C:/ProgramData/MySQL/MySQL Server 5.5/Data/"
# The default character set that will be used when a new schema or table is
#如果不是修改成UTF8
character-set-server=UTF8
# The default storage engine that will be used when create new tables when
default-storage-engine=INNODB
# Set the SQL mode to strict
sql-mode="STRICT_TRANS_TABLES,NO_AUTO_CREATE_USER,NO_ENGINE_SUBSTITUTION"
# connection limit has been reached.
max_connections=100
query_cache_size=0
table_cache=256
tmp_table_size=35M
thread_cache_size=8
myisam_max_sort_file_size=100G
myisam_sort_buffer_size=69M
key_buffer_size=55M
read_buffer_size=64K
read_rnd_buffer_size=256K
sort_buffer_size=256K
#*** INNODB Specific options ***
innodb_additional_mem_pool_size=3M
innodb_flush_log_at_trx_commit=1
innodb_log_buffer_size=2M
innodb_buffer_pool_size=107M
innodb_log_file_size=54M
innodb_thread_concurrency=10
#开启binlog
log-bin=mysql-bin
#选择row模式
binlog-format=ROW
#配置mysql replaction需要定义,不能和canal的slaveId重复
server_id=1
canal 部署与测试:
配置:
vi conf/example/instance.properties
#################################################
## mysql serverId
canal.instance.mysql.slaveId = 1234

# position info,需要改成自己的数据库信息
canal.instance.master.address = 127.0.0.1:3306
canal.instance.master.journal.name =
canal.instance.master.position =
canal.instance.master.timestamp =

#canal.instance.standby.address =
#canal.instance.standby.journal.name =
#canal.instance.standby.position =
#canal.instance.standby.timestamp =

# username/password,需要改成自己的数据库信息
canal.instance.dbUsername = canal
canal.instance.dbPassword = canal
canal.instance.defaultDatabaseName =
canal.instance.connectionCharset = UTF-8

# table regex
canal.instance.filter.regex = .*\\..*

#################################################
说明:
- canal.instance.connectionCharset 代表数据库的编码方式对应到java中的编码类型,比如UTF-8,GBK , ISO-8859-1
- 启动:sh bin/startup.sh
- 日志:vi logs/canal/canal.log
- 关闭:sh bin/stop.sh
日志显示:the canal server is running now ...... 启动成功
otter部署与测试:
配置:

1、配置 aria2
配置环境变量即可 $ARIA2_HOME:D:\Program Files\aria2-1.20.0-win-64bit-build1
然后将变量$ARIA2_HOME 加入Path
2、配置zookeeper
切换到目录:zookeeper-3.4.8\conf 将文件zoo_sample.cfg重新命名成zoo.cfg
打开zoo.cfg配置:
# The number of milliseconds of each tick
tickTime=2000
# The number of ticks that the initial
# synchronization phase can take
initLimit=10
# The number of ticks that can pass between
# sending a request and getting an acknowledgement
syncLimit=5
# the directory where the snapshot is stored.
# do not use /tmp for storage, /tmp here is just
# example sakes.
dataDir=E:\\zookeeper\\data
dataLogDir=E:\\zookeeper\\log
# the port at which the clients will connect
clientPort=2181
# the maximum number of client connections.
# increase this if you need to handle more clients
maxClientCnxns=60
#
# Be sure to read the maintenance section of the
# administrator guide before turning on autopurge.
#
# http://zookeeper.apache.org/doc/current/zookeeperAdmin.html#sc_maintenance
#
# The number of snapshots to retain in dataDir
#autopurge.snapRetainCount=3
# Purge task interval in hours
# Set to "0" to disable auto purge feature
#autopurge.purgeInterval=1
3、manager配置:
创建数据库:使用附件中文件managersql.txt ,也可以使用 开源项目地址下提供的,是一样的;
## otter manager domain name
otter.domainName = 127.0.0.1
## otter manager http port
otter.port = 8080
## jetty web config xml
otter.jetty = jetty.xml
## otter manager database config 你自己的数据库配置
otter.database.driver.class.name = com.mysql.jdbc.Driver
otter.database.driver.url = jdbc:mysql://127.0.0.1:3306/otter
otter.database.driver.username = root
otter.database.driver.password = Aa12345
## otter communication port
otter.communication.manager.port = 1099
## otter communication pool size
otter.communication.pool.size = 10
## default zookeeper address 配置zookeeper的ip及端口
otter.zookeeper.cluster.default = 127.0.0.1:2181
## default zookeeper sesstion timeout = 60s
otter.zookeeper.sessionTimeout = 60000
## otter arbitrate connect manager config
otter.manager.address = ${otter.domainName}:${otter.communication.manager.port}
## should run in product mode , true/false
otter.manager.productionMode = true
## self-monitor enable or disable
otter.manager.monitor.self.enable = true
## self-montir interval , default 120s
otter.manager.monitor.self.interval = 120
## auto-recovery paused enable or disable
otter.manager.monitor.recovery.paused = true
# manager email user config
otter.manager.monitor.email.host = smtp.gmail.com
otter.manager.monitor.email.username =
otter.manager.monitor.email.password =
otter.manager.monitor.email.stmp.port = 465
4、node配置
切换到 node的配置地址:D:\otter\node.deployer-4.2.12\conf(我的)
切换文件目录命令:cd /d D:\otter\node.deployer-4.2.12\conf
cmd 命令:echo 1空格>空格nid #执行的时候将文字换成真空格
配置文件:
# otter node root dir
otter.nodeHome = ${user.dir}/../
## otter node dir
otter.htdocs.dir = ${otter.nodeHome}/htdocs
otter.download.dir = ${otter.nodeHome}/download
otter.extend.dir= ${otter.nodeHome}/extend
## default zookeeper sesstion timeout = 60s
otter.zookeeper.sessionTimeout = 60000
## otter communication pool size
otter.communication.pool.size = 10
## otter arbitrate & node connect manager config
otter.manager.address = 172.16.8.164:1099
注意:同颜色表示同一个值
界面配置:
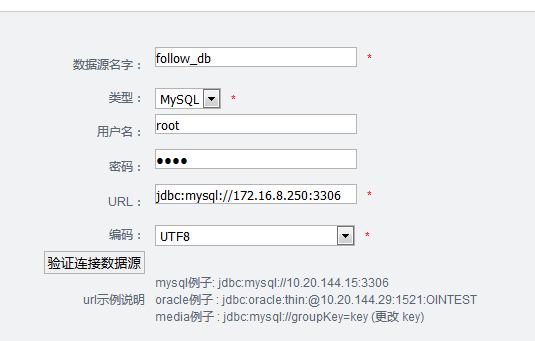
数据源:
数据表:

canal:

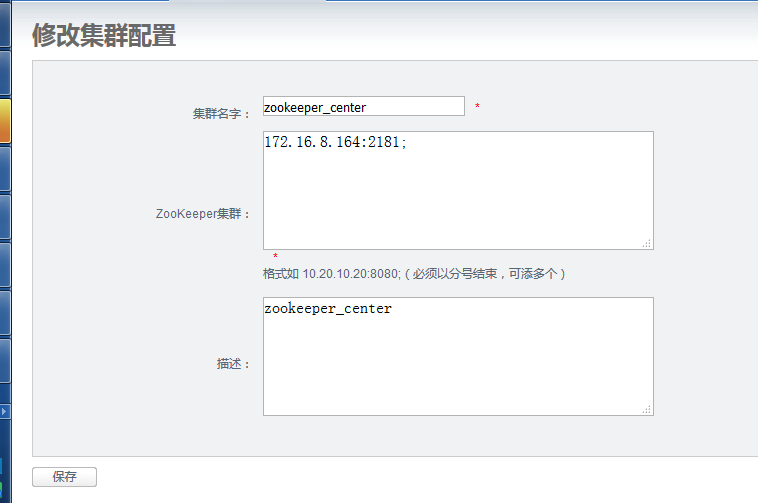
zookeeper:
note:

channel:

pipeline:

映射配置:

监控配置:
