-
一、环境说明
| 主机名 | IP地址 | 角色 | 磁盘 |
| gluster-node1 | 192.168.56.11 | Server、Client | /dev/sdb、/dev/sdc、/dev/sdd |
| gluster-node2 | 192.168.56.12 | Server、Client | /dev/sdb、/dev/sdc、/dev/sdd |
| gluster-node3 | 192.168.56.13 | Server、Client | /dev/sdb、/dev/sdc、/dev/sdd |
-
二、GlusterFS安装
(1)修改主机名
[root@localhost ~]# hostnamectl set-hostname gluster-node1
[root@localhost ~]# bash
[root@localhost ~]# hostnamectl set-hostname gluster-node2
[root@localhost ~]# bash
[root@localhost ~]# hostnamectl set-hostname gluster-node3
[root@localhost ~]# bash
(2)添加host解析,实现集群主机之间相互解析
[root@gluster-node1 ~]# cat /etc/hosts
127.0.0.1   localhost localhost.localdomain localhost4 localhost4.localdomain4
::1         localhost localhost.localdomain localhost6 localhost6.localdomain6
192.168.56.11 gluster-node1
192.168.56.12 gluster-node2
192.168.56.13 gluster-node3
[root@gluster-node1 ~]# scp /etc/hosts root@gluster-node2:/etc/hosts
[root@gluster-node1 ~]# scp /etc/hosts root@gluster-node3:/etc/hosts
(3)关闭SElinux和防火墙
[root@gluster-node1 ~]# setenforce 0
[root@gluster-node1 ~]# sed -i 's#SELINUX=enforcing#SELINUX=disabled#g' /etc/sysconfig/selinux
[root@gluster-node2 ~]# setenforce 0
[root@gluster-node2 ~]# sed -i 's#SELINUX=enforcing#SELINUX=disabled#g' /etc/sysconfig/selinux
[root@gluster-node3 ~]# setenforce 0
[root@gluster-node3 ~]# sed -i 's#SELINUX=enforcing#SELINUX=disabled#g' /etc/sysconfig/selinux
[root@gluster-node1 ~]# systemctl stop firewalld.service
[root@gluster-node1 ~]# systemctl disable firewalld.service
[root@gluster-node2 ~]# systemctl stop firewalld.service
[root@gluster-node2 ~]# systemctl disable firewalld.service
[root@gluster-node3 ~]# systemctl stop firewalld.service
[root@gluster-node3 ~]# systemctl disable firewalld.service
(4)安装epel源
[root@gluster-node1 ~]# yum install -y epel-release
[root@gluster-node2 ~]# yum install -y epel-release
[root@gluster-node3 ~]# yum install -y epel-release
(5)安装glusterfs源
[root@gluster-node1 ~]#  yum install -y centos-release-gluster
[root@gluster-node2 ~]#  yum install -y centos-release-gluster
[root@gluster-node3 ~]#  yum install -y centos-release-gluster
(6)安装glusterfs
[root@gluster-node1 ~]# yum install glusterfs-server -y
[root@gluster-node2 ~]# yum install glusterfs-server -y
[root@gluster-node3 ~]# yum install glusterfs-server -y
-
三、GlusterFS配置
(1)查看gluster版本信息
[root@gluster-node1 ~]# glusterfs -V
glusterfs 4.1.2
Repository revision: git://git.gluster.org/glusterfs.git
Copyright (c) 2006-2016 Red Hat, Inc. <https://www.gluster.org/>
GlusterFS comes with ABSOLUTELY NO WARRANTY.
It is licensed to you under your choice of the GNU Lesser
General Public License, version 3 or any later version (LGPLv3
or later), or the GNU General Public License, version 2 (GPLv2),
in all cases as published by the Free Software Foundation.

(2)启动glusterd服务
[root@gluster-node1 ~]# systemctl start glusterd
[root@gluster-node2 ~]# systemctl start glusterd
[root@gluster-node3 ~]# systemctl start glusterd
在开始创建ClusterFS卷之前,需要创建一个称之为Trusted Storage的池,是一个可信的网络存储服务器,可以理解为集群。为卷提供bricks。
gluster peer probe<主机名或者IP地址>,建议是IP地址,或者内网用DNS做主机名解析,或者在/etc/hosts做好绑定。
- 1、增加server到pool
[root@gluster-node1 ~]#  gluster peer probe gluster-node2
peer probe: success.

[root@gluster-node1 ~]#  gluster peer probe gluster-node3
peer probe: success.

注意不要添加本地的服务器。这里在gluster-node1上操作,所以不需要添加gluster-node1
- 2、从Pool中删除Server
[root@gluster-node1 ~]# gluster peer detach gluster-node2
peer detach: success.
- 3、查看Pool状态
[root@gluster-node1 ~]# gluster status
unrecognized word: status (position 0)
[root@gluster-node1 ~]# gluster peer status
Number of Peers: 2

Hostname: gluster-node2
Uuid: 5faada9a-1168-4a4d-bbb2-decf5b63990e
State: Peer in Cluster (Connected)

Hostname: gluster-node3
Uuid: 0ba4f9f4-4cc5-4362-ac41-4941285cedbb
State: Peer in Cluster (Connected)

#在glutser-node2上查看
[root@gluster-node2 ~]# gluster peer status
Number of Peers: 2

Hostname: gluster-node1
Uuid: 6899d47f-1ce0-4c37-a6cb-fcd0defbb85f
State: Peer in Cluster (Connected)

Hostname: gluster-node3
Uuid: 0ba4f9f4-4cc5-4362-ac41-4941285cedbb
State: Peer in Cluster (Connected)
- 4、配置前的准备工作
在各个节点上增加磁盘/dev/sdb,在gluster-node2和gluster-node3上都执行以下步骤
[root@gluster-node1 ~]# mkfs.xfs -f /dev/sdb
meta-data=/dev/sdb               isize=512    agcount=4, agsize=65536 blks
         =                       sectsz=512   attr=2, projid32bit=1
         =                       crc=1        finobt=0, sparse=0
data     =                       bsize=4096   blocks=262144, imaxpct=25
         =                       sunit=0      swidth=0 blks
naming   =version 2              bsize=4096   ascii-ci=0 ftype=1
log      =internal log           bsize=4096   blocks=2560, version=2
         =                       sectsz=512   sunit=0 blks, lazy-count=1
realtime =none                   extsz=4096   blocks=0, rtextents=0
[root@gluster-node1 ~]# mkdir -p /storage/brick1
[root@gluster-node1 ~]# mount /dev/sdb /storage/brick1
[root@gluster-node1 ~]# df -h
Filesystem      Size  Used Avail Use% Mounted on
/dev/sda2        20G  1.5G   19G   8% /
devtmpfs        483M     0  483M   0% /dev
tmpfs           493M     0  493M   0% /dev/shm
tmpfs           493M  6.8M  486M   2% /run
tmpfs           493M     0  493M   0% /sys/fs/cgroup
/dev/sda1       197M   97M  100M  50% /boot
tmpfs            99M     0   99M   0% /run/user/0
/dev/sdb       1014M   33M  982M   4% /storage/brick1
[root@gluster-node1 ~]# echo "/dev/sdb /storage/brick1 xfs default 0 0" >> /etc/fstab
- 5、创建volume及其他操作
Distributed:分布式卷,文件通过hash算法随机的分不到bricks组成的卷上。
Replicated:复制卷,类似raid1,replica数必须等于volume中brick所包含的存储服务器数,可用性高。
striped:条带式卷,类似raid0,stripe数必须等于volume中brick所包含的存储服务器数,文件会被分成数据块,以Round Robin的方式存储在bricks中,并发粒度是数据块,大文件性能好。
Distributed striped:分布式条带卷,volume中brick所包含的存储服务器必须是stripe的倍数(>=2倍),兼顾分布式和条带式的功能。
Distributed Replicated:分布式的复制卷,volume中brick所包含的存储服务器数必须是replica的倍数(>=2倍),兼顾分布式和复制式的功能。
Stripe Replicated:条带复制卷,volume中brick所包含的存储服务器数必须是stripe和replica的倍数(>=2倍),兼顾条带式和复制式的功能。
Distributed Stripe Replicated:分布式条带复制卷,按需存储服务器数量必须是2*2*2=8共8台,兼顾分布式,条带式和复制式的功能,此处使用了3台服务器,8块硬盘,不尽完美!
创建各种卷语法格式:
volume create <NEW-VOLNAME> [stripe <COUNT>] [replica <COUNT> [arbiter <COUNT>]] [disperse [<COUNT>]] [disperse-data <COUNT>] [redundancy <COUNT>] [transport <tcp|rdma|tcp,rdma>] <NEW-BRICK>?<vg_name>... [force]
下面逐一演示7种卷的使用:
- (1)创建分布式卷
分布式卷架构示意图:
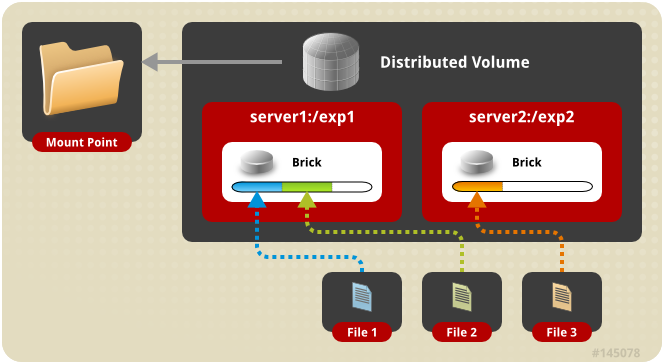
默认模式,既DHT, 也叫 分布卷: 将文件已hash算法随机分布到 一台服务器节点中存储。如:
gluster volume create test-volume server1:/exp1 server2:/exp2


(1)查看创建命令的帮助
[root@gluster-node1 ~]# gluster volume create -h

Usage:
volume create <NEW-VOLNAME> [stripe <COUNT>] [replica <COUNT> [arbiter <COUNT>]] [disperse [<COUNT>]] [disperse-data <COUNT>] [redundancy <COUNT>] [transport <tcp|rdma|tcp,rdma>] <NEW-BRICK>?<vg_name>... [force]

(2)创建卷gv1
[root@gluster-node1 ~]# gluster volume create gv1 gluster-node1:/storage/brick1 gluster-node2:/storage/brick1 force  #创建卷gv1,并将gluster-node1和gluster-node2上的/dev/sdb合并空间
volume create: gv1: success: please start the volume to access data
[root@gluster-node1 ~]# gluster volume start gv1  #启动gv1卷
volume start: gv1: success
[root@gluster-node3 ~]# gluster volume info  #在glutser-node3上查看volume信息

Volume Name: gv1
Type: Distribute
Volume ID: 5773c33b-2371-419a-a753-de89063f4e23
Status: Started
Snapshot Count: 0
Number of Bricks: 2
Transport-type: tcp
Bricks:
Brick1: gluster-node1:/storage/brick1
Brick2: gluster-node2:/storage/brick1
Options Reconfigured:
transport.address-family: inet
nfs.disable: on

(3)挂载数据卷
[root@gluster-node1 ~]# mkdir /gv1  #创建挂载目录
[root@gluster-node1 ~]# mount -t glusterfs 127.0.0.1:/gv1 /gv1  #挂载gv1卷
[root@gluster-node1 ~]# df -h  #查看挂载信息
Filesystem      Size  Used Avail Use% Mounted on
/dev/sda2        20G  1.5G   19G   8% /
devtmpfs        483M     0  483M   0% /dev
tmpfs           493M     0  493M   0% /dev/shm
tmpfs           493M  6.8M  486M   2% /run
tmpfs           493M     0  493M   0% /sys/fs/cgroup
/dev/sda1       197M   97M  100M  50% /boot
tmpfs            99M     0   99M   0% /run/user/0
/dev/sdb       1014M   33M  982M   4% /storage/brick1
127.0.0.1:/gv1  2.0G   85M  1.9G   5% /gv1  #可以看到挂载在gv1目录下的gv1卷磁盘大小为2个G,是gluster-node1和gluster-node2合并一起的磁盘大小

[root@gluster-node2 ~]# mkdir /gv1  #在gluster-node2上同样创建挂载目录
[root@gluster-node2 ~]# mount -t glusterfs 127.0.0.1:/gv1 /gv1  #在gluster-node2上挂载gv1卷
[root@gluster-node2 ~]# df -h
Filesystem      Size  Used Avail Use% Mounted on
/dev/sda2        20G  1.3G   19G   7% /
devtmpfs        483M     0  483M   0% /dev
tmpfs           493M     0  493M   0% /dev/shm
tmpfs           493M  6.8M  486M   2% /run
tmpfs           493M     0  493M   0% /sys/fs/cgroup
/dev/sda1       197M   97M  100M  50% /boot
tmpfs            99M     0   99M   0% /run/user/0
/dev/sdb       1014M   33M  982M   4% /storage/brick1
127.0.0.1:/gv1  2.0G   85M  1.9G   5% /gv1

[root@gluster-node3 ~]# mkdir /gv1
[root@gluster-node3 ~]# mount -t glusterfs 127.0.0.1:/gv1 /gv1
[root@gluster-node3 ~]# df -h
Filesystem      Size  Used Avail Use% Mounted on
/dev/sda3        28G  1.6G   27G   6% /
devtmpfs        483M     0  483M   0% /dev
tmpfs           493M     0  493M   0% /dev/shm
tmpfs           493M  6.8M  486M   2% /run
tmpfs           493M     0  493M   0% /sys/fs/cgroup
/dev/sda1       197M   97M  100M  50% /boot
tmpfs            99M     0   99M   0% /run/user/0
/dev/sdb       1014M   33M  982M   4% /storage/brick1
127.0.0.1:/gv1  2.0G   85M  1.9G   5% /gv1

(4)测试在gluster-node1上写入数据,看挂载在gluster-node2和gluster-node3是否有同样的数据
[root@gluster-node1 gv1]# touch 1.txt 2.txt 3.txt
[root@gluster-node1 gv1]# ll
total 0
-rw-r--r--. 1 root root 0 Aug  5 06:33 1.txt
-rw-r--r--. 1 root root 0 Aug  5 06:33 2.txt
-rw-r--r--. 1 root root 0 Aug  5 06:33 3.txt

[root@gluster-node2 ~]# ll /gv1/
total 0
-rw-r--r-- 1 root root 0 Aug  5  2018 1.txt
-rw-r--r-- 1 root root 0 Aug  5  2018 2.txt
-rw-r--r-- 1 root root 0 Aug  5  2018 3.txt

[root@gluster-node3 ~]# ll /gv1/
total 0
-rw-r--r-- 1 root root 0 Aug  4 18:33 1.txt
-rw-r--r-- 1 root root 0 Aug  4 18:33 2.txt
-rw-r--r-- 1 root root 0 Aug  4 18:33 3.txt
- (2)创建复制卷
复制卷的架构示意图:
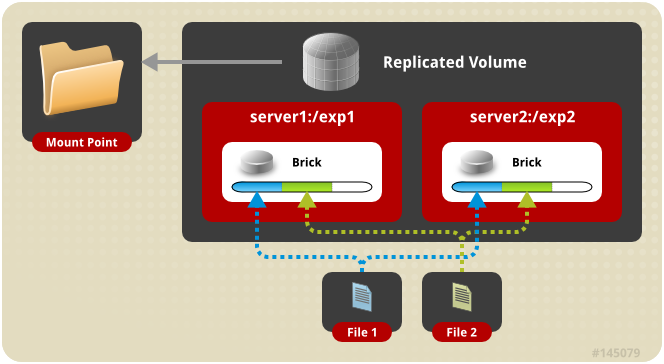
复制模式,既AFR, 创建volume 时带 replica x 数量: 将文件复制到 replica x 个节点中。如:
gluster volume create test-volume replica 2 transport tcp server1:/exp1 server2:/exp2
(1)将gluster-node1和gluster-node2上的/dev/sdc格式化并挂载到/storage/brick2
[root@gluster-node1 ~]# mkfs.xfs -f /dev/sdc
meta-data=/dev/sdc               isize=512    agcount=4, agsize=65536 blks
         =                       sectsz=512   attr=2, projid32bit=1
         =                       crc=1        finobt=0, sparse=0
data     =                       bsize=4096   blocks=262144, imaxpct=25
         =                       sunit=0      swidth=0 blks
naming   =version 2              bsize=4096   ascii-ci=0 ftype=1
log      =internal log           bsize=4096   blocks=2560, version=2
         =                       sectsz=512   sunit=0 blks, lazy-count=1
realtime =none                   extsz=4096   blocks=0, rtextents=0
[root@gluster-node1 ~]#
[root@gluster-node1 ~]# mkdir -p /storage/brick2
[root@gluster-node1 ~]# mount /dev/sdc /storage/brick2
[root@gluster-node1 ~]# df -h
Filesystem      Size  Used Avail Use% Mounted on
/dev/sda2        20G  1.5G   19G   8% /
devtmpfs        483M     0  483M   0% /dev
tmpfs           493M     0  493M   0% /dev/shm
tmpfs           493M  6.8M  486M   2% /run
tmpfs           493M     0  493M   0% /sys/fs/cgroup
/dev/sda1       197M   97M  100M  50% /boot
tmpfs            99M     0   99M   0% /run/user/0
/dev/sdb       1014M   33M  982M   4% /storage/brick1
127.0.0.1:/gv1  2.0G   85M  1.9G   5% /gv1
/dev/sdc       1014M   33M  982M   4% /storage/brick2
[root@gluster-node1 ~]# echo "/dev/sdc /storage/brick2 xfs defaults 0 0" >> /etc/fstab

(2)创建复制卷
[root@gluster-node1 ~]# gluster volume create gv2 replica 2 gluster-node1:/storage/brick2 gluster-node2:/storage/brick2 force
volume create: gv2: success: please start the volume to access data
[root@gluster-node1 ~]# gluster volume start gv2    #启动volume gv2
volume start: gv2: success
[root@gluster-node1 ~]# gluster volume info

Volume Name: gv1
Type: Distribute    #gv1为分布卷
Volume ID: 5773c33b-2371-419a-a753-de89063f4e23
Status: Started
Snapshot Count: 0
Number of Bricks: 2
Transport-type: tcp
Bricks:
Brick1: gluster-node1:/storage/brick1
Brick2: gluster-node2:/storage/brick1
Options Reconfigured:
transport.address-family: inet
nfs.disable: off

Volume Name: gv2
Type: Replicate        #可以看到gv2为复制卷
Volume ID: aee56c69-2c33-455d-8da0-aa4591a25065
Status: Started
Snapshot Count: 0
Number of Bricks: 1 x 2 = 2
Transport-type: tcp
Bricks:
Brick1: gluster-node1:/storage/brick2
Brick2: gluster-node2:/storage/brick2
Options Reconfigured:
transport.address-family: inet
nfs.disable: on
performance.client-io-threads: off

(3)创建挂载目录/gv2并将gv2卷挂载
[root@gluster-node1 ~]# mkdir /gv2
[root@gluster-node1 ~]# mount -t glusterfs 127.0.0.1:/gv2 /gv2
[root@gluster-node1 ~]# df -h    #查看挂载信息,可以看到gv2的磁盘空间大小为1G,为2块磁盘空间的一般,这就是复制卷,可用空间只有一半
Filesystem      Size  Used Avail Use% Mounted on
/dev/sda2        20G  1.5G   19G   8% /
devtmpfs        483M     0  483M   0% /dev
tmpfs           493M     0  493M   0% /dev/shm
tmpfs           493M  6.9M  486M   2% /run
tmpfs           493M     0  493M   0% /sys/fs/cgroup
/dev/sda1       197M   97M  100M  50% /boot
tmpfs            99M     0   99M   0% /run/user/0
/dev/sdb       1014M   33M  982M   4% /storage/brick1
127.0.0.1:/gv1  2.0G   85M  1.9G   5% /gv1
/dev/sdc       1014M   33M  982M   4% /storage/brick2
127.0.0.1:/gv2 1014M   43M  972M   5% /gv2

(4)在挂载目录/gv2下创建文件测试
[root@gluster-node1 ~]# cd /gv2/
[root@gluster-node1 gv2]# touch file1 file2 file3
[root@gluster-node1 gv2]# ls
file1  file2  file3
[root@gluster-node1 gv2]# ls /storage/brick2/
file1  file2  file3
[root@gluster-node2 ~]# ls /storage/brick2/
file1  file2  file3

可以看到创建的文件在gluster-node1和gluster-node2上磁盘挂载目录/storage/brick2目录中的文件是一样的,那么在gluster-node3上挂载后再创建测试

[root@gluster-node3 ~]# mkdir /gv2
[root@gluster-node3 ~]# mount -t glusterfs 127.0.0.1:/gv2 /gv2
[root@gluster-node3 ~]# df -h
Filesystem      Size  Used Avail Use% Mounted on
/dev/sda3        28G  1.6G   27G   6% /
devtmpfs        483M     0  483M   0% /dev
tmpfs           493M     0  493M   0% /dev/shm
tmpfs           493M  6.8M  486M   2% /run
tmpfs           493M     0  493M   0% /sys/fs/cgroup
/dev/sda1       197M   97M  100M  50% /boot
tmpfs            99M     0   99M   0% /run/user/0
/dev/sdb       1014M   33M  982M   4% /storage/brick1
127.0.0.1:/gv2 1014M   43M  972M   5% /gv2
[root@gluster-node3 ~]# cd /gv2/
[root@gluster-node3 gv2]# touch file4

[root@gluster-node2 ~]# ls /storage/brick2/
file1  file2  file3  file4

[root@gluster-node1 gv2]# ls
file1  file2  file3  file4
[root@gluster-node1 gv2]# ls /storage/brick2/
file1  file2  file3  file4
也可以看到gluster-node1和gluster-node2磁盘挂载目录/storage/brick2的文件是一样的
- (3)创建条带卷
条带卷架构示意图:
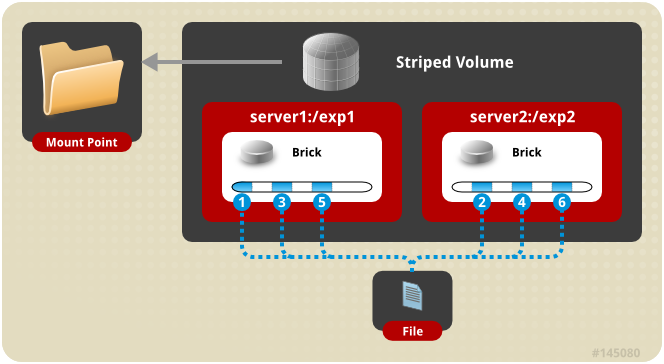
条带模式,既Striped, 创建volume 时带 stripe x 数量: 将文件切割成数据块,分别存储到 stripe x 个节点中 ( 类似raid 0 )。如:
gluster volume create test-volume stripe 2 transport tcp server1:/exp1 server2:/exp2
(1)格式化gluster-node1和gluster-node2上的磁盘/dev/sdd并挂载到/storage/brick3
[root@gluster-node1 ~]# mkfs.xfs -f /dev/sdd
meta-data=/dev/sdd               isize=512    agcount=4, agsize=65536 blks
         =                       sectsz=512   attr=2, projid32bit=1
         =                       crc=1        finobt=0, sparse=0
data     =                       bsize=4096   blocks=262144, imaxpct=25
         =                       sunit=0      swidth=0 blks
naming   =version 2              bsize=4096   ascii-ci=0 ftype=1
log      =internal log           bsize=4096   blocks=2560, version=2
         =                       sectsz=512   sunit=0 blks, lazy-count=1
realtime =none                   extsz=4096   blocks=0, rtextents=0
[root@gluster-node1 ~]# mkdir -p /storage/brick3
[root@gluster-node1 ~]# mount /dev/sdd /storage/brick3
[root@gluster-node1 ~]# echo "/dev/sdd /storage/brick3 xfs defaults 0 0" >> /etc/fstab

(2)创建条带卷
[root@gluster-node1 ~]# gluster volume create gv3 stripe 2 gluster-node1:/storage/brick3 gluster-node2:/storage/brick3 force
volume create: gv3: success: please start the volume to access data
[root@gluster-node1 ~]# gluster volume info

Volume Name: gv1
Type: Distribute
Volume ID: 5773c33b-2371-419a-a753-de89063f4e23
Status: Started
Snapshot Count: 0
Number of Bricks: 2
Transport-type: tcp
Bricks:
Brick1: gluster-node1:/storage/brick1
Brick2: gluster-node2:/storage/brick1
Options Reconfigured:
transport.address-family: inet
nfs.disable: off

Volume Name: gv2
Type: Replicate
Volume ID: aee56c69-2c33-455d-8da0-aa4591a25065
Status: Started
Snapshot Count: 0
Number of Bricks: 1 x 2 = 2
Transport-type: tcp
Bricks:
Brick1: gluster-node1:/storage/brick2
Brick2: gluster-node2:/storage/brick2
Options Reconfigured:
transport.address-family: inet
nfs.disable: on
performance.client-io-threads: off

Volume Name: gv3
Type: Stripe
Volume ID: 4d3c3a88-0c3f-4b6f-a2ef-25ab599cb015
Status: Created
Snapshot Count: 0
Number of Bricks: 1 x 2 = 2
Transport-type: tcp
Bricks:
Brick1: gluster-node1:/storage/brick3
Brick2: gluster-node2:/storage/brick3
Options Reconfigured:
transport.address-family: inet
nfs.disable: on
[root@gluster-node1 ~]# gluster volume start gv3
volume start: gv3: success

(3)创建挂载目录,并挂载
[root@gluster-node1 ~]# mkdir /gv3
[root@gluster-node1 ~]# mount -t glusterfs 127.0.0.1:/gv3 /gv3
[root@gluster-node1 ~]# df -h
Filesystem      Size  Used Avail Use% Mounted on
/dev/sda2        20G  1.5G   19G   8% /
devtmpfs        483M     0  483M   0% /dev
tmpfs           493M     0  493M   0% /dev/shm
tmpfs           493M  6.8M  486M   2% /run
tmpfs           493M     0  493M   0% /sys/fs/cgroup
/dev/sda1       197M   97M  100M  50% /boot
tmpfs            99M     0   99M   0% /run/user/0
/dev/sdb       1014M   33M  982M   4% /storage/brick1
127.0.0.1:/gv1  2.0G   85M  1.9G   5% /gv1
/dev/sdc       1014M   33M  982M   4% /storage/brick2
127.0.0.1:/gv2 1014M   43M  972M   5% /gv2
/dev/sdd       1014M   33M  982M   4% /storage/brick3
127.0.0.1:/gv3  2.0G   85M  1.9G   5% /gv3

(4)创建文件测试
[root@gluster-node1 ~]# cd /gv3/
[root@gluster-node1 gv3]# dd if=/dev/zero bs=1024 count=10000 of=/gv3/10M.file
10000+0 records in
10000+0 records out
10240000 bytes (10 MB) copied, 2.46812 s, 4.1 MB/s
[root@gluster-node1 gv3]# ll
total 10000
-rw-r--r--. 1 root root 10240000 Aug  6 04:14 10M.file
[root@gluster-node1 gv3]# ll -h
total 9.8M
-rw-r--r--. 1 root root 9.8M Aug  6 04:14 10M.file
[root@gluster-node1 gv3]# ll /storage/brick3/    #在gluster-node1实际存储目录中文件大小只有4.9M
total 5008
-rw-r--r--. 2 root root 5128192 Aug  6 04:14 10M.file
[root@gluster-node1 gv3]# ll -h /storage/brick3/    #在gluster-node1实际存储目录中文件大小只有4.9M
total 4.9M
-rw-r--r--. 2 root root 4.9M Aug  6 04:14 10M.file
- (4)创建分布式+条带卷
分布式条带卷架构示意图:
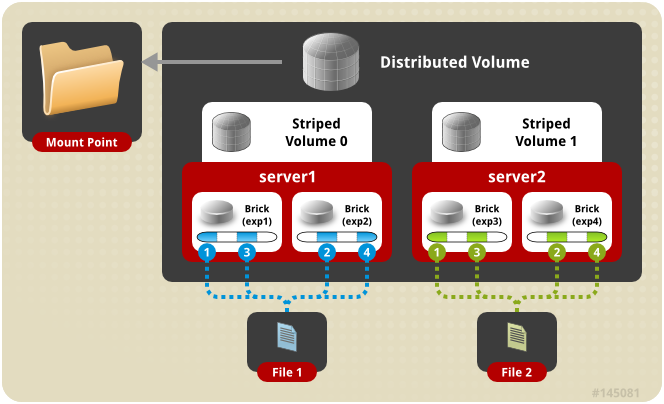
分布式条带模式(组合型),最少需要4台服务器或者4块磁盘才能创建。 创建volume 时 stripe 2 server = 4 个节点: 是DHT 与 Striped 的组合型。如:
gluster volume create test-volume stripe 2 transport tcp server1:/exp1 server2:/exp2 server3:/exp3 server4:/exp4
(1)停止前面的所有卷
[root@gluster-node1 ~]# gluster volume stop gv1
Stopping volume will make its data inaccessible. Do you want to continue? (y/n) y
volume stop: gv1: success
[root@gluster-node1 ~]# gluster volume stop gv2
Stopping volume will make its data inaccessible. Do you want to continue? (y/n) y
volume stop: gv2: success
[root@gluster-node1 ~]# gluster volume stop gv3
Stopping volume will make its data inaccessible. Do you want to continue? (y/n) y
volume stop: gv3: success

(2)删除前面的所有卷
[root@gluster-node1 ~]# gluster volume delete gv1
Deleting volume will erase all information about the volume. Do you want to continue? (y/n) y
volume delete: gv1: success

[root@gluster-node1 ~]# gluster volume delete gv2
Deleting volume will erase all information about the volume. Do you want to continue? (y/n) y
volume delete: gv2: success

[root@gluster-node1 ~]# gluster volume delete gv3
Deleting volume will erase all information about the volume. Do you want to continue? (y/n) y
volume delete: gv3: success

(3)创建分布式条带卷
[root@gluster-node1 ~]# gluster volume create gv1 stripe 2 gluster-node1:/storage/brick1 gluster-node1:/storage/brick2 gluster-node2:/storage/brick1 gluster-node2:/storage/brick2 force
volume create: gv1: success: please start the volume to access data
[root@gluster-node1 ~]# gluster volume info

Volume Name: gv1
Type: Distributed-Stripe   #类型为分布式条带卷
Volume ID: 4e6a8ddd-8403-4eb7-bd28-9365164755e3
Status: Created
Snapshot Count: 0
Number of Bricks: 2 x 2 = 4
Transport-type: tcp
Bricks:
Brick1: gluster-node1:/storage/brick1
Brick2: gluster-node1:/storage/brick2
Brick3: gluster-node2:/storage/brick1
Brick4: gluster-node2:/storage/brick2
Options Reconfigured:
transport.address-family: inet
nfs.disable: on

(4)启动gv1卷,并挂载到/gv1
[root@gluster-node1 ~]# gluster volume start gv1
volume start: gv1: success
[root@gluster-node1 ~]# mount -t glusterfs 127.0.0.1:/gv1 /gv1
[root@gluster-node1 ~]# df -h
Filesystem      Size  Used Avail Use% Mounted on
/dev/sda2        20G  1.5G   19G   8% /
devtmpfs        483M     0  483M   0% /dev
tmpfs           493M     0  493M   0% /dev/shm
tmpfs           493M  6.8M  486M   2% /run
tmpfs           493M     0  493M   0% /sys/fs/cgroup
/dev/sda1       197M   97M  100M  50% /boot
tmpfs            99M     0   99M   0% /run/user/0
/dev/sdb       1014M   33M  982M   4% /storage/brick1
/dev/sdc       1014M   33M  982M   4% /storage/brick2
/dev/sdd       1014M   38M  977M   4% /storage/brick3
127.0.0.1:/gv1  4.0G  170M  3.8G   5% /gv1

(5)测试创建文件,并查看实际存储信息
[root@gluster-node1 ~]# cd /gv1/
[root@gluster-node1 gv1]# dd if=/dev/zero bs=1024 count=10000 of=/gv1/10M.file
10000+0 records in
10000+0 records out
10240000 bytes (10 MB) copied, 1.94059 s, 5.3 MB/s

[root@gluster-node1 gv1]# ll -h
total 9.8M
-rw-r--r--. 1 root root 9.8M Aug  6 06:58 10M.file
[root@gluster-node1 gv1]# ll -h /storage/brick1/
total 4.9M
-rw-r--r--. 2 root root 4.9M Aug  6 06:58 10M.file
[root@gluster-node1 gv1]# ll -h /storage/brick2/
total 4.9M
-rw-r--r--. 2 root root 4.9M Aug  6 06:58 10M.file
- (5)创建分布式+复制卷
分布式复制卷架构示意图:
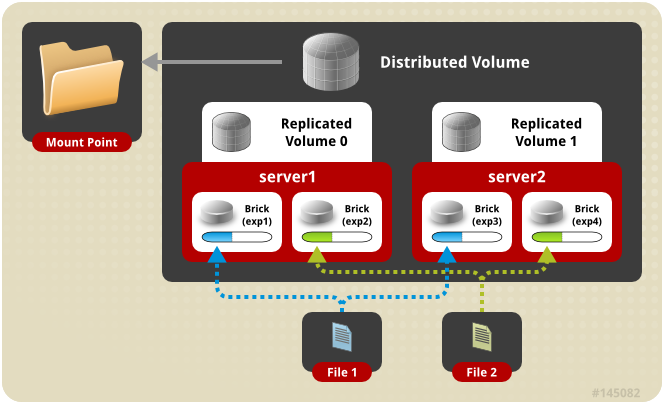
分布式复制模式(组合型), 最少需要4台服务器或者2台服务器4块磁盘才能创建。 创建volume 时 replica 2 server = 4 个节点:是DHT 与 AFR 的组合型。
gluster volume create test-volume replica 2 transport tcp server1:/exp1 server2:/exp2 server3:/exp3 server4:/exp4
(1)卸载前面的分布式条带卷并删除
[root@gluster-node1 ~]# umount /gv1/
[root@gluster-node1 ~]# gluster volume stop gv1
Stopping volume will make its data inaccessible. Do you want to continue? (y/n) y
volume stop: gv1: success
[root@gluster-node1 ~]# gluster volume delete gv1
Deleting volume will erase all information about the volume. Do you want to continue? (y/n) y
volume delete: gv1: success

(2)创建分布式复制卷
[root@gluster-node1 ~]# gluster volume create gv1 replica 2 gluster-node1:/storage/brick1/ gluster-node1:/storage/brick2 gluster-node2:/storage/brick1/ gluster-node2:/storage/brick2 force
volume create: gv1: success: please start the volume to access data
[root@gluster-node1 ~]# gluster volume info

Volume Name: gv1
Type: Distributed-Replicate
Volume ID: 86f110cb-5075-493e-b49a-d7458b3def79
Status: Created
Snapshot Count: 0
Number of Bricks: 2 x 2 = 4
Transport-type: tcp
Bricks:
Brick1: gluster-node1:/storage/brick1
Brick2: gluster-node1:/storage/brick2
Brick3: gluster-node2:/storage/brick1
Brick4: gluster-node2:/storage/brick2
Options Reconfigured:
transport.address-family: inet
nfs.disable: on
performance.client-io-threads: off
[root@gluster-node1 ~]# gluster volume start gv1
volume start: gv1: success

(3)挂载分布式复制卷/gv1
[root@gluster-node3 ~]# mount  -t glusterfs 127.0.0.1:/gv1 /gv1
[root@gluster-node3 ~]# df -h
Filesystem      Size  Used Avail Use% Mounted on
/dev/sda3        28G  1.7G   27G   6% /
devtmpfs        483M     0  483M   0% /dev
tmpfs           493M     0  493M   0% /dev/shm
tmpfs           493M  6.8M  486M   2% /run
tmpfs           493M     0  493M   0% /sys/fs/cgroup
/dev/sda1       197M   97M  100M  50% /boot
tmpfs            99M     0   99M   0% /run/user/0
/dev/sdb       1014M   33M  982M   4% /storage/brick1
127.0.0.1:/gv1  2.0G  120M  1.9G   6% /gv1

(4)创建文件测试
[root@gluster-node3 gv1]# touch file1 file2 file3
[root@gluster-node3 gv1]# ls
file1  file2  file3

[root@gluster-node1 ~]# ll /storage/brick1/
total 0
-rw-r--r--. 2 root root 0 Aug  9  2018 file3
[root@gluster-node1 ~]# ll /storage/brick2/
total 0
-rw-r--r--. 2 root root 0 Aug  9  2018 file3
[root@gluster-node2 ~]# ll /storage/brick1/
total 0
-rw-r--r-- 2 root root 0 Aug  9  2018 file1
-rw-r--r-- 2 root root 0 Aug  9  2018 file2
[root@gluster-node2 ~]# ll /storage/brick2/
total 0
-rw-r--r-- 2 root root 0 Aug  9  2018 file1
-rw-r--r-- 2 root root 0 Aug  9  2018 file2

在gluster-node3上挂载并创建文件,查看在gluster-node1和gluster-node2的实际存储位置/storage/brick1、/storage/brick2可以看到在gluster-node1上存储了file1文件并且在其存储位置brick1和brick2都有该文件,实现了复制功能。同理在gluster-node2上也可以看到file2、file3的存储情况。
- (6)创建条带+复制卷
条带+复制卷架构示意图:
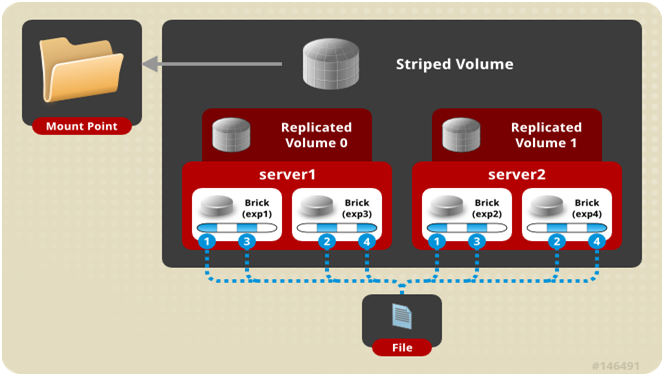
条带复制卷模式(组合型), 最少需要4台服务器才能创建。 创建volume 时 stripe 2 replica 2 server = 4 个节点: 是 Striped 与 AFR 的组合型。
gluster volume create test-volume stripe 2 replica 2 transport tcp server1:/exp1 server2:/exp2 server3:/exp3 server4:/exp4
①卸载前面的分布式复制卷并删除
[root@gluster-node3 ~]# umount /gv1
[root@gluster-node1 ~]# gluster volume stop gv1
Stopping volume will make its data inaccessible. Do you want to continue? (y/n) y
volume stop: gv1: success
[root@gluster-node1 ~]# gluster volume delete gv1
Deleting volume will erase all information about the volume. Do you want to continue? (y/n) y
volume delete: gv1: success
②创建条带复制卷并启动
root@gluster-node1 ~]# gluster volume create gv1 stripe 2 replica 2 gluster-node1:/storage/brick1/ gluster-node1:/storage/brick2 gluster-node2:/storage/brick1/ gluster-node2:/storage/brick2 force
volume create: gv1: success: please start the volume to access data

[root@gluster-node1 ~]# gluster volume info

Volume Name: gv1
Type: Striped-Replicate
Volume ID: b65aa061-044d-4a54-ac16-725077c2a0b8
Status: Created
Snapshot Count: 0
Number of Bricks: 1 x 2 x 2 = 4
Transport-type: tcp
Bricks:
Brick1: gluster-node1:/storage/brick1
Brick2: gluster-node1:/storage/brick2
Brick3: gluster-node2:/storage/brick1
Brick4: gluster-node2:/storage/brick2
Options Reconfigured:
transport.address-family: inet
nfs.disable: on
performance.client-io-threads: off

[root@gluster-node1 ~]# gluster volume start gv1
volume start: gv1: success
③挂载条带复制卷
[root@gluster-node3 ~]# mount  -t glusterfs 127.0.0.1:/gv1 /gv1
[root@gluster-node3 ~]# df -h
Filesystem      Size  Used Avail Use% Mounted on
/dev/sda3        28G  1.7G   27G   6% /
devtmpfs        483M     0  483M   0% /dev
tmpfs           493M     0  493M   0% /dev/shm
tmpfs           493M  6.8M  486M   2% /run
tmpfs           493M     0  493M   0% /sys/fs/cgroup
/dev/sda1       197M   97M  100M  50% /boot
tmpfs            99M     0   99M   0% /run/user/0
/dev/sdb       1014M   33M  982M   4% /storage/brick1
127.0.0.1:/gv1  2.0G   85M  1.9G   5% /gv1
④touch创建文件测试
[root@gluster-node3 ~]# cd /gv1/
[root@gluster-node3 gv1]# touch file1 file2 file3
[root@gluster-node3 gv1]# ll
total 0
-rw-r--r-- 1 root root 0 Aug  8 23:25 file1
-rw-r--r-- 1 root root 0 Aug  8 23:25 file2
-rw-r--r-- 1 root root 0 Aug  8 23:25 file3


[root@gluster-node1 ~]# ll /storage/brick1/
total 0
-rw-r--r--. 2 root root 0 Aug  9  2018 file1
-rw-r--r--. 2 root root 0 Aug  9  2018 file2
-rw-r--r--. 2 root root 0 Aug  9  2018 file3
[root@gluster-node1 ~]# ll /storage/brick2/
total 0
-rw-r--r--. 2 root root 0 Aug  9  2018 file1
-rw-r--r--. 2 root root 0 Aug  9  2018 file2
-rw-r--r--. 2 root root 0 Aug  9  2018 file3

[root@gluster-node2 ~]# ll /storage/brick1/
total 0
-rw-r--r-- 2 root root 0 Aug  9  2018 file1
-rw-r--r-- 2 root root 0 Aug  9  2018 file2
-rw-r--r-- 2 root root 0 Aug  9  2018 file3
[root@gluster-node2 ~]# ll /storage/brick2/
total 0
-rw-r--r-- 2 root root 0 Aug  9  2018 file1
-rw-r--r-- 2 root root 0 Aug  9  2018 file2
-rw-r--r-- 2 root root 0 Aug  9  2018 file3
从touch创建文件可以看到创建的文件,分别在gluster-node1和gluster-node2上的实际存储位置/storage/brick1、/storage/brick2上都存在这些文件,实现了复制功能
⑤dd创建文件测试
[root@gluster-node3 gv1]# dd if=/dev/zero bs=1024 count=20000 of=/gv1/20M.file
20000+0 records in
20000+0 records out
20480000 bytes (20 MB) copied, 1.08174 s, 18.9 MB/s

[root@gluster-node1 ~]# ll /storage/brick1/ -h
total 9.8M
-rw-r--r--. 2 root root 9.8M Aug  7 00:50 20M.file
-rw-r--r--. 2 root root    0 Aug  9  2018 file1
-rw-r--r--. 2 root root    0 Aug  9  2018 file2
-rw-r--r--. 2 root root    0 Aug  9  2018 file3
[root@gluster-node1 ~]# ll /storage/brick2/ -h
total 9.8M
-rw-r--r--. 2 root root 9.8M Aug  7 00:50 20M.file
-rw-r--r--. 2 root root    0 Aug  9  2018 file1
-rw-r--r--. 2 root root    0 Aug  9  2018 file2
-rw-r--r--. 2 root root    0 Aug  9  2018 file3

[root@gluster-node2 ~]# ll /storage/brick1/ -h
total 9.8M
-rw-r--r-- 2 root root 9.8M Aug  6 19:24 20M.file
-rw-r--r-- 2 root root    0 Aug  9  2018 file1
-rw-r--r-- 2 root root    0 Aug  9  2018 file2
-rw-r--r-- 2 root root    0 Aug  9  2018 file3
[root@gluster-node2 ~]# ll /storage/brick2/ -h
total 9.8M
-rw-r--r-- 2 root root 9.8M Aug  6 19:24 20M.file
-rw-r--r-- 2 root root    0 Aug  9  2018 file1
-rw-r--r-- 2 root root    0 Aug  9  2018 file2
-rw-r--r-- 2 root root    0 Aug  9  2018 file3
从dd创建的20M文件,在gluster-node1上可以看到20M的文件被切割成10M一份进行存储,并且在gluster-node2上也有这样的一份数据,实现了条带功能,也实现了复制功能。
- (7)创建分布式+条带+复制卷
分布式+条带+复制卷架构示意图:
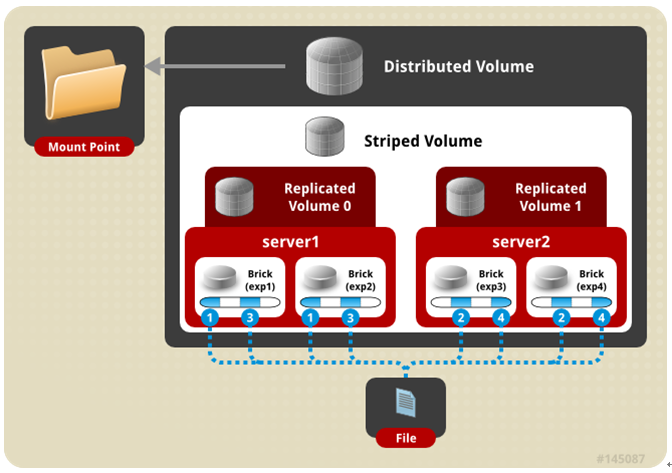
三种模式混合, 至少需要8台 服务器或者2台服务器8块磁盘才能创建。 stripe 2 replica 2 , 每4个节点 组成一个 组。
gluster volume create test-volume stripe 2 replica 2 transport tcp server1:/exp1 server2:/exp2 server3:/exp3 server4:/exp4 server5:/exp5 server6:/exp6 server7:/exp7 server8:/exp8
①卸载前面的条带复制卷并删除
[root@gluster-node1 ~]# umount /gv1
[root@gluster-node1 ~]# gluster volume stop gv1
Stopping volume will make its data inaccessible. Do you want to continue? (y/n) y
volume stop: gv1: success
[root@gluster-node1 ~]# gluster volume delete gv1
Deleting volume will erase all information about the volume. Do you want to continue? (y/n) y
volume delete: gv1: success
②创建分布式条带复制卷
[root@gluster-node1 ~]# gluster volume create gv1 stripe 2 replica 2 gluster-node1:/storage/brick1 gluster-node1:/storage/brick2 gluster-node1:/storage/brick3 gluster-node2:/storage/brick1 gluster-node2:/storage/brick2 gluster-node2:/storage/brick3 gluster-node3:/storage/brick1 gluster-node3:/storage/brick2 force
volume create: gv1: success: please start the volume to access data


[root@gluster-node1 ~]# gluster volume info

Volume Name: gv1
Type: Distributed-Striped-Replicate
Volume ID: fc16d0f2-52ec-4932-a21e-4226afc79ddf
Status: Created
Snapshot Count: 0
Number of Bricks: 2 x 2 x 2 = 8
Transport-type: tcp
Bricks:
Brick1: gluster-node1:/storage/brick1
Brick2: gluster-node1:/storage/brick2
Brick3: gluster-node1:/storage/brick3
Brick4: gluster-node2:/storage/brick1
Brick5: gluster-node2:/storage/brick2
Brick6: gluster-node2:/storage/brick3
Brick7: gluster-node3:/storage/brick1
Brick8: gluster-node3:/storage/brick2
Options Reconfigured:
transport.address-family: inet
nfs.disable: on
performance.client-io-threads: off
③启动条带复制卷并挂载
[root@gluster-node1 ~]# gluster volume start gv1
volume start: gv1: success
[root@gluster-node1 ~]# mount -t glusterfs 127.0.0.1:/gv1 /gv1
[root@gluster-node1 ~]# df -h
Filesystem      Size  Used Avail Use% Mounted on
/dev/sda2        20G  1.5G   19G   8% /
devtmpfs        483M     0  483M   0% /dev
tmpfs           493M     0  493M   0% /dev/shm
tmpfs           493M  6.8M  486M   2% /run
tmpfs           493M     0  493M   0% /sys/fs/cgroup
/dev/sda1       197M   97M  100M  50% /boot
tmpfs            99M     0   99M   0% /run/user/0
/dev/sdd       1014M   38M  977M   4% /storage/brick3
/dev/sdb       1014M   33M  982M   4% /storage/brick1
/dev/sdc       1014M   43M  972M   5% /storage/brick2
127.0.0.1:/gv1  4.0G  200M  3.8G   5% /gv1

观察存储容量,一共有4个G,原来的8块磁盘一共是8G大小。使用了分布式条带复制卷,存储空间会减半
④dd创建文件查看
[root@gluster-node1 ~]# cd /gv1/
[root@gluster-node1 gv1]# dd if=/dev/zero bs=1024 count=100000 of=/gv1/100M.file
100000+0 records in
100000+0 records out
102400000 bytes (102 MB) copied, 29.2668 s, 3.5 MB/s

[root@gluster-node1 gv1]# ll -h
total 98M
-rw-r--r--. 1 root root 98M Aug  7 04:30 100M.file
[root@gluster-node1 gv1]# ll -h /storage/brick1/
total 64M
-rw-r--r--. 2 root root 49M Aug  7 04:30 100M.file
[root@gluster-node1 gv1]# ll -h /storage/brick2/
total 64M
-rw-r--r--. 2 root root 49M Aug  7 04:30 100M.file
[root@gluster-node1 gv1]# ll -h /storage/brick3/
total 64M
-rw-r--r--. 2 root root 49M Aug  7 04:30 100M.file
[root@gluster-node2 ~]# ll /storage/brick1/ -h
total 49M
-rw-r--r-- 2 root root 49M Aug  6 23:04 100M.file
从创建的文件上看,创建了100M的文件,会进行分割49M文件作为一份数据进行存储,并通过hash算法随即存储到8块磁盘中的其中2块磁盘,并在另外2块磁盘中作了复制,以保证数据的备份。
本次的部署实验,使用了3台主机,8块磁盘,并不是生产使用方案,而是机子抗不住。在实际生产中,可以独立使用多台服务器进行磁盘整合,实现分布式文件系统。