一、LAMP解析
a: apache
m: mariadb, mysql
p: php, perl, python
静态资源:静态内容;客户端从服务器获得的资源的表现形式与原文件相同;
动态资源:通常是程序文件,需要在服务器执行之后,将执行的结果返回给客户端;
LAMP请求流程:Client --> (http) --> httpd --> (cgi) --> application server (program file) --> (mysql) --> mariadb

二、YUM安装Aapche 2.4、 Mariadb 数据库 以及PHP
程序包:httpd, php, php-mysql, mariadb-server
注意:php要求httpd使用prefork MPM
(1)YUM部署httpd、mariadb以及php
[root@localhost ~]# yum install -y httpd
[root@localhost ~]# yum install -y mariadb mariadb-server mariadb-libs mariadb-devel php php-mysql  #安装mariadb、php

(2)启动httpd、mariadb、php
[root@localhost ~]# systemctl enable httpd
[root@localhost ~]# systemctl start httpd
[root@localhost ~]# systemctl enable mariadb   #设置mariadb开机启动
[root@localhost ~]# systemctl start mariadb    #启动数据库
[root@localhost ~]# netstat -tulnp |grep "3306"   #查看监听端口
tcp        0      0 0.0.0.0:3306            0.0.0.0:*               LISTEN      43059/mysqld
[root@localhost ~]# mysql -uroot -p -e "select version();"  #查看mariadb的版本
Enter password:
+----------------+
| version()      |
+----------------+
| 5.5.56-MariaDB |
+----------------+
[root@localhost ~]# php -v
PHP 5.4.16 (cli) (built: Apr 12 2018 19:02:01)
Copyright (c) 1997-2013 The PHP Group
Zend Engine v2.4.0, Copyright (c) 1998-2013 Zend Technologies

(3)检查MPM模式是否为prefork
[root@localhost ~]# grep "^[a-Z]" /etc/httpd/conf.modules.d/00-mpm.conf
LoadModule mpm_prefork_module modules/mod_mpm_prefork.so
[root@localhost ~]# cd /var/www/html/
[root@localhost html]# cat index.php
<?php
    $link=mysql_connect('127.0.0.1','mysql','');
    if ($link) {
        echo "php_mysql is Success!";
    }
    else {
        echo "php_mysql is Failure!";
    }
    mysql_close();
?>
[root@localhost htdocs]# curl 192.168.56.11
php_mysql is Success!
访问:http://192.168.56.11

三、编译安装Aapche 2.4结合YUM安装的php和mysql
(1)YUM安装mariadb和php
[root@localhost ~]# yum install -y mariadb mariadb-server mariadb-libs mariadb-devel php php-mysql  #安装mariadb、php

(2)安装PHP常用模块
[root@localhost ~]# yum install -y php-gd php-ldap php-odbc php-pear php-xml php-xmlrpc php-mbstring php-snmp php-soap curl curl-devel php-bcmath

(3)启动mariadb并查看端口
[root@localhost ~]# systemctl enable mariadb   #设置mariadb开机启动
[root@localhost ~]# systemctl start mariadb    #启动数据库
[root@localhost ~]# netstat -tulnp |grep "3306"   #查看监听端口
tcp        0      0 0.0.0.0:3306            0.0.0.0:*               LISTEN      43059/mysqld

(4)下载httpd 2.4并解压
[root@localhost ~]# wget http://mirror.bit.edu.cn/apache/httpd/httpd-2.4.33.tar.gz
[root@localhost ~]# tar -zxvf httpd-2.4.33.tar.gz

(5)下载apr和apr-util的1.5.1版本
[root@localhost ~]# wget http://archive.apache.org/dist/apr/apr-util-1.5.1.tar.gz
[root@localhost ~]# wget http://archive.apache.org/dist/apr/apr-1.5.1.tar.gz
[root@localhost ~]# cp -rf apr-util-1.5.1 httpd-2.4.33/srclib/apr-util
[root@localhost ~]# cp -rf apr-1.1.1 httpd-2.4.33/srclib/apr

(6)编译安装apache 2.4.33
[root@localhost httpd-2.4.33]# ./configure
--prefix=/usr/local/apache-2.4.33   #指定安装路径
--enable-ssl     # 启动ssl加密功能
--enable-cgi     # 启用cgi协议
--enable-rewrite     #启用URL重写功能
--enable-so     #允许运行时加载DSO模块
--enable-modules=most  # 启用大多数共享模块
--enable-mods-shared=most     #启用MPM大多数参数
--enable-mpms-shared=all     #指定mpm切换为动态加载模式
--with-mpm=event     #指定使用的MPM的类型
[root@localhost httpd-2.4.33]# make && make install

(7)修改ServerName,并启动apache
[root@localhost httpd-2.4.33]# vim /usr/local/apache-2.4.33/conf/httpd.conf
ServerName localhost:80
[root@localhost httpd-2.4.33]# apachectl -t
Syntax OK
[root@localhost httpd-2.4.33]# apachectl start
[root@localhost httpd-2.4.33]# ps -ef |grep httpd
root      6979     1  0 12:20 ?        00:00:00 /usr/local/apache-2.4.33/bin/httpd -k start
daemon    6980  6979  0 12:20 ?        00:00:00 /usr/local/apache-2.4.33/bin/httpd -k start
daemon    6982  6979  0 12:20 ?        00:00:00 /usr/local/apache-2.4.33/bin/httpd -k start
daemon    7003  6979  1 12:20 ?        00:00:00 /usr/local/apache-2.4.33/bin/httpd -k start
root      7065 37942  0 12:20 pts/0    00:00:00 grep --color=auto httpd
[root@localhost httpd-2.4.33]# curl localhost
<html><body><h1>It works!</h1></body></html>

(8)配置apache解析php并连接mysql
[root@localhost conf]# vim httpd.conf
DocumentRoot "/var/www/html"  #修改网站根目录
<Directory "/var/www/html">  #修改目录权限设置路径
AddType application/x-httpd-php .php  #增加PHP解析类型
<IfModule dir_module>
    DirectoryIndex index.html index.php  #修改主页类型文件
</IfModule>

(9)"/var/www/html/"目录下创建index.php
[root@localhost ~]# cd /var/www/html/
[root@localhost html]# cat index.php
<?php
    $link=mysql_connect('127.0.0.1','mysql','');
    if ($link) {
        echo "php_mysql is Success!";
    }
    else {
        echo "php_mysql is Failure!";
    }
    mysql_close();
?>
(10)测试php和mysql的连通性
[root@localhost htdocs]# curl 192.168.56.11
php_mysql is Success!
访问:http://192.168.56.11

四、编译部署LAMP环境
(1)二进制免编译部署mysql 5.6
# cd /tools
# wget http://mirrors.sohu.com/mysql/MySQL-5.6/mysql-5.6.35-linux-glibc2.5-x86_64.tar.gz
# tar zxvf mysql-5.6.35-linux-glibc2.5-x86_64.tar.gz
# mv mysql-5.6.35-linux-glibc2.5-x86_64 /usr/local/mysql
# cd /usr/local/mysql
# useradd mysql
# mkdir /data/
# ./scripts/mysql_install_db --user=mysql --datadir=/data/mysql
# cp support-files/my-default.cnf  /etc/my.cnf
# cp support-files/mysql.server /etc/init.d/mysqld
# vi /etc/init.d/mysqld
定义basedir和datadir
# /etc/init.d/mysqld start
(2)安装Apache 2.4.27
# wget http://mirrors.cnnic.cn/apache/httpd/httpd-2.4.27.tar.gz
# wget http://mirrors.hust.edu.cn/apache/apr/apr-1.5.2.tar.gz
# wget http://mirrors.hust.edu.cn/apache/apr/apr-util-1.5.4.tar.gz
apr和apr-util是一个通用的函数库,它让httpd可以不关心底层的操作系统平台,可以很方便地移植(从linux移植到windows)
# tar zxvf httpd-2.4.27.tar.gz
# tar zxvf apr-util-1.5.4.tar.gz
# tar zxvf apr-1.5.2.tar.gz
# cd /usr/local/src/apr-1.5.2
# ./configure --prefix=/usr/local/apr
# make && make install
# cd /usr/local/src/apr-util-1.5.4
# ./configure --prefix=/usr/local/apr-util --with-apr=/usr/local/apr
# make && make install
# cd /usr/local/src/httpd-2.4.27
# ./configure
--prefix=/usr/local/apache2.4     # 指定安装目录
--with-apr=/usr/local/apr         #指定apr的安装路径
--with-apr-util=/usr/local/apr-util      指定apr-util的安装路径
--enable-ssl     # 启动ssl加密功能
--enable-cgi     # 启用cgi协议
--enable-rewrite     #启用URL重写功能
--enable-so     #允许运行时加载DSO模块
--enable-modules=most  # 启用大多数共享模块
--enable-mods-shared=most     #启用MPM大多数参数
--enable-mpms-shared=all     #指定mpm切换为动态加载模式
--with-mpm=event     #指定使用的MPM的类型

# make && make install
(3)安装PHP5或PHP7
(1)PHP5安装
# cd /tools
# wget http://cn2.php.net/distributions/php-5.6.30.tar.gz
# tar zxf php-5.6.30.tar.gz
# cd php-5.6.30
# ./configure --prefix=/usr/local/php --with-apxs2=/usr/local/apache2.4/bin/apxs --with-config-file-path=/usr/local/php/etc  --with-mysql=/usr/local/mysql --with-pdo-mysql=/usr/local/mysql --with-mysqli=/usr/local/mysql/bin/mysql_config --with-libxml-dir --with-gd --with-jpeg-dir --with-png-dir --with-freetype-dir --with-iconv-dir --with-zlib-dir --with-bz2 --with-openssl --with-mcrypt --enable-soap --enable-gd-native-ttf --enable-mbstring --enable-sockets --enable-exif
# make && make install
# cp php.ini-production  /usr/local/php/etc/php.ini

(2)PHP7安装
# cd /tools
# wget http://cn2.php.net/distributions/php-7.1.6.tar.bz2
# tar zxf php-7.1.6.tar.bz2
# cd php-7.1.6
# ./configure --prefix=/usr/local/php7 --with-apxs2=/usr/local/apache2.4/bin/apxs --with-config-file-path=/usr/local/php7/etc  --with-pdo-mysql=/usr/local/mysql --with-mysqli=/usr/local/mysql/bin/mysql_config --with-libxml-dir --with-gd --with-jpeg-dir --with-png-dir --with-freetype-dir --with-iconv-dir --with-zlib-dir --with-bz2 --with-openssl --with-mcrypt --enable-soap --enable-gd-native-ttf --enable-mbstring --enable-sockets --enable-exif
# make && make install
# ls /usr/local/apache2.4/modules/libphp7.so
# cp php.ini-production  /usr/local/php7/etc/php.ini
(4)配置httpd支持php
httpd主配置文件/usr/local/apache2.4/conf/httpd.conf
# vim /usr/local/apache2.4/conf/httpd.conf //修改以下几个地方
ServerName
Require all denied
AddType application/x-httpd-php .php
DirectoryIndex index.html index.php
LoadModule mpm_prefork_module modules/mod_mpm_prefork.so  #启用prefork模式
LoadModule php5_module modules/libphp5.so  #导入php5解析模块,在使用php5版本使用
#LoadModule php7_module modules/libphp7.so  #导入php6=7解析模块,在使用php7版本使用
# /usr/local/apache2.4/bin/apachectl -t //测试语法
# /usr/local/apache2.4/bin/apachectl start //启动服务
# netstat -lntp
# curl localhost
# vim /usr/local/apache2.4/htodcs/test.php //增加如下内容
<?php
echo 123;
?>
# curl localhost/test.php
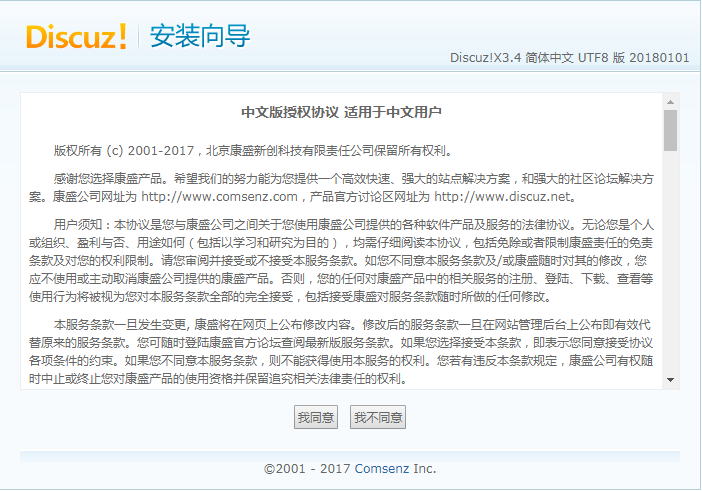
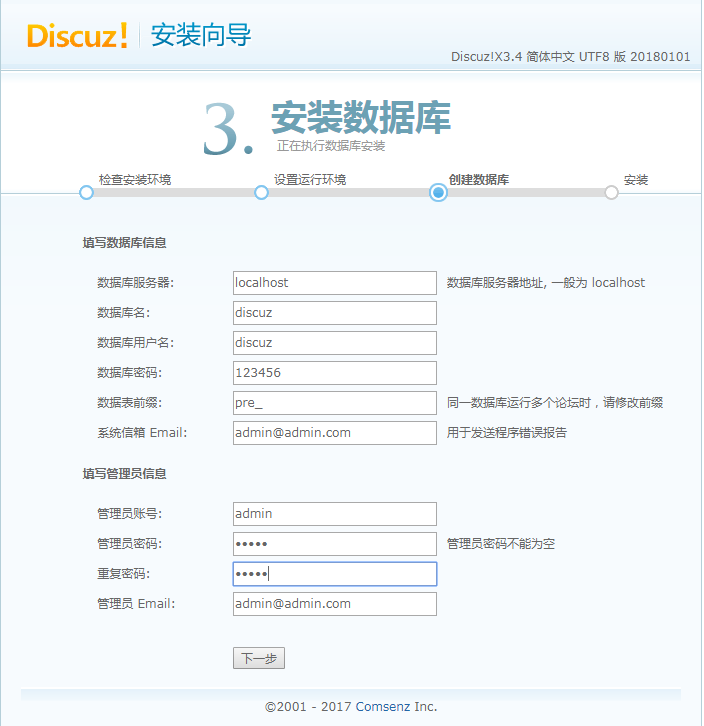
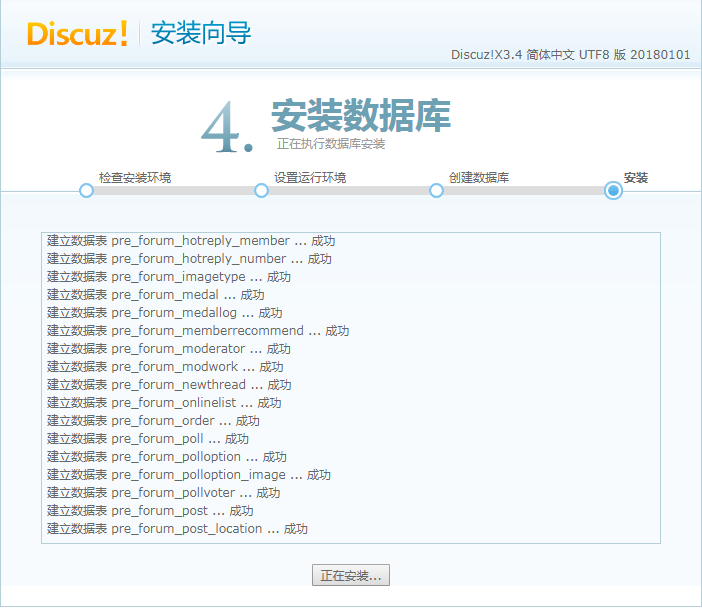
五、使用LAMP部署discuz论坛
(1)修改主配置文件,增加虚拟主机配置
[root@localhost conf]# vim httpd.conf
打开虚拟主机注释:
Include conf/extra/httpd-vhosts.conf

(2)修改虚拟主机配置文件,增加虚拟主机bbs.discuz.com
[root@localhost conf]# vim extra/httpd-vhosts.conf
<VirtualHost *:80>
    DocumentRoot "/vhosts/html"
    ServerName bbs.discuz.com
</VirtualHost>

(3)创建网站根目录,并下载Discuz论坛源码包
[root@localhost ~]# mkdir /vhosts/html && cd /vhosts/html
[root@localhost html]# git clone https://gitee.com/ComsenzDiscuz/DiscuzX
[root@localhost html]# mv DiscuzX/* .
[root@localhost html]# rm -rf upload/ readme/ utility/ DiscuzX  #删除多余无用目录
[root@localhost conf]# apachectl -t
Syntax OK
[root@localhost conf]# apachectl stop
[root@localhost conf]# apachectl start

(4)配置数据库
[root@localhost conf]# mysql_secure_installation     #数据库安全初始化

NOTE: RUNNING ALL PARTS OF THIS SCRIPT IS RECOMMENDED FOR ALL MariaDB
      SERVERS IN PRODUCTION USE!  PLEASE READ EACH STEP CAREFULLY!

In order to log into MariaDB to secure it, we'll need the current
password for the root user.  If you've just installed MariaDB, and
you haven't set the root password yet, the password will be blank,
so you should just press enter here.

Enter current password for root (enter for none):
OK, successfully used password, moving on...

Setting the root password ensures that nobody can log into the MariaDB
root user without the proper authorisation.

Set root password? [Y/n] Y
New password: 123456
Re-enter new password: 123456
Password updated successfully!
Reloading privilege tables..
 ... Success!


By default, a MariaDB installation has an anonymous user, allowing anyone
to log into MariaDB without having to have a user account created for
them.  This is intended only for testing, and to make the installation
go a bit smoother.  You should remove them before moving into a
production environment.

Remove anonymous users? [Y/n] Y
 ... Success!

Normally, root should only be allowed to connect from 'localhost'.  This
ensures that someone cannot guess at the root password from the network.

Disallow root login remotely? [Y/n] Y
 ... Success!

By default, MariaDB comes with a database named 'test' that anyone can
access.  This is also intended only for testing, and should be removed
before moving into a production environment.

Remove test database and access to it? [Y/n] Y
 - Dropping test database...
 ... Success!
 - Removing privileges on test database...
 ... Success!

Reloading the privilege tables will ensure that all changes made so far
will take effect immediately.

Reload privilege tables now? [Y/n] Y
 ... Success!

Cleaning up...

All done!  If you've completed all of the above steps, your MariaDB
installation should now be secure.

Thanks for using MariaDB!


[root@localhost conf]# mysql -uroot -p123456    #登录创建discuz的数据库并授权
Welcome to the MariaDB monitor.  Commands end with ; or g.
Your MariaDB connection id is 38
Server version: 5.5.56-MariaDB MariaDB Server

Copyright (c) 2000, 2017, Oracle, MariaDB Corporation Ab and others.

Type 'help;' or 'h' for help. Type 'c' to clear the current input statement.

MariaDB [(none)]> create database discuz default character set = 'utf8';
Query OK, 1 row affected (0.05 sec)

MariaDB [(none)]> grant all privileges on discuz.* to 'discuz'@"%" identified by '123456';
Query OK, 0 rows affected (0.44 sec)

MariaDB [(none)]> flush privileges;
Query OK, 0 rows affected (0.03 sec)

MariaDB [(none)]> quit;
Bye
[root@localhost conf]# mysql -udiscuz -p123456 -e "show databases;"        #测试授权用户登陆
+--------------------+
| Database           |
+--------------------+
| information_schema |
| discuz             |
+--------------------+
windows下做域名解析:192.168.56.11 bbs.discuz.com
访问:http://bbs.discuz.com进入安装界面