-
一、Openstack的概述
Openstack是一个由NASA(美国国家航空航天局)和Rackspace合作研发并发起的,以Apache许可证授权的自由软件和开放源代码项目。
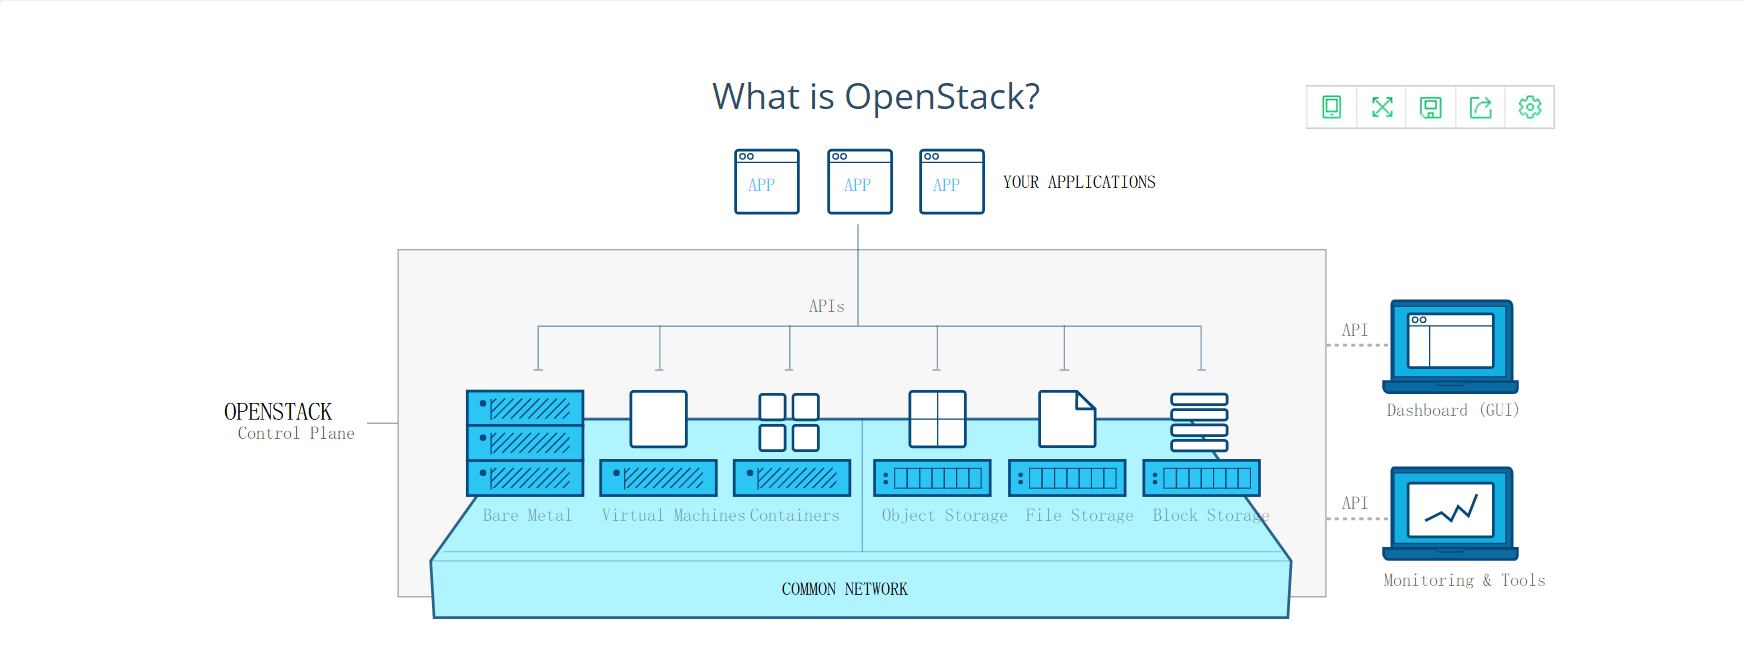
Openstack是一个开源的云计算管理平台项目,由几个主要的组件组合起来完成具体工作。Openstack支持几乎所有类型的云环境,项目目标是提供实施简单、可大规模扩展、丰富、标准统一的云计算管理平台。Openstack通过各种互补的服务提供了基础设施即服务(IaaS)的解决方案,每个服务提供API以进行集成。
Openstack是一个旨在为公共及私有云的建设与管理提供软件的开源项目,项目的首要任务是简化云的部署过程并为其带来良好的可扩展性。
Openstack官方网站: https://www.openstack.org/
Openstack官方文档:https://docs.openstack.org/pike/
-
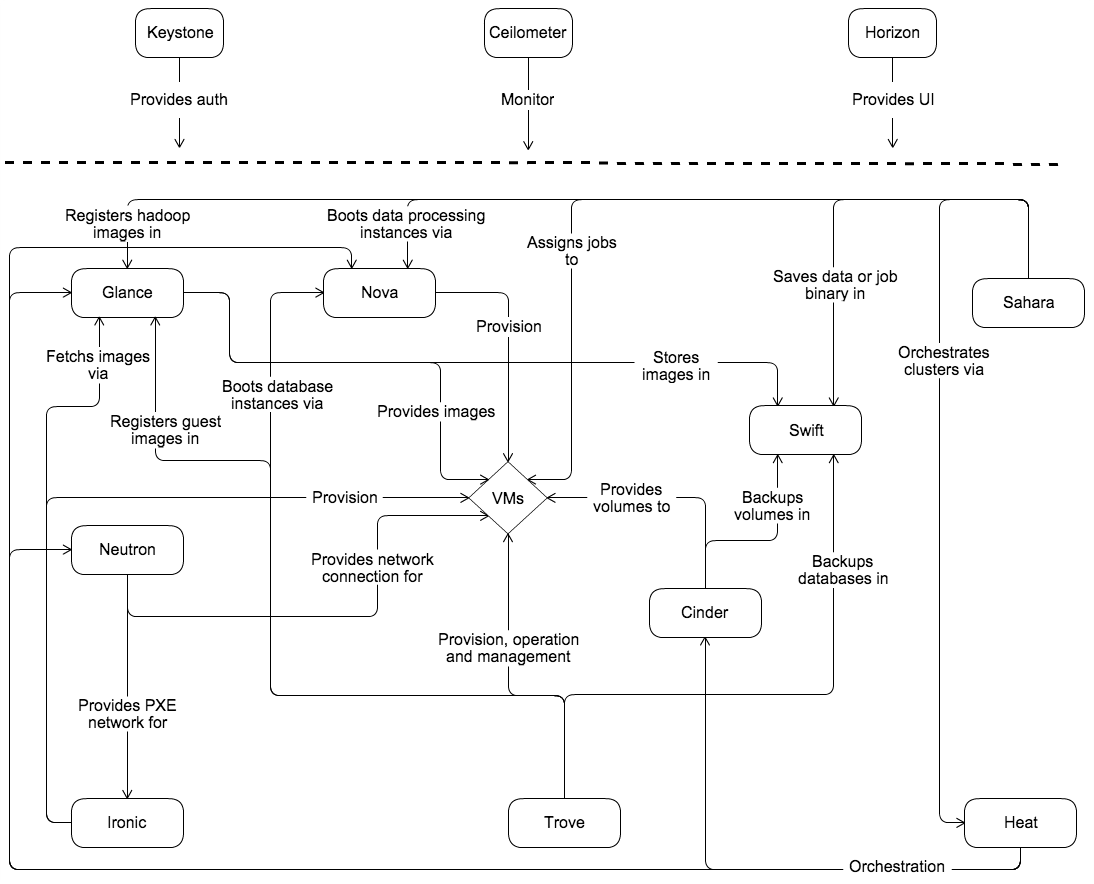
二、Openstack的组件
| 序号 | 服务名称 | 项目名称 | 描述 |
|---|---|---|---|
| 1 | Dashboard | Horizon | 为Openstack用户提供一个Web的自服务Portal |
| 2 | Compute service | Nova | 管理VM的生命周期,是Openstack中最核心的服务 |
| 3 | Networking service | Neutron | 提供网络连接服务,负责创建和管理L2、L3网络,为VM提供虚拟网络和物理网络连接 |
| 4 | Object Storage service | Swift | 提供对象存储服务。VM可以通过RESTful API存放对象数据。作为可选的方案,Glance可以将镜像存放在Swift中;Cinder也可以将Volume备份到Swift中 |
| 5 | Block Storage service | Cinder | 为VM提供块存储服务。Cinder提供的每一个 Volume在VM看来就是一块虚拟硬盘,一般用作数据盘 |
| 6 | Identity service | Keystone | 为Openstack的各种服务提供认证和权限管理服务。简单的说,Openstack上的每一个操作都必须通过Keystone的审核 |
| 7 | Image service | Glance | 管理VM的启动镜像,Nova创建VM时将使用Glance提供的镜像 |
| 8 | Telemetry service | Ceilometer | 提供Openstack监控和计量服务,为报警、统计或计费提供数据 |
| 9 | Orchestration service | Heat | 自动化部署的组件 |
| 10 | Database service | Trove | 提供数据库应用服务 |
-
三、Openstack的安装
1、环境规划
| 序号 | 主机名 | IP地址 | 描述 | 系统版本 |
|---|---|---|---|---|
| 1 | linux-node1 | eth0:192.168.56.11 | 控制节点 | CentOS Linux release 7.2 |
| 2 | linux-node2 | eth0:192.168.56.12 | 计算节点 | CentOS Linux release 7.2 |
2、系统优化
- 关闭selinux和iptables
[root@linux-node1 ~]# setenforce 0
[root@linux-node1 ~]# getenforce
Disabled
[root@linux-node1 ~]# sed -i 's#SELINUX=enforcing#SELINUX=disabled#g' /etc/sysconfig/selinux

[root@linux-node1 ~]# systemctl disable firewalld
[root@linux-node1 ~]# systemctl stop firewalld
- 同步网络时间服务器
[root@linux-node1 ~]# ntpdate 0.pool.ntp.org
10 Jan 12:38:28 ntpdate[2446]: adjust time server 120.25.115.20 offset 0.048309 sec
[root@linux-node1 ~]# hwclock
Wed 10 Jan 2018 08:31:31 PM CST  -0.944430 seconds
[root@linux-node1 ~]# crontab -e
####Synchronization Network Time Server####
*/5 * * * * /usr/sbin/ntpdate 0.pool.ntp.org &>/dev/null
[root@linux-node1 ~]# crontab -l
####Synchronization Network Time Server####
*/5 * * * * /usr/sbin/ntpdate 0.pool.ntp.org &>/dev/null
3、基础服务安装
- 添加Openstack仓库,安装Newton版
[root@linux-node1 ~]# yum -y install centos-release-openstack-newton
[root@linux-node1 ~]# rpm -qa centos-release-openstack-newton
centos-release-openstack-newton-1-2.el7.noarch
- 安装Openstack客户端
[root@linux-node1 ~]# yum -y install python-openstackclient openstack-selinux
[root@linux-node1 ~]# rpm -qa python-openstackclient openstack-selinux
python-openstackclient-3.2.1-1.el7.noarch
openstack-selinux-0.8.11-1.el7.noarch
4、基础服务MySQL
大多数Openstack服务使用SQL数据库来存储信息(生产环境建议做集群)。 典型地,数据库运行在控制节点上。当然了Openstack服务也支持其他SQL数据库,包括PostgreSQL。
tips:除了Horizon,OpenStack其他组件都需要连接数据库
除了Horizon和Keystone,其他组件都需要连接RabbitMQ
- 安装MariaDB数据库
[root@linux-node1 ~]# yum -y install mariadb mariadb-server python2-PyMySQL
[root@linux-node1 ~]# rpm -qa mariadb mariadb-server python2-PyMySQL
python2-PyMySQL-0.7.9-2.el7.noarch
mariadb-10.1.20-1.el7.x86_64
mariadb-server-10.1.20-1.el7.x86_64
- 创建并编辑/etc/my.cnf.d/openstack.cnf,添加如下内容
[root@linux-node1 ~]# vim /etc/my.cnf.d/openstack.cnf
[mysqld]
bind-address = 192.168.56.11  #绑定ip地址

default-storage-engine = innodb   #默认存储引擎
innodb_file_per_table    #使用独立表空间
max_connections = 4096   #最大连接数
collation-server = utf8_general_ci
character-set-server = utf8  #字符集设置
- 启动mariadb,并配置为开机自启
[root@linux-node1 ~]# systemctl enable mariadb.service
[root@linux-node1 ~]# systemctl start mariadb.service
[root@linux-node1 ~]# systemctl status mariadb.service
- 为了保证数据库服务的安全性,运行mysql_secure_installation脚本
[root@linux-node1 ~]# mysql_secure_installation

NOTE: RUNNING ALL PARTS OF THIS SCRIPT IS RECOMMENDED FOR ALL MariaDB
      SERVERS IN PRODUCTION USE!  PLEASE READ EACH STEP CAREFULLY!

In order to log into MariaDB to secure it, we'll need the current
password for the root user.  If you've just installed MariaDB, and
you haven't set the root password yet, the password will be blank,
so you should just press enter here.

Enter current password for root (enter for none):
OK, successfully used password, moving on...

Setting the root password ensures that nobody can log into the MariaDB
root user without the proper authorisation.

Set root password? [Y/n] Y
New password: 123456
Re-enter new password: 123456
Password updated successfully!
Reloading privilege tables..
 ... Success!
5、基础服务RabbitMQ
Openstack使用message queue协调操作和各服务的状态信息(生产环境建议做集群)。消息队列服务一般运行在控制节点上。Openstack支持好几种消息队列服务包括RabbitMQ,Qpid, 和ZeroMQ。不过,大多数发行版本的Openstack包支持特定的消息队列服务。这里安装RabbitMQ消息队列服务,因为大部分发行版本都支持它。如果你想安装不同的消息队列服务,查询与之相关的文档。
- 安装RabbitMQ消息队列
[root@linux-node1 ~]# yum -y install rabbitmq-server
[root@linux-node1 ~]# rpm -qa rabbitmq-server
rabbitmq-server-3.6.5-1.el7.noarch
- 启动rabbitmq,并配置为开机自启
[root@linux-node1 ~]# systemctl enable rabbitmq-server.service
[root@linux-node1 ~]# systemctl start rabbitmq-server.service
[root@linux-node1 ~]# systemctl status rabbitmq-server.service
- 查看端口状态,默认监听在5672端口
[root@linux-node1 ~]# lsof -i:5672
COMMAND  PID     USER   FD   TYPE DEVICE SIZE/OFF NODE NAME
beam    4570 rabbitmq   48u  IPv6  29455      0t0  TCP *:amqp (LISTEN
- 添加openstack用户
[root@linux-node1 ~]# rabbitmqctl add_user openstack openstack
Creating user "openstack" ...
- 配置openstack用户写和读权限
[root@linux-node1 ~]# rabbitmqctl set_permissions openstack ".*" ".*" ".*"
Setting permissions for user "openstack" in vhost "/" ...
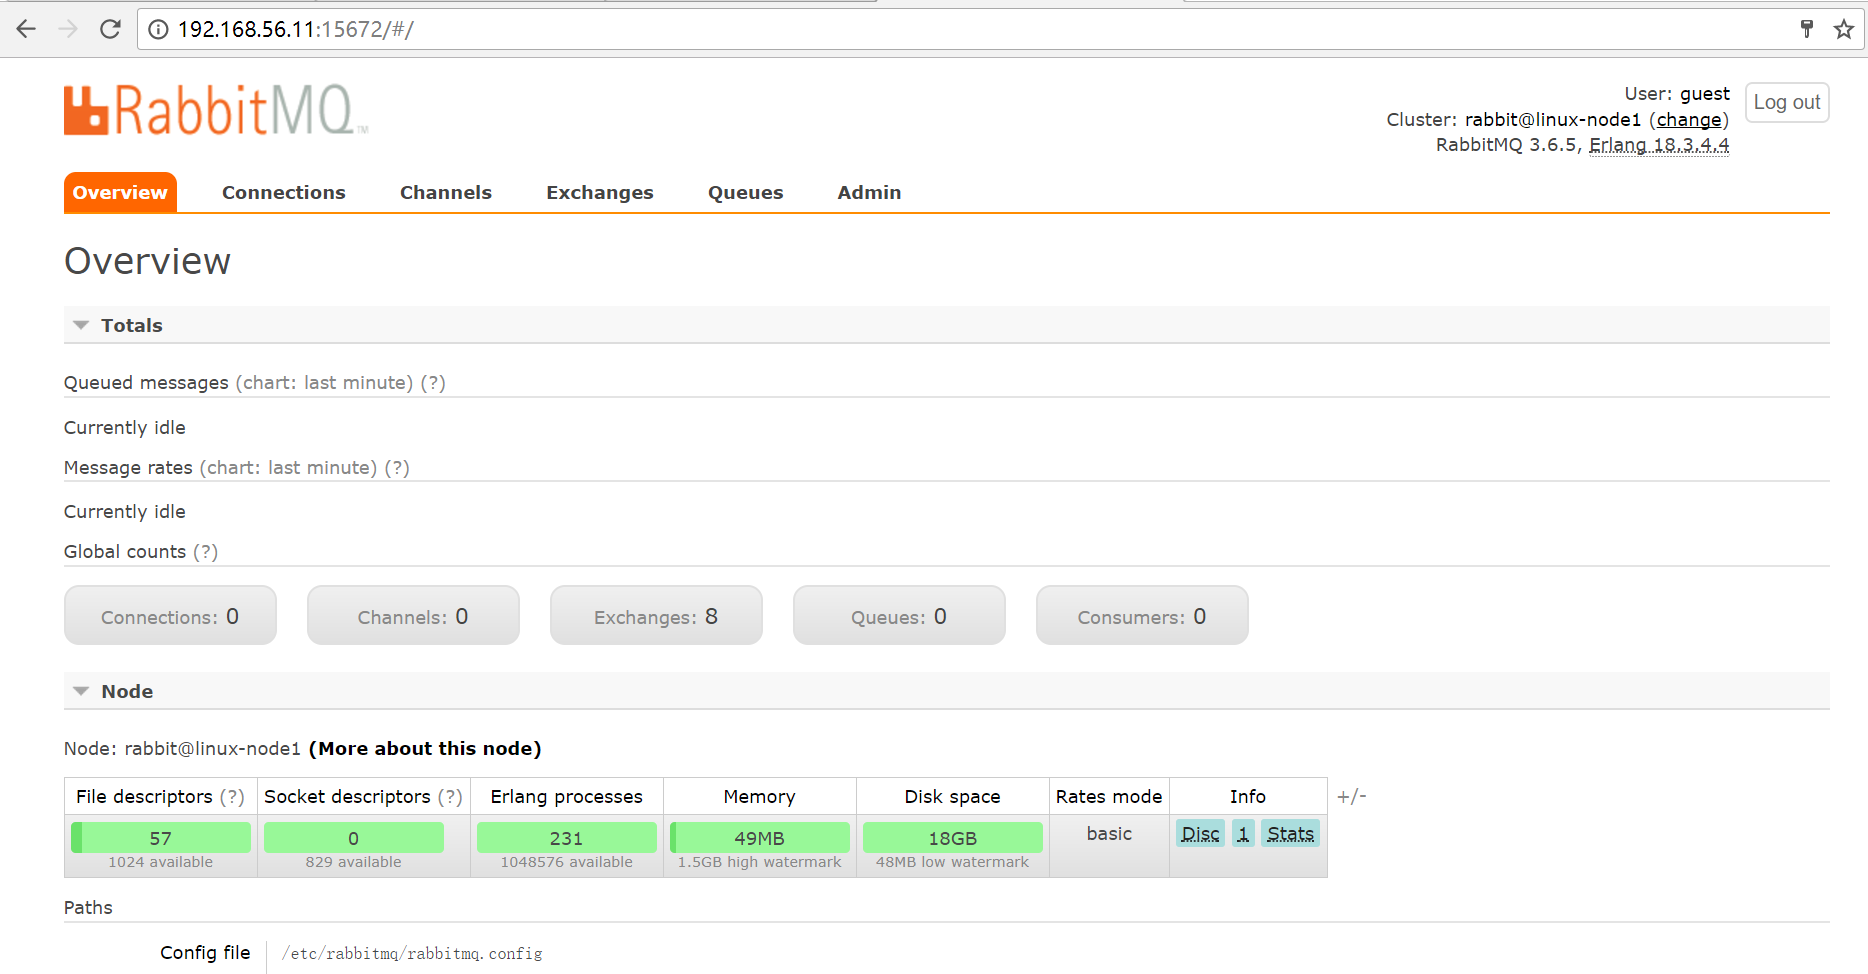
- 启动Web管理插件,默认监听在15672端口
[root@linux-node1 ~]# rabbitmq-plugins list
 Configured: E = explicitly enabled; e = implicitly enabled
 | Status:   * = running on rabbit@linux-node1
 |/
[  ] amqp_client                       3.6.5
[  ] cowboy                            1.0.3
[  ] cowlib                            1.0.1
[  ] mochiweb                          2.13.1
[  ] rabbitmq_amqp1_0                  3.6.5
[  ] rabbitmq_auth_backend_ldap        3.6.5
[  ] rabbitmq_auth_mechanism_ssl       3.6.5
[  ] rabbitmq_consistent_hash_exchange 3.6.5
[  ] rabbitmq_event_exchange           3.6.5
[  ] rabbitmq_federation               3.6.5
[  ] rabbitmq_federation_management    3.6.5
[  ] rabbitmq_jms_topic_exchange       3.6.5
[  ] rabbitmq_management               3.6.5
[  ] rabbitmq_management_agent         3.6.5
[  ] rabbitmq_management_visualiser    3.6.5
[  ] rabbitmq_mqtt                     3.6.5
[  ] rabbitmq_recent_history_exchange  1.2.1
[  ] rabbitmq_sharding                 0.1.0
[  ] rabbitmq_shovel                   3.6.5
[  ] rabbitmq_shovel_management        3.6.5
[  ] rabbitmq_stomp                    3.6.5
[  ] rabbitmq_top                      3.6.5
[  ] rabbitmq_tracing                  3.6.5
[  ] rabbitmq_trust_store              3.6.5
[  ] rabbitmq_web_dispatch             3.6.5
[  ] rabbitmq_web_stomp                3.6.5
[  ] rabbitmq_web_stomp_examples       3.6.5
[  ] sockjs                            0.3.4
[  ] webmachine                        1.10.3
[root@linux-node1 ~]# rabbitmq-plugins enable rabbitmq_management
The following plugins have been enabled:
  mochiweb
  webmachine
  rabbitmq_web_dispatch
  amqp_client
  rabbitmq_management_agent
  rabbitmq_management

Applying plugin configuration to rabbit@linux-node1... started 6 plugins.
[root@linux-node1 ~]# lsof -i:15672
COMMAND  PID     USER   FD   TYPE DEVICE SIZE/OFF NODE NAME
beam    4570 rabbitmq   50u  IPv4  31327      0t0  TCP *:15672 (LISTEN)
- 浏览器访问192.168.56.11:15672,默认账号
guest,密码:guest

6、基础服务Memcached
各类服务的身份认证机制使用Memcached缓存令牌。缓存服务Memecached通常运行在控制节点。在生产部署中,我们推荐联合启用防火墙、认证和加密保证它的安全。
- 安装Memcached缓存
[root@linux-node1 ~]# yum -y install memcached python-memcached
[root@linux-node1 ~]# rpm -qa memcached python-memcached
memcached-1.4.39-1.el7.x86_64
python-memcached-1.54-3.el7.noarch
- 编辑/etc/sysconfig/memcached文件,更改监听地址
[root@linux-node1 ~]# vim /etc/sysconfig/memcached
PORT="11211"
USER="memcached"
MAXCONN="1024"
CACHESIZE="64"
OPTIONS="-l 192.168.56.11,::1"
- 编辑/etc/memcached.conf文件并配置这个服务使用控制节点的管理地址。这是为了让其它节点可以通过管理网络进行访问。
[root@linux-node1 ~]# vim /etc/memcached.conf
192.168.56.11
- 启动memcached,并配置为开机自启
[root@linux-node1 ~]# systemctl enable memcached.service
[root@linux-node1 ~]# systemctl start memcached.service
[root@linux-node1 ~]# systemctl status memcached.service
7、linux-node1节点安装各项服务
①认证服务keystone,wsgi是用于apache与pythone进行通信的模块
[root@linux-node1 ~]# yum install -y openstack-keystone httpd mod_wsgi
②镜像服务glance
[root@linux-node1 ~]# yum install -y openstack-glance
③计算服务nova
[root@linux-node1 ~]# yum install -y openstack-nova-api openstack-nova-conductor
    openstack-nova-console openstack-nova-novncproxy
    openstack-nova-scheduler
④网络服务neutron
[root@linux-node1 ~]# yum install -y openstack-neutron openstack-neutron-ml2
    openstack-neutron-linuxbridge ebtables