首先必须完成必要的软件安装,memcached是php连接memcached服务器的php扩展
以前有个叫memcache也是php连接memcached服务器的扩展
php的memcache和memcached扩展都是作为客户端去连接memcached服务器
但memcached作为客户端比memcache性能更好功能更强大,而且memcache已经停止更新了,因此现在使用扩展的话就用
memcached
接下来安装必要组件:wget https://launchpad.net/libmemcached/1.0/1.0.18/+download/libmemcached-1.0.18.tar.gz
mkdir /usr/local/libmemcached
tar xf libmemcached-1.0.18.tar.gz cd libmemcached-1.0.18
./configure --prefix=/usr/local/libmemcached --with-memcached
make && make install
如果报错:./libtool: line 1125: g++: command not found
解决方法:yum -y install gcc-c++
wget http://pecl.php.net/get/memcached-2.2.0.tgz
tar xf memcached-2.2.0.tgz cd memcached-2.2.0
/usr/local/php/bin/phpize (生成configure文件) 如果你是yum安装的php,phpize程序在php-devel开发包中,yum -y
install php-devel
./configure --with-php-config=/usr/local/php/bin/php-config --with-libmemcached-dir=/usr/local/libmemcached --
enable-memcached
如果yum安装的php报错:checking for zlib location... configure: error: memcached support requires ZLIB.
解决方法:yum -y install zlib-devel
继续报错:configure: error: no, sasl.h is not available. Run configure with --disable-memcached-sasl to disable this
check
解决方法:在配置选项中加入--disable-memcached-sasl这功能比较诡异而且没用,禁用它
make && make install
echo "extension=memcached.so" >> /etc/php.ini
service php-fpm restart

php支持使用memcached到这里就完成了
简单说下memcached服务端
安装 yum -y install memcached service memcached start
memcached的默认参数放在/etc/sysconfig/memcached文件中
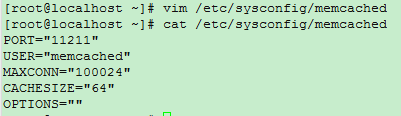
memcached每次启动都会读取此文件
可以用telnet命令登陆memcached 例如:yum -y install telnet telnet 127.0.0.1 11211
登陆后查看memcached的状态信息使用命令stats

上面这个php脚本是连接到memcached,并设置int的值为99
/usr/local/php/bin/php /usr/local/nginx/html/test.php (执行上面的php脚本)
查看:

连接memcached成功