一、Hystrix介绍
1)Hystrix是用于处理延迟和容错的开源库
2)Hystrix主要用于避免级联故障,提高系统弹性。
3)Hystrix解决了由于扇出导致的“雪崩效应”。 2)和3) 是一件事情。
4) Hystrix的核心是“隔离术”和“熔断机制”
二、Hystrix主要作用
1) 服务隔离和服务熔断。
服务隔离:每次请求过来的时候,找个单独的空间去执行,这样你出了问题,就不会影像其它的业务。
服务熔断:发现某个服务不可用,服务熔断,触发降级。
2)服务降级、限流和快速失败。降级和快速失败一般一起去说,服务降级的目标就是快速失败。
3)请求合并和请求缓存
4)自带单体和集群监控
三、Hytrix架构图和处理流程图思维导图
1、Hytrix架构图
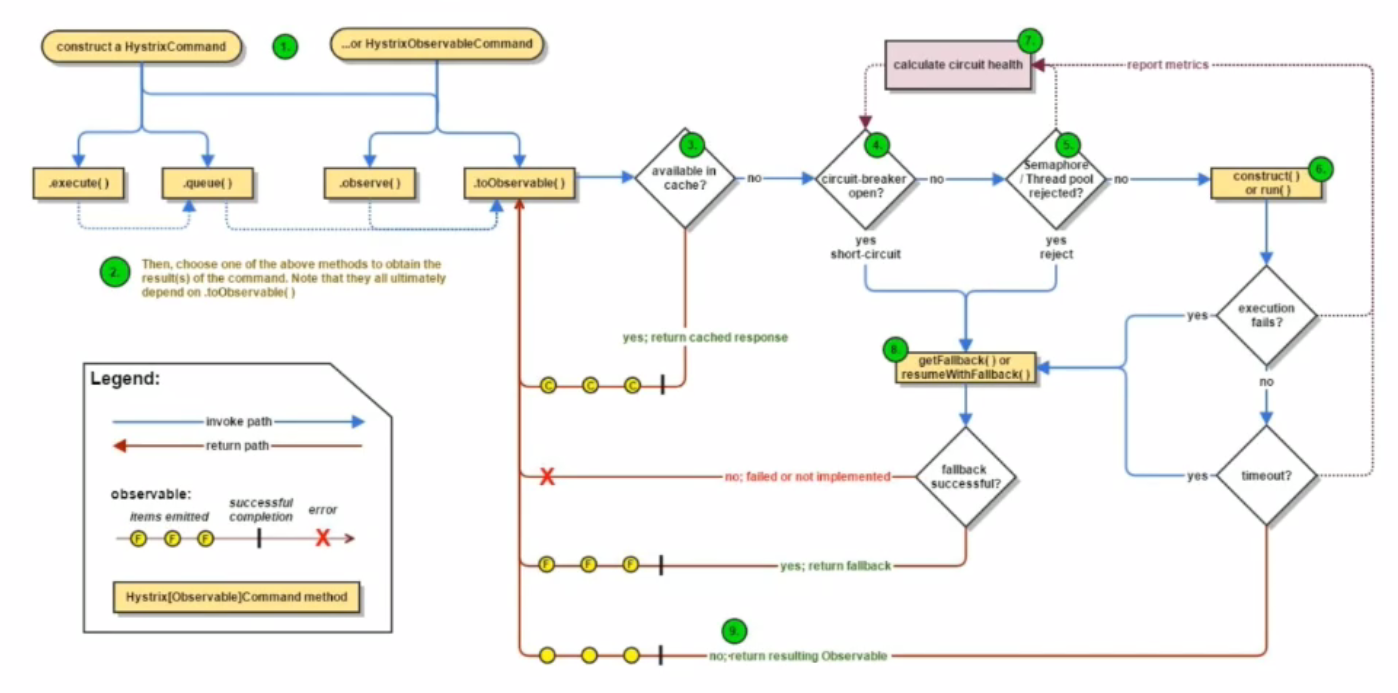
Hystrix整个工作流如下:
- 构造一个 HystrixCommand或HystrixObservableCommand对象,用于封装请求,并在构造方法配置请求被执行需要的参数;
- 执行命令,Hystrix提供了4种执行命令的方法,后面详述;
- 判断是否使用缓存响应请求,若启用了缓存,且缓存可用,直接使用缓存响应请求。Hystrix支持请求缓存,但需要用户自定义启动;
- 判断熔断器是否打开,如果打开,跳到第8步;
- 判断线程池/队列/信号量是否已满,已满则跳到第8步;
- 执行HystrixObservableCommand.construct()或HystrixCommand.run(),如果执行失败或者超时,跳到第8步;否则,跳到第9步;
- 统计熔断器监控指标;
- 走Fallback备用逻辑
- 返回请求响应
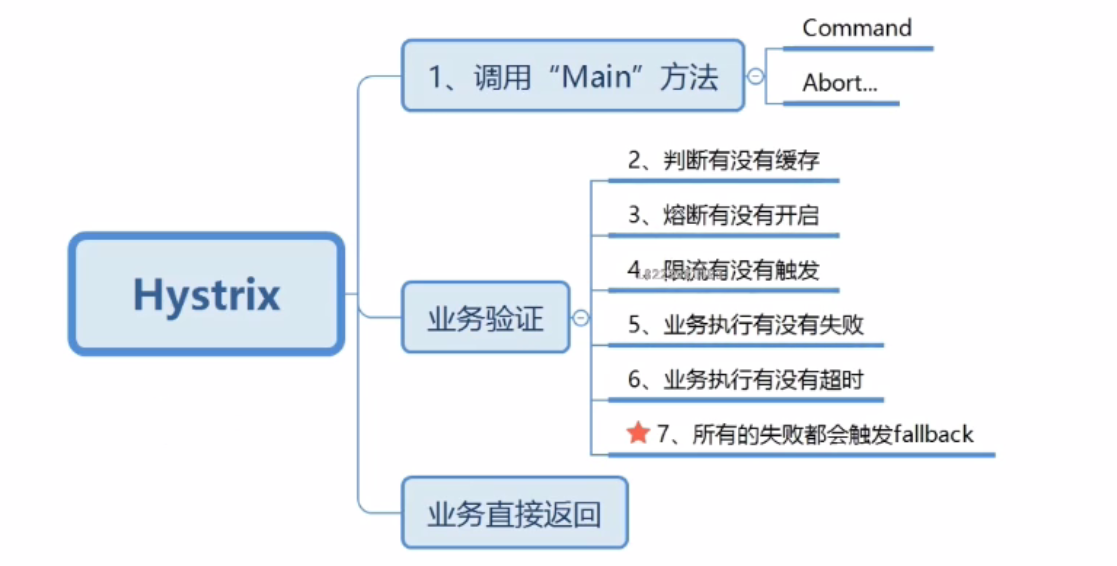
2、Hystrix思维导图
四、Hystrix两种命令模式
HystrixCommand和HystrixObservableCommand
Command会以隔离的形式完成run方法调用
ObservableCommand使用当前线程进行调用
1、command构建
1)工程中引入Hystrix依赖、
<dependency>
           <groupId>com.netflix.hystrix</groupId>
           <artifactId>hystrix-core</artifactId>
           <version>1.5.18</version>
       </dependency>
2)command构建
|
1
2
3
4
5
6
7
8
9
10
11
12
13
14
15
16
17
18
19
20
21
22
23
24
25
26
|
public class CommandDemo extends HystrixCommand<String> { private String name; public String getName() { return name; } public void setName(String name) { this.name = name; } public CommandDemo(String name) { super(Setter.withGroupKey(HystrixCommandGroupKey.Factory.asKey("CommandHelloWorld"))); this.name = name; } //单次请求调用 @Override protected String run() throws Exception { String result = "CommandHelloWorld name: " + name; System.out.println(result + ", currentThread name: " + Thread.currentThread().getName()); return result; }} |
3)测试
|
1
2
3
4
5
6
7
8
9
10
|
public class CommandTest { @Test public void executeTest(){ CommandDemo commandDemo = new CommandDemo("execute"); //同步执行Command String result = commandDemo.execute(); System.out.println("result=" + result); }} |
4) 运行结果

运行的线程hystrix-CommandHelloWorld-1,不是main线程。
5)queue测试方法
|
1
2
3
4
5
6
7
8
9
10
11
12
13
|
@Test public void queueTest() throws Exception{ long beginTime = System.currentTimeMillis(); CommandDemo commandDemo = new CommandDemo("queue"); //同步执行Command Future<String> queue = commandDemo.queue(); long endTime = System.currentTimeMillis(); System.out.println("future end,花费时间=" + (endTime - beginTime)); long endTime2 = System.currentTimeMillis(); System.out.println("result=" + queue.get() + ",花费时间=" + (endTime2 - beginTime)); } |
显示结果

6)observe测试方法
|
1
2
3
4
5
6
7
8
9
10
11
12
|
@Testpublic void observeTest(){ long beginTime = System.currentTimeMillis(); CommandDemo commandDemo = new CommandDemo("observe"); //阻塞式调用 Observable<String> observe = commandDemo.observe(); String result = observe.toBlocking().single(); long endTime = System.currentTimeMillis(); System.out.println("result=" + result + ",花费时间=" + (endTime - beginTime));} |
显示结果

7)非阻塞obsere
|
1
2
3
4
5
6
7
8
9
10
11
12
13
14
15
16
17
18
19
20
21
22
23
24
25
26
27
28
29
30
31
|
@Test public void observeTest2(){ long beginTime = System.currentTimeMillis(); CommandDemo commandDemo = new CommandDemo("observe"); Observable<String> observe = commandDemo.observe(); //阻塞式调用 String result = observe.toBlocking().single(); long endTime = System.currentTimeMillis(); System.out.println("result=" + result + ",花费时间=" + (endTime - beginTime)); //非阻塞式调用 observe.subscribe(new Subscriber<String>() { @Override public void onCompleted() { System.out.println("observe onCompleted"); } @Override public void onError(Throwable throwable) { System.out.println("observe onError throwable=" + throwable); } @Override public void onNext(String s) { long endTime = System.currentTimeMillis(); System.out.println("observe, onNext=" + s + ",花费时间=" + (endTime - beginTime)); } }); } |
显示结果

8)toObserve
|
1
2
3
4
5
6
7
8
9
10
11
12
13
14
15
16
17
18
19
20
21
22
23
24
25
26
27
28
29
30
31
32
33
34
|
@Test public void toObserveTest() throws InterruptedException { long beginTime = System.currentTimeMillis(); CommandDemo commandDemo = new CommandDemo("toObserve"); Observable<String> toObservable = commandDemo.toObservable(); //阻塞式调用 String result = toObservable.toBlocking().single(); long endTime = System.currentTimeMillis(); System.out.println("result=" + result + ",花费时间=" + (endTime - beginTime)); //非阻塞式调用 CommandDemo commandDemo2 = new CommandDemo("toObserve2"); Observable<String> toObservable2 = commandDemo2.toObservable(); toObservable2.subscribe(new Subscriber<String>() { @Override public void onCompleted() { System.out.println("toObservable2 onCompleted"); } @Override public void onError(Throwable throwable) { System.out.println("toObservable2 onError throwable=" + throwable); } @Override public void onNext(String s) { long endTime = System.currentTimeMillis(); System.out.println("toObservable2, onNext=" + s + ",花费时间=" + (endTime - beginTime)); } }); Thread.sleep(2000); } |
显示结果:

2、HystrixObservableCommand
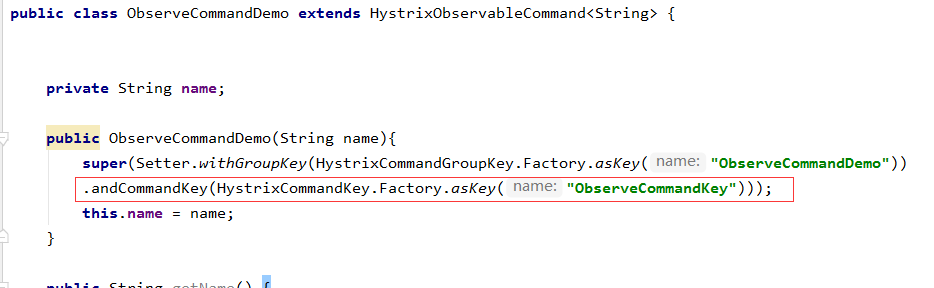
1)创建ObserveCommandDemo ,继承HystrixObservableCommand
|
1
2
3
4
5
6
7
8
9
10
11
12
13
14
15
16
17
18
19
20
21
22
23
24
25
26
27
28
29
30
31
32
33
34
35
36
|
public class ObserveCommandDemo extends HystrixObservableCommand<String> { private String name; public ObserveCommandDemo(String name){ super(Setter.withGroupKey(HystrixCommandGroupKey.Factory.asKey("ObserveCommandDemo"))); this.name = name; } public String getName() { return name; } public void setName(String name) { this.name = name; } @Override protected Observable<String> construct() { System.out.println("current Thrad:" + Thread.currentThread().getName()); return Observable.create(new Observable.OnSubscribe<String>(){ @Override public void call(Subscriber<? super String> subscriber) { //业务处理 subscriber.onNext("action 1, name=" + name); subscriber.onNext("action 2, name=" + name); subscriber.onNext("action 3, name=" + name); //业务处理结束 subscriber.onCompleted(); } }).subscribeOn(Schedulers.io()); }} |
2) 创建测试类
|
1
2
3
4
5
6
7
8
9
10
11
12
13
14
15
16
17
18
19
20
21
22
23
24
25
26
27
28
29
30
31
32
33
34
|
public class ObserveCommandTest { @Test public void observeTest2() throws InterruptedException { long beginTime = System.currentTimeMillis(); ObserveCommandDemo commandDemo = new ObserveCommandDemo("ObserveCommandTest-observe"); Observable<String> observe = commandDemo.observe(); observe.subscribe(new Subscriber<String>() { @Override public void onCompleted() { System.out.println("ObserveCommandTest observe onCompleted"); } @Override public void onError(Throwable throwable) { System.out.println("ObserveCommandTest observe onError throwable=" + throwable); } @Override public void onNext(String s) { long endTime = System.currentTimeMillis(); System.out.println("ObserveCommandTest observe, onNext=" + s + ",花费时间=" + (endTime - beginTime)); } }); Thread.sleep(2000l); }} |
3) 显示结果。运行的线程是main线程

五、HystrixCommand和HystrixObservableCommand的区别
HystrixCommand会以隔离的形式完成run方法
HystrixObservableCommand使用当前线程进行调用
六、GroupKey和CommandKey
Hystrix中GroupKey是唯一必填项
GroupKey可以作为分组监控和报警的作用
GroupKey将作为线程池的默认名称
CommandKey非必填项,对功能没有影响,类似于取了一个小名
七、请求缓存
Hystrix支持将请求结果进行本地缓存
通过实行getCacheKey方法来判断是否取出缓存
请求缓存要求请求必须在同一个上下文
可以通过RequestCacheEnabled开启请求缓存
1、重写getCacheKey方法,根据名字进行缓存。

2、增加测试方法
|
1
2
3
4
5
6
7
8
9
10
11
12
13
14
15
16
17
18
19
20
21
22
23
24
25
26
27
|
//演示请求缓存 @Test public void requestCache(){ //开启请求上下文 HystrixRequestContext requestContext = HystrixRequestContext.initializeContext(); long beginTime = System.currentTimeMillis(); CommandDemo c1 = new CommandDemo("c1"); CommandDemo c2 = new CommandDemo("c2"); CommandDemo c3 = new CommandDemo("c1"); // 第一次请求 String r1 = c1.execute(); long endTime = System.currentTimeMillis(); System.out.println("result=" + r1 + ",花费时间=" + (endTime - beginTime)); // 第二次请求 String r2 = c2.execute(); endTime = System.currentTimeMillis(); System.out.println("result=" + r2 + ",花费时间=" + (endTime - beginTime)); // 第三次请求 String r3 = c3.execute(); endTime = System.currentTimeMillis(); System.out.println("result=" + r3 + ",花费时间=" + (endTime - beginTime)); // 请求上下文关闭 requestContext.close(); } |
第一次请求和第三次请求,name都是c1
3、显示结果

第三次请求和第二次请求相差8毫秒,说明第三次请求命中缓存。
4、关闭缓存,配置如下

八、请求合并
Hystrix支持将多个请求合并成一次请求
Hystrix请求合并要求两次请求必须足够“近”(500毫秒)
请求合并分为局部合并和全局合并两种
Collapser可以设置相关参数
1、创建请求合并对象
|
1
2
3
4
5
6
7
8
9
10
11
12
13
14
15
16
17
18
19
20
21
22
23
24
25
26
27
28
29
30
31
32
33
34
35
36
37
38
39
40
41
42
43
44
45
46
47
48
49
50
51
52
53
54
55
56
57
58
59
60
|
//请求合并处理对象public class CommandCollasper extends HystrixCollapser<List<String>,String,Integer> { private Integer id; public CommandCollasper(Integer id){ super(Setter.withCollapserKey(HystrixCollapserKey.Factory.asKey("CommandCollapser"))); this.id = id; } //获取请求参数 @Override public Integer getRequestArgument() { return id; } //批量业务处理 @Override protected HystrixCommand<List<String>> createCommand(Collection<CollapsedRequest<String, Integer>> collection) { return new BatchCommand(collection); } //批量处理结果与请求业务之间映射关系处理 @Override protected void mapResponseToRequests(List<String> strings, Collection<CollapsedRequest<String, Integer>> collection) { int counts = 0; Iterator<HystrixCollapser.CollapsedRequest<String, Integer>> iterator = collection.iterator(); while (iterator.hasNext()){ HystrixCollapser.CollapsedRequest<String, Integer> response = iterator.next(); String result = strings.get(counts++); response.setResponse(result); } }}class BatchCommand extends HystrixCommand<List<String>>{ private Collection<HystrixCollapser.CollapsedRequest<String, Integer>> collection; public BatchCommand(Collection<HystrixCollapser.CollapsedRequest<String, Integer>> collection) { super(Setter.withGroupKey(HystrixCommandGroupKey.Factory.asKey("BatchCommand"))); this.collection = collection; } @Override protected List<String> run() throws Exception { System.err.println("currentThread:" +Thread.currentThread().getName()); List<String> result = Lists.newArrayList(); Iterator<HystrixCollapser.CollapsedRequest<String, Integer>> iterator = collection.iterator(); while (iterator.hasNext()){ HystrixCollapser.CollapsedRequest<String, Integer> request = iterator.next(); Integer reqParam = request.getArgument(); //具体业务逻辑 result.add("example req:" + reqParam); } return result; }} |
2、创建测试方法
|
1
2
3
4
5
6
7
8
9
10
11
12
13
14
15
16
17
18
19
20
21
22
23
24
25
26
27
28
29
30
31
32
33
34
|
//请求合并测试public class CollapserUnit { @Test public void collapserTest() throws ExecutionException, InterruptedException { HystrixRequestContext context = HystrixRequestContext.initializeContext(); //构建请求 CommandCollasper c1 = new CommandCollasper(1); CommandCollasper c2 = new CommandCollasper(2); CommandCollasper c3 = new CommandCollasper(3); CommandCollasper c4 = new CommandCollasper(4); //获取结果 Future<String> q1 = c1.queue(); ///Thread.sleep(500); Future<String> q2 = c2.queue(); //Thread.sleep(500); Future<String> q3 = c3.queue(); //Thread.sleep(500); Future<String> q4 = c4.queue(); String r1 = q1.get(); String r2 = q2.get(); String r3 = q3.get(); String r4 = q4.get(); //打印 System.out.println(r1 + "," + r2 + ", " + r3+ ", " + r4 ); context.close(); }} |
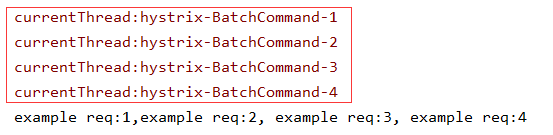
3、显示结果。
4次请求,用了两个线程

4、如果我们把请求事件间隔增加到500毫秒
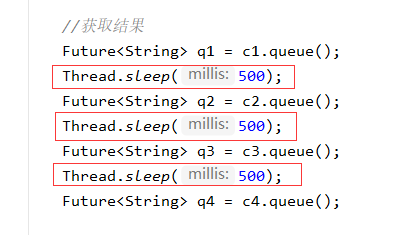
显示结果将有如下4个线程
5、请求合并作用
主要优化点,多个服务调用的多次Http请求合并
缺点: 很少有机会对同一个服务进行多次Http调用,同时还要足够的"近"
九、Hystrix隔离术
1、Hystrix隔离之ThreadPoolKey
Hystrix可以不填写ThreadPoolKe
默认Hystrix会使用GroupKey命名线程池
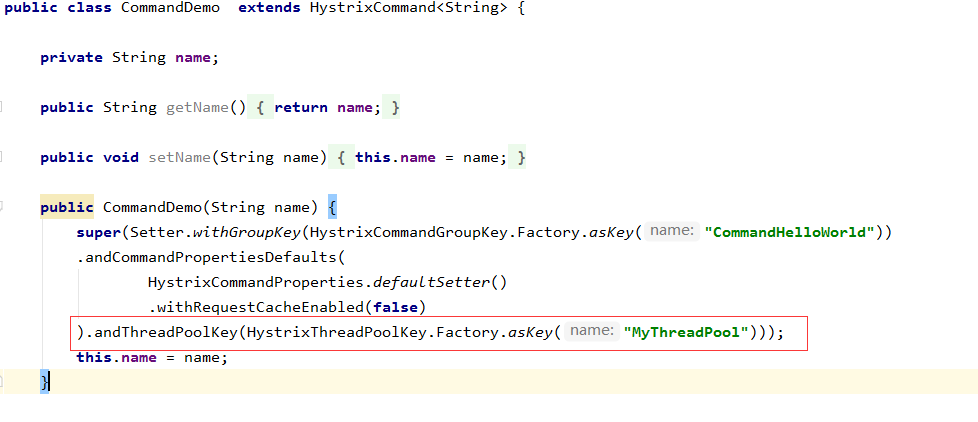
在Seting中加入andThradPoolKey进行命名
命名demo如下
2、Hystrix隔离介绍
Hystrix提供了信号量和线程两种隔离手段
线程隔离会在单独的线程中执行业务逻辑
信号量隔离在调用线程上执行
官方推荐优先线程隔离
1) 运行前面的executeTest测试方法
|
1
2
3
4
5
6
7
8
9
|
@Testpublic void executeTest(){ long beginTime = System.currentTimeMillis(); CommandDemo commandDemo = new CommandDemo("execute"); //同步执行Command String result = commandDemo.execute(); long endTime = System.currentTimeMillis(); System.out.println("result=" + result + ",花费时间=" + (endTime - beginTime));} |
返回的线程名为hystrix-MyThreadPool-1

2) 然后我们设置隔离模式为信号量隔离
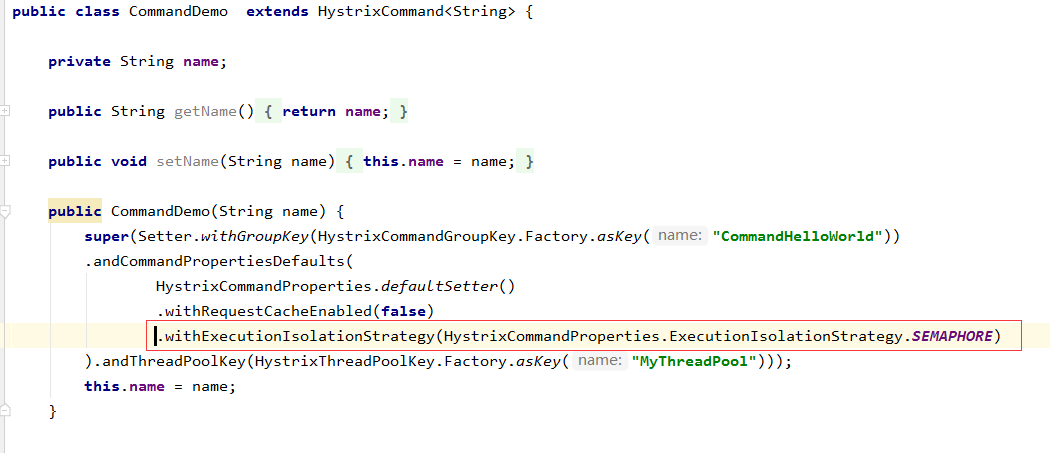
此时使用的是主线程main

3)线程隔离和信号量隔离的差异
线程隔离
应用自身完全受保护,不会受其他依赖影像
有效降低接入新服务的风险
依赖服务出现问题,应用自身可以快速反应问题
可以通过实时刷新动态属性减少依赖问题影像
信号量隔离
信号量隔离是轻量级的隔离术
无网络开销的情况下推荐使用信号量隔离
消耗量是通过计数器与请求线程比对进行限流的
十、Hystrix线程隔离参数
1、线程隔离参数设置
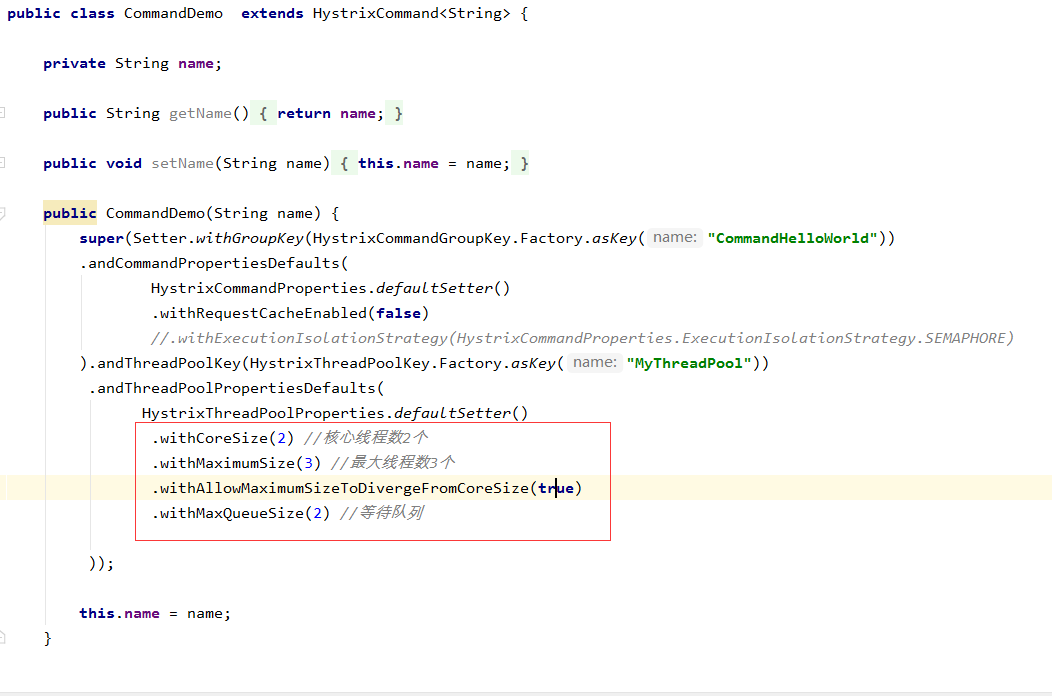
2、测试方法
    //线程池内容使用
    @Test
    public void threadTest() throws  Exception{

        CommandDemo c1 = new CommandDemo("c1");
        CommandDemo c2 = new CommandDemo("c2");
        CommandDemo c3 = new CommandDemo("c3");
        CommandDemo c4 = new CommandDemo("c4");
        CommandDemo c5 = new CommandDemo("c5");

        Future<String> q1 = c1.queue();
        Future<String> q2 = c2.queue();
        Future<String> q3 = c3.queue();
        Future<String> q4 = c4.queue();
        Future<String> q5 = c5.queue();

        String r1 = q1.get();
        String r2 = q2.get();
        String r3 = q3.get();
        String r4 = q4.get();
        String r5 = q5.get();


        System.out.println(r1 + "," + r2 + "," + r3  +"," + r4  + "," + r5);

    }
十一、Hystrix降级处理
Command降级需要实现fallback方法
ObservableCommand降级实现resumeWithFallback方法
1、降级触发原则
除HystrixBadRequestRxception以外的异常
运行超时或者熔断器处于开启状态
线程池或信号量已满
如下图所示的几种情况会触发降级

十二、Hystrix熔断机制
1、熔断器介绍: 熔断器是一种开关,用来控制流量是否执行了业务逻辑
2、熔断器核心指标
熔断器核心指标: 快照时间窗
熔断器核心指标:请求总数阈值
熔断器核心指标:错误百分比阈值(失败率)
3、熔断器状态
熔断器开启: 所有请求都会进入fallback方法
熔断器半开启: 间歇性让请求触发run方法
熔断器关闭: 正常处理业务
默认情况下熔断器开启5秒后进入半开启状态
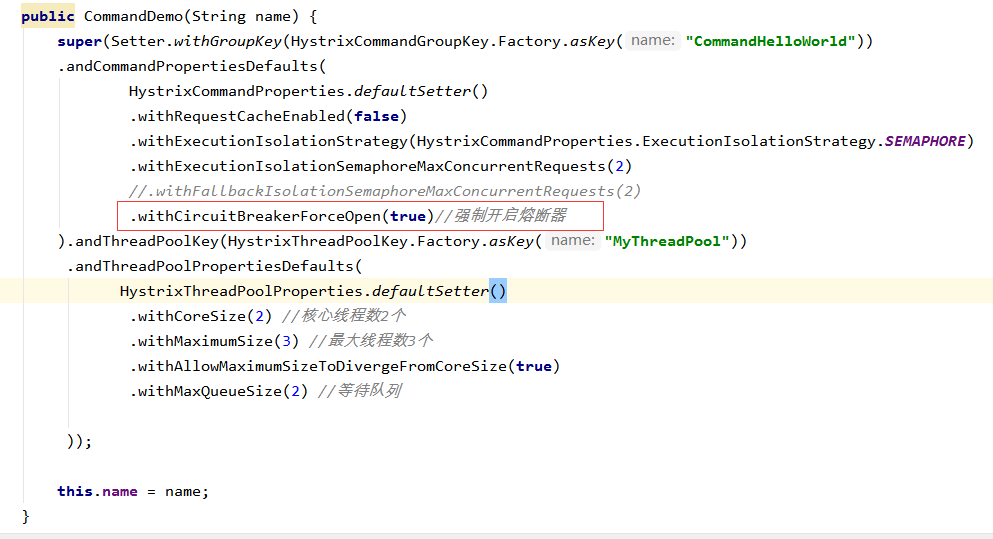
4、熔断器能强制开启和关闭
5、实践
1)强制开启熔断器
当name为larry时,run方法抛出异常
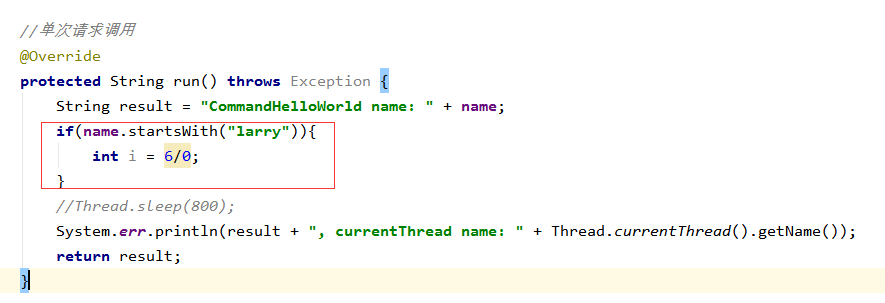
然后运行熔断器测试代码
    //熔断演示
    @Test
    public void CBTest(){

        //正确业务
        CommandDemo commandDemo = new CommandDemo("c1");
        String result  = commandDemo.execute();
        System.out.println("result=" + result );

        //错误业务
        CommandDemo c2 = new CommandDemo("larry");
        result  = c2.execute();
        System.out.println("result=" + result );

        //正确业务
        CommandDemo c3 = new CommandDemo("c3");
        result  = c3.execute();
        System.out.println("result=" + result );
    }
运行结果:三次都是失败

2)单位时间内超过阈值,触发熔断
配置如下:

然后测试方法如下

显示结果。当第二次name为larry时,抛出异常,触发熔断。然后第三也是失败

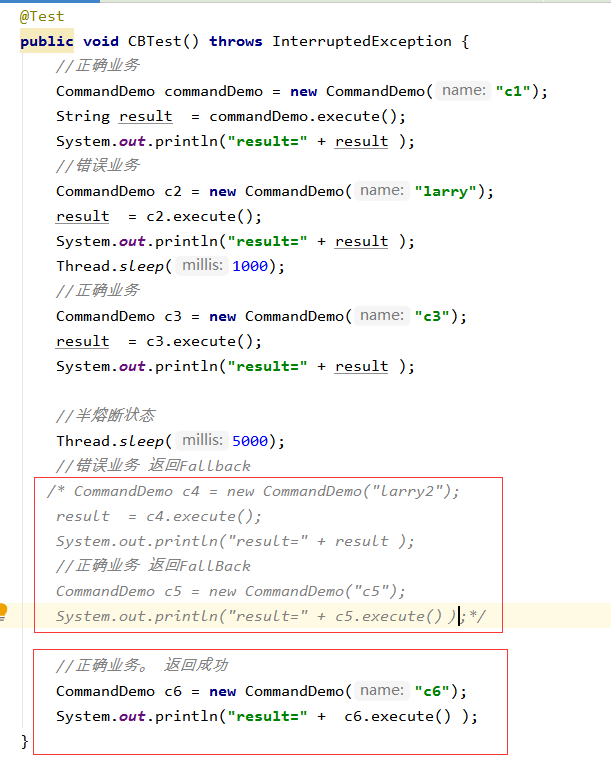
3)半熔断状态