环境:
centos7.3 + moosefs 3.0.97 + drbd84-utils-8.9.8-1 + keepalived-1.2.13-9
工作原理:
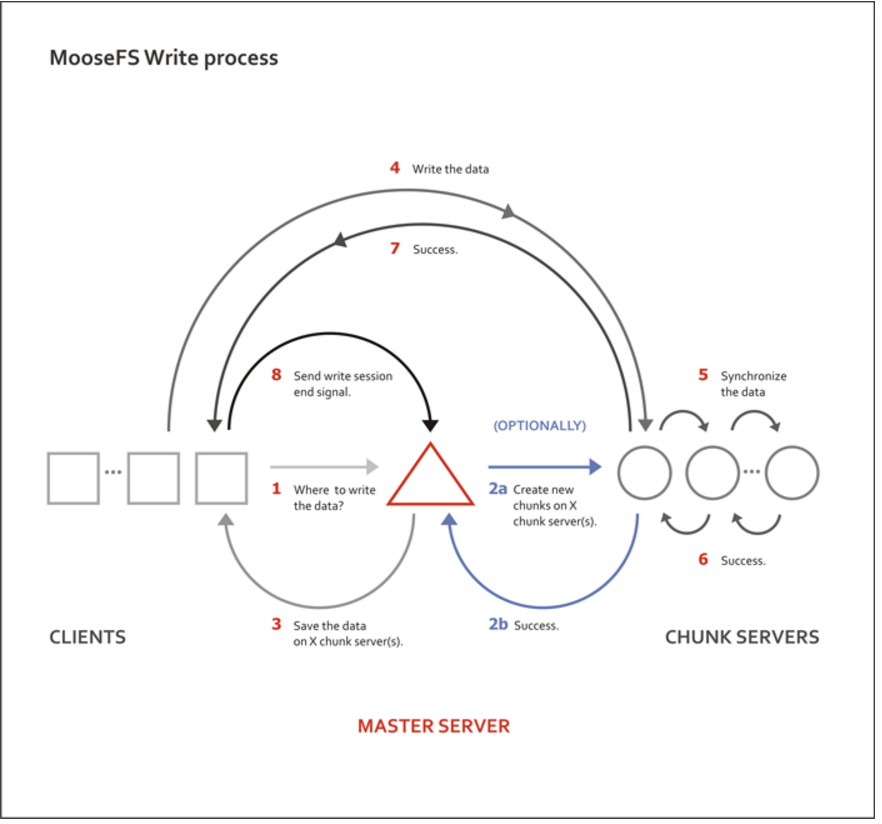

架构图:

节点信息:
节点名 MFS角色 主机名 IP
node1 master & metalogger node1 172.16.0.41
node2 master & metalogger node2 172.16.0.42
node3 chunk server node3 172.16.0.43
node4 chunk server node4 172.16.0.44
node5 chunk server node5 172.16.0.45
node6 client node5 172.16.0.11
node7 client node5 172.16.0.12
node8 client node5 172.16.0.13
vip mfsmaster 172.16.0.47
说明:
1) 在两台MFS Master机服务器安装DRBD做网络磁盘,网络磁盘上存放mfs master的meta文件。
2)在两台机器上都安装keepalived,两台服务器上有一个VIP漂移。keepalived通过检测脚本来检测服务器状态,当一台有问题时,VIP自动切换到另一台上。
3)client、chunk server、 metalogger都是连接的VIP,所以当其中一台服务器挂掉后,并不影响服务。
node1 node2绑定hosts
cat /etc/hosts
172.16.0.41    node1
172.16.0.42    node2
172.16.0.43    node3
172.16.0.44    node4
172.16.0.45    node5
172.16.0.11    node6
172.16.0.12    node7
172.16.0.13    node8
172.16.0.47    mfsmaster
node3 - node8上绑定hosts, cat /etc/hosts
172.16.0.47 mfsmaster
安装MFS yum库(所有节点)
Import the public key:
curl "http://ppa.moosefs.com/RPM-GPG-KEY-MooseFS" > /etc/pki/rpm-gpg/RPM-GPG-KEY-MooseFS


To install ELRepo for RHEL-7, SL-7 or CentOS-7:
curl "http://ppa.moosefs.com/MooseFS-3-el7.repo" > /etc/yum.repos.d/MooseFS.repo


To install ELRepo for RHEL-6, SL-6 or CentOS-6:
curl "http://ppa.moosefs.com/MooseFS-3-el6.repo" > /etc/yum.repos.d/MooseFS.repo
安装elreo库(node1 node2)
Get started

Import the public key:
rpm --import https://www.elrepo.org/RPM-GPG-KEY-elrepo.org

Detailed info on the GPG key used by the ELRepo Project can be found on https://www.elrepo.org/tiki/key
If you have a system with Secure Boot enabled, please see the SecureBootKey page for more information.

To install ELRepo for RHEL-7, SL-7 or CentOS-7:
rpm -Uvh http://www.elrepo.org/elrepo-release-7.0-3.el7.elrepo.noarch.rpm


To make use of our mirror system, please also install yum-plugin-fastestmirror.
To install ELRepo for RHEL-6, SL-6 or CentOS-6:
rpm -Uvh http://www.elrepo.org/elrepo-release-6-8.el6.elrepo.noarch.rpm
创建分区(node1、node2)
node1、node2添加单独的硬盘做DRBD,大小一样
基于LVM,方便扩容
[root@mfs-n1 /]# fdisk /dev/vdb
Welcome to fdisk (util-linux 2.23.2).

Changes will remain in memory only, until you decide to write them.
Be careful before using the write command.


Command (m for help): p

Disk /dev/vdb: 64.4 GB, 64424509440 bytes, 125829120 sectors
Units = sectors of 1 * 512 = 512 bytes
Sector size (logical/physical): 512 bytes / 512 bytes
I/O size (minimum/optimal): 512 bytes / 512 bytes
Disk label type: dos
Disk identifier: 0xdaf38769

   Device Boot      Start         End      Blocks   Id  System

Command (m for help): n
Partition type:
   p   primary (0 primary, 0 extended, 4 free)
   e   extended
Select (default p): p
Partition number (1-4, default 1):
First sector (2048-125829119, default 2048):
Using default value 2048
Last sector, +sectors or +size{K,M,G} (2048-125829119, default 125829119):
Using default value 125829119
Partition 1 of type Linux and of size 60 GiB is set

Command (m for help): m
Command action
   a   toggle a bootable flag
   b   edit bsd disklabel
   c   toggle the dos compatibility flag
   d   delete a partition
   g   create a new empty GPT partition table
   G   create an IRIX (SGI) partition table
   l   list known partition types
   m   print this menu
   n   add a new partition
   o   create a new empty DOS partition table
   p   print the partition table
   q   quit without saving changes
   s   create a new empty Sun disklabel
   t   change a partition's system id
   u   change display/entry units
   v   verify the partition table
   w   write table to disk and exit
   x   extra functionality (experts only)

Command (m for help): t
Selected partition 1
Hex code (type L to list all codes): L

 0  Empty           24  NEC DOS         81  Minix / old Lin bf  Solaris
 1  FAT12           27  Hidden NTFS Win 82  Linux swap / So c1  DRDOS/sec (FAT-
 2  XENIX root      39  Plan 9          83  Linux           c4  DRDOS/sec (FAT-
 3  XENIX usr       3c  PartitionMagic  84  OS/2 hidden C:  c6  DRDOS/sec (FAT-
 4  FAT16 <32M      40  Venix 80286     85  Linux extended  c7  Syrinx
 5  Extended        41  PPC PReP Boot   86  NTFS volume set da  Non-FS data
 6  FAT16           42  SFS             87  NTFS volume set db  CP/M / CTOS / .
 7  HPFS/NTFS/exFAT 4d  QNX4.x          88  Linux plaintext de  Dell Utility
 8  AIX             4e  QNX4.x 2nd part 8e  Linux LVM       df  BootIt
 9  AIX bootable    4f  QNX4.x 3rd part 93  Amoeba          e1  DOS access
 a  OS/2 Boot Manag 50  OnTrack DM      94  Amoeba BBT      e3  DOS R/O
 b  W95 FAT32       51  OnTrack DM6 Aux 9f  BSD/OS          e4  SpeedStor
 c  W95 FAT32 (LBA) 52  CP/M            a0  IBM Thinkpad hi eb  BeOS fs
 e  W95 FAT16 (LBA) 53  OnTrack DM6 Aux a5  FreeBSD         ee  GPT
 f  W95 Ext'd (LBA) 54  OnTrackDM6      a6  OpenBSD         ef  EFI (FAT-12/16/
10  OPUS            55  EZ-Drive        a7  NeXTSTEP        f0  Linux/PA-RISC b
11  Hidden FAT12    56  Golden Bow      a8  Darwin UFS      f1  SpeedStor
12  Compaq diagnost 5c  Priam Edisk     a9  NetBSD          f4  SpeedStor
14  Hidden FAT16 <3 61  SpeedStor       ab  Darwin boot     f2  DOS secondary
16  Hidden FAT16    63  GNU HURD or Sys af  HFS / HFS+      fb  VMware VMFS
17  Hidden HPFS/NTF 64  Novell Netware  b7  BSDI fs         fc  VMware VMKCORE
18  AST SmartSleep  65  Novell Netware  b8  BSDI swap       fd  Linux raid auto
1b  Hidden W95 FAT3 70  DiskSecure Mult bb  Boot Wizard hid fe  LANstep
1c  Hidden W95 FAT3 75  PC/IX           be  Solaris boot    ff  BBT
1e  Hidden W95 FAT1 80  Old Minix
Hex code (type L to list all codes): 8e
Changed type of partition 'Linux' to 'Linux LVM'

Command (m for help): w
The partition table has been altered!
Calling ioctl() to re-read partition table.
Syncing disks.
pvcreate /dev/vdb1 #创建物理卷
vgcreate vgdrbr /dev/vdb1 #创建卷组
vgdisplay (查看逻辑卷组)
vgdisplay
  --- Volume group ---
  VG Name               vgdrbr
  System ID
  Format                lvm2
  Metadata Areas        1
  Metadata Sequence No  1
  VG Access             read/write
  VG Status             resizable
  MAX LV                0
  Cur LV                0
  Open LV               0
  Max PV                0
  Cur PV                1
  Act PV                1
  VG Size               <60.00 GiB
  PE Size               4.00 MiB
  Total PE              15359
  Alloc PE / Size       0 / 0
  Free  PE / Size       15359 / <60.00 GiB
  VG UUID               jgrCsU-CQmQ-l2yz-O375-qFQq-Rho9-r6eY54
lvcreate -l +15359 -n mfs vgdrbr #创建逻辑卷
lvdisplay
  --- Logical volume ---
  LV Path                /dev/vgdrbr/mfs
  LV Name                mfs
  VG Name                vgdrbr
  LV UUID                3pb6ZJ-aMIu-PVbU-PAID-ozvB-XVpz-hdfK1c
  LV Write Access        read/write
  LV Creation host, time mfs-n1, 2017-11-08 10:14:00 +0800
  LV Status              available
  # open                 2
  LV Size                <60.00 GiB
  Current LE             15359
  Segments               1
  Allocation             inherit
  Read ahead sectors     auto
  - currently set to     8192
  Block device           253:3
映射分区为 /dev/mapper/vgdrbr-mfs
DRBD
安装DRBD(node1 node2 )
yum -y install drbd84-utils kmod-drbd84 # 有更新的版本 yum install -y drbd90 kmod-drbd90
加载DRBD模块:
# modprobe drbd
查看DRBD模块是否加载到内核:
# lsmod |grep drbd
配置DRBD
node1:
cat /etc/drbd.conf
# You can find an example in  /usr/share/doc/drbd.../drbd.conf.example

include "drbd.d/global_common.conf";
include "drbd.d/*.res";
cat /etc/drbd.d/global_common.conf
# DRBD is the result of over a decade of development by LINBIT.
# In case you need professional services for DRBD or have
# feature requests visit http://www.linbit.com

global {
    usage-count no;
    # minor-count dialog-refresh disable-ip-verification
    # cmd-timeout-short 5; cmd-timeout-medium 121; cmd-timeout-long 600;
}

common {
    handlers {
        # These are EXAMPLE handlers only.
        # They may have severe implications,
        # like hard resetting the node under certain circumstances.
        # Be careful when chosing your poison.

        # pri-on-incon-degr "/usr/lib/drbd/notify-pri-on-incon-degr.sh; /usr/lib/drbd/notify-emergency-reboot.sh; echo b > /proc/sysrq-trigger ; reboot -f";
        # pri-lost-after-sb "/usr/lib/drbd/notify-pri-lost-after-sb.sh; /usr/lib/drbd/notify-emergency-reboot.sh; echo b > /proc/sysrq-trigger ; reboot -f";
        # local-io-error "/usr/lib/drbd/notify-io-error.sh; /usr/lib/drbd/notify-emergency-shutdown.sh; echo o > /proc/sysrq-trigger ; halt -f";
        # fence-peer "/usr/lib/drbd/crm-fence-peer.sh";
        # split-brain "/usr/lib/drbd/notify-split-brain.sh root";
        # out-of-sync "/usr/lib/drbd/notify-out-of-sync.sh root";
        # before-resync-target "/usr/lib/drbd/snapshot-resync-target-lvm.sh -p 15 -- -c 16k";
        # after-resync-target /usr/lib/drbd/unsnapshot-resync-target-lvm.sh;
    }

    startup {
        # wfc-timeout degr-wfc-timeout outdated-wfc-timeout wait-after-sb
        wfc-timeout 30;
        degr-wfc-timeout 30;
        outdated-wfc-timeout 30;
    }

    options {
        # cpu-mask on-no-data-accessible
    }

    disk {
        # size on-io-error fencing disk-barrier disk-flushes
        # disk-drain md-flushes resync-rate resync-after al-extents
        # c-plan-ahead c-delay-target c-fill-target c-max-rate
        # c-min-rate disk-timeout
        on-io-error detach;
    }

    net {
        # protocol timeout max-epoch-size max-buffers unplug-watermark
        # connect-int ping-int sndbuf-size rcvbuf-size ko-count
        # allow-two-primaries cram-hmac-alg shared-secret after-sb-0pri
        # after-sb-1pri after-sb-2pri always-asbp rr-conflict
        # ping-timeout data-integrity-alg tcp-cork on-congestion
        # congestion-fill congestion-extents csums-alg verify-alg
        # use-rle
        protocol C;
        cram-hmac-alg sha1;
        shared-secret "bqrPnf9";
    }

}
cat /etc/drbd.d/mfs.res
resource mfs{
        device /dev/drbd0;
        meta-disk internal;

        on node1{
            disk /dev/vgdrbr/mfs;
            address 172.16.0.41:9876;
        }

        on node2{
            disk /dev/vgdrbr/mfs;
            address 172.16.0.42:9876;
        }
}
从node1 复制 /etc/drbd.d/* 到node2 /etc/drbd.d/
创建DRBD资源
drbdadm create-md mfs
initializing activity log
NOT initializing bitmap
Writing meta data...
New drbd meta data block successfully created.
启动DRBD服务(node1 node2)
systemctl enable drbd
systemctl start drbd
查看DRBD初始化状态:
drbd-overview
配置node1节点为主节点
drbdadm primary mfs
如果报错,执行:
drbdadm primary --force mfs # 不行重启下drbd服务,再执行
drbdadm --overwrite-data-of-peer primary all
此时用命令 drbd-overview 或cat /proc/drbd 可以看到开始同步数据了
drbdsetup status mfs --verbose --statistics // 查看详细情况
node1节点上格式化drbd设备
mkfs -t xfs /dev/drbd0 或 mkfs.xfs /dev/drbd0
节点上测试mount设备
mkdir -p /data/drbd

mount /dev/drbd0 /data/drbd
node2上需要创建 挂载相同的挂载目录 mkdir -p /data/drbd
node2上无需创建DRBD资源及格式化drbd设备,同步完后,node2上的数据跟node1上是一致的,已经是创建资源并格式化好的。
安装MFS Master + metalogger
yum -y install moosefs-master moosefs-cli moosefs-cgi moosefs-cgiserv moosefs-metalogger
配置MFS Master 、MFSmetalogger
/etc/mfs/mfsmaster.cfg
grep -v "^#" mfsmaster.cfg
WORKING_USER = mfs
WORKING_GROUP = mfs
SYSLOG_IDENT = mfsmaster
LOCK_MEMORY = 0
NICE_LEVEL = -19
DATA_PATH = /data/drbd/mfs
EXPORTS_FILENAME = /etc/mfs/mfsexports.cfg
TOPOLOGY_FILENAME = /etc/mfs/mfstopology.cfg
BACK_LOGS = 50
BACK_META_KEEP_PREVIOUS = 1
MATOML_LISTEN_HOST = *
MATOML_LISTEN_PORT = 9419
MATOCS_LISTEN_HOST = *
MATOCS_LISTEN_PORT = 9420
# chunkserver 与 master之间的认证
AUTH_CODE = mfspassword
REPLICATIONS_DELAY_INIT = 300
CHUNKS_LOOP_MAX_CPS = 100000
CHUNKS_LOOP_MIN_TIME = 300
CHUNKS_SOFT_DEL_LIMIT = 10
CHUNKS_HARD_DEL_LIMIT = 25
CHUNKS_WRITE_REP_LIMIT = 2
CHUNKS_READ_REP_LIMIT = 10
MATOCL_LISTEN_HOST = *
MATOCL_LISTEN_PORT = 9421
SESSION_SUSTAIN_TIME = 86400
/etc/mfs/mfsmetalogger.cfg
grep -v "^#" mfsmetalogger.cfg
WORKING_USER = mfs

WORKING_GROUP = mfs

SYSLOG_IDENT = mfsmetalogger

LOCK_MEMORY = 0


NICE_LEVEL = -19


DATA_PATH = /var/lib/mfs

BACK_LOGS = 50

BACK_META_KEEP_PREVIOUS = 3

META_DOWNLOAD_FREQ = 24


MASTER_RECONNECTION_DELAY = 5


MASTER_HOST = mfsmaster

MASTER_PORT = 9419

MASTER_TIMEOUT = 10
/etc/mfs/mfsexports.cfg 权限配置
grep -v "^#" mfsexports.cfg
* / rw,alldirs,admin,maproot=0:0,password=9WpV9odJ
* . rw
password值是MFS客户连接时的认证密码
把node1 /etc/mfs目录下 mfsexports.cfg mfsmaster.cfg mfsmetalogger.cfg mfstopology.cfg 文件同步到 node2 的/etc/mfs 目录下
创建metadata存储目录:
mkdir -p /data/drbd/mfs
cp /var/lib/mfs/metadata.mfs.empty /data/drbd/mfs/metadata.mfs
chown -R mfs.mfs /data/drbd/mfs
启动mfsmaster(node2上不用启,在node1故障里通过keepalived脚本来启动node2的mfsmaster)
mfsmaster start
启动MFS监控服务
chmod 755 /usr/share/mfscgi/*.cgi # node1 node2都确定有可执行权限
mfscgiserv start 或 systemctl start moosefs-cgiserv
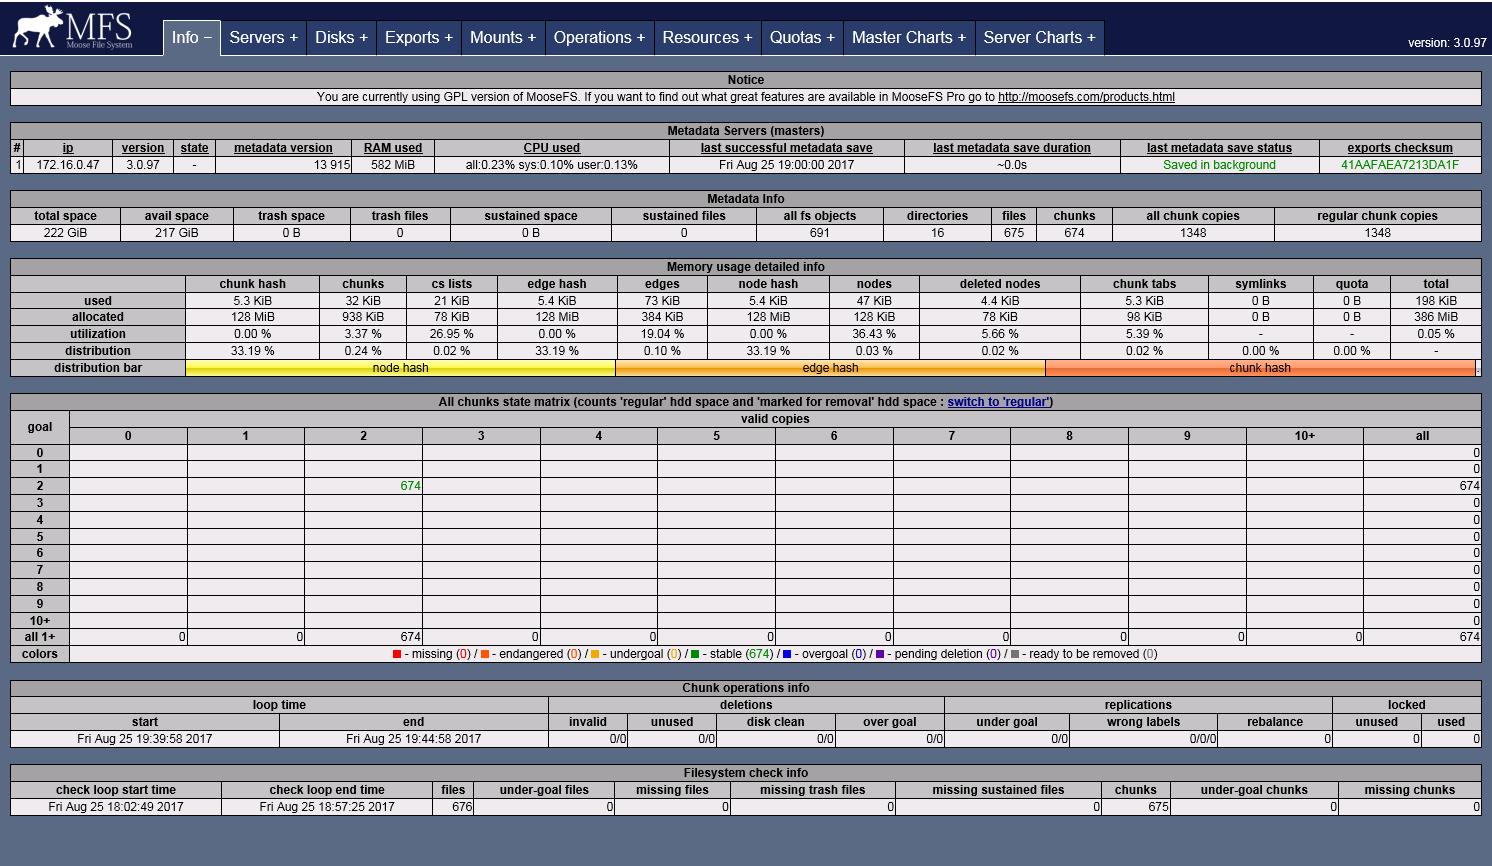
用浏览器访问:http://172.16.0.41:9425
安装keepalived (node1 node2)
yum -y install keepalived
配置keepalived
node1:
添加脚本
发邮件脚本:
cat /etc/keepalived/script/mail_notify.py
#!/usr/bin/env python
# -*- coding:utf-8 -*-

import smtplib
from email.mime.text import MIMEText
from email.header import Header
import sys, time, subprocess, random


# 第三方 SMTP 服务
mail_host="smtp.qq.com"  #设置服务器
userinfo_list = [{'user':'user1@qq.com','pass':'pass1'}, {'user':'user2@qq.com','pass':'pass2'}, {'user':'user3@qq.com','pass':'pass3'}]
user_inst = userinfo_list[random.randint(0, len(userinfo_list)-1)]
mail_user=user_inst['user'] #用户名
mail_pass=user_inst['pass'] #口令
sender = mail_user # 邮件发送者
receivers = ['xx1@qq.com', 'xx2@163.com']  # 接收邮件,可设置为你的QQ邮箱或者其他邮箱


p = subprocess.Popen('hostname', shell=True, stdin=subprocess.PIPE, stdout=subprocess.PIPE, stderr=subprocess.PIPE)
hostname = p.stdout.readline().split('
')[0]

message_to = ''
for i in receivers:
    message_to += i + ';'

def print_help():
    note = '''python script.py role ip vip
    '''
    print(note)
    exit(1)

time_stamp = time.strftime('%Y-%m-%d %H:%M:%S',time.localtime(time.time()))

if len(sys.argv) != 4:
    print_help()
elif sys.argv[1] == 'master':
    message_content = '%s server: %s(%s) keepalived change to Master, vIP: %s' %(time_stamp, sys.argv[2], hostname, sys.argv[3])
    subject = '%s keepalived change to Master -- keepalived notify' %(sys.argv[2])
elif sys.argv[1] == 'backup':
    message_content = '%s server: %s(%s) keepalived change to Backup, vIP: %s' %(time_stamp, sys.argv[2], hostname, sys.argv[3])
    subject = '%s keepalived change to Backup -- keepalived notify' %(sys.argv[2])
elif sys.argv[1] == 'stop':
    message_content = '%s server: %s(%s) keepalived change to Stop, vIP: %s' %(time_stamp, sys.argv[2], hostname, sys.argv[3])
    subject = '%s keepalived change to Stop -- keepalived notify' %(sys.argv[2])
else:
    print_help()

message = MIMEText(message_content, 'plain', 'utf-8')
message['From'] = Header(sender, 'utf-8')
message['To'] =  Header(message_to, 'utf-8')

message['Subject'] = Header(subject, 'utf-8')

try:
    smtpObj = smtplib.SMTP()
    smtpObj.connect(mail_host, 25)    # 25 为 SMTP 端口号
    smtpObj.login(mail_user,mail_pass)
    smtpObj.sendmail(sender, receivers, message.as_string())
    print("邮件发送成功")
except smtplib.SMTPException as e:
    print("Error: 无法发送邮件")
    print(e)
DRBD检测脚本:
cat /etc/keepalived/script/check_drbd.sh
#!/bin/bash

# set basic parameter
drbd_res=mfs
drbd_mountpoint=/mfs/drbd


status="ok"
#ret=`ps -C mfsmaster --no-header |wc -l`
ret=`pidof mfsmaster |wc -l`

if [ $ret -eq 0 ]; then
   status="mfsmaster not running"
   umount $drbd_mountpoint
   drbdadm secondary $drbd_res
   mfscgiserv stop
   /bin/python /etc/keepalived/script/mail_notify.py stop 172.16.0.41 172.16.0.47
   systemctl stop keepalived
fi

echo $status
keepalived切换为master脚本:
cat /etc/keepalived/script/master.sh
#!/bin/bash

drbdadm primary mfs
mount /dev/drbd0 /data/drbd
mfsmaster start
mfscgiserv start
chmod +x /etc/keepalived/script/*.sh
从node1 复制 mail_notify.py 到 node2 /etc/keepalived/script
cat /etc/keepalived/keepalived.conf
! Configuration File for keepalived


global_defs {

    notification_email {
        xx@xx.com
    }

    notification_email_from keepalived@xx.com
    smtp_server 127.0.0.1
    smtp_connect_timeout 30

    router_id node1_mfs_master      # 标识本节点的字条串,通常为hostname,但不一定非得是hostname。故障发生时,邮件通知会用到
}

vrrp_script check_drbd {
    script "/etc/keepalived/script/check_drbd.sh"
    interval 3     # check every 3 seconds
#    weight -40      # if failed, decrease 40 of the priority
#    fall   2        # require 2 failures for failures
#    rise   1        # require 1 sucesses for ok
}

# net.ipv4.ip_nonlocal_bind=1
vrrp_instance VI_MFS {

    state BACKUP
    interface ens160
    virtual_router_id 16
    #mcast_src_ip 172.16.0.41

    nopreempt    ## 当node2 keepalived 选举为 MASTER 时,node1 keepalived重启,优先级比node2高也不会抢占MASTER角色,state 都需为 BACKUP,只在优先级高的设置 nopreempt
    priority 100
    advert_int 1
    #debug

    authentication {
        auth_type PASS
        auth_pass O7F3CjHVXWP
    }

    virtual_ipaddress {
        172.16.0.47
    }

    track_script {
        check_drbd
    }

}
systemctl start keepalived
systemctl disable keepalived
systemctl enable moosefs-metalogger; systemctl start moosefs-metalogger
node2:
keepalived切换为master脚本:
cat /etc/keepalived/script/master.sh
#!/bin/bash

# set basic parameter
drbd_res=mfs
drbd_driver=/dev/drbd0
drbd_mountpoint=/mfs/drbd


drbdadm primary $drbd_res
mount $drbd_driver $drbd_mountpoint
mfsmaster start
mfscgiserv start


/bin/python /etc/keepalived/script/mail_notify.py master 172.16.0.42 172.16.0.47
keepalived切换为backup脚本:
cat /etc/keepalived/script/backup.sh
#!/bin/bash

# set basic parameter
drbd_res=mfs
drbd_mountpoint=/mfs/drbd


mfsmaster stop
umount $drbd_mountpoint
drbdadm secondary $drbd_res
mfscgiserv stop


/bin/python /etc/keepalived/script/mail_notify.py backup 172.16.0.42 172.16.0.47
cat /etc/keepalived/keepalived.conf
! Configuration File for keepalived


global_defs {

    notification_email {
        xx@xx.com
    }

    notification_email_from keepalived@xx.com
    smtp_server 127.0.0.1
    smtp_connect_timeout 30

    router_id node2_mfs_backup
}


# net.ipv4.ip_nonlocal_bind=1
vrrp_instance mfs {

    state BACKUP
    interface ens160
    virtual_router_id 16
    #mcast_src_ip 172.16.0.42

    priority 80
    advert_int 1
    #debug

    authentication {
        auth_type PASS
        auth_pass O7F3CjHVXWP
    }

    virtual_ipaddress {
        172.16.0.47
    }

    notify_master "/etc/keepalived/script/master.sh"
    notify_backup "/etc/keepalived/script/backup.sh"
}
systemctl start keepalived
systemctl disable keepalived
systemctl enable moosefs-metalogger; systemctl start moosefs-metalogger
注意:node1 node2 的mfsmaster、keepalived服务不要设置成开机启动
安装MFS Chunk servers
yum -y install moosefs-chunkserver
配置MFS Chunk servers (node3 node4 node5)
/etc/mfs/mfschunkserver.cfg
grep -v "^#" /etc/mfs/mfschunkserver.cfg
WORKING_USER = mfs
WORKING_GROUP = mfs
SYSLOG_IDENT = mfschunkserver
LOCK_MEMORY = 0
NICE_LEVEL = -19
DATA_PATH = /var/lib/mfs
HDD_CONF_FILENAME = /etc/mfs/mfshdd.cfg
HDD_TEST_FREQ = 10
BIND_HOST = *
MASTER_HOST = mfsmaster
MASTER_PORT = 9420
MASTER_TIMEOUT = 60
MASTER_RECONNECTION_DELAY = 5
# authentication string (used only when master requires authorization)
AUTH_CODE = mfspassword
CSSERV_LISTEN_HOST = *
CSSERV_LISTEN_PORT = 9422
/etc/mfs/mfshdd.cfg 指定chunk server的硬盘驱动
mkdir -p /data/mfs; chown -R mfs:mfs /data/mfs
grep -v "^#" /etc/mfs/mfshdd.cfg
mfschunk保存数据的路径,建议使用单独的LVM 逻辑卷
/data/mfs
systemctl enable moosefs-chunkserver; systemctl start moosefs-chunkserver
手动启动命令 mfschunkserver start
可通过MFS的监控页面查看是否连接MFS MASTER成功
MFS客户端
安装MFS客户端
yum -y install moosefs-client fuse
MFS客户端重启自动挂载mfs目录
Shell> vi /etc/rc.local
/sbin/modprobe fuse
/usr/bin/mfsmount /mnt1 -H mfsmaster -S /backup/db
/usr/bin/mfsmount /mnt2 -H mfsmaster -S /app/image

mfsmount -H mfsmaster /mnt3             # 挂载根目录到 /mnt3
mfsmount -H 主机 -P 端口 -p 认证密码 挂载点路径
mfsmount -H 主机 -P 端口 -o mfspassword=PASSWORD 挂载点路径
通过/etc/fstab的方式(建议使用该方法)
mfsmaster使用主机名的话,需要本机可以解析,可以设置/etc/hosts
Shell> vi /etc/fstab

mfsmount /mnt fuse mfsmaster=MASTER_IP,mfsport=9421,_netdev 0 0 (重启系统后挂载MFS的根目录)
mfsmount /mnt2 fuse mfstermaster=MASTER_IP,mfsport=9421,mfssubfolder=/subdir,_netdev 0 0(重启系统后挂载MFS的子目录)

mfsmount /data/upload    fuse    mfsmaster=mfsmaster,mfsport=9421,mfssubfolder=/pro1,mfspassword=9WpV9odJ,_netdev 0 0(使用密码认证)


## _netdev:当网络可用时才进行挂载,避免挂载失败
采用fstab配置文件挂载方式可以通过如下命令,测试是否配置正确,并可把fstab中mfsmount 进行挂载:
mount -a -t fuse
取消挂载,操作时工作目录不能在挂载点/mnt:
umount /mnt
查看挂载情况
df -h -T
附:
MFS master切换测试
node1:
停止 mfsmaster服务
mfsmaster stop
查看node2是否有接管vip
df -h -T 查看磁盘挂载情况
cat /proc/drbd #查看 DRBD状态
drbd-overview # 查看DRBD详情
告警邮件是否有收到
若node2 keepalived为master,node1要再切回master,先确定node1 node2 drbd状态已经同步一致,使用drbd-overview可查看
若一致时,node2上执行 /etc/keepalived/script/backup.sh脚本,然后关闭 keepalived服务,
node1执行 /etc/keepalived/script/master.sh 脚本,然后启动 keepalived服务
node2 启动 keepalived服务
使用metalogger恢复数据
metalogger节点不是必要的,但是在master挂掉的时候,可以用来恢复master,十分有用!
如果master无法启动,使用 mfsmetarestore -a 进行修复,如果不能修复,则拷贝metalogger上的备份日志到master上,然后进行恢复!
查看drbd状态
cat /proc/drbd
version: 8.4.9-1 (api:1/proto:86-101)
GIT-hash: 9976da086367a2476503ef7f6b13d4567327a280 build by akemi@Build64R7, 2016-12-04 01:08:48
0: cs:SyncTarget ro:Secondary/Primary ds:Inconsistent/UpToDate C r-----
ns:0 nr:4865024 dw:4865024 dr:0 al:8 bm:0 lo:0 pe:0 ua:0 ap:0 ep:1 wo:f oos:58046556
[>...................] sync'ed: 7.8% (56684/61436)M
finish: 0:23:35 speed: 41,008 (33,784) want: 41,000 K/sec
第一行为:drbd的版本信息
第二行为:编译的信息
重点第三行:
开头"0:"表示 设备/dev/drbd0
开头"1:"表示 设备/dev/data-1-1
"cs(connection state):" 连接状态 Connected连接
"ro(roles):" 角色 Primary/Secondary 一个主一个备,正常状态应该属于这样。
"ds:(disk staes)" 硬盘状态 UpToDate/UpToDate
"ns(network send)" 通过网络连接把数据发送到对端 volume of net data sent to the parther via the network connection
MFS安装
Add the appropriate key to package manager:
curl "http://ppa.moosefs.com/RPM-GPG-KEY-MooseFS" > /etc/pki/rpm-gpg/RPM-GPG-KEY-MooseFS
Next you need to add the repository entry (MooseFS 3.0):
- For EL7 family:
# curl "http://ppa.moosefs.com/MooseFS-3-el7.repo" > /etc/yum.repos.d/MooseFS.repo
- For EL6 family:
# curl "http://ppa.moosefs.com/MooseFS-3-el6.repo" > /etc/yum.repos.d/MooseFS.repo
For MoosefS 2.0, use:
- For EL7 family:
# curl "http://ppa.moosefs.com/MooseFS-2-el7.repo" > /etc/yum.repos.d/MooseFS.repo
- For EL6 family:
# curl "http://ppa.moosefs.com/MooseFS-2-el6.repo" > /etc/yum.repos.d/MooseFS.repo
After those operations it should be possible to install the packages with following commands:
- For Master Server:
# yum install moosefs-master moosefs-cli moosefs-cgi moosefs-cgiserv
- For Chunkservers:
# yum install moosefs-chunkserver
- For Metaloggers:
# yum install moosefs-metalogger
- For Clients:
# yum install moosefs-client
If you want MooseFS to be mounted automatically when system starts, first of all install File System in Userspace (FUSE) utilities:# yum install fuseand then add one of the following entries to your /etc/fstab:
"classic" entry (works with all MooseFS 3.0 and 2.0 verisons):mfsmount /mnt/mfs fuse defaults 0 0
or "NFS-like" entry (works with MooseFS 3.0.75+):mfsmaster.host.name: /mnt/mfs moosefs defaults 0 0
Running the system
- To start process manually:
# mfsmaster start
# mfschunkserver start - For systemd OS family - EL7:
# systemctl start moosefs-master.service
# systemctl start moosefs-chunkserver.service - For SysV OS family - EL6:
# service moosefs-master start
# service moosefs-chunkserver start
moosefs-master.service修复
默认的moosefs-master.service 启动脚本启动超时不成功,方法:注释掉 PIDFile=/var/lib/mfs/.mfsmaster.lock 这行
cat /usr/lib/systemd/system/moosefs-master.service
[Unit]
Description=MooseFS Master server
Wants=network-online.target
After=network.target network-online.target

[Service]
Type=forking
ExecStart=/usr/sbin/mfsmaster start
ExecStop=/usr/sbin/mfsmaster stop
ExecReload=/usr/sbin/mfsmaster reload
#PIDFile=/var/lib/mfs/.mfsmaster.lock
TimeoutStopSec=60
TimeoutStartSec=60
Restart=no

[Install]
WantedBy=multi-user.target
drbdadm create-md mfs时报 'mfs' not defined in your config (for this host)错
主要问题:主机名与 /etc/drbd.d/mfs.res 中定义的不一样,改成一样即可
多个业务需要连接MFS建议
多个业务需要连接MFS,建议先用一台MFS客户端挂载MFS / 目录,然后创建好相应业务对方的目录,每业务客户机再挂载相应业务的子目录。
MFS文件系统使用
Client通过MFS软件提供的工具来管理MFS文件系统,下面是工具介绍
/usr/local/mfs/bin/mfstools -h
mfs multi tool

usage:
        mfstools create - create symlinks (mfs<toolname> -> /usr/local/mfs/bin/mfstools)

tools:
        mfsgetgoal                               // 设定副本数
        mfssetgoal                               // 获取副本数
        mfsgettrashtime                          // 设定回收站时间
        mfssettrashtime                          // 设定回收站时间
        mfscheckfile                             // 检查文件
        mfsfileinfo                              // 文件信息
        mfsappendchunks
        mfsdirinfo                                // 目录信息
        mfsfilerepair                             // 文件修复
        mfsmakesnapshot                           // 快照
        mfsgeteattr                               // 设置权限
        mfsseteattr
        mfsdeleattr

deprecated tools:                                  // 递归设置
        mfsrgetgoal = mfsgetgoal -r
        mfsrsetgoal = mfssetgoal -r
        mfsrgettrashtime = mfsgettreshtime -r
        mfsrsettrashtime = mfssettreshtime -r
挂载文件系统
MooseFS 文件系统利用下面的命令:
mfsmount mountpoint [-d][-f] [-s][-m] [-n][-p] [-HMASTER][-PPORT] [-S PATH][-o OPT[,OPT...]]
-H MASTER:是管理服务器(master server)的ip 地址
-P PORT: 是管理服务器( master server)的端口号,要按照mfsmaster.cfg 配置文件中的变量
MATOCU_LISTEN_POR 的之填写。如果master serve 使用的是默认端口号则不用指出。
-S PATH:指出被挂接mfs 目录的子目录,默认是/目录,就是挂载整个mfs 目录。
Mountpoint:是指先前创建的用来挂接mfs 的目录。
在开始mfsmount 进程时,用一个-m 或-o mfsmeta 的选项,这样可以挂接一个辅助的文件系统
MFSMETA,这么做的目的是对于意外的从MooseFS 卷上删除文件或者是为了释放磁盘空间而移动的
文件而又此文件又过去了垃圾文件存放期的恢复,例如:
/usr/local/mfs/bin/mfsmount -m /MFS_meta/ -H 172.16.18.137
设定副本数量
目标(goal),是指文件被拷贝副本的份数,设定了拷贝的份数后是可以通过mfsgetgoal 命令来证实的,也可以通过mfsrsetgoal 来改变设定。
mfssetgoal 3 /MFS_data/test/
mfssetgoal 3 /MFS_data/test/
用 mfsgetgoal –r 和 mfssetgoal –r 同样的操作可以对整个树形目录递归操作,其等效于 mfsrsetgoal 命令。实际的拷贝份数可以通过 mfscheckfile 和 mfsfile info 命令来证实。
注意以下几种特殊情况:
- 一个不包含数据的零长度的文件,尽管没有设置为非零的目标(the non-zero “goal”),但用mfscheckfile 命令查询将返回一个空的结果;将文件填充内容后,其会根据设置的goal创建副本;这时再将文件清空,其副本依然作为空文件存在。
- 假如改变一个已经存在的文件的拷贝个数,那么文件的拷贝份数将会被扩大或者被删除,这个过程会有延时。可以通过mfscheckfile 命令来证实。
- 对一个目录设定“目标”,此目录下的新创建文件和子目录均会继承此目录的设定,但不会改变已经存在的文件及目录的拷贝份数。
可以通过mfsdirinfo来查看整个目录树的信息摘要。
垃圾回收站
一个被删除文件能够存放在一个“ 垃圾箱”的时间就是一个隔离时间, 这个时间可以用 mfsgettrashtime 命令来验证,也可以使用`mfssettrashtime 命令来设置。
mfssettrashtime 64800 /MFS_data/test/test1
mfsgettrashtime /MFS_data/test/test1
时间的单位是秒(有用的值有:1 小时是3600 秒,24 - 86400 秒,1天 - 604800 秒)。就像文件被存储的份数一样, 为一个目录设定存放时间是要被新创建的文件和目录所继承的。数字0 意味着一个文件被删除后, 将立即被彻底删除,在想回收是不可能的。
删除文件可以通过一个单独安装MFSMETA 文件系统。特别是它包含目录/ trash (包含任然可以被还原的被删除文件的信息)和/ trash/undel (用于获取文件)。只有管理员有权限访问MFSMETA(用户的uid 0,通常是root)。
/usr/local/mfs/bin/mfsmount -m /MFS_meta/ -H 172.16.18.137
被删文件的文件名在“垃圾箱”目录里还可见,文件名由一个八位十六进制的数i-node 和被删文件的文件名组成,在文件名和i-node 之间不是用“/”,而是用了“|”替代。如果一个文件名的长度超过操作系统的限制(通常是255 个字符),那么部分将被删除。通过从挂载点起全路径的文件名被删除的文件任然可以被读写。
移动这个文件到trash/undel 子目录下,将会使原始的文件恢复到正确的MooseFS 文件系统上路径下(如果路径没有改变)。如果在同一路径下有个新的同名文件,那么恢复不会成功。
从“垃圾箱”中删除文件结果是释放之前被它站用的空间(删除有延迟,数据被异步删除)。
在MFSMETA中还有另一个目录reserved,该目录内的是被删除但依然打开的文件。在用户关闭了这些被打开的文件后,reserved 目录中的文件将被删除,文件的数据也将被立即删除。在reserved 目录中文件的命名方法同trash 目录中的一样,但是不能有其他功能的操作。
快照snapshot
MooseFS 系统的另一个特征是利用mfsmakesnapshot 工具给文件或者是目录树做快照
mfsmakesnapshot source ... destination
Mfsmakesnapshot 是在一次执行中整合了一个或是一组文件的拷贝,而且任何修改这些文件的源文件都不会影响到源文件的快照, 就是说任何对源文件的操作,例如写入源文件,将不会修改副本(或反之亦然)。
也可以使用mfsappendchunks:
mfsappendchunks destination-file source-file ...
当有多个源文件时,它们的快照被加入到同一个目标文件中(每个chunk 的最大量是chunk)。
MFS集群维护
启动MFS集群
安全的启动MooseFS 集群(避免任何读或写的错误数据或类似的问题)的方式是按照以下命令步骤:
- 启动mfsmaster 进程
- 启动所有的mfschunkserver 进程
- 启动mfsmetalogger 进程(如果配置了mfsmetalogger)
- 当所有的chunkservers 连接到MooseFS master 后,任何数目的客户端可以利用mfsmount 去挂接被export 的文件系统。(可以通过检查master 的日志或是CGI 监视器来查看是否所有的chunkserver被连接)。
停止MFS集群
安全的停止MooseFS 集群:
- 在所有的客户端卸载MooseFS 文件系统(用umount 命令或者是其它等效的命令)
- 用mfschunkserver stop 命令停止chunkserver 进程
- 用mfsmetalogger stop 命令停止metalogger 进程
- 用mfsmaster stop 命令停止master 进程
Chunkservers 的维护
若每个文件的goal(目标)都不小于2,并且没有under-goal 文件(这些可以用mfsgetgoal –r和mfsdirinfo 命令来检查),那么一个单一的chunkserver 在任何时刻都可能做停止或者是重新启动。以后每当需要做停止或者是重新启动另一个chunkserver 的时候,要确定之前的chunkserver 被连接,而且要没有under-goal chunks。
MFS元数据备份
通常元数据有两部分的数据:
- 主要元数据文件metadata.mfs,当mfsmaster 运行的时候会被命名为metadata.mfs.back
- 元数据改变日志changelog.*.mfs,存储了过去的N 小时的文件改变(N 的数值是由BACK_LOGS参数设置的,参数的设置在mfschunkserver.cfg 配置文件中)。
主要的元数据文件需要定期备份,备份的频率取决于取决于多少小时changelogs 储存。元数据changelogs 实时的自动复制。1.6版本中这个工作都由metalogger完成。
MFS Master的恢复
一旦mfsmaster 崩溃(例如因为主机或电源失败),需要最后一个元数据日志changelog 并入主要的metadata 中。这个操作时通过 mfsmetarestore 工具做的,最简单的方法是:
mfsmetarestore -a
如果master 数据被存储在MooseFS 编译指定地点外的路径,则要利用-d 参数指定使用,如:
mfsmetarestore -a -d /opt/mfsmaster
从MetaLogger中恢复Master
如果mfsmetarestore -a无法修复,则使用metalogger也可能无法修复,暂时没遇到过这种情况,这里不暂不考虑。
- 找回metadata.mfs.back 文件,可以从备份中找,也可以中metalogger 主机中找(如果启动了metalogger 服务),然后把metadata.mfs.back 放入data 目录,一般为{prefix}/var/mfs
- 从在master 宕掉之前的任何运行metalogger 服务的服务器上拷贝最后metadata 文件,然后放入mfsmaster 的数据目录。
- 利用mfsmetarestore 命令合并元数据changelogs,可以用自动恢复模式mfsmetarestore –a,也可以利用非自动化恢复模式
mfsmetarestore -m metadata.mfs.back -o metadata.mfs changelog_ml.*.mfs
或:强制使用metadata.mfs.back创建metadata.mfs,可以启动master,但丢失的数据暂无法确定。
Automated Failover
生产环境使用 MooseFS 时,需要保证 master 节点的高可用。 使用 ucarp 是一种比较成熟的方案,或者 DRBD+[hearbeat|keepalived] 。 ucarp 类似于 keepalived ,通过主备服务器间的健康检查来发现集群状态,并执行相应操作。另外 MooseFS商业版本已经支持双主配置,解决单点故障。
moosefs-chunkserver升级
systemctl stop moosefs-chunkserver
yum -y update moosefs-chunkserver
systemctl start moosefs-chunkserver #启动异常
mfschunkserver -u
open files limit has been set to: 16384
working directory: /var/lib/mfs
config: using default value for option 'FILE_UMASK' - '23'
lockfile created and locked
config: using default value for option 'LIMIT_GLIBC_MALLOC_ARENAS' - '4'
setting glibc malloc arena max to 4
setting glibc malloc arena test to 4
config: using default value for option 'DISABLE_OOM_KILLER' - '1'
initializing mfschunkserver modules ...
config: using default value for option 'HDD_LEAVE_SPACE_DEFAULT' - '256MiB'
hdd space manager: data folder '/data/mfs/' already locked (used by another process)
hdd space manager: no hdd space defined in /etc/mfs/mfshdd.cfg file
init: hdd space manager failed !!!
error occurred during initialization - exiting
ps -ef |grep mfs
mfs 51699 1 1 2017 ? 1-15:27:28 /usr/sbin/mfschunkserver start
把这个进程结束掉
删除PID文件:rm -rf /var/lib/mfs/.mfschunkserver.lock