Spring Security是一个能够为基于Spring的企业应用系统提供声明式的安全访问控制解决方案的安全框架。
这里是基于Spring Security-3.2的测试。
Spring Security为我们处理了登录的逻辑,所以我们可以通过配置来完成登录。
先来体验一下。完成helloworld,通过配置完成登录和权限
创建maven工程
1. 在pom.xml中加入相关jar包的配置
<dependency>
    <groupId>junit</groupId>
    <artifactId>junit</artifactId>
    <version>4.11</version>
    <scope>test</scope>
</dependency>
<!-- 加入jstl依赖包 -->
<dependency>
    <groupId>jstl</groupId>
    <artifactId>jstl</artifactId>
    <version>1.2</version>
</dependency>
<dependency>
    <groupId>javax.servlet.jsp</groupId>
    <artifactId>jsp-api</artifactId>
    <version>2.2.1-b03</version>
    <scope>provided</scope>
</dependency>
<!-- servlet -->
<dependency>
    <groupId>javax.servlet</groupId>
    <artifactId>servlet-api</artifactId>
    <version>2.5</version>
    <scope>provided</scope>
</dependency>
<!-- spring3 -->
<dependency>
    <groupId>org.springframework</groupId>
    <artifactId>spring-core</artifactId>
    <version>3.2.5.RELEASE</version>
</dependency>
<dependency>
    <groupId>org.springframework</groupId>
    <artifactId>spring-context</artifactId>
    <version>3.2.5.RELEASE</version>
</dependency>
<dependency>
    <groupId>org.springframework</groupId>
    <artifactId>spring-jdbc</artifactId>
    <version>3.2.5.RELEASE</version>
</dependency>
<dependency>
    <groupId>org.springframework</groupId>
    <artifactId>spring-beans</artifactId>
    <version>3.2.5.RELEASE</version>
</dependency>
<dependency>
    <groupId>org.springframework</groupId>
    <artifactId>spring-web</artifactId>
    <version>3.2.5.RELEASE</version>
</dependency>
<dependency>
    <groupId>org.springframework</groupId>
    <artifactId>spring-expression</artifactId>
    <version>3.2.5.RELEASE</version>
</dependency>
<dependency>
    <groupId>org.springframework</groupId>
    <artifactId>spring-orm</artifactId>
    <version>3.2.5.RELEASE</version>
</dependency>
<!-- spring-security -->
<dependency>
    <groupId>org.springframework.security</groupId>
    <artifactId>spring-security-core</artifactId>
    <version>3.2.5.RELEASE</version>
</dependency>
<dependency>
     <groupId>org.springframework.security</groupId>
     <artifactId>spring-security-web</artifactId>
     <version>3.2.5.RELEASE</version>
</dependency>
<dependency>
     <groupId>org.springframework.security</groupId>
     <artifactId>spring-security-config</artifactId>
     <version>3.2.5.RELEASE</version>
</dependency>
2.添加spring-security.xml文件
spring-security.xml文件
<beans xmlns="http://www.springframework.org/schema/beans"
        xmlns:security="http://www.springframework.org/schema/security"
        xmlns:xsi="http://www.w3.org/2001/XMLSchema-instance"
        xsi:schemaLocation="http://www.springframework.org/schema/beans
          http://www.springframework.org/schema/beans/spring-beans-3.2.xsd
          http://www.springframework.org/schema/security
          http://www.springframework.org/schema/security/spring-security-3.2.xsd">
    <!-- 认证管理器,配置了管理员与角色的关系  -->
    <security:authentication-manager>
        <!-- 配置账号密码所属的角色  角色以 ROLE_开头,为spring获取名称的标识 -->
        <security:authentication-provider>
            <!-- 采用xml的方式
             -->
            <security:user-service>
                <security:user name="user" password="user" authorities="ROLE_USER" />
                <security:user name="admin" password="admin" authorities="ROLE_ADMIN" />
            </security:user-service>
        </security:authentication-provider>
    </security:authentication-manager>

    <!--
        auto-config="true"      : 自动生成登录页面
        pattern="/admin/**"     : 为配置的路径,**表示支持子目录
        access="ROLE_ADMIN"     : 需要管理员权限,“ROLE_”前缀是一个提示Spring使用基于角色的检查的标记。
        use-expressions="true"    : 表示access中支持hasRole这样的函数
     -->
    <security:http auto-config="true" use-expressions="true" access-denied-page="/login.jsp?error=access-denied-page">
        <!-- xml配置
         -->
        <security:intercept-url pattern="/admin/**" access="hasRole('ROLE_ADMIN')" />
        <security:intercept-url pattern="/user/**" access="hasAnyRole('ROLE_USER','ROLE_ADMIN')" />
    </security:http>
</beans>
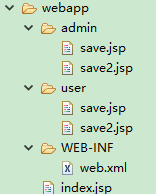
3.新建admin和user文件夹
4.配置web.xml文件
<?xml version="1.0" encoding="UTF-8"?>
<web-app version="2.5" xmlns="http://java.sun.com/xml/ns/javaee" xmlns:xsi="http://www.w3.org/2001/XMLSchema-instance" xsi:schemaLocation="http://java.sun.com/xml/ns/javaee
    http://java.sun.com/xml/ns/javaee/web-app_2_5.xsd">
    <!-- 加载spring配置文件 -->
    <context-param>
        <param-name>contextConfigLocation</param-name>
        <param-value>classpath*:spring-*.xml</param-value>
    </context-param>
    <!-- 添加spring监听器 -->
    <listener>
        <listener-class>org.springframework.web.context.ContextLoaderListener</listener-class>
    </listener>
    <!-- 添加 spring-security : springSecurityFilterChain 过滤链 -->
    <filter>
        <filter-name>springSecurityFilterChain</filter-name>
        <filter-class>org.springframework.web.filter.DelegatingFilterProxy</filter-class>
    </filter>
    <filter-mapping>
        <filter-name>springSecurityFilterChain</filter-name>
        <url-pattern>/*</url-pattern>
    </filter-mapping>
    <welcome-file-list>
        <welcome-file>index.jsp</welcome-file>
    </welcome-file-list>
</web-app>
5.访问
-
访问index.jsp页面
http://localhost:9999/security3/ 会直接进入页面,因为配置文件中没有对这个目录进行配置,可以随意访问 -
访问admin/save.jsp或admin/save2.jsp页面
http://localhost:9999/security3/admin/save.jsp 访问这个页面的时候,需要登录才能访问
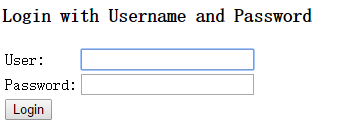
这个页面为spring自动生成。可以通过配置文件改成我们自己的登录页面。(下一节讲)
- 当你密码错误,页面会有相应提示
- 当你用user用户来登录的时候,会报403错误,表示你权限不足
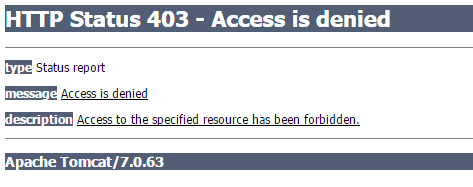
- 只有用admin登录才能进入。在spring-security.xml中配置了。
/admin/** --> hasRole('ROLE_ADMIN') --> admin用户