S
Centos 7: 打开Samba防火墙端口
https://www.cnblogs.com/ilovewindy/p/6019903.html
firewall-cmd --permanent --add-port=137/tcp
firewall-cmd --permanent --add-port=138/tcp
firewall-cmd --permanent --add-port=139/tcp
firewall-cmd --permanent --add-port=445/tcp
firewall-cmd --permanent --add-port=901/tcp
centos7安装samba
https://blog.csdn.net/liuyunshengsir/article/details/89518042
1、关闭防火墙
[root@centos7-cfj data]# systemctl stop firewalld.service
[root@centos7-cfj data]# systemctl disable firewalld.service
2、关闭selinux
[root@centos7-cfj data]# vim /etc/selinux/config
SELINUX=enforcing修改为SELINUX=disabled
3、安装samba
[root@centos7-cfj data]# yum install samba
samba-common-3.5.10-125.el6.x86_64 //主要提供samba服务器的设置文件与设置文件语法检验程序testparm
samba-client-3.5.10-125.el6.x86_64 //客户端软件,主要提供linux主机作为客户端时,所需要的工具指令集
samba-swat-3.5.10-125.el6.x86_64 //基于https协议的samba服务器web配置界面
samba-3.5.10-125.el6.x86_64 //服务器端软件,主要提供samba服务器的守护程序,共享文档,日志的轮替,开机默认选项
4、启动samba
[root@centos7-cfj data]# systemctl start smb
[root@centos7-cfj data]# systemctl status smb
[root@centos7-cfj data]# /usr/sbin/smbd -V
Version 4.10.16
5、添加linux账户
添加账户(添加的账户必须linux已经创建的),直接添加用户test会导致失败
[root@localhost share]# groupadd test -g 6000
[root@localhost share]# useradd test -u 6000 -g 6000 -s /sbin/nologin -d /dev/null
6、添加samba账户
[root@localhost share]# smbpasswd -a test
7、删除samba账户
[root@localhost share]# smbpasswd -x test
问题:linux 关闭防火墙
解决:
临时关闭防火墙 systemctl stop firewalld
临时打开防火墙 systemctl start firewalld
永久关闭防火墙 systemctl disable firewalld
防火墙开机启动 systemctl enable firewalld
防火墙重新启动 systemctl restart firewalld
防火墙状态查看 systemctl status firewalld
问题1:win 10无法访问Linux 局域网共享,错误代码0x80070043找不到网络名
https://www.cnblogs.com/lcword/p/5715363.html
解决1:Linux 临时关闭 selinux
[root@centos7-cfj samba]# /usr/sbin/setenforce 0
[root@centos7-cfj samba]# getenforce
Permissive
[root@centos7-cfj samba]# sestatus -v
SELinux status: enabled
SELinuxfs mount: /sys/fs/selinux
SELinux root directory: /etc/selinux
Loaded policy name: targeted
Current mode: permissive
Mode from config file: disabled
Policy MLS status: enabled
Policy deny_unknown status: allowed
Max kernel policy version: 31
Process contexts:
Current context: unconfined_u:unconfined_r:unconfined_t:s0-s0:c0.c1023
Init context: system_u:system_r:init_t:s0
/usr/sbin/sshd system_u:system_r:sshd_t:s0-s0:c0.c1023
File contexts:
Controlling terminal: unconfined_u:object_r:user_devpts_t:s0
/etc/passwd system_u:object_r:passwd_file_t:s0
/etc/shadow system_u:object_r:shadow_t:s0
/bin/bash system_u:object_r:shell_exec_t:s0
/bin/login system_u:object_r:login_exec_t:s0
/bin/sh system_u:object_r:bin_t:s0 -> system_u:object_r:shell_exec_t:s0
/sbin/agetty system_u:object_r:getty_exec_t:s0
/sbin/init system_u:object_r:bin_t:s0 -> system_u:object_r:init_exec_t:s0
/usr/sbin/sshd system_u:object_r:sshd_exec_t:s0
解决2:linux永久禁用selinux
修改文件/etc/sysconfig/selinux
修改内容SELINUX=disabled
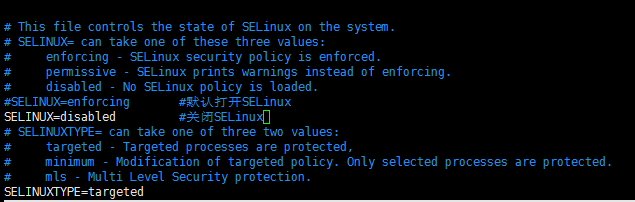
重启生效。
问题2 :Linux通过Samba共享的文件在Windows上不能访问。
提示如下错误信息:
You can't access this shared folder because your organization's security policies block unauthenticated guest access. These policies help protect your PC from unsafe or malicious devices on the network.
检查Linux Samba服务一切正常,通过错误信息提示应该是Windows禁止了访问,Google错误信息,是因为Window10 更新安全策略,默认禁止访问无密码的Samba共享。
解决方法:
在Samba中增加用户名密码配置。(用户访问会麻烦一些)
修改Windows安全配置,运行gpedit.msc, 找到 Computer Configuration -> Administrative Templates -> Network -> Lanman Workstation,选择 Enable insecure guest logons。
END