作为阿里版的hystrix,sentinel简化了配置方式,提供了可视化界面网站和便捷的配置方式,更加贴合实际的使用方式,各种优点使得sentinel成为服务降级熔断流控等的最佳选择。
1.安装启用
https://github.com/alibaba/Sentinel/releases
官网选择合适的版本下载,其本体是jar文件。
java -jar sentinel-dashboard-1.7.2.jar
由于下载的安装包是jar,所以直接在cmd中启动即可。
登录地址默认是localhost:8080,账号密码都是sentinel,第一次进入界面会是空白,且只有访问过应用一遍,界面内才会出现对应的应用程序的信息。

2.配置应用项目连接sentinel。
1)配置pom文件


 <dependencies>
        <!-- SpringCloud ailibaba nacos-->
        <dependency>
            <groupId>com.alibaba.cloud</groupId>
            <artifactId>spring-cloud-starter-alibaba-nacos-discovery</artifactId>
        </dependency>
        <!-- SpringCloud ailibaba sentinel-datasource-nacos 持久化需要用到-->
        <dependency>
            <groupId>com.alibaba.csp</groupId>
            <artifactId>sentinel-datasource-nacos</artifactId>
        </dependency>
        <!-- SpringCloud ailibaba sentinel-->
        <dependency>
            <groupId>com.alibaba.cloud</groupId>
            <artifactId>spring-cloud-starter-alibaba-sentinel</artifactId>
        </dependency>
        <dependency>
            <groupId>com.bai</groupId>
            <artifactId>cloud-api-common</artifactId>
            <version>${project.version}</version>
        </dependency>
        <dependency>
            <groupId>org.springframework.cloud</groupId>
            <artifactId>spring-cloud-starter-openfeign</artifactId>
        </dependency>
        <dependency>
            <groupId>org.springframework.boot</groupId>
            <artifactId>spring-boot-starter-web</artifactId>
        </dependency>
        <!--监控-->
        <dependency>
            <groupId>org.springframework.boot</groupId>
            <artifactId>spring-boot-starter-actuator</artifactId>
        </dependency>
        <!--热部署-->
        <dependency>
            <groupId>org.springframework.boot</groupId>
            <artifactId>spring-boot-devtools</artifactId>
            <scope>runtime</scope>
            <optional>true</optional>
        </dependency>
        <dependency>
            <groupId>org.projectlombok</groupId>
            <artifactId>lombok</artifactId>
            <optional>true</optional>
        </dependency>
        <dependency>
            <groupId>org.springframework.boot</groupId>
            <artifactId>spring-boot-starter-test</artifactId>
            <scope>test</scope>
        </dependency>
    </dependencies>
2)配置yml
server:
  port: 8401

spring:
  application:
    name: cloudalibaba-sentinal-service
  cloud:
    nacos:
      discovery:
        #Nacos服务注册中心地址
        server-addr: localhost:8848
    sentinel:
      transport:
        #配置Sentin dashboard地址
        dashboard: localhost:8080
        # 默认8719端口,假如被占用了会自动从8719端口+1进行扫描,直到找到未被占用的 端口
        port: 8719
      datasource:   #配置流控规则持久化
        ds1:
          nacos:
            server-addr: localhost:8848
            dataId: cloudalibaba-sentinel-service
            groupId: DEFAULT_GROUP
            data-type: json
            rule-type: flow
management:
  endpoints:
    web:
      exposure:
        include: '*'
3)启动类常规配置
@SpringBootApplication
@EnableDiscoveryClient
public class SentinelMain8401 {
    public static void main(String[] args) {
        SpringApplication.run(SentinelMain8401.class,args);
    }
}
4)controller测试
@RestController
@Slf4j
public class FlowLimitController {

    @GetMapping(value = "/testA")
    public String testA(){
        return "******this is A";
    }
    @GetMapping(value = "/testB")
    public String testB(){
        log.info(Thread.currentThread().getName()+"	"+"***testB");
        return "******this is B";
    }
    @GetMapping(value = "/testD")
    public String testD(){
       /* try {
            TimeUnit.SECONDS.sleep(1);
        } catch (InterruptedException e) {
            e.printStackTrace();
        }
        log.info("this is testD  RT");*/
        int a=10/0;
        log.info("this is testD  异常比例");
        return "!!!!!TESTD";
    }@GetMapping(value = "/testE")
    public String testE(){
        int a=10/0;
        log.info("this is testE  异常数");
        return "!!!!!TESTE";
    }

    @GetMapping(value = "/hotkey")
    @SentinelResource(value = "hotkey",blockHandler = "hotkeyhandler")
    public String hotkey(@RequestParam(value = "p1",required = false)String p1,
                         @RequestParam(value = "p2",required = false)String p2){
        return ">>>>>>hotkey is ready";
    }
    public String hotkeyhandler(String p1, String p2, BlockException exception){
        return ".....hotkey is failed o(╥﹏╥)o";
    }

}
3.常规使用
1)流控规则
点击主页面的流控规则选择新增规则
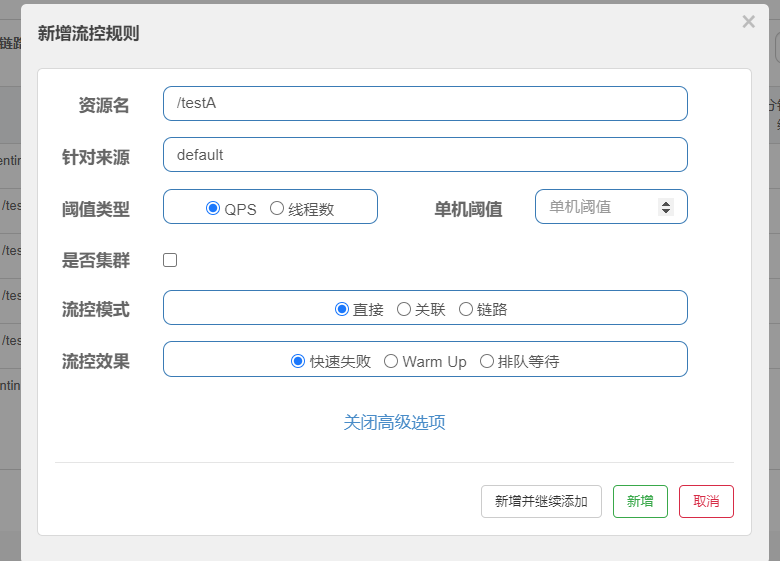
资源名,自己要访问方法的地址
阈值类型,QPS指一秒内通过的访问量,线程数则是启用多少个线程来访问同一个资源。
单机阈值,例如写1,选QPS那么一秒内多于1次访问testA就会进行流量控制,强制报错,线程同理。
流控模式,直接则是遇到阈值就直接失败且默认,关联则是可以在一个资源上关联另一个资源,当资源访问量超过阈值就会强制停止另一个资源进行控制。
流控效果,快速失败是默认,warm up 是为了避免系统突然一段时间内进行了高并发的情况,对阈值进行限制,分为一段段的增长,最终达到阈值。排队等待即访问量过来根据规则一个个通过。
2)降级规则
区别于hystrix,sentinel通过网页可以配置三种降级策略。
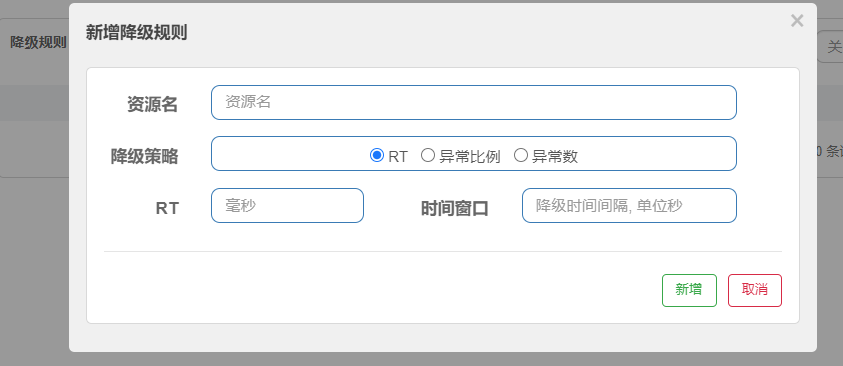
RT:建议去查看官网,有明确的限定规则,即1秒内5次以上访问,且平均访问时间不得超过4900,如若超过以上限制就会进行降级处理。
异常比例:一定时间内错误达到一定比例就会触发降级。
异常数:一定时间内错误达到一定数就会触发降级。(以上配置需要严格遵守官网标准)
3.热点规则
热点规则是为了对方法中的某一个参数进行限流控制,可以精确到特定的参数,而且可以对指定的变量进行额外的控制。
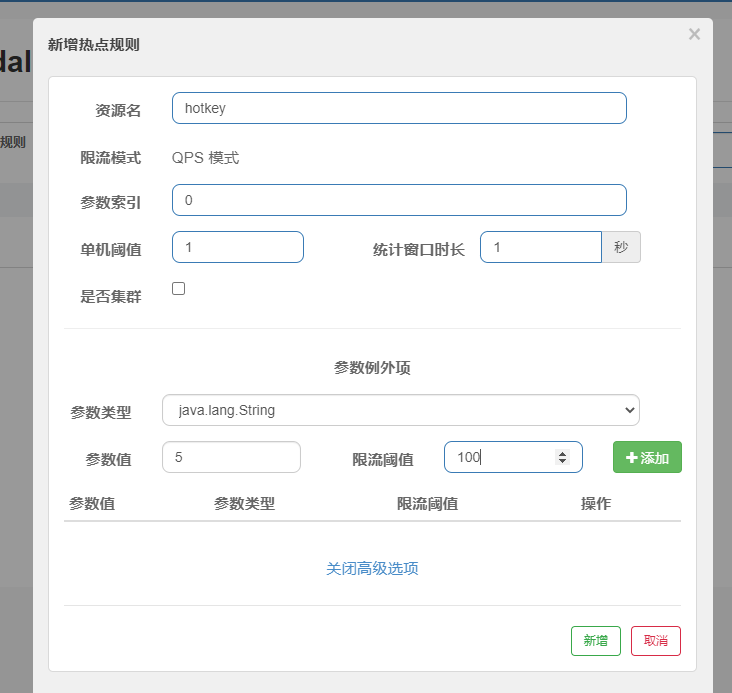
热点规则只支持QPS,需要配合sentinelresource注解
@SentinelResource(value = "hotkey",blockHandler = "hotkeyhandler")
blockhandler为热点限定的方法出现错误的时候兜底的另一个方法。避免出现错误时候使用的系统自带的页面,可以控制想要出现的信息。
public String hotkeyhandler(String p1, String p2, BlockException exception){
        return ".....hotkey is failed o(╥﹏╥)o";
    }
4.系统规则

系统规则可以为整个应用加上层限制,最先进行判断,如果超过规定的阈值,就会触发降级规则,出现错误页面提示。
5.接口形式兜底方法。
  @GetMapping(value = "/byhander")
    @SentinelResource(value = "byhander",blockHandlerClass = Myhander.class,blockHandler = "byhander1")
    public CommonResult byhander(){
        return new CommonResult(200,"成功访问到URL",new PayMent(21L,"999"));
    }
hander接口
public class Myhander {
    public static CommonResult byhander1(BlockException exception){
        return new CommonResult(400,"访问失败了"+exception.getClass().getCanonicalName()+"这里是hander1");
    }
    public static CommonResult byhander2(BlockException exception){
        return new CommonResult(400,"访问失败了"+exception.getClass().getCanonicalName()+"这里是hander2");
    }
}
选择什么样的兜底方法,如果进行报错的话,就会选择对应的方法名称。
本篇所有代码均在GitHub: