小程序的基础组件——视图容器
1. view
基本上用来包裹其他组件
<view class="section">
  <view class="section__title">flex-direction: row</view>
  <view class="flex-wrp" style="flex-direction:row;">
    <view class="flex-item bc_green">1</view>
    <view class="flex-item bc_red">2</view>
    <view class="flex-item bc_blue">3</view>
  </view>
</view>
<view class="section">
  <view class="section__title">flex-direction: column</view>
  <view class="flex-wrp" style="height: 300px;flex-direction:column;">
    <view class="flex-item bc_green">1</view>
    <view class="flex-item bc_red">2</view>
    <view class="flex-item bc_blue">3</view>
  </view>
</view>

2. scroll-view
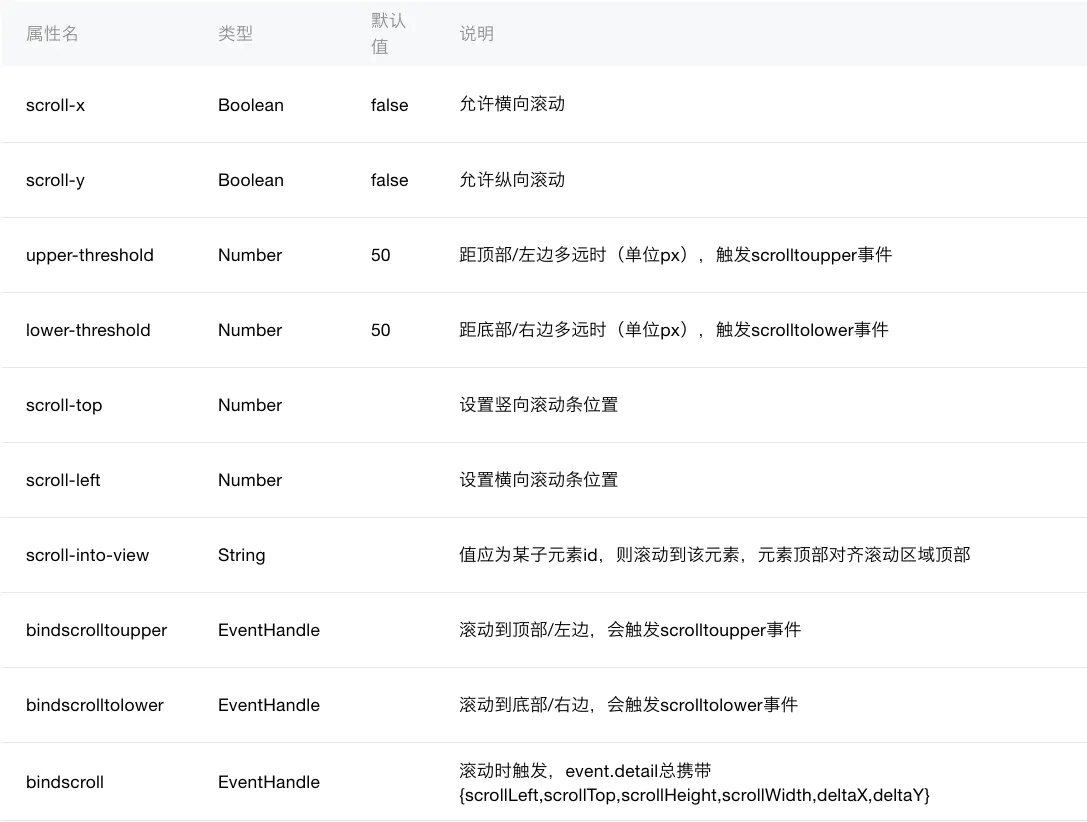
注意:使用竖向滚动时,需要给
index.wxml
<view class="section">
  <view class="section__title">vertical scroll</view>
<!--垂直滚动,这里必须设置高度-->
  <scroll-view scroll-y="true" style="height: 200px;" bindscrolltoupper="upper" bindscrolltolower="lower" bindscroll="scroll" scroll-into-view="{{toView}}" scroll-top="{{scrollTop}}">
    <view id="green" class="scroll-view-item bc_green"></view>
    <view id="red"  class="scroll-view-item bc_red"></view>
    <view id="yellow" class="scroll-view-item bc_yellow"></view>
    <view id="blue" class="scroll-view-item bc_blue"></view>
  </scroll-view>

  <view class="btn-area">
    <button size="mini" bindtap="tap">click me to scroll into view </button>
    <button size="mini" bindtap="tapMove">click me to scroll</button>
  </view>
</view>
<view class="section section_gap">
  <view class="section__title">horizontal scroll</view>
  <scroll-view class="scroll-view_H" scroll-x="true" style=" 100%">
    <view id="green" class="scroll-view-item_H bc_green"></view>
    <view id="red"  class="scroll-view-item_H bc_red"></view>
    <view id="yellow" class="scroll-view-item_H bc_yellow"></view>
    <view id="blue" class="scroll-view-item_H bc_blue"></view>
  </scroll-view>
</view>
index.js
var order = ['red', 'yellow', 'blue', 'green', 'red']
Page({
  data: {
    toView: 'red',
    scrollTop: 100
  },
  upper: function(e) {
    console.log(e)
  },
  lower: function(e) {
    console.log(e)
  },
  scroll: function(e) {
    console.log(e)
  },
  tap: function(e) {
    for (var i = 0; i < order.length; ++i) {
      if (order[i] === this.data.toView) {
        this.setData({
          toView: order[i + 1]
        })
        break
      }
    }
  },
  tapMove: function(e) {
    this.setData({
      scrollTop: this.data.scrollTop + 10
    })
  }
})
index.wxss
.scroll-view-item{
  height: 100px;
}

<!--  white-space
  normal: 正常无变化(默认处理方式.文本自动处理换行.假如抵达容器边界内容会转到下一行)
  pre: 保持HTML源代码的空格与换行,等同与pre标签
  nowrap: 强制文本在一行,除非遇到br换行标签
  pre-wrap: 同pre属性,但是遇到超出容器范围的时候会自动换行
  pre-line: 同pre属性,但是遇到连续空格会被看作一个空格
  inherit: 继承
-->

.scroll-view_H{
  white-space: nowrap;
  display: flex;
}

.scroll-view-item_H{
    height: 100px;
     200px;
    display: inline-block;
}

#green{
  background: green;
}

#yellow{
  background: yellow;
}

#red{
  background: red;
}

#blue{
  background: blue;
}

3. swiper 图片轮播组件
基本属性

index.wxml
<!--是否显示圆点,自动播放,间隔时间,监听滚动和点击事件-->
<swiper indicator-dots="true" autoplay="true" duration="1000" bindchange="listenSwiper" >
<!--注意:其中只可放置<swiper-item/>组件,否则会导致未定义的行为-->
<!--swiper-item只能包含一个节点再多会自动删除-->
    <swiper-item>
        <view style="background: red; height: 150px"></view>
    </swiper-item>
    <swiper-item>
         <view style="background: green; height: 150px"></view>
    </swiper-item>
        <swiper-item>
          <view style="background: blue; height: 150px"></view>
    </swiper-item>
</swiper>
