1.准备工作
|
1
2
3
4
5
|
yum install vim<br>yum install wgetyum install makeyum -y install bzip2yum install m4yum install gcc gcc-c++ glibc-static -y //安装旧的gcc相关的编译工具 |
2.下载gcc 4.8.2源代码
|
1
|
wget http://gcc.gnu.org/pub/gcc/releases/gcc-4.8.2/gcc-4.8.2.tar.bz2 |
3.解压缩源代码包,进入gcc-4.8.2目录,执行./contrib/download_prerequisities脚本会自动下载三个依赖库别为gmp-4.3.2、mpfr-2.4.2、mpc-0.8.1
4.安装gmp,mpfr,mpc
|
1
2
3
4
5
|
cd gmp mkdir build cd build ../configure --prefix=/usr/local/gcc/gmp-4.3.2 make && make install |
|
1
2
3
4
5
|
cd ../../mpfr mkdir build cd build ../configure --prefix=/usr/local/gcc/mpfr-2.4.2 --with-gmp=/usr/local/gcc/gmp-4.3.2make && make install |
|
1
2
3
4
5
|
cd ../../mpc mkdir build cd build ../configure --prefix=/usr/local/gcc/mpc-0.8.1 --with-mpfr=/usr/local/gcc/mpfr-2.4.2 --with-gmp=/usr/local/gcc/gmp-4.3.2make && make install |
5.添加共享库路径
|
1
2
3
4
|
vim /etc/ld.so.conf //添加如下内容/usr/local/gcc/gmp-4.3.2/lib/usr/local/gcc/mpfr-2.4.2/lib/usr/local/gcc/mpc-0.8.1/lib<br>//保存退出,执行ldconfig<br>ldconfig |
6.编译GCC4.8.2
|
1
2
3
4
5
|
cd ../.. mkdir build cd build ../configure --prefix=/usr/local/gcc --enable-threads=posix --disable-checking --enable-languages=c,c++ --disable-multilibmake && make install |
7.卸载旧版本
|
1
2
3
|
yum remove gcc yum remove gcc-c++ updatedb |
8.安装phpstudy
据说在centos-6.5,debian-7.4.,ubuntu-13.10测试成功。(可是也不来个详细步骤,捣鼓了两天,特喵的,成功了赶紧写个博客记录下来)
下载版:http://lamp.phpstudy.net/phpstudy.bin
完整版:http://lamp.phpstudy.net/phpstudy-all.bin
安装:
wget -c http://lamp.phpstudy.net/phpstudy.bin
chmod +x phpstudy.bin #权限设置
./phpstudy.bin #运行安装
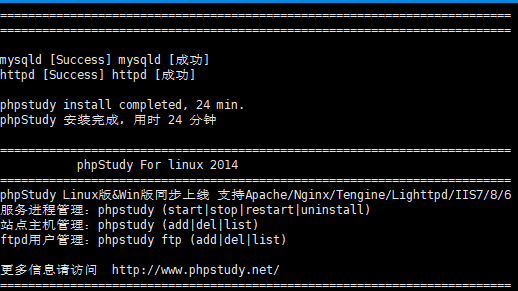
经过前七步的铺垫,很顺利安装成功了
如何切换php版:
再次运行./phpstudy.bin
9.配置apache
|
1
2
3
4
5
6
7
8
9
10
11
12
13
14
15
|
<Directory "/phpstudy/www">Options +Indexes +FollowSymLinks +ExecCGI AllowOverride All Order allow,deny Allow from all Require all granted</Directory><Directory /> Options -Indexes +FollowSymLinks +ExecCGI AllowOverride All Order allow,deny Allow from all Require all granted</Directory> |
安装完ssh后,启动服务

以特权模式运行容器
创建容器:
# docker run -d -name centos7 --privileged=true centos:7 /usr/sbin/init
进入容器:
# docker exec -it centos7 /bin/bash
这样可以使用systemctl启动服务了。