aop( Aspect-Oriented Programming)前置通知原理案例讲解
编程步骤;
- 定义接口
- 编写对象(被代理的对象即目标对象)
- 编写通知(前置通知即目标方法调用前调用)
- 在beans.xml文件中配置
4.1. 配置 被代理对象即目标对象
4.2. 配置通知
4.3. 配置代理对象 其是ProxyFactoryBean的对象实例
4.3.1 配置代理接口集
4.3.2 织入通知
4.3.3 配置被代理对象
直接上代码
1.分别创建两个接口如下:
TestServiceInterface.java接口
1 package com.LHB.aop;
2
3 public interface TestServiceInterface {
4
5     public void sayHello();
6 }
TestServiceInterface2.java接口
1 package com.LHB.aop;
2
3 public interface TestServiceInterface2 {
4
5     public void sayBye();
6 }
2. 创建被代理对象(目标对象)类testService.java,该类实现了TestServiceInterface和TestServiceInterface2两个接口方法
 1 package com.LHB.aop;
 2
 3 public class testService implements TestServiceInterface,TestServiceInterface2 {
 4
 5     private String name;
 6     public String getName() {
 7         return name;
 8     }
 9     public void setName(String name) {
10         this.name = name;
11     }
12     @Override
13     public void sayHello() {
14         // TODO Auto-generated method stub
15
16         System.out.println("hello " + name);
17     }
18     @Override
19     public void sayBye() {
20         // TODO Auto-generated method stub
21         System.out.println("Bye "+ name);
22     }
23
24 }
3. 编写前置通知即MyMethodBeforeAdvice.java,该类实现了MethodBeforeAdvice接口中的before(method method,Object[] args,Object target )方法。
注意:在实现该接口的时候需要导入spring-aop-5.0.1.RELEASE.jar包(本案例在spring5.0.1版本下实现的)
 1 package com.LHB.aop;
 2
 3 import java.lang.reflect.Method;
 4
 5 import org.springframework.aop.MethodBeforeAdvice;
 6
 7 public class MyMethodBeforeAdvice implements MethodBeforeAdvice {
 8
 9     /**
10      * 功能:该函数将在目标函数执行前首先执行
11      * method:被调用方法名字
12      * args:给method传递的参数
13      * target:被代理的目标对象
14      */
15     @Override
16     public void before(Method method, Object[] args, Object target)
17             throws Throwable {
18         // TODO Auto-generated method stub
19         //method.getName()方法将得到目标函数的函数名称
20         System.out.println("记录日志...." + method.getName());
21     }
22
23 }
4.通过new/File新建一个bean.xml配置文件,开始配置前置通知
 1 <?xml version="1.0" encoding="UTF-8"?>
 2 <beans xmlns="http://www.springframework.org/schema/beans"
 3        xmlns:xsi="http://www.w3.org/2001/XMLSchema-instance"
 4        xmlns:context="http://www.springframework.org/schema/context"
 5        xsi:schemaLocation="http://www.springframework.org/schema/beans
 6                 http://www.springframework.org/schema/beans/spring-beans.xsd
 7                 http://www.springframework.org/schema/context
 8                 http://www.springframework.org/schema/context/spring-context.xsd">
 9
10    <!--4.1 配置一个被代理的对象即目标对象-->
11    <bean id="testService" class="com.LHB.aop.testService">
12        <property name="name" value="张三" />
13    </bean>
14    <!--4.2 配置前置通知 -->
15    <bean id="MyMethodBeforeAdvice" class="com.LHB.aop.MyMethodBeforeAdvice" />
16    <!--4.3 配置代理对象 -->
17    <bean id="ProxyFactoryBean" class="org.springframework.aop.framework.ProxyFactoryBean">
18        <!--4.3.1 配置代理接口集 -->
19        <property name="proxyInterfaces">
20                 <list>
21                     <value>com.LHB.aop.TestServiceInterface</value>
22                     <value>com.LHB.aop.TestServiceInterface2</value>
23                 </list>
24        </property>
25        <!--4.3.2 把通知织入到代理对象 -->
26    <property name="interceptorNames">
27        <!-- 相当于把MyMethodBeforeAdvice前置通知把代理对象关联起来,也可以把通知看成拦截器 -->
28        <value>MyMethodBeforeAdvice</value>
29    </property>
30    <!--4.3.3 配置被代理对象可以指定 -->
31    <property name="target" ref="testService"/>
32
33    </bean>
34
35 </beans>
5. 创建一个测试类APP
 1 package com.LHB.aop;
 2
 3 import org.springframework.context.ApplicationContext;
 4 import org.springframework.context.support.ClassPathXmlApplicationContext;
 5
 6 public class App {
 7
 8     public static void main(String[] args) {
 9         // TODO Auto-generated method stub
10         ApplicationContext ac = new ClassPathXmlApplicationContext("com/LHB/aop/beans.xml");
11         TestServiceInterface tsi = (TestServiceInterface) ac.getBean("ProxyFactoryBean");
12         tsi.sayHello();
13         ((TestServiceInterface2)tsi).sayBye();
14
15     }
16
17 }
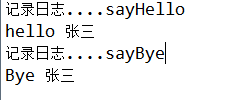
6. 运行结果