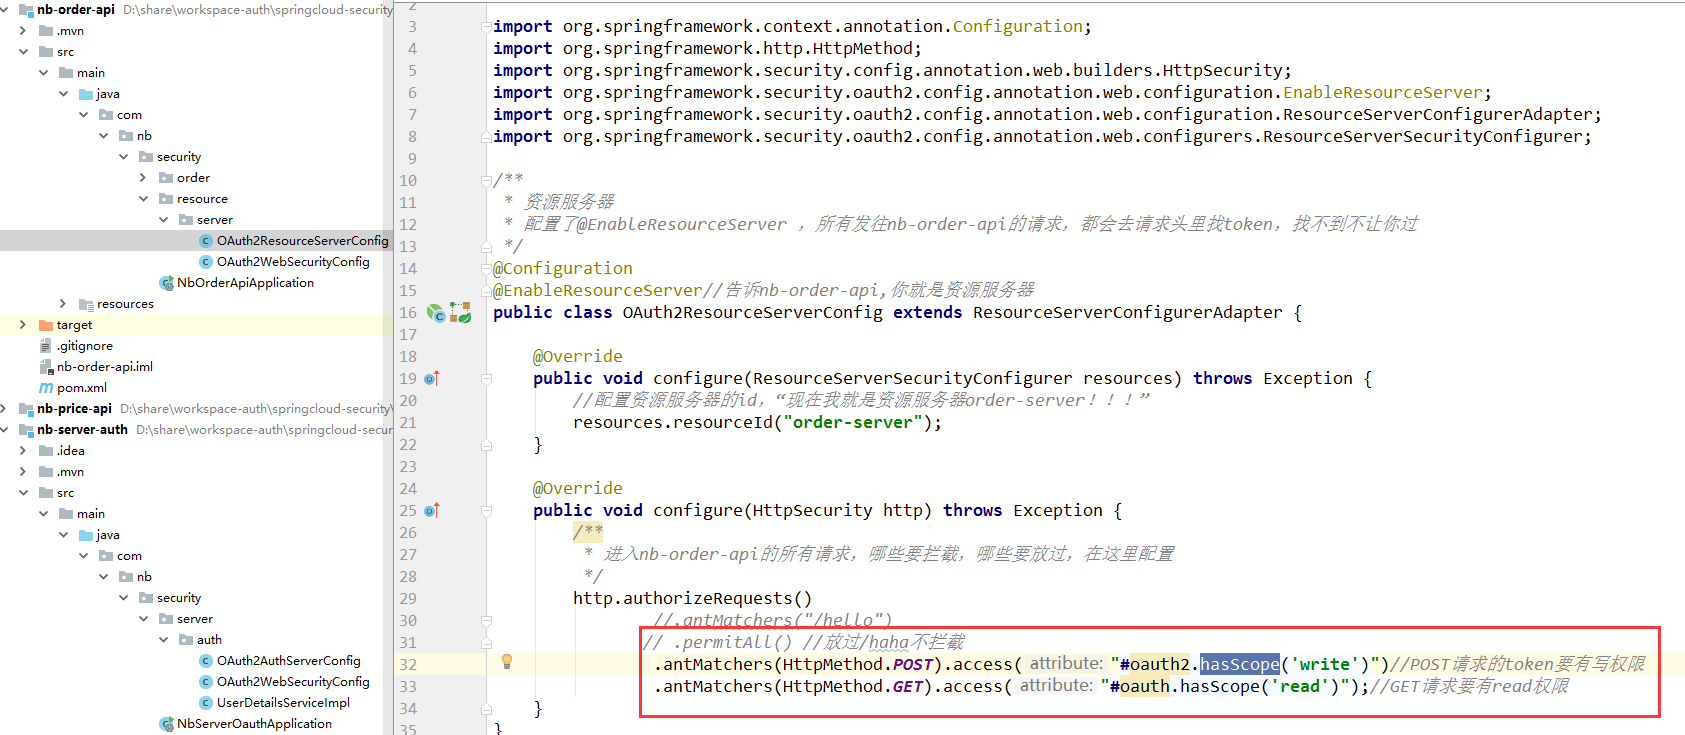
一、通过OAuth2 Toke的Scope参数控制权限
1,在服务端认证服务器里,通过配置客户端的Scope,可以控制给这个客户端生成的token有哪些权限

2,在客户端,申请令牌的时候,可以指定scope
示例:在资源服务器 (nb-order-api)里,控制post请求的token ,其scope必须包含write权限,get请求的token必须包含read权限。
用postman客户端(clientId=orderApp)去认证服务器申请一个scpoe=read的token,去调用资源服务器里的Post请求:

调用这个创建订单的Post请求:
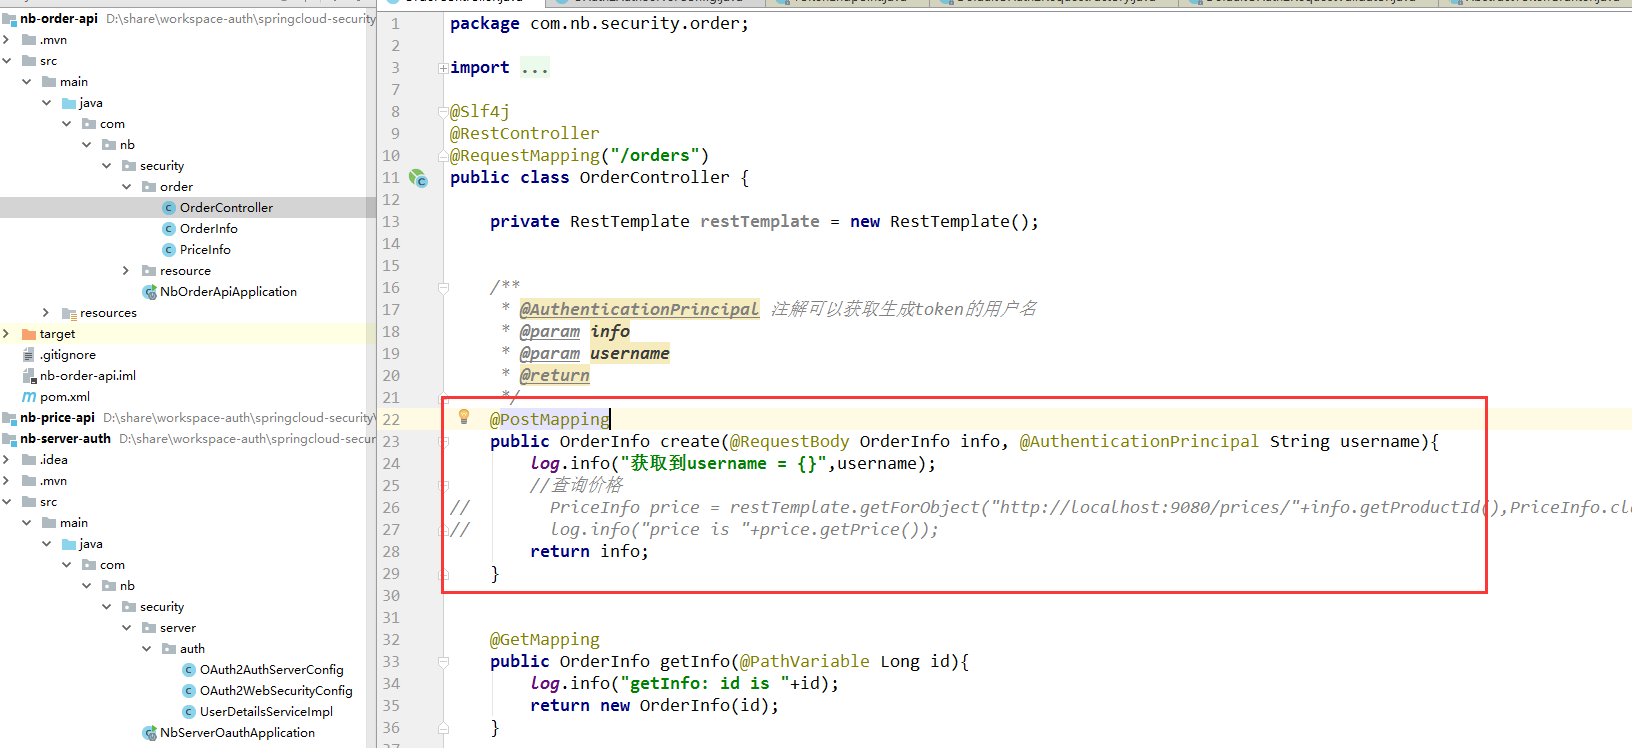
返回错误信息:

二,将token转换为用户信息
目前在资源服务器里,想要获取用户信息,在Controller里,可以通过 @AuthenticationPrincipal 注解,获取生成token的用户名。但是获取不到用户的其他信息,如userId等。

做如下修改:
1,在资源服务器的安全配置: OAuth2WebSecurityConfig 里,的 tokenServices方法里,配置一个 AccessTokenConverter,用来将token信息转换为 User 信息
2,新建UserDetailsService的实现类
OAuth2WebSecurityConfig:
package com.nb.security.resource.server;

import org.springframework.beans.factory.annotation.Autowired;
import org.springframework.context.annotation.Bean;
import org.springframework.context.annotation.Configuration;
import org.springframework.security.authentication.AuthenticationManager;
import org.springframework.security.config.annotation.web.configuration.EnableWebSecurity;
import org.springframework.security.config.annotation.web.configuration.WebSecurityConfigurerAdapter;
import org.springframework.security.core.userdetails.UserDetailsService;
import org.springframework.security.oauth2.provider.authentication.OAuth2AuthenticationManager;
import org.springframework.security.oauth2.provider.token.*;

/**
 * 怎么验发往本服务的请求头的令牌
 * 1,自定义tokenServices ,说明去哪里去验token
 * 2,重写authenticationManagerBean()方法,将AuthenticationManager暴露为一个Bean
 *    要认证跟用户相关的信息,一般用 AuthenticationManager
 *
 * 这样配置了后,所有发往nb-order-api的请求,
 * 需要验token的时候就会发请求去http://localhost:9090/oauth/check_token验token,获取到token对应的用户信息
 */
@Configuration
@EnableWebSecurity
public class OAuth2WebSecurityConfig extends WebSecurityConfigurerAdapter{

    @Autowired
    private UserDetailsService userDetailsService;

    /**
     * 通过这个Bean,去远程调用认证服务器,验token
     * @return
     */
    @Bean
    public ResourceServerTokenServices tokenServices(){
        RemoteTokenServices tokenServices = new RemoteTokenServices();
        tokenServices.setClientId("orderService");//在认证服务器配置的,订单服务的clientId
        tokenServices.setClientSecret("123456");//在认证服务器配置的,订单服务的ClientSecret
        tokenServices.setCheckTokenEndpointUrl("http://localhost:9090/oauth/check_token");
        //配置一个转换器,将token信息转换为用户对象
        // TODO:获取用户信息本应该是认证服务器的事吧!总感觉在这里做不合适
        tokenServices.setAccessTokenConverter(getAccessTokenConverter());
        return tokenServices;
    }

    //转换器,将token转换为用户信息
    private AccessTokenConverter getAccessTokenConverter() {
        DefaultAccessTokenConverter accessTokenConverter = new DefaultAccessTokenConverter();
        //这个类的目的是设UserDetailsService,来将token转换为用户信息,不设默认为空
        DefaultUserAuthenticationConverter userTokenConverter = new DefaultUserAuthenticationConverter();
        userTokenConverter.setUserDetailsService(userDetailsService);
        accessTokenConverter.setUserTokenConverter(userTokenConverter);
        return accessTokenConverter;
    }

    /**
     * 要认证跟用户相关的信息,一般用 AuthenticationManager
     * 覆盖这个方法,可以将AuthenticationManager暴露为一个Bean
     *
     * @return
     * @throws Exception
     */
    @Bean
    @Override
    public AuthenticationManager authenticationManagerBean() throws Exception {
        OAuth2AuthenticationManager authenticationManager = new OAuth2AuthenticationManager();
        authenticationManager.setTokenServices(tokenServices());//设置为自定义的TokenServices,去校验令牌
        return authenticationManager;
    }

}
UserDetailsServiceImpl
package com.nb.security.resource.server;

import org.springframework.security.core.userdetails.UserDetails;
import org.springframework.security.core.userdetails.UserDetailsService;
import org.springframework.security.core.userdetails.UsernameNotFoundException;
import org.springframework.stereotype.Component;

@Component("userDetailsService") //TODO:不
public class UserDetailsServiceImpl implements UserDetailsService {


    @Override
    public UserDetails loadUserByUsername(String username) throws UsernameNotFoundException {
        //这里就不去读数据库了
        User user = new User();
        user.setId(1L);
        user.setUsername(username);
        return user;
    }
}
User对象,实现UserDetails接口:
package com.nb.security.resource.server;

import org.springframework.security.core.GrantedAuthority;
import org.springframework.security.core.authority.AuthorityUtils;
import org.springframework.security.core.userdetails.UserDetails;

import java.util.Collection;

public class User implements UserDetails{

    private Long id;

    private String username;

    private String password;


    @Override
    public Collection<? extends GrantedAuthority> getAuthorities() {
        return AuthorityUtils.commaSeparatedStringToAuthorityList("ROLE_ADMIN");
    }


    @Override
    public boolean isAccountNonExpired() {
        return true;  //账号没过期
    }

    @Override
    public boolean isAccountNonLocked() {
        return true;//账号没被锁定
    }

    @Override
    public boolean isCredentialsNonExpired() {
        return true;//密码没过期
    }

    @Override
    public boolean isEnabled() {
        return true;//是否可用
    }


    @Override
    public String getUsername() {
        return username;
    }

    public void setUsername(String username) {
        this.username = username;
    }

    @Override
    public String getPassword() {
        return password;
    }

    public void setPassword(String password) {
        this.password = password;
    }

    public Long getId() {
        return id;
    }

    public void setId(Long id) {
        this.id = id;
    }


}
然后在订单Controller里,就可以取到用户的 id等其他属性了:
用 @AuthenticationPrincipal User user 注解可以取出User对象。
用 @AuthenticationPrincipal(expression = "#this.id") Long id 可以取出User里面的属性

 代码放在了github :https://github.com/lhy1234/springcloud-security/tree/chapt-4-6-config-persistence

下一节,说将token持久化到数据库