使用POP3协议分析邮箱自动激活用户
2015-03-28 Lover雪儿
前几天,我们实现了,用户PHP模拟邮件激活注册用户,
地址:http://www.cnblogs.com/lihaiyan/p/4359927.html ,但是有的时候,往往是需要注册用户自己手动的向服务器的邮箱进行发送一封邮件,然后服务器通过分析邮箱的发件人,从而匹配自动的激活用户账号。
上class.pop3.php 邮件发送人分析php源代码:


  1 <?php
  2
  3 //用户往lihaiyan1063385677@163.com邮箱发一封邮件,
  4 //系统就会将此用户激活
  5 /*
  6 1.用PHP+POP3协议收取信件(PHP + SOCKER编程)
  7 2.收到信件,分析发件人,并激活该用户
  8 3.每隔几分钟,自动运行一次(linux下crontab做定时任务)
  9 */
 10 class pop3{
 11     const CRLF = "
";    //确定换行符
 12     protected $host = 'pop3.163.com';    //使用163
 13     protected $port = 110;    //端口号
 14
 15     protected $errno = -1;
 16     protected $errstr = '';
 17
 18     protected $user = 'lihaiyan1063385677';
 19     protected $pass = '1063385677';
 20
 21     protected $fh = NULL;    //放置连接资源
 22     protected $conn = NULL;    //放置数据库的资源
 23
 24     public function __construct(){
 25         $this->conn();    //连接
 26         $this->login();    //登陆
 27     }
 28     //连接服务器
 29     public function conn(){
 30         //连上服务器,并会返回资源
 31         $this->fh = fsockopen($this->host,$this->port,$this->errno,$this->errstr);
 32         //var_dump($this->fh);
 33     }
 34     //发送用户名+密码 登陆
 35     public function login(){
 36         //发送  user lihaiyan1063385677
 37         fwrite($this->fh,'user '.$this->user.self::CRLF);
 38         //读取一行返回信息,正确则返回 +OK
 39         if(substr($this->getLine(),0,3) != '+OK'){
 40             throw new Exception('用户名不正确');    //扔出一个异常
 41         }
 42         //发送  pass 1063385677
 43         fwrite($this->fh,'pass '.$this->pass.self::CRLF);
 44         //读取一行返回信息,正确则返回 +OK
 45         if(substr($this->getLine(),0,3) != '+OK'){
 46             throw new Exception('密码不正确');    //扔出一个异常
 47         }
 48     }
 49     //读取内容,从资源中获取一行数据
 50     protected function getLine(){
 51         $temp = fgets($this->fh);
 52         //echo $temp;
 53         return $temp;
 54     }
 55     //查询邮件数量
 56     public function getCnt(){
 57         fwrite($this->fh,'stat '.' '.self::CRLF);
 58         $temp = explode(" ",$this->getLine());
 59         //var_dump($temp);
 60         return $temp[1];
 61     }
 62     //查询出所有的邮件发信人
 63     public function getAll(){
 64         $sum = $this->getCnt();    //获取邮件总数量
 65         $post = array();    //发信人
 66
 67         for($i = 1; $i <= $sum; $i++){
 68             fwrite($this->fh,'top '.$i.' 10'.self::CRLF);
 69                 //每次读取一行,找到以From 开头的行,截取后面的邮箱地址
 70             while($row = fgets($this->fh)){
 71                 //echo $row,'<br/>';
 72                 if(substr(strtolower($row),0,4) == 'from'){
 73                          //截取所有发件人账号
 74                     //$post[] = substr($row,5,strlen($row));
 75                     //echo strpos($row,'<')," ",strpos($row,'>')-10,'<br/>';
 76                     $post[] = substr($row,strpos($row,'<')+1,strpos($row,'>')-strpos($row,'<')-1);
 77                     break;
 78                 }
 79             }
 80         }
 81         return $post;
 82     }
 83     //获取数据库中为激活的用户的邮箱
 84     protected function get_no_active_mail(){
 85         //链接数据库
 86         $this->conn = mysql_connect('localhost','root','');
 87         mysql_query('use test',$this->conn);
 88         mysql_query('set names utf8',$this->conn);
 89
 90         $sql = "select email from mailuser where status = 0";
 91         $rs = mysql_query($sql,$this->conn);
 92         $rs = mysql_fetch_assoc($rs);    //取结果
 93         //print_r($rs);
 94         return $rs;
 95     }
 96
 97
 98     //激活发信人的用户
 99     public function activeUser(){
100         $post = $this->getAll();
101         echo "<B><h3>邮箱中所有的发件人:</h3></B><br/>";
102         print_r($post);
103         $rs = $this->get_no_active_mail();
104         echo "<br/><B><h3>未激活用户的邮箱:</h3></B><br/>";
105         print_r($rs);
106         if(!empty($rs))
107         foreach($rs as $v){
108             if(in_array($v,$post)){
109                 echo "<br/><B><h3>邮箱 ".$v." 的用户激活成功!</h3></B>";
110                 $sql = "update mailuser set status = 1 where status = 0 and email = '".$v."'";
111                 mysql_query($sql,$this->conn);
112             }
113         }
114     }
115 }
116
117 $pop = new pop3();
118 try {
119 //    $pop->conn();    //连接
120 //    $pop->login();    //登陆
121 //    echo '你有',$pop->getCnt(),'封邮件<br/>';
122 //    echo '发信人是:',print_r($pop->getAll()),'<br/>';
123     $pop->activeUser();
124 }
125 catch(exception $e){
126     echo $e->getMessage(); //获取异常
127 }
128 ?>
上mail_create.php模拟账号激活php源代码:
 1 <?php
 2 /* 模拟创建用户+创建激活码+发送激活码邮件
 3  *邮箱用户表
 4     create table mailuser (
 5     uid int primary key auto_increment,
 6     uname char(20) not null default '',
 7     email char(35) not null default '',
 8     pass char(32) not null default '',
 9     status tinyint not null default 0
10 )engine myisam charset utf8;
11   邮箱激活码
12     create table activecode(
13     cid int primary key auto_increment,
14     uname char(20) not null default '',
15     code char(16) not null default '',
16     expire int not null default 0   //激活码过期时间
17 )engine myisam charset utf8;
18  */
19 /*    思路步骤:
20  *    1. 连接数据库
21  *    2. insert用户表
22  *    3. 随机生成激活码并insert activecode表
23  *    4. 把生成的激活码发送至注册邮件,用户激活
24  * */
25 //1.连接数据库
26 require('./conn.php');
27
28 //用户生成随机 激活码 字符串
29 $str = 'abcdefghijkmnpqrstuvwxyzABCDEFGHJMNPQRSTUVWXYZ23456789';
30
31 $uname = substr(str_shuffle($str),0,8);  //生成8位的随机用户名
32 $email = "1063385677@qq.com";   //激活邮件发送地址
33
34
35 //2. 模拟注册用户
36 $sql = "insert into mailuser(uname,email) values('$uname','$email')";
37 mysql_query($sql,$conn);
38
39
40 //3. 生成激活码
41 $code = substr(str_shuffle($str),0,8);    //生成8位随机用户表
42 $expire = time() + 5*24*36;        //激活码5天内有效
43
44 $sql = "insert into activecode(uname,code,expire) value('$uname','$code','$expire')";
45 mysql_query($sql,$conn);
46
47
48 //4. 发送激活邮件,把激活码发送给用户
49 require('../PHPMailer_v5.1/class.phpmailer.php'); //包含phpmailer
50
51 $phpmailer = new PHPMailer();
52 /*设置PHPMAILER发信用的方式
53  * 可以用win下的mail()来发送
54  * 可以用linux下sengmail ,gmail来发送
55  * 可以用smtp协议登录到某个账户上来发送
56  * */
57 $phpmailer->IsSMTP();
58 $phpmailer->Host = 'smtp.163.com';    //设置smtp服务器
59 $phpmailer->SMTPAuth = true;        //SMTP服务器是否需要认证,要登录
60 $phpmailer->Port = 25;                //smtp端口
61 $phpmailer->Username = "lihaiyan1063385677";  //smtp服务器账号
62 $phpmailer->Password = "xxxx";          //smtp服务器密码
63
64 //信息设置完毕
65 //开始正式写信
66 $phpmailer->CharSet = "UTF-8";        //设置字符集
67 $phpmailer->From = "lihaiyan1063385677@163.com";    //来自
68 $phpmailer->FromName = "LoverXueEr";        //姓名
69 $phpmailer->Subject = $uname . ',点击激活邮件';    //主题
70 //开始正式写邮件内容
71 $phpmailer->Body = "please click http://localhost/foruser/PHPMailer/mail/mail_active.php?code=$code to active the acount!!
Thank you!";
72
73 //添加收件人
74 $phpmailer->AddAddress("1063385677@qq.com", "Lover雪儿");
75
76 //发信
77 echo $phpmailer->send() ? "ok":"fail";
78
79
80 ?>
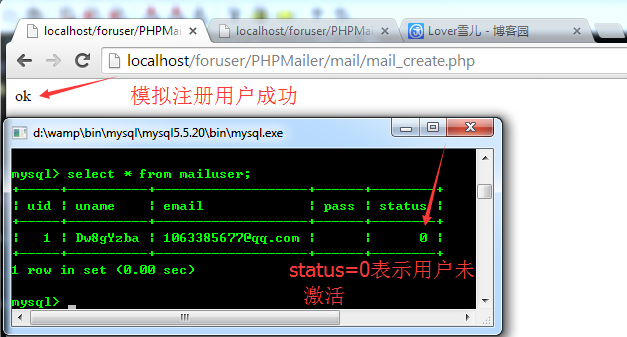
1. 运行mail_create.php,成功的模拟注册用户,查看数据库,结果如图所示:
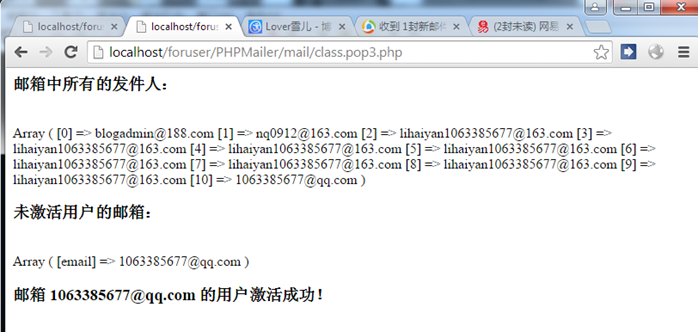
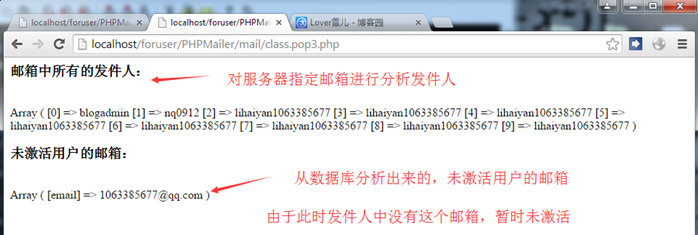
2.运行class.pop3.php,分析邮件的发送人,并且自动匹配激活用户,如下图所示:
3.模拟用户向服务器邮箱发送邮件

发送成功

4.再次运行class.pop3.php,激活成功后,用户status已经激活成功为1,如图所示: