Integration with FastAPI and APScheduler
https://www.cnblogs.com/lightsong/p/15054120.html
上篇博文,介绍了如何给 API Server添加 APScheduler, 以便之后后台的定时任务。
但是这里有一个问题, 如果执行的定时任务很是耗时, 则会在主进程(API server)占有大量的计算资源, 导致API server响应新的连接不及时。
这里引入 RAY 框架来专门解决这个问题。
Ray
https://github.com/ray-project/ray
本质上说, 此框架是一个支持分布式计算的框架, 并且支持 强化学习, 以及模型调参的工作。
An open source framework that provides a simple, universal API for building distributed applications. Ray is packaged with RLlib, a scalable reinforcement learning library, and Tune, a scalable hyperparameter tuning library.
支持三种模式:
寄生于宿主进程
独立进程
集群
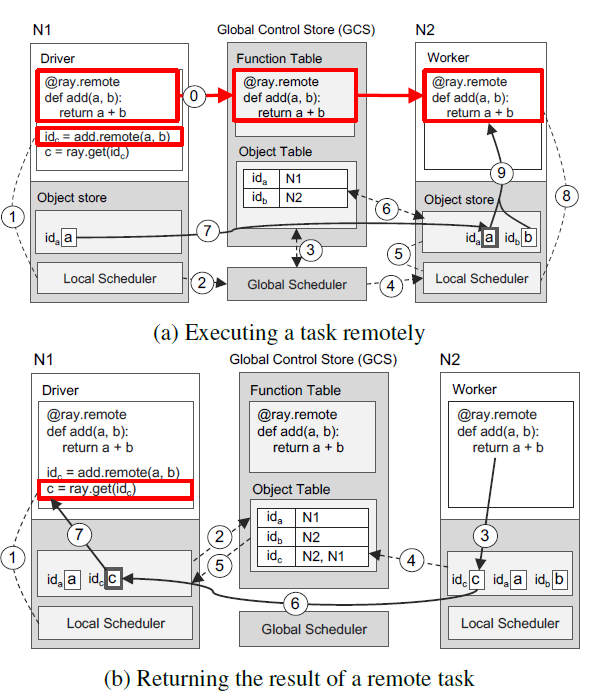
样例代码, 在主进程中, 调用如下代码, 则会将remote标注的函数推送到 ray 工作进程, 此工作进程可以在任何一个主机上。
import ray
ray.init()

@ray.remote
def f(x):
    return x * x

futures = [f.remote(i) for i in range(4)]
print(ray.get(futures))
https://zhuanlan.zhihu.com/p/111340572
在 Paper 里面描述了一个典型的远程调用流程:
Ray与Celery相比
celery也是一个分布式计算的框架。
但是celery部署work进程时候, 需要制定 task所在脚本,
这样工作进程的环境部署,是跟要执行的脚本强相关的。
但是Ray,更加类似Jenkins的主从模式, 可以将待执行的脚本推送到worker node上,然后执行,
这在应用部署上更加解耦, ray相当于是一个分布式运行环境, 可以提交任何的脚本到平台上执行。
类似 spark 平台。
https://github.com/fanqingsong/distributed_computing_on_celery/blob/master/tasks.py
# tasks.py
import time
from celery import Celery

celery = Celery('tasks', broker='pyamqp://localhost:5672')

@celery.task
def sendmail(mail):
    print('sending mail to %s...' % mail['to'])
    time.sleep(2.0)
    print('mail sent.')
https://github.com/fanqingsong/distributed_computing_on_celery/blob/master/taskscaller.py
# tasks caller

from tasks import sendmail

sendmail.delay(dict(to='celery@python.org'))

print("call done")
run
#run tasks proccess
pipenv run celery -A tasks worker --loglevel=info -P eventlet

# run producer
pipenv run python taskscaller.py
Ray Cluster Overview
https://docs.ray.io/en/master/cluster/index.html
What is a Ray cluster?
One of Ray’s strengths is the ability to leverage multiple machines in the same program. Ray can, of course, be run on a single machine (and is done so often), but the real power is using Ray on a cluster of machines.
A Ray cluster consists of a head node and a set of worker nodes. The head node needs to be started first, and the worker nodes are given the address of the head node to form the cluster:

https://docs.ray.io/en/master/configure.html#cluster-resources
# To start a head node.
$ ray start --head --num-cpus=<NUM_CPUS> --num-gpus=<NUM_GPUS>

# To start a non-head node.
$ ray start --address=<address> --num-cpus=<NUM_CPUS> --num-gpus=<NUM_GPUS>

# Specifying custom resources
ray start [--head] --num-cpus=<NUM_CPUS> --resources='{"Resource1": 4, "Resource2": 16}'
code refer
# Connect to ray. Notice if connected to existing cluster, you don't specify resources.
ray.init(address=<address>)
also refer to
https://docs.ray.io/en/releases-0.8.5/using-ray-on-a-cluster.html#deploying-ray-on-a-cluster
Autoscaling clusters with Ray
https://medium.com/distributed-computing-with-ray/autoscaling-clusters-with-ray-36bad4da6b9c
Ray Dashboard
https://docs.ray.io/en/master/ray-dashboard.html#ray-dashboard
提供了完备的后台诊断工具
(1)集群度量
(2)错误和异常,容易定位
(3)查看各个机器上的日志
。。。
Ray’s built-in dashboard provides metrics, charts, and other features that help Ray users to understand Ray clusters and libraries.
The dashboard lets you:
View cluster metrics.
See errors and exceptions at a glance.
View logs across many machines in a single pane.
Understand Ray memory utilization and debug memory errors.
See per-actor resource usage, executed tasks, logs, and more.
Kill actors and profile your Ray jobs.
See Tune jobs and trial information.
Detect cluster anomalies and debug them.
Logging directory structure
https://docs.ray.io/en/master/ray-logging.html#id1
By default, Ray logs are stored in a /tmp/ray/session_*/logs directory.
worker-[worker_id]-[job_id]-[pid].[out|err]: Python/Java part of Ray drivers and workers. All of stdout and stderr from tasks/actors are streamed here. Note that job_id is an id of the driver.
在代码中添加打印,辅助定位
import ray
# Initiate a driver.
ray.init()

@ray.remote
def task():
    print(f"task_id: {ray.get_runtime_context().task_id}")

ray.get(task.remote())
(pid=47411) task_id: TaskID(a67dc375e60ddd1affffffffffffffffffffffff01000000)
API for log
https://docs.ray.io/en/master/package-ref.html#runtime-context-apis
Runtime Context APIs
ray.runtime_context.get_runtime_context()[source]Get the runtime context of the current driver/worker.
Example:
>>> ray.get_runtime_context().job_id # Get the job id.
>>> ray.get_runtime_context().get() # Get all the metadata.
PublicAPI (beta): This API is in beta and may change before becoming stable.
还可以查到 node_id, task_id
- property
job_idGet current job ID for this worker or driver.
Job ID is the id of your Ray drivers that create tasks or actors.
- Returns
- If called by a driver, this returns the job ID. If called in
a task, return the job ID of the associated driver.
- property
node_idGet current node ID for this worker or driver.
Node ID is the id of a node that your driver, task, or actor runs.
- Returns
a node id for this worker or driver.
- property
task_idGet current task ID for this worker or driver.
Task ID is the id of a Ray task. This shouldn’t be used in a driver process.
ray.wait() for Pipeline data processing
https://docs.ray.io/en/master/auto_examples/tips-for-first-time.html#tip-4-pipeline-data-processing
import time
import random
import ray

ray.init(num_cpus = 4)

@ray.remote
def do_some_work(x):
    time.sleep(random.uniform(0, 4)) # Replace this is with work you need to do.
    return x

def process_incremental(sum, result):
    time.sleep(1) # Replace this with some processing code.
    return sum + result

start = time.time()
result_ids = [do_some_work.remote(x) for x in range(4)]
sum = 0
while len(result_ids):
    done_id, result_ids = ray.wait(result_ids)
    sum = process_incremental(sum, ray.get(done_id[0]))
print("duration =", time.time() - start, "
result = ", sum)
AsyncIOScheduler of APScheduler
https://apscheduler.readthedocs.io/en/stable/modules/schedulers/asyncio.html
AsyncIOScheduler was meant to be used with the AsyncIO event loop. By default, it will run jobs in the event loop’s thread pool.
If you have an application that runs on an AsyncIO event loop, you will want to use this scheduler.
异步调度器
https://stackoverflow.com/questions/63001954/python-apscheduler-how-does-asyncioscheduler-work
from apscheduler.schedulers.asyncio import AsyncIOScheduler
import asyncio

async def job():
    print('hi')

scheduler = AsyncIOScheduler()
scheduler.add_job(job, "interval", seconds=3)

scheduler.start()

asyncio.get_event_loop().run_forever()
Code Demo
https://github.com/fanqingsong/fastapi_apscheduler
Purpose
With the help of fastapi and apscheduler, implement API to get cpu rate and set/delete periodical cpu scan job.
reference: https://ahaw021.medium.com/scheduled-jobs-with-fastapi-and-apscheduler-5a4c50580b0e
Architecture
Seperate workload from fastapi server, in order to prevent the server from being too busy.
Select APScheduler as time policy manager.
Select Ray as logic node to execute workload.
The call from fastapi or apscheduler to ray cluster is asynchronous, so all the communication is reactive, no blocking status exists.
Description:
To demostrating how to use fastapi and apscheduler
Requirements: previde API to get CPU rate, and get it periodically
(1) get_cpu_rate -- get current cpu rate by this call
(2) set_cpu_scanner_job -- set one scheduled job to scan cpu rate periodically
(3) del_cpu_scanner_job -- delete the scheduled job

#FastAPI and Pydantic Related Libraries
from fastapi import FastAPI
from pydantic import BaseModel,Field
from typing import List
import asyncio

#APScheduler Related Libraries
from apscheduler.schedulers.asyncio import AsyncIOScheduler
from apscheduler.jobstores.sqlalchemy import SQLAlchemyJobStore

import uuid

import logging
import psutil
from datetime import datetime
import os

import ray

import time

ray.init(address="192.168.1.10:6379")

# Global Variables
app = FastAPI(title="APP for demostrating integration with FastAPI and APSCheduler", version="2020.11.1",
              description="An Example of Scheduling CPU scanner info periodically")

Schedule = None

logging.basicConfig(level=logging.INFO)
logger = logging.getLogger(__name__)


class CPURateResponse(BaseModel):
    cpu_rate:float=Field(title="CPU Rate", description="The current CPU rate")


class SetCPUScannerJobResponse(BaseModel):
    job_id:str=Field(title="CPU Scanner Job ID", description="CPU Scanner Job ID")


class DelCPUScannerJobResponse(BaseModel):
    job_id:str=Field(title="CPU Scanner Job ID", description="CPU Scanner Job ID")


@app.on_event("startup")
async def load_schedule_or_create_blank():
    """
    Instatialise the Schedule Object as a Global Param and also load existing Schedules from SQLite
    This allows for persistent schedules across server restarts.
    """
    print("#####startup event is called.")

    global Schedule
    try:
        jobstores = {
            'default': SQLAlchemyJobStore(url='sqlite:///../store/jobs.sqlite')
        }
        Schedule = AsyncIOScheduler(jobstores=jobstores)
        Schedule.start()
        # asyncio.get_event_loop().run_forever()
        logger.info("Created Schedule Object")
    except:
        logger.error("Unable to Create Schedule Object")


@app.on_event("shutdown")
async def pickle_schedule():
    """
    An Attempt at Shutting down the schedule to avoid orphan jobs
    """
    print("#####shutdown event is called.")

    global Schedule
    Schedule.shutdown()
    logger.info("Disabled Schedule")


@ray.remote
def get_cpu_rate_on_ray():
    logging.info("get_cpu_rate_on_ray called.")
    print("get_cpu_rate_on_ray called. !!")

    job_id = ray.get_runtime_context().job_id
    print(f"job_id={job_id}")

    # time.sleep(10)

    cpu_rate = psutil.cpu_percent(interval=1)

    logging.info(f"cpu_rate = {cpu_rate}")

    return cpu_rate

async def scan_cpu_rate(job_id):
    logging.info(f'###!!!!!!!!!!!!! Tick! call by apscheduler job {job_id}')

    future = get_cpu_rate_on_ray.remote()

    logging.info(future)

    cpu_rate = ray.get(future)

    logging.info(f"cpu_rate = {cpu_rate}")

@app.post("/get_cpu_rate/", response_model=CPURateResponse, tags=["API"])
def get_cpu_rate():
    future = get_cpu_rate_on_ray.remote()

    logging.info(future)

    cpu_rate = ray.get(future)

    logging.info(f"cpu_rate = {cpu_rate}")

    return {"cpu_rate": cpu_rate}


@app.post("/set_cpu_scanner_job/", response_model=SetCPUScannerJobResponse, tags=["API"])
def set_cpu_scanner_job():
    random_suffix = uuid.uuid1()
    job_id = str(random_suffix)

    cpu_scanner_job = Schedule.add_job(scan_cpu_rate, 'interval', seconds=30, id=job_id, args=[job_id])

    job_id = cpu_scanner_job.id
    logging.info(f"set cpu scanner job, id = {job_id}")

    return {"job_id": job_id}


@app.post("/del_cpu_scanner_job/", response_model=DelCPUScannerJobResponse, tags=["API"])
def del_cpu_scanner_job(job_id:str):

    Schedule.remove_job(job_id)

    logging.info(f"set cpu scanner job, id = {job_id}")

    return {"job_id": job_id}