REST API
https://airflow.apache.org/docs/apache-airflow/stable/stable-rest-api-ref.html#section/Overview
为了利于管理, 支持了REST API。
To facilitate management, Apache Airflow supports a range of REST API endpoints across its objects. This section provides an overview of the API design, methods, and supported use cases.
Most of the endpoints accept
JSONas input and returnJSONresponses. This means that you must usually add the following headers to your request:Content-type: application/json Accept: application/json
Open Authentication
https://airflow.apache.org/docs/apache-airflow/stable/security/api.html#basic-authentication
默认API是关闭的, 需要调整为 鉴权认证 模式。
Basic authentication
Basic username password authentication is currently supported for the API. This works for users created through LDAP login or within Airflow Metadata DB using password.
To enable basic authentication, set the following in the configuration:
[api]
auth_backend = airflow.api.auth.backend.basic_auth
https://airflow.apache.org/docs/apache-airflow/stable/stable-rest-api-ref.html#section/Authentication
默认为阻止任何API
To be able to meet the requirements of many organizations, Airflow supports many authentication methods, and it is even possible to add your own method.
If you want to check which auth backend is currently set, you can use
airflow config get-value api auth_backendcommand as in the example below.$ airflow config get-value api auth_backend airflow.api.auth.backend.basic_authThe default is to deny all requests.
For details on configuring the authentication, see API Authorization.
Trigger a new DAG run
https://airflow.apache.org/docs/apache-airflow/stable/stable-rest-api-ref.html#operation/post_dag_run
Trigger a new DAG run
path Parameters
dag_id requiredThe DAG ID.
Request Body schema: application/json
dag_run_id Run ID.
The value of this field can be set only when creating the object. If you try to modify the field of an existing object, the request fails with an BAD_REQUEST error.
If not provided, a value will be generated based on execution_date.
If the specified dag_run_id is in use, the creation request fails with an ALREADY_EXISTS error.
This together with DAG_ID are a unique key.
execution_date The execution date. This is the time when the DAG run should be started according to the DAG definition. The value of this field can be set only when creating the object. If you try to modify the field of an existing object, the request fails with an BAD_REQUEST error. This together with DAG_ID are a unique key.
state DAG State.
conf JSON object describing additional configuration parameters.
The value of this field can be set only when creating the object. If you try to modify the field of an existing object, the request fails with an BAD_REQUEST error.
WHY not using python client?
https://github.com/apache/airflow-client-python
项目还在开发,有些API是坏的。
Apache Airflow Python Client
NOTE: The Apache Airflow Client is still under active development and some methods or APIs might be broken. Please raise an issue in github if you encounter any such issues.
trigger接口确实是坏的, 并且测试用例大都是空的。
https://github.com/apache/airflow-client-python/issues/21
Requirement on DAG
https://stackoverflow.com/questions/56480312/how-to-trigger-a-dag-to-run-immediately
必须将DAG调度模式(scheduling_interva)定义为None
If you want to trigger this dag manually then you need to set scheduling_interval=None and use
airflow trigger_dag dag_id(Documentation : airflow trigger dag)
如下:
https://www.waitingforcode.com/apache-airflow/externally-triggered-dags-apache-airflow/read
dag = DAG(
    dag_id='hello_world_a',
    default_args={
        "owner": "airflow",
        'start_date': airflow.utils.dates.days_ago(1),
    },
    schedule_interval=None
)


def print_hello(**kwargs):
    task_params = kwargs['dag_run'].conf['task_payload']
    print('Hello world a with {}'.format(task_params))

PythonOperator(
    task_id='hello_world_printer',
    python_callable=print_hello,
    provide_context=True,
    dag=dag)
Then deploy this DAG file
https://stackoverflow.com/questions/49033163/airflow-publish-a-dynamically-created-dag
此问题是动态创建dag的讨论, 正常的发布方法为, 将dag文件拷贝到 $AIRFLOW_HOME/dags 目录下, 则airflow文件会自动扫描加载dag。
尝试过,将文件放入此目录下, DAG在数秒之内就能生成, 貌似没有必要研究动态创建的的新的方法。
I want to be able to publish and trigger a DAG object from my code which is not in control of scheduler (viz. $AIRFLOW_HOME/dags folder)
My last resort would be to programmatically create a py file containing the DAG definition that I want to publish and save this file to the $AIRFLOW_HOME/dags folder. I'm sure it should be easier than that.
https://airflow.apache.org/docs/apache-airflow/stable/dag-serialization.html
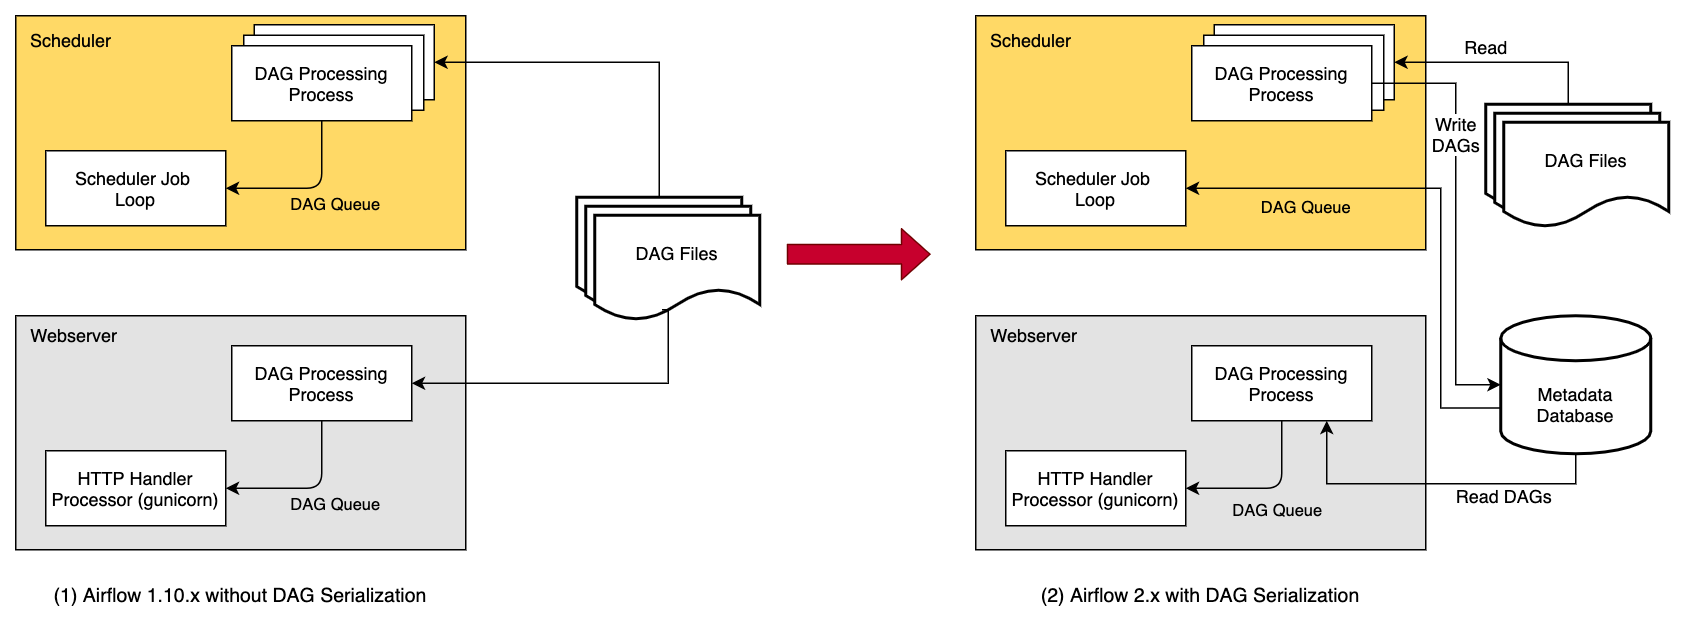
2.0做了架构上的优化,scheduler将dag文件解析后的结果(序列化结果), 保存到 数据库中, 然后sheduler和webserver都使用数据库中的序列化结果。达到解析成果的复用。
In order to make Airflow Webserver stateless, Airflow >=1.10.7 supports DAG Serialization and DB Persistence. From Airflow 2.0.0, the Scheduler also uses Serialized DAGs for consistency and makes scheduling decisions.
As shown in the image above, when using this feature, the
DagFileProcessorProcessin the Scheduler parses the DAG files, serializes them in JSON format and saves them in the Metadata DB asSerializedDagModelmodel.
Code Sample
https://github.com/fanqingsong/machine_learning_workflow_on_airflow/blob/master/rest_api_call/trigger_dag.py
触发一个dag run,然后轮询其状态,直至状态为sucess。
import requests
import json
from pprint import pprint
from datetime import datetime
import sched, time

def get_execution_time():
    # datetime object containing current date and time
    now = datetime.utcnow()

    print("now =", now)

    dt_string = now.strftime("%Y-%m-%dT%H:%M:%SZ")
    print("date and time =", dt_string)

    return dt_string

dag_id = "kmeans_with_workflow"

def trigger_dag():
    exec_time = get_execution_time()

    data = {
        # "dag_run_id": dag_run_id,
        "execution_date": exec_time,
        # "execution_date": None,
        # "state": None,
        "conf": { }
    }

    header = {"content-type": "application/json"}

    result = requests.post(
    f"http://localhost:8080/api/v1/dags/{dag_id}/dagRuns",
    data=json.dumps(data),
    headers=header,
    auth=("admin", "admin"))

    pprint(result.content.decode('utf-8'))

    result = json.loads(result.content.decode('utf-8'))

    pprint(result)

    return result


def get_dag_run(dag_run_id):
    result = requests.get(
    f"http://localhost:8080/api/v1/dags/{dag_id}/dagRuns/{dag_run_id}",
    auth=("admin", "admin"))

    pprint(result.content.decode('utf-8'))


    result = json.loads(result.content.decode('utf-8'))

    pprint(result)

    return result

result = trigger_dag()
dag_run_id = result["dag_run_id"]

s = sched.scheduler(time.time, time.sleep)

def watch_dag_until_complete():
    result = get_dag_run(dag_run_id)
    state = result["state"]

    if state != "success":
        s.enter(1, 1, watch_dag_until_complete)
    else:
        print("dag completed!")

s.enter(1, 1, watch_dag_until_complete)
s.run()
Time zones
https://airflow.apache.org/docs/apache-airflow/stable/timezone.html
上面的例子中, execution_time 为 UTC时间(本初子午线时间),经过查阅资料,发现其内部设计如此,这样可以解除时区的依赖。
Support for time zones is enabled by default. Airflow stores datetime information in UTC internally and in the database. It allows you to run your DAGs with time zone dependent schedules. At the moment Airflow does not convert them to the end user’s time zone in the user interface. There it will always be displayed in UTC. Also templates used in Operators are not converted. Time zone information is exposed and it is up to the writer of DAG what do with it.
schedule_interval
https://airflow.apache.org/docs/apache-airflow/stable/concepts/dags.html#running-dags
除了手动和API触发,
DAG还支持定时触发, 使用的语法和 Crontab一致。
DAGs will run in one of two ways:
When they are triggered either manually or via the API
On a defined schedule, which is defined as part of the DAG
DAGs do not require a schedule, but it's very common to define one. You define it via the
schedule_intervalargument, like this:with DAG("my_daily_dag", schedule_interval="@daily"): ...The
schedule_intervalargument takes any value that is a valid Crontab schedule value, so you could also do:with DAG("my_daily_dag", schedule_interval="0 * * * *"): ...Every time you run a DAG, you are creating a new instance of that DAG which Airflow calls a DAG Run. DAG Runs can run in parallel for the same DAG, and each has a defined
execution_date, which identifies the logical date and time it is running for - not the actual time when it was started.
https://airflow.apache.org/docs/apache-airflow/stable/dag-run.html
输入三种类型:
#1 crontab格式
#2 datetime.timedelta 多长时间间隔执行一次
#3 presets 预设值
或者None
A DAG Run is an object representing an instantiation of the DAG in time.
Each DAG may or may not have a schedule, which informs how DAG Runs are created.
schedule_intervalis defined as a DAG argument, which can be passed a cron expression as astr, adatetime.timedeltaobject, or one of the following cron "presets".Cron Presets
preset
meaning
cron
NoneDon't schedule, use for exclusively "externally triggered" DAGs
@onceSchedule once and only once
@hourlyRun once an hour at the beginning of the hour
0 * * * *
@dailyRun once a day at midnight
0 0 * * *
@weeklyRun once a week at midnight on Sunday morning
0 0 * * 0
@monthlyRun once a month at midnight of the first day of the month
0 0 1 * *
@quarterlyRun once a quarter at midnight on the first day
0 0 1 */3 *
@yearlyRun once a year at midnight of January 1
0 0 1 1 *Your DAG will be instantiated for each schedule along with a corresponding DAG Run entry in the database backend.
timedelta
https://github.com/apache/airflow/issues/14969
import datetime as dt

from airflow import DAG
from airflow.operators.dummy_operator import DummyOperator

dag_params = {
    'dag_id': 'schedule_interval_bug_example_dag',
    'default_args':{
        'owner': 'Administrator',
        'depends_on_past': False,
        'retries': 0,
        'email': ['example@example.com']
    },
    'schedule_interval': dt.timedelta(days=1),
    'start_date': dt.datetime(year=2021, month=1, day=1, hour=11, minute=10),
    'catchup': False
}

with DAG(**dag_params) as dag:
    DummyOperator(task_id='start') >> DummyOperator(task_id='end')
OpenAPI?
此API是遵守 openapi 规范的。
这是什么东东?
https://spec.openapis.org/oas/v3.1.0
What is the OpenAPI Specification?
The OpenAPI Specification (OAS) defines a standard, programming language-agnostic interface description for HTTP APIs, which allows both humans and computers to discover and understand the capabilities of a service without requiring access to source code, additional documentation, or inspection of network traffic. When properly defined via OpenAPI, a consumer can understand and interact with the remote service with a minimal amount of implementation logic. Similar to what interface descriptions have done for lower-level programming, the OpenAPI Specification removes guesswork in calling a service.
https://oai.github.io/Documentation/start-here.html
Advantages of Using OpenAPI
Having your API formally described in a machine-readable format allows automated tools to process it, instantly opening the door to:
- Description Validation and Linting: Check that your description file is syntactically correct and adheres to a specific version of the Specification and the rest of your team’s formatting guidelines.
- Data Validation: Check that the data flowing through your API (in both directions) is correct, during development and once deployed.
- Documentation Generation: Create traditional human-readable documentation based on the machine-readable description, which always stays up-to-date.
- Code Generation: Create both server and client code in any programming language, freeing developers from having to perform data validation or write SDK glue code, for example.
- Graphical Editors: Allow easy creation of description files using a GUI instead of typing them by hand.
- Mock Servers: Create fake servers providing example responses which you and your customers can start testing with before you write a single line of code.
- Security Analysis: Discover possible vulnerabilities at the API design stage instead of much, much later.
swagger vs openapi
https://swagger.io/blog/api-strategy/difference-between-swagger-and-openapi/
Let's start with clarifying Swagger vs OpenAPI
The easiest way to understand the difference is:
- OpenAPI = Specification
- Swagger = Tools for implementing the specification
The OpenAPI is the official name of the specification. The development of the specification is fostered by the OpenAPI Initiative, which involves more the 30 organizations from different areas of the tech world — including Microsoft, Google, IBM, and CapitalOne. Smartbear Software, which is the company that leads the development of the Swagger tools, is also a member of the OpenAPI Initiative, helping lead the evolution of the specification.