在LCD显示任意编码的文本文件,类似电子书
怎样在LCD上显示文件:

需要哪几个文件?
1.顶部文件
通过main.c分析命令行的操作,然后初始化各个管理文件下的结构体,比如DisplayInit();
然后进入draw.c,在draw.c里按顺序调用3个管理文件,并控制显示.
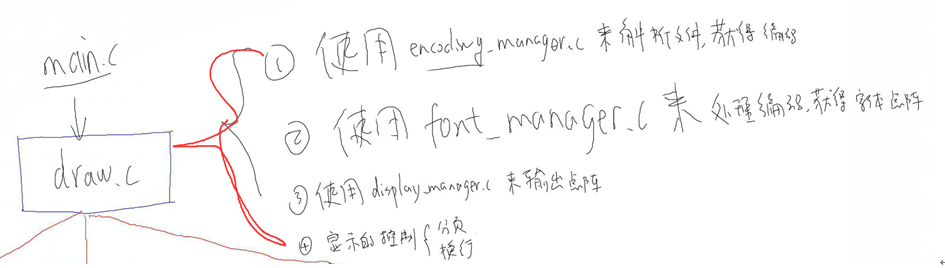
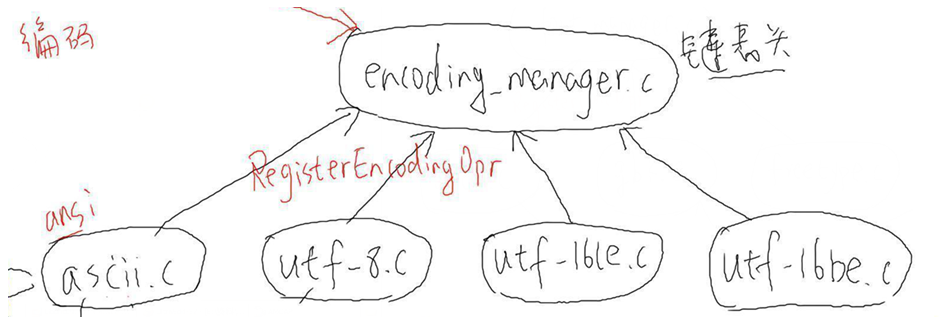
2. encoding_manager.c管理文件
管理4个编码子文件:utf-8.c utf-16be.c utf-16le.c ascii.c
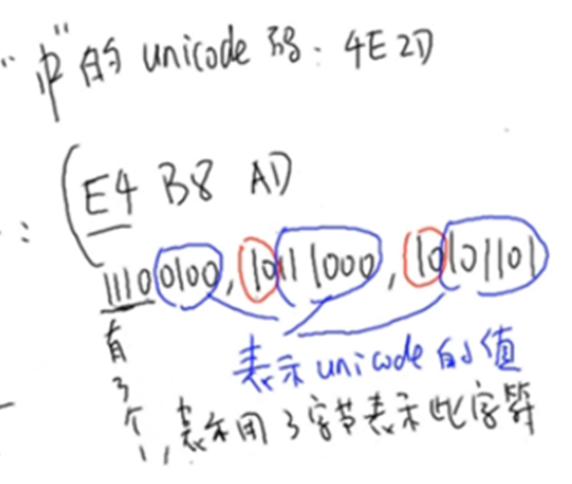
比如utf-8.c:判断某个文件是否以0xEF, 0xBB, 0xBF开头,若是,则接下来通过utf-8规律,来转换字节编码.
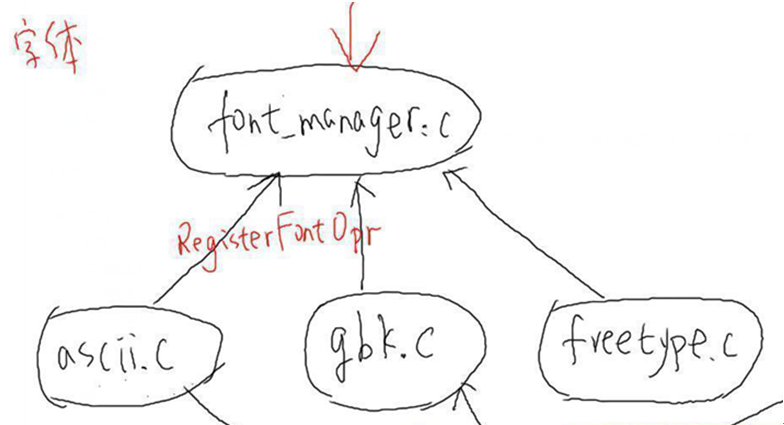
3. font_manager.c管理文件
管理3个字体子文件: ascii.c(英文点阵) gbk.c(中文点阵) freetype.c(矢量字体)
用来将获取的字符编码转换为点阵信息.
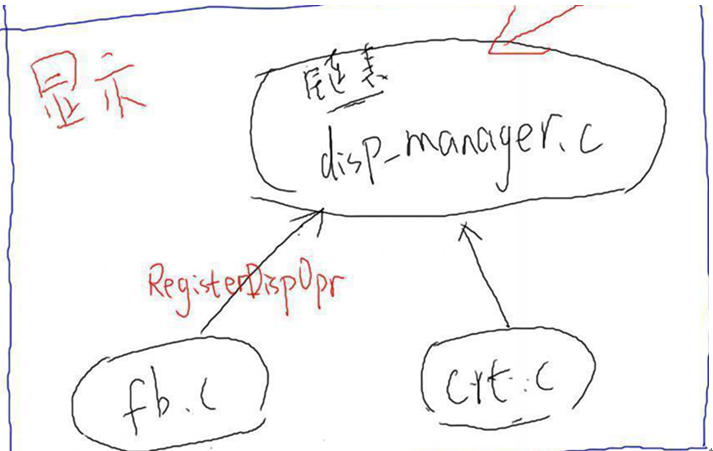
4. disp_manager.c管理文件
管理2个显示子文件: fb.c(LCD显示) crt.c(串口显示)
主要负责将点阵信息发送到显存或串口上.
在3个管理.h头文件里,声明3个不同的结构体
T_DispOpr :显示操作结构体
T_FontOpr:字体操作结构体
T_EncodingOpr:编码操作结构体
5.首先来写显示部分
fb.c需要用到fb初始化函数,以及显示像素函数,当我们换页时,还需要一个清屏函数,所以有个3个函数.
在disp_manager.h里的T_DispOpr结构体,声明如下:
typedef struct DispOpr {
       char *name;
       int iXres;                      //x像素个数
       int iYres;                       //y像素个数
       int iBpp;                       //每个像素多少位
       int (*DeviceInit)(void);    //该函数对于fb.c,是用来打开/dev/fb0,获取var和fix,然后mmap
       int (*ShowPixel)(int iPenX, int iPenY, unsigned int dwColor); //显示一个像素点
       int (*CleanScreen)(void);                     //清屏
       struct DispOpr *ptNext;         //指向下一个注册的T_DispOpr结构体
}T_DispOpr, *PT_DispOpr;
在disp_manager.c里
定义一个空链表: static PT_DispOpr g_ptDispOprHead = NULL;
写一个RegisterDispOpr()函数, 子文件通过调用该函数来注册到链表g_ptDispOprHead里
在disp_manager.c里
定义一个 DisplayInit()函数,用来被main.c初始化时调用。
在fb.c里
在fb.c里定义g_tFBOpr:
static T_DispOpr g_tFBOpr = {
       .name        = "fb",
       .DeviceInit  = FBDeviceInit,    //该函数打开/dev/fb0,然后获取fix和var成员,来mmap()
       .ShowPixel   = FBShowPixel,     //该函数根据x,y,color这3个函数参数,来显示一个像素点
       .CleanScreen = FBCleanScreen,   //该函数,通过memset来将显存清0
};
并定义一个FBInit ()函数,将结构体g_tFBOpr注册到g_ptDispOprHead链表里:
int FBInit(void)
{
       return RegisterDispOpr(&g_tFBOpr);
}
由于FBInit()被disp_manager.c文件的DisplayInit()调用,所以不能写static了.
6.写字体部分
和显示部分思路一样,在fonts_manager.h里的声明了两个结构体,如下所示:
typedef struct FontBitMap {
       int iXLeft;         //文字最左边X坐标
       int iYTop;         //文字最顶部Y坐标
       int iXMax;        //文字的一行像素有多大
       int iYMax;       //文字的一列像素有多大
       int iBpp;       //像素格式
       int iPitch;   /* 对于单色位图, 两行象素之间的跨度,比如8*16,则跨度是8(文字的一行像素有8位) */
       int iCurOriginX;    //当前原点x坐标
       int iCurOriginY;    //当前原点y坐标
       int iNextOriginX;   //下个文字的原点x坐标
       int iNextOriginY;   //下个文字的原点y坐标
       unsigned char *pucBuffer;   //存放文字的像素数据
}T_FontBitMap, *PT_FontBitMap;
typedef struct FontOpr {
       char *name;
       int (*FontInit)(char *pcFontFile, unsigned int dwFontSize);   //初始化字体文件
       int (*GetFontBitmap)(unsigned int dwCode, PT_FontBitMap ptFontBitMap);  //根据dwCode编码获取字体位图,并将信息(坐标,数据,格式等)存到ptFontBitMap里
       struct FontOpr *ptNext;
}T_FontOpr, *PT_FontOpr;
在fonts_manager.c里
定义一个空链表:static PT_FontOpr g_ptFontOprHead = NULL;
写一个RegisterFontOpr()函数, 子文件通过调用该函数来注册到链表g_ptFontOprHead里
写一个GetFontOpr()函数,用来获取字体文件的name
写一个FontsInit ()函数,用来被main.c初始化时调用:
int FontsInit(void)
{
       int iError;
       iError = ASCIIInit();              //调用./fonts/ascii.c里的ASCIIInit()函数
       if (iError)
       {
              DBG_PRINTF("ASCIIInit error!
");
              return -1;
       }

       iError = GBKInit();   //调用./fonts/gbk.c里的GBKInit ()函数
       if (iError)
       {
              DBG_PRINTF("GBKInit error!
");
              return -1;
       }

       iError = FreeTypeInit();  //调用./fonts/freetype.c里的FreeTypeInit ()函数
       if (iError)
       {
              DBG_PRINTF("FreeTypeInit error!
");
              return -1;
       }
       return 0;
}
写一个GetFontOpr()函数,该函数被编码文件调用,来使编码文件与字体文件关联起来,比如通过utf-8编码找到对应的freetype字体.
写字体文件,以freetype.c(矢量字体)为例
首先定义一个T_FontOpr结构体.
定义FreeTypeFontInit成员函数,初始化freetype库,设置字体大小等
定义GetFontBitmap成员函数,FT_Load_Char()转换位图,保存在PT_FontBitMap里
具体内容如下:
#include <config.h>
#include <fonts_manager.h>
#include <ft2build.h>
#include FT_FREETYPE_H
#include FT_GLYPH_H

static int FreeTypeFontInit(char *pcFontFile, unsigned int dwFontSize);
static int FreeTypeGetFontBitmap(unsigned int dwCode, PT_FontBitMap ptFontBitMap);

static T_FontOpr g_tFreeTypeFontOpr = {
       .name          = "freetype",
       .FontInit      = FreeTypeFontInit,
       .GetFontBitmap = FreeTypeGetFontBitmap,
};

static FT_Library g_tLibrary;
static FT_Face g_tFace;
static FT_GlyphSlot g_tSlot;

static int FreeTypeFontInit(char *pcFontFile, unsigned int dwFontSize)
{
       int iError;

       /* 显示矢量字体 */
       iError = FT_Init_FreeType(&g_tLibrary );                       /* initialize library */
       /* error handling omitted */
       if (iError)
       {
              DBG_PRINTF("FT_Init_FreeType failed
");
              return -1;
       }

       iError = FT_New_Face(g_tLibrary, pcFontFile, 0, &g_tFace); /* create face object */
       /* error handling omitted */
       if (iError)
       {
              DBG_PRINTF("FT_Init_FreeType failed
");
              return -1;
       }
       g_tSlot = g_tFace->glyph;
       iError = FT_Set_Pixel_Sizes(g_tFace, dwFontSize, 0);
       if (iError)
       {
              DBG_PRINTF("FT_Set_Pixel_Sizes failed : %d
", dwFontSize);
              return -1;
       }
       return 0;
}

static int FreeTypeGetFontBitmap(unsigned int dwCode, PT_FontBitMap ptFontBitMap)
{
       int iError;
       int iPenX = ptFontBitMap->iCurOriginX;     //初始值为:0  dwFontSize
       int iPenY = ptFontBitMap->iCurOriginY;
#if 0
       FT_Vector tPen;
       tPen.x = 0;
       tPen.y = 0;

       /* set transformation */
       FT_Set_Transform(g_tFace, 0, &tPen);
#endif

       /* load glyph image into the slot (erase previous one) */
       //iError = FT_Load_Char(g_tFace, dwCode, FT_LOAD_RENDER );
       iError = FT_Load_Char(g_tFace, dwCode, FT_LOAD_RENDER | FT_LOAD_MONOCHROME);
       if (iError)
       {
              DBG_PRINTF("FT_Load_Char error for code : 0x%x
", dwCode);
              return -1;
       }

       //DBG_PRINTF("iPenX = %d, iPenY = %d, bitmap_left = %d, bitmap_top = %d, width = %d, rows = %d
", iPenX, iPenY, g_tSlot->bitmap_left, g_tSlot->bitmap_top, g_tSlot->bitmap.width, g_tSlot->bitmap.rows);
       /*笛卡尔坐标的左上角是(bitmap_left,bitmap_top),
          对应LCD的左上角是(Y+bitmap_left,Y-bitmap_top)*/
       ptFontBitMap->iXLeft    = iPenX + g_tSlot->bitmap_left;
       ptFontBitMap->iYTop     = iPenY - g_tSlot->bitmap_top;
       ptFontBitMap->iXMax     = ptFontBitMap->iXLeft + g_tSlot->bitmap.width;
       ptFontBitMap->iYMax     = ptFontBitMap->iYTop  + g_tSlot->bitmap.rows;
       ptFontBitMap->iBpp      = 1;
       ptFontBitMap->iPitch    = g_tSlot->bitmap.pitch;
       ptFontBitMap->pucBuffer = g_tSlot->bitmap.buffer;
       ptFontBitMap->iNextOriginX = iPenX + g_tSlot->advance.x / 64;
       ptFontBitMap->iNextOriginY = iPenY;
       //DBG_PRINTF("iXLeft = %d, iYTop = %d, iXMax = %d, iYMax = %d, iNextOriginX = %d, iNextOriginY = %d
", ptFontBitMap->iXLeft, ptFontBitMap->iYTop, ptFontBitMap->iXMax, ptFontBitMap->iYMax, ptFontBitMap->iNextOriginX, ptFontBitMap->iNextOriginY);
       return 0;
}

int FreeTypeInit(void)
{
       return RegisterFontOpr(&g_tFreeTypeFontOpr);
}
7.写编码部分
在encoding_manager.h里的T_EncondingOpr结构体,声明如下:
typedef struct EncodingOpr {
       char *name;
       int iHeadLen;                                       //文件以多少字节开头
       PT_FontOpr aptFontOprSupported[4]; //指针数组,用来存放支持该编码的字体结构体,以后就通过这个来显示文字
       int (*isSupport)(unsigned char *pucBufHead);  //该函数判断要显示的文件是否支持XX格式
       int (*GetCodeFrmBuf)(unsigned char *pucBufStart, unsigned char *pucBufEnd, unsigned int *pdwCode);
                                                                //将文件里的字节转为编码,存到*pdwCode里
       struct EncodingOpr *ptNext;                    //链表
}T_EncodingOpr, *PT_EncodingOpr;
在encoding_manager.c里
定义一个空链表: static PT_EncodingOpr g_ptEncodingOprHead= NULL;
写一个RegisterEncodingOpr()函数, 子文件通过调用该函数来注册到链表g_ptEncodingOprHead里
写一个SelectEncodingOprForFile()函数,,通过链表来找isSupport成员函数,判断要显示的文字支持哪种格式
写一个EncodingInit()函数,调用每个编码文件的init()函数,里面会初始化编码T_EncodingOpr结构体,并添加编码所支持的文字结构体。
写编码文件,以utf-8.c为例
比如:
对于ansi.c(编码文件),其实就是GBK编码, ascii占1字节,使用ascii点阵库,汉字占2字节,使用HZK16汉字库.
对于utf-8.c(编码文件), ascii只占1字节, 使用ascii点阵库,而汉字占2~4字节,由于freetype字库默认支持的是utf-16格式,所以需要utf-8转换为utf-16后,再使用freetype字库,转换如下图所示:
8.写draw.c
8.1首先定义一个T_PageDesc结构体
用来控制分页换行用,需要用到双向链表
typedef struct PageDesc {

       int iPage;                                                  //当前页数

       unsigned char *pucLcdFirstPosAtFile;            //在LCD上第一个字符位置位于在文件哪个位置

       unsigned char *pucLcdNextPageFirstPosAtFile; //下一页的LCD上第一个字符位置位于文件哪位置

       struct PageDesc *ptPrePage;     //上一页链表,指向上一个T_PageDesc结构体

       struct PageDesc *ptNextPage;     //下一页链表,指向下一个T_PageDesc结构体

} T_PageDesc, *PT_PageDesc;
8.2 写一个OpenTextFile()函数
用来打开文本文件,然后mmap(),并判断支持哪种编码,并获取文件第一个字符位置g_pucLcdFirstPosAtFile标志量,该值被显示下一页函数使用
代码如下:
static int g_iFdTextFile;                       //文件描述符
static unsigned char *g_pucTextFileMem;         //内存映射基地址
static unsigned char *g_pucTextFileMemEnd;      //内存映射结尾地址
static PT_EncodingOpr g_ptEncodingOprForFile;   //用来指向该文件支持的编码EncodingOpr结构体

static unsigned char *g_pucLcdFirstPosAtFile;            //第一个字符位于文件的位置
int OpenTextFile(char *pcFileName)
{
      g_iFdTextFile = open(pcFileName, O_RDONLY);
      ... ...
       if(fstat(g_iFdTextFile, &tStat))
       {
              DBG_PRINTF("can't get fstat
");
              return -1;
       }
g_pucTextFileMem = (unsigned char *)mmap(NULL , tStat.st_size, PROT_READ, MAP_SHARED, g_iFdTextFile, 0);
g_pucTextFileMemEnd = g_pucTextFileMem + tStat.st_size;

       g_ptEncodingOprForFile = SelectEncodingOprForFile(g_pucTextFileMem); //获取支持的编码格式
       if (g_ptEncodingOprForFile)
       {
              g_pucLcdFirstPosAtFile = g_pucTextFileMem + g_ptEncodingOprForFile->iHeadLen; //去掉文件编码前缀的开头位置
              return 0;
       }
       else
       {
              return -1;
       }
}
8.3 写一个ShowOnePage ()显示一页函数
首先设置原点xy为(0,fontsize),通过编码结构体的成员函数获取编码,判断编码是否为 ,然后通过字体结构体的成员函数将编码转为位图,然后判断是否换行,满页,最后显示
8.4 写一个SetTextDetail()函数
通过支持的编码,来设置HZK,freetype,ascii字体文件,以及文字大小,供给main.c调用
9.写main.c
main.c主要用来通过main.c分析命令行的操作,然后初始化各个管理文件下的结构体,比如DisplayInit();
命令行:
./show_file   [-l] [-s Size] [-d Dispshow] [-f freetype_font_file] [-h HZK] <text_file>

//-l  :列出选项

//-s  :设置文字大小

//-d :选择显示到哪里,是fb还是crt

//-f  :指定矢量文字文件位置

//-h  :指定汉字库文件位置

// text_file:指定要显示哪个文件
main.c流程:
1.通过getopt(argc,argv, "ls:f:h:d:");来解析命令行,获取每个选项后的参数
2.然后调用管理文件的初始化函数,去初始化显示文件fb.c,字体文件freetype.c,gbk.c等,以及添加链表
比如: iError = DisplayInit(); //最终调用FBInit();->RegisterDispOpr(&g_tFBOpr);
3.因为optind等于<text_file>位置,所以通过optind打开<text_file>文件:
strncpy(acTextFile, argv[optind], 128); acTextFile[127] = '�'; iError = OpenTextFile(acTextFile); //里面进行mmap(),并获取该文件所支持的编码结构体
4.设置文本细节(HZK库,freetype库,文字大小)
iError = SetTextDetail(acHzkFile, acFreetypeFile, dwFontSize); //该函数位于draw.c
5.调用SelectAndInitDisplay()函数,通过[-d Dispshow]来从g_ptDispOprHead显示链表里,找到name相同的结构体,并放入g_ptDispOpr结构体,然后执行g_ptDispOpr->DeviceInit(); 来初始化LCD
iError = SelectAndInitDisplay(acDisplay);
6.调用ShowNextPage()显示第一页
7.然后进入while(1)里,通过getchar()来获取命令行参数.
输入n则调用ShowNextPage(),显示下一页
输入u则调用ShowNextPage(),显示上一页
输入q退出
10.在PC上显示文本文件
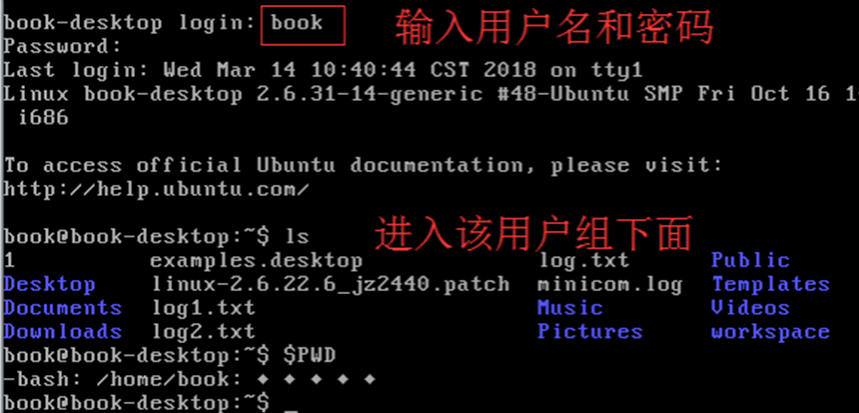
输入ctrl+alt+tab+F1~F6 进入tty1~6字符终端界面,如下图所示,在tty1和tty2里登录book用户:
再次输入ctrl+alt+tab+F7 则退出字符终端界面,进入图形GUI界面
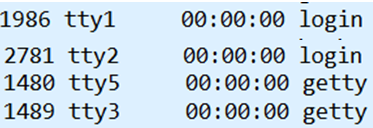
然后输入ps -A,可以发现tty1和tty2显示login登录状态,而其它tty显示getty待机状态:
接下来便通过svaglib库,使在字符终端界面上显示图形,这样就能显示文本了
10.1安装svgalib:
搜索ubuntu svgalib,找到下载地址https://launchpad.net/ubuntu/+source/svgalib/1:1.4.3-30:
svgalib_1.4.3.orig.tar.gz //源码
svgalib_1.4.3-30.debian.tar.gz // 在其debian/patches目录下有很多补丁文件
svgalib_1.4.3-30.dsc
打补丁:
tar xzf svgalib_1.4.3.orig.tar.gz

tar xzf svgalib_1.4.3-30.debian.tar.gz

cd svgalib-1.4.3.orig/

for file in ../debian/patches/*.patch; do patch -p1 < $file; done
编译安装:
sudo make install // 编译出错,需要安装libx86
10.2 安装libx86:
搜索ubuntu libx86,找到下载地址http://packages.ubuntu.com/lucid/libx86-1:
tar xzf libx86_1.1+ds1.orig.tar.gz

gunzip libx86_1.1+ds1-6.diff.gz

cd libx86-1.1/

patch -p1 < ../libx86_1.1+ds1-6.diff

make     // 出错
修改lrmi.c,添加宏, 参考561491.patch,添加如下代码:
=======================================
#if defined(__linux__) && !defined(TF_MASK)
#define TF_MASK X86_EFLAGS_TF
#define IF_MASK X86_EFLAGS_IF
#define VIF_MASK X86_EFLAGS_VIF
#define IOPL_MASK X86_EFLAGS_IOPL
#endif
=======================================
make
sudo make install              //安装成功
10.3 应用程序示例
参考:http://www.svgalib.org/jay/beginners_guide/beginners_guide.html
svgatext.c代码如下:
#include "stdlib.h"
#include "vga.h"
#include "vgagl.h"

int main(void)
{
    int x, y;

    vga_init();

    vga_setmode(G320x200x256);     //分辨率为320x200,24位分辨率

    gl_setpalettecolor(4, 0xE7>>2, 0xDB>>2, 0xB5>>2);
              //将设置调色板第4格设为0xE7DBB5颜色 (泛黄色)

    vga_setcolor(4);           //使用调色板第4格的颜色

    for (x = 0; x < 320; x++)
        for (y = 0; y < 200; y++)
            vga_drawpixel(x, y);         //将整个屏设为调色板第4格的颜色

    sleep(5);
    vga_setmode(TEXT);                //返回到字符终端界面上
    return EXIT_SUCCESS;
}
编译svgatext.c
gcc -o svgatext svgatext.c -lvga -lvgal
10.4 参考svgatext.c,在电子书项目里的./fonts目录下写crt.c显示文件
11.自己写电子书
思路如下:
字体文件只要一个freetype.c,用来显示矢量字体
编码文件只需要: utf-16be.c,utf-16le.c, utf-8,iconv_encoding.c
显示文件就只要一个fb.c文件.
最后写一个draw.c、main.c文件
iconv_encoding.c作用:
因为freetype只支持unicode,所以先判断文本文件是否是GBK编码,若是,则通过iconv_encoding.c,将整个文本文件转换成utf-8编码.
过程:
在arm板上使用iconv()函数时,发现调用
iconv_open("utf-8", " GBK")失败,错误信息为“Invalid argument”.
后来才发现是libiconv库和arm板上的C库版本不同,参考: http://blog.csdn.net/love_life2011/article/details/7086910
进入http://ftp.gnu.org/gnu/libiconv/libiconv-1.14.tar.gz下载libiconv库,重新交叉编译
解压进入libconv目录:
$./configure --prefix=$PWD/out --host=arm-linux
$make
$make install
然后进入out子目录,将编译好的out/lib/目录下的preloadable_libiconv.so拷贝到arm板的lib目录下
再进入arm板,更新环境变量:
$ export LD_PRELOAD=/lib/preloadable_libiconv.so