MyBatis逆向工程
什么是逆向工程
MyBatis的一个主要的特点就是需要程序员自己编写sql,那么如果表太多的话,难免会很麻烦,所以mybatis官方提供了一个逆向工程,可以针对单表自动生成mybatis执行所需要的代码(包括mapper.xml、mapper.java、po..)。一般在开发中,常用的逆向工程方式是通过数据库的表生成代码。
使用逆向工程
使用MyBatis的逆向工程,需要导入逆向工程的jar包,我用的是mybatis-generator-core-1.3.2.jar,下面开始总结一下MyBatis逆向工程的使用步骤。
1,普通项目下使用逆向工程
新建一个工程
我们要新建一个java工程,这个工程专门用来使用逆向工程生成代码的。有些人可能会问,为什么要新建一个工程呢?直接在原来工程中你想生成不就可以了么?确实是这样,可以在原来的工程中生成,但是有风险,因为MyBatis是根据配置文件来生成的(下面会说到),如果生成的路径中有相同的文件,那么就会覆盖原来的文件,这样会有风险。所以开发中一般都会新建一个java工程来生成,然后将生成的文件拷贝到自己的工程中,这也不麻烦,而且很安全。如下:
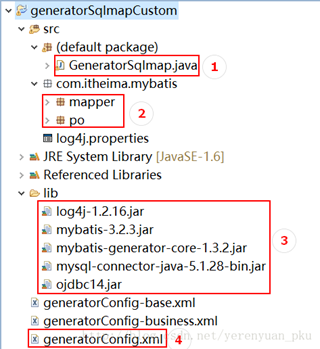
从上图中看,①就是要执行的java代码,执行它即可生成我们需要的代码;②是执行过程中新建的包,这个包都可以在④的配置文件中指定,最好是跟我们自己项目的包名一致,后面就可以直接拷贝了,就不需要修改包名了;③就是jar包咯;④是配置文件,下面会详细分析。
如若需要MyBatis的逆向工程——generatorSqlmapCustom,可点击MyBatis的逆向工程——generatorSqlmapCustom进行下载!
配置逆向工程的配置文件
MyBatis逆向工程生成代码需要一个配置文件,名字随便起。然后MyBatis会根据这个配置文件中的配置,生成相应的代码。mybatis-generator-core-1.3.2.jar这个jar包里面有帮助文档,打开后里面有配置文件的模板,这里就不再赘述了,下面先把配置文件写好
<?xml version="1.0" encoding="UTF-8"?>
<!DOCTYPE generatorConfiguration
PUBLIC "-//mybatis.org//DTD MyBatis Generator Configuration 1.0//EN"
"http://mybatis.org/dtd/mybatis-generator-config_1_0.dtd">
<generatorConfiguration>
<context id="testTables" targetRuntime="MyBatis3">
<commentGenerator>
<!-- 是否去除自动生成的注释 true:是 : false:否 -->
<property name="suppressAllComments" value="true" />
</commentGenerator>
<!--数据库连接的信息:驱动类、连接地址、用户名、密码 -->
<jdbcConnection driverClass="com.mysql.jdbc.Driver"
connectionURL="jdbc:mysql://localhost:3306/mybatis" userId="root"
password="yezi">
</jdbcConnection>
<!-- <jdbcConnection driverClass="oracle.jdbc.OracleDriver"
connectionURL="jdbc:oracle:thin:@127.0.0.1:1521:yycg"
userId="yycg"
password="yycg">
</jdbcConnection> -->
<!-- 默认false,把JDBC DECIMAL 和 NUMERIC 类型解析为 Integer,为 true时把JDBC DECIMAL 和
NUMERIC 类型解析为java.math.BigDecimal -->
<javaTypeResolver>
<property name="forceBigDecimals" value="false" />
</javaTypeResolver>
<!-- targetProject:生成PO类的位置 -->
<javaModelGenerator targetPackage="com.itheima.mybatis.po"
targetProject=".src">
<!-- enableSubPackages:是否让schema作为包的后缀 -->
<property name="enableSubPackages" value="false" />
<!-- 从数据库返回的值被清理前后的空格 -->
<property name="trimStrings" value="true" />
</javaModelGenerator>
<!-- targetProject:mapper映射文件生成的位置 -->
<sqlMapGenerator targetPackage="com.itheima.mybatis.mapper"
targetProject=".src">
<!-- enableSubPackages:是否让schema作为包的后缀 -->
<property name="enableSubPackages" value="false" />
</sqlMapGenerator>
<!-- targetPackage:mapper接口生成的位置 -->
<javaClientGenerator type="XMLMAPPER"
targetPackage="com.itheima.mybatis.mapper"
targetProject=".src">
<!-- enableSubPackages:是否让schema作为包的后缀 -->
<property name="enableSubPackages" value="false" />
</javaClientGenerator>
<!-- 指定数据库表 -->
<table schema="" tableName="user"></table>
<table schema="" tableName="orders"></table>
<!-- 有些表的字段需要指定java类型
<table schema="" tableName="">
<columnOverride column="" javaType="" />
</table> -->
</context>
</generatorConfiguration>
从上面的配置文件中可以看出,配置文件主要做的几件事是:
- 连接数据库,这是必须的,要不然怎么根据数据库的表生成代码呢?
- 指定要生成代码的位置,要生成的代码包括po类,mapper.xml和mapper.java
- 指定数据库中想要生成哪些表
执行逆向工程生成代码
配置文件搞好了,然后就执行以下程序即可生成代码了,生成的java程序,下载的逆向工程文档中都有示例,如下:
public class GeneratorSqlmap {
public void generator() throws Exception{
List<String> warnings = new ArrayList<String>();
boolean overwrite = true;
//指定 逆向工程配置文件
File configFile = new File("generatorConfig.xml");
ConfigurationParser cp = new ConfigurationParser(warnings);
Configuration config = cp.parseConfiguration(configFile);
DefaultShellCallback callback = new DefaultShellCallback(overwrite);
MyBatisGenerator myBatisGenerator = new MyBatisGenerator(config,
callback, warnings);
myBatisGenerator.generate(null);
}
public static void main(String[] args) throws Exception {
try {
GeneratorSqlmap generatorSqlmap = new GeneratorSqlmap();
generatorSqlmap.generator();
} catch (Exception e) {
e.printStackTrace();
}
}
}
运行一下即可,运行完了后刷新一下工程,就可以看到最新生成的代码了。
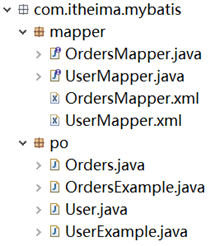
这里可以看出有个细节,每个po类多了一个东西,就是xxxExample.java,这个类是给用户自定义sql使用的,后面我会提到。到这里就生成好了,下面我们就把生成的代码拷贝到自己的工程使用了。
逆向工程测试
在这里我把生成的代码拷贝到MyBatis整合Spring的工程案例中,如下:
接着在Spring核心配置文件——application-context.xml添加如下配置:
<bean class="org.mybatis.spring.mapper.MapperScannerConfigurer">
<!-- 配置要扫描的包,如果扫描多个包使用半角逗号分隔 -->
<property name="basePackage" value="com.itheima.mybatis.mapper" />
</bean>
最后编写UserMapper接口的单元测试类——UserMapperTest.java,内容如下:
public class UserMapperTest {
private ApplicationContext applicationContext;
@Before
public void init() {
//初始化Spring容器
applicationContext = new ClassPathXmlApplicationContext("classpath:spring/applicationContext.xml");
}
@Test
public void testDeleteByPrimaryKey() {
fail("Not yet implemented");
}
@Test
public void testInsert() {
UserMapper userMapper = applicationContext.getBean(UserMapper.class);
User user = new User();
user.setUsername("武大郎");
user.setSex("1");
user.setBirthday(new Date());
user.setAddress("河北清河县");
userMapper.insert(user);
}
@Test
public void testSelectByExample() {
UserMapper userMapper = applicationContext.getBean(UserMapper.class);
UserExample example = new UserExample();
// Criteria类是UserExample类里面的内部类,它专门用于封装自定义查询条件的
// Criteria criteria = example.createCriteria();
// criteria.andUsernameLike("%张%");
// 执行查询
List<User> list = userMapper.selectByExample(example);
for (User user : list) {
System.out.println(user);
}
}
@Test
public void testSelectByPrimaryKey() {
UserMapper userMapper = applicationContext.getBean(UserMapper.class);
User user = userMapper.selectByPrimaryKey(10);
System.out.println(user);
}
@Test
public void testUpdateByPrimaryKey() {
fail("Not yet implemented");
}
}
可以看出,逆向工程生成的代码,基本上和之前使用的差不多,只不过它更规范一点,而且还多了自定义查询条件的java类,用起来还是挺方便的。
2,Maven项目创建逆向工程
配置文件:
<?xml version="1.0" encoding="UTF-8" ?>
<!DOCTYPE generatorConfiguration PUBLIC
"-//mybatis.org//DTD MyBatis Generator Configuration 1.0//EN"
"http://mybatis.org/dtd/mybatis-generator-config_1_0.dtd" >
<generatorConfiguration>
//注意:这里的配置一定要是本地mysqlj的ar文件路径. 这是指向的是我的maven仓库的地址
<classPathEntry location="C:ToolsAndDevelopedevelop epository_sshmysqlmysql-connector-java5.1.6mysql-connector-java-5.1.6.jar"/>
<context id="context" targetRuntime="MyBatis3">
<commentGenerator>
<property name="suppressAllComments" value="false"/>
<property name="suppressDate" value="true"/>
</commentGenerator>
<jdbcConnection userId="root" password="root" driverClass="com.mysql.jdbc.Driver"
connectionURL="jdbc:mysql://localhost:3306/mybatis_db"/>
<javaTypeResolver>
<property name="forceBigDecimals" value="false"/>
</javaTypeResolver>
<javaModelGenerator targetPackage="com.lifeibai.domian" targetProject=".">
<property name="enableSubPackages" value="false"/>
<property name="trimStrings" value="true"/>
<property name="" value=""
</javaModelGenerator>
<sqlMapGenerator targetPackage="com.lifeibai.mapper" targetProject=".">
<property name="enableSubPackages" value="false"/>
</sqlMapGenerator>
<javaClientGenerator targetPackage="com.lifeibai.mapper" type="XMLMAPPER" targetProject=".">
<property name="enableSubPackages" value="false"/>
</javaClientGenerator>
<table schema="" tableName="user" enableCountByExample="false" enableDeleteByExample="false"
enableSelectByExample="false" enableUpdateByExample="false"/>
<table schema="" tableName="orders" enableCountByExample="false" enableDeleteByExample="false"
enableSelectByExample="false" enableUpdateByExample="false"/>
</context>
</generatorConfiguration>
(一) Maven插件版
<?xml version="1.0" encoding="UTF-8"?>
<project xmlns="http://maven.apache.org/POM/4.0.0"
xmlns:xsi="http://www.w3.org/2001/XMLSchema-instance"
xsi:schemaLocation="http://maven.apache.org/POM/4.0.0 http://maven.apache.org/xsd/maven-4.0.0.xsd">
<modelVersion>4.0.0</modelVersion>
<groupId>com.lifeibia.mybaitis_demo_002</groupId>
<artifactId>mybaitis_demo_002</artifactId>
<version>1.0-SNAPSHOT</version>
<build>
<plugins>
<plugin>
<groupId>org.mybatis.generator</groupId>
<artifactId>mybatis-generator-maven-plugin</artifactId>
<version>1.3.2</version>
<configuration>
<verbose>true</verbose>
<overwrite>true</overwrite>
</configuration>
</plugin>
</plugins>
</build>
</project>
注意:maven项目运行插件, generatorConfig文件的子元素属性:targetProject的路径必须是./src/main/java
<javaModelGenerator targetPackage="com.lifeibai.domian" targetProject="./src/main/java ">
<property name="enableSubPackages" value="false"/>
<property name="trimStrings" value="true"/>
<property name="" value=""
</javaModelGenerator>
<sqlMapGenerator targetPackage="com.lifeibai.mapper" targetProject="./src/main/java.>
<property name="enableSubPackages" value="false"/>
</sqlMapGenerator>
<javaClientGenerator targetPackage="com.lifeibai.mapper" type="XMLMAPPER" targetProject="./src/main/java">
<property name="enableSubPackages" value="false"/>
</javaClientGenerator>
(二) IDEA-maven环境下的MyBatis plugin
注意: javaModelGenerator, sqlMapGenerator, javaClientGenerator的targetPackage指向的包,一定要<先创建出来>如:com.lifebai.mapper. 这个是与maven plugin插件不同的地方,maven plugin插件会针对没有的目录进行创建,MyBatis的插件并不会
<javaModelGenerator targetPackage="com.lifeibai.domian" targetProject="./src/main/java ">
<property name="enableSubPackages" value="false"/>
<property name="trimStrings" value="true"/>
<property name="" value=""
</javaModelGenerator>
<sqlMapGenerator targetPackage="com.lifeibai.mapper" targetProject="./src/main/java.>
<property name="enableSubPackages" value="false"/>
</sqlMapGenerator>
<javaClientGenerator targetPackage="com.lifeibai.mapper" type="XMLMAPPER" targetProject="./src/main/java">
<property name="enableSubPackages" value="false"/>
</javaClientGenerator>
1,下载MyBatis plugin插件
2,在resources下邮件新建文件
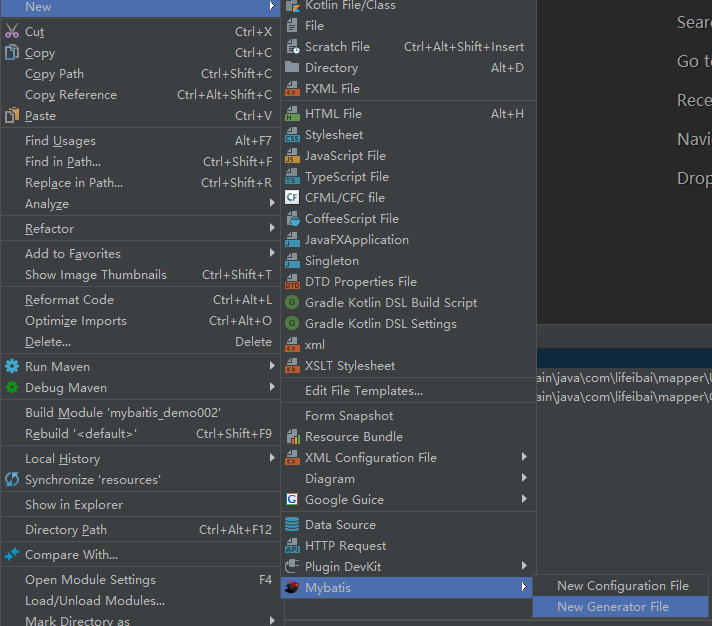
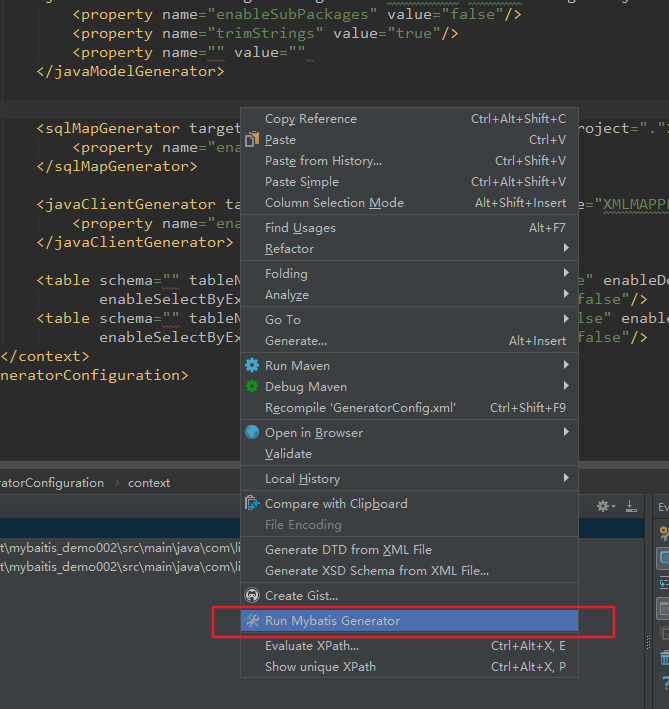
3,编写好GeneratorConfig.xml文件后,选中该文件,或在文件中右键:
最后generatordiamante奉上,下面注意,一定要有本地数据库连接的jar包
<?xml version="1.0" encoding="UTF-8" ?>
<!DOCTYPE generatorConfiguration PUBLIC
"-//mybatis.org//DTD MyBatis Generator Configuration 1.0//EN"
"http://mybatis.org/dtd/mybatis-generator-config_1_0.dtd" >
<generatorConfiguration>
<classPathEntry location="C:ToolsAndDevelopedevelop epository_sshmysqlmysql-connector-java5.1.6mysql-connector-java-5.1.6.jar"/>
<context id="context" targetRuntime="MyBatis3">
<commentGenerator>
<property name="suppressAllComments" value="false"/>
<property name="suppressDate" value="true"/>
</commentGenerator>
<jdbcConnection userId="root" password="root" driverClass="com.mysql.jdbc.Driver"
connectionURL="jdbc:mysql://localhost:3306/mybatis_db"/>
<javaTypeResolver>
<property name="forceBigDecimals" value="false"/>
</javaTypeResolver>
<javaModelGenerator targetPackage="com.lifeibai.domian" targetProject="./src/main/java">
<property name="enableSubPackages" value="false"/>
<property name="trimStrings" value="true"/>
</javaModelGenerator>
<sqlMapGenerator targetPackage="com.lifeibai.mapper" targetProject="./src/main/java">
<property name="enableSubPackages" value="false"/>
</sqlMapGenerator>
<javaClientGenerator targetPackage="com.lifeibai.mapper" type="XMLMAPPER" targetProject="./src/main/java">
<property name="enableSubPackages" value="false"/>
</javaClientGenerator>
<table schema="" tableName="user" enableCountByExample="false" enableDeleteByExample="false"
enableSelectByExample="false" enableUpdateByExample="false"/>
<table schema="" tableName="orders" enableCountByExample="false" enableDeleteByExample="false"
enableSelectByExample="false" enableUpdateByExample="false"/>
</context>
</generatorConfiguration>