目录
2.3 展示: /work 需要密码 /public 无需密码
1.nginx基础知识
1.1 什么是nginx
nginx 是一个 web服务器 ( 静态资源 ) 代理服务器
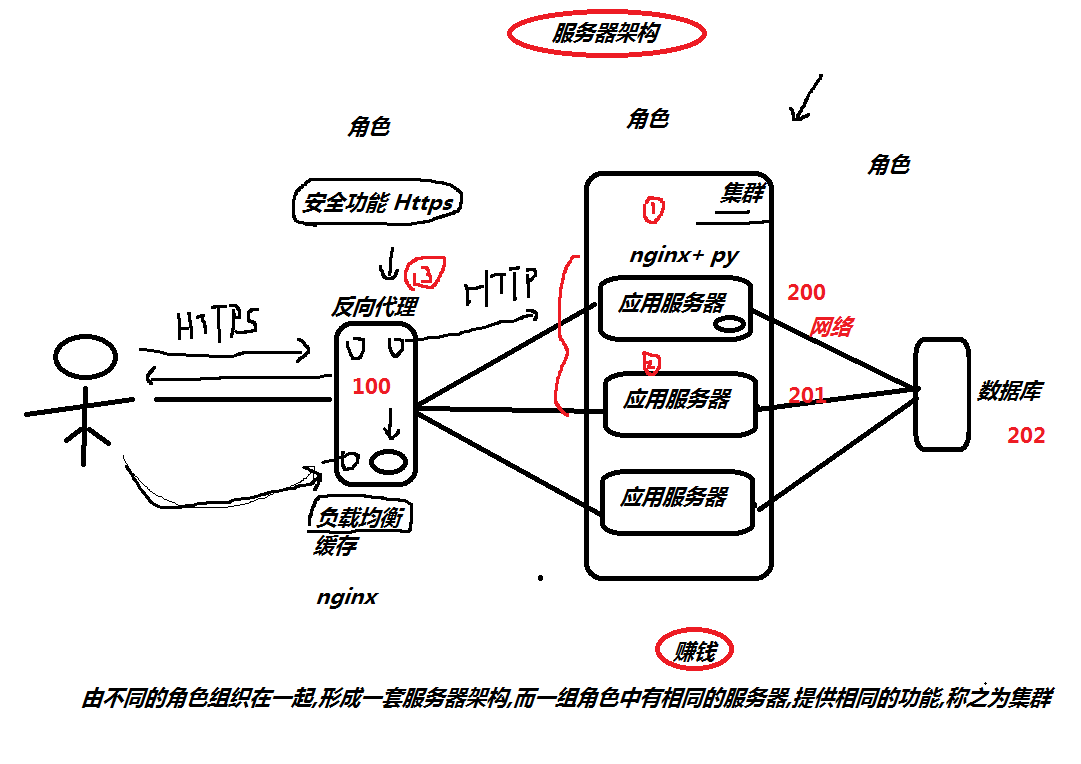
1.2 nginx应用场景
1.web服务器
2.反向代理
2.1) 负载均衡
2.2) 缓存
3.安全服务https
1.3 nginx组成结构
二进制文件: 汽车的基本框架,提供驾驶功能
nginx配置文件: 控制汽车前往的目的地
access_log日志: GPS记录行动轨迹
error_log日志: 黑匣子,分析故障,和定位故障

1.4 nginx安装部署
step1.配置官方yum源 ( epel源获取,使用过程中就会出现权限不足的问题 )
step2.执行以下命令安装nginx
[root@oldboy-pythonedu ~]# wget -O /etc/yum.repos.d/epel.repo http://mirrors.aliyun.com/repo/epel-7.repo
[root@oldboy-pythonedu ~]# yum install nginx -y
[root@oldboy-pythonedu ~]# rpm -q nginx
nginx-1.16.1-1.el7.x86_64
1.5 nginx目录结构
[root@oldboy-pythonedu ~]# rpm -ql nginx
/etc/logrotate.d/nginx 日志轮转 ( 日志切割 )
/etc/nginx/ nginx配置文件目录
/etc/nginx/nginx.conf nginx主配置文件
/var/log/nginx 日志目录
1.6 nginx配置文件
/etc/nginx/nginx.conf
[root@oldboy-pythonedu ~]# cat /etc/nginx/nginx.conf
user nginx;                                            # 运行nginx的用户身份
worker_processes auto;                                # worker进程运行多少个, auto自动与cpu核心保持一致
error_log /var/log/nginx/error.log;                    # 错误日志
pid /run/nginx.pid;                                    # 进程运行后,在该目录下存放一个pid文件,文件中记录的是该进程的ID编号

include /usr/share/nginx/modules/*.conf;            # 包含所有的模块配置文件

events {
    worker_connections 1024;                        # worker的最大连接数   [  worker_connections *  worker_processes ]
}


http {            # 负责http的请求与响应
    log_format  main  '$remote_addr - $remote_user [$time_local] "$request" '
                      '$status $body_bytes_sent "$http_referer" '
                      '"$http_user_agent" "$http_x_forwarded_for"';

    access_log  /var/log/nginx/access.log  main;

    sendfile            on;
    tcp_nopush          on;
    tcp_nodelay         on;
    keepalive_timeout   65;
    types_hash_max_size 2048;

    include             /etc/nginx/mime.types;            # 存放的都是nginx能支持的文件类型
    default_type        application/octet-stream;        # 当 nginx 不支持该类型时,默认以下载的方式回传给用户

    include /etc/nginx/conf.d/*.conf;                    # 包含conf.d/*.conf结尾的文件    [ 定义的一个又一个的网站 ]
}
1.7 test.oldboyedu.com
step1.关闭防火墙
firewalld
        systemctl stop firewalld
        systemctl disable firewalld

selinux
        setenforce 0
        sed -i 's#SELINUX=enforcing#SELINUX=disabled#g' /etc/selinux/config
step2.清除nginx.conf中所有的注释,以及server整个段的内容
step3.新建一个站点
[root@oldboy-pythonedu ~]# cat /etc/nginx/conf.d/test.oldboyedu.com.conf
server {
    listen 80;
    server_name test.oldboyedu.com;

    location / {
        root /code/html;
        index index.html;
    }
}

# 根据配置文件定义的路径,创建该路径,并放入代码
[root@oldboy-pythonedu ~]# mkdir /code/html -p
[root@oldboy-pythonedu ~]# echo "test-oldboyedu.com....." > /code/html/index.html

# 检查配置文件是否有错误的地方
[root@oldboy-pythonedu ~]# nginx -t
nginx: the configuration file /etc/nginx/nginx.conf syntax is ok
nginx: configuration file /etc/nginx/nginx.conf test is successful


# 重载服务,并生效
[root@oldboy-pythonedu ~]# systemctl restart nginx


# 配置Hosts解析  ( 假的域名  )
Windows:  C:WindowsSystem32driversetc
    10.0.0.200 test.oldboyedu.com

MacOS:    /etc/hosts
    10.0.0.200 test.oldboyedu.com
1.8 game.oldboyedu.com
step1.编辑nginx配置文件
[root@oldboy-pythonedu ~]# cat /etc/nginx/conf.d/game.oldboyedu.com.conf
server {
    listen 80;
    server_name game.oldboyedu.com;

    location / {
        root /code/game;
        index index.html;
    }
}
step2.根据配置,创建目录,上传代码
[root@oldboy-pythonedu ~]# mkdir /code/game -p
[root@oldboy-pythonedu ~]# cd /code/game/
[root@oldboy-pythonedu game]# rz
[root@oldboy-pythonedu game]# unzip html5_(1).zip
step3.检查nginx配置文件语法, 然后重载服务
[root@oldboy-pythonedu game]# nginx -t
nginx: the configuration file /etc/nginx/nginx.conf syntax is ok
nginx: configuration file /etc/nginx/nginx.conf test is successful
[root@oldboy-pythonedu game]# systemctl restart nginx
step4.配置Host解析
Windows电脑没有Hosts文件,  新建出来.
        Windows:  C:WindowsSystem32driversetc
                    10.0.0.200 test.oldboyedu.com
                    10.0.0.200 game.oldboyedu.com
Tip:在location中可以可以设置两个默认值
# vim /etc/nginx/conf.d/game.oldboyedu.com.conf            # 定义的第一个网站
server {
    listen 80;                            # 监听的端口
    server_name game.oldboyedu.com;        # 申明域名

    location / {                        # 匹配用户请求的uri路径
        root /code/html;                # 告诉 nginx 站点的代码在哪里目录下
        index index.html index.htm;        # 定义 默认返回的主页面
    }
}
index index.html index.htm
如果找到index.html 就返回index.html页面
如果找不到index.html
如果能找到index.htm 就返回index.htm
如果找不到index.htm 就报错
1.9 nginx整个请求流程
url路径: http://game.oldboyedu.com /game/zuqiu/index.html
真实服务器地址: /code/game/game/zuqiu/index.html
nginx请求流程
1.用户通过浏览器请求game.oldboyedu.com
2.浏览器会添加一些协议头信息,携带上默认的请求uri, http://game.oldboyedu.com/
3.浏览器会发起DNS解析,解析game.oldboyedu.com 对应的真实IP地址
4.浏览器获取到真实的IP地址后, 通过 IP+Prot的方式请求应用程序Nginx
5.Nginx接受到请求后,会进行事件的处理, 将用户请求的 Request 信息中 包含的 Host 字段, 与 Server_name 字段进行匹配
5.1) 如果匹配不成功,则会随机返回一个站点的页面给用户.
5.2) 可以通过 在 listen 80 default_server; 方式来定义具体默认返回哪个站点给用户.
5.3) 如果碰到非法的域名,可以拒绝,也可以做跳转.
拒绝:
return 500;
跳转:
return 302 https://www.jd.com;
6.如果匹配成功, 接下来进行location uri地址匹配, 获取要返回的文件所在的路径 + 默认返回的页面
7.Nginx获取磁盘上的文件, 然后构建响应报文,回传给浏览器,浏览器加载并且渲染最终的结果呈现给用户.

Tip:虚拟主机
虚拟主机: 在一台服务器上,运行多套站点.
2.nginx基础模块
2.1 目录索引 auto_index
什么是目录索引? 能实现和阿里云mirrors.aliyun.com 一样的效果.
[root@oldboy-pythonedu ~]# cat /etc/nginx/conf.d/mirror.oldboyedu.com.conf
server {
    listen 80;
    server_name mirror.oldboyedu.com;
    charset utf8;

    location / {
        root /code/mirror;
        autoindex on;                    # 开启目录索引功能
        autoindex_exact_size off;        # 显示文件具体大小
        autoindex_localtime on;            # 显示本地服务器时间
    }
}

[root@oldboy-pythonedu ~]# nginx -t
[root@oldboy-pythonedu ~]# systemctl restart nginx

[root@oldboy-pythonedu ~]# mkdir -p /code/mirror
[root@oldboy-pythonedu ~]# cd /code/mirror
[root@oldboy-pythonedu ~]# rz
2.2 访问限制
1.基于IP访问限制
1) 仅允许 10.0.0.1 访问,其他访问全部拒绝

            server {
                ...
                allow 10.0.0.1/32;
                deny all;
                ...
            }

2) 拒绝10.0.0.1 访问, 其他全部允许

            server {
                ...
                deny 10.0.0.1/32;
                allow all;
                ...
            }
Tip:测试的curl命令
[root@oldboy-pythonedu mirror]# curl -HHost:mirror.oldboyedu.com http://10.0.0.200/
2.基于用户名和密码限制:auth_basic_module
设置用户名和密码
[root@oldboy-pythonedu ~]# yum install httpd-tools -y
[root@oldboy-pythonedu nginx]# htpasswd -c -b password_file oldboy 123
[root@oldboy-pythonedu nginx]# cat password_file
oldboy:$apr1$7dYbXvco$LSJaBM3HqlK3k1kkRt2Ya.
nginx配置文件
server {
                listen 80;
                server_name mirror.oldboyedu.com;
                charset utf8;

                auth_basic "hello,nginx";                # 描述信息
                auth_basic_user_file password_file;        # 定义密码文件名称

                location / {
                    root /code/mirror;
                    autoindex on;
                    autoindex_exact_size off;
                    autoindex_localtime on;
                }
            }
3.展示: /work 需要密码 /public 无需密码
[root@oldboy-pythonedu ~]# mkdir /basic/{work,public} -p
[root@oldboy-pythonedu mirror]# cat /etc/nginx/conf.d/basic.oldboyedu.com.conf
        server {
            listen 80;
            server_name basic.oldboyedu.com;
            root /basic;
            autoindex on;

            location / {
            }

            location /work {
                auth_basic "test_work";
                auth_basic_user_file password_file;
            }
        }

[root@oldboy-pythonedu mirror]# nginx -t
nginx: the configuration file /etc/nginx/nginx.conf syntax is ok
nginx: configuration file /etc/nginx/nginx.conf test is successful
[root@oldboy-pythonedu mirror]# systemctl restart nginx