问题:
从另外一台电脑,直接 把VMware 中的一个linux虚拟机系统 目录(其中包括.vmx文件和许多.vmkd文件)直接复制到我的电脑,然后用 “打开虚拟机” 方式打开那个目录,启动虚拟机,发现居然没有eth0网卡,只有一个lo。
解决流程:
然后在网上找资料,
找到如下资料:
-------------------
VMware虚拟机克隆Linux系统后找不到eth0网卡的问题
有时候,会使用VMware虚拟机的的克隆功能,快速的复制已安装好的Linux系统。
可是克隆完之后,会发现没有eth0网卡。

解决方法:
1、编辑/etc/udev/rules.d/70-persistent-net.rules文件

把NAME="eth0"的那行配置注释掉或者删掉,把NAME="eth1"的修改成NAME="eth0",修改后如下:

2、更改网卡配置文件,/etc/sysconfig/network-scripts/ifcfg-eth0

将HWADDR的值修改为/etc/udev/rules.d/70-persistent-net.rules文件中的新值,修改后如下:

3、修改/etc/sysconfig/network,更改主机名

修改HOSTNAME
4、重启系统,reboot。

-------------------
按照上面的方法,执行完,用 ifconfig 查看,果然 eth0 出来了,但是,里面只有要给 inet6,没有inet,
想到刚才修改 网卡配置文件,/etc/sysconfig/network-scripts/ifcfg-eth0 的时候,
输入 vim etc/sysconfig/network-scripts/ifcfg-eth0 后,不是正常的直接进入编辑界面,而是
提示了一些东西:
 1 [root@zabbix ~]# vim /etc/sysconfig/network-scripts/ifcfg-eth0
 2
 3 E325: ATTENTION
 4 Found a swap file by the name "/usr/local/msmtp/etc/.msmtprc.swp"
 5           owned by: root  dated: Thu May 22 15:47:09 2014
 6         file name: /etc/sysconfig/network-scripts/ifcfg-eth0
 7           modified: YES
 8         user name: root  host name: zabbix.clvn.com.cn
 9         process ID: 3122
10 While opening file "/etc/sysconfig/network-scripts/ifcfg-eth0"
11             dated: Thu May 22 15:44:52 2014
12
13 (1) Another program may be editing the same file.
14     If this is the case, be careful not to end up with two
15     different instances of the same file when making changes.
16     Quit, or continue with caution.
17
18 (2) An edit session for this file crashed.
19     If this is the case, use ":recover" or "vim -r /etc/sysconfig/network-scripts/ifcfg-eth0"
20     to recover the changes (see ":help recovery").
21     If you did this already, delete the swap file "/etc/sysconfig/network-scripts/ifcfg-eth0.ifcfg-eth0.swp"
22     to avoid this message.
23
24 Swap file /etc/sysconfig/network-scripts/ifcfg-eth0.ifcfg-eth0.swp" already exists!
25 [O]pen Read-Only, (E)dit anyway, (R)ecover, (D)elete it, (Q)uit, (A)bort:
当时,没管它,直接按的 enter,就进入编辑界面编辑了,是不是这个的问题,就又搜了一下,找到如下文章:
---------------------------------------------------
用Vim编辑文件时出现E325: ATTENTION错误的解决方法
当用Vim编辑一个文件时出现下列错误
[root@zabbix ~]# vim /usr/local/msmtp/etc/msmtprc
E325: ATTENTION
Found a swap file by the name "/usr/local/msmtp/etc/.msmtprc.swp"
owned by: root dated: Thu May 22 15:47:09 2014
file name: /usr/local/msmtp/etc/msmtprc
modified: YES
user name: root host name: zabbix.clvn.com.cn
process ID: 3122
While opening file "/usr/local/msmtp/etc/msmtprc"
dated: Thu May 22 15:44:52 2014
(1) Another program may be editing the same file.
If this is the case, be careful not to end up with two
different instances of the same file when making changes.
Quit, or continue with caution.
(2) An edit session for this file crashed.
If this is the case, use ":recover" or "vim -r /usr/local/msmtp/etc/msmtprc"
to recover the changes (see ":help recovery").
If you did this already, delete the swap file "/usr/local/msmtp/etc/.msmtprc.swp"
to avoid this message.
Swap file "/usr/local/msmtp/etc/.msmtprc.swp" already exists!
[O]pen Read-Only, (E)dit anyway, (R)ecover, (D)elete it, (Q)uit, (A)bort:
解决方法:
方法一、可以在上面出现的提示中按D,将临时文件删除掉
方法二、
[root@bjsd-zabbix-x86v-app01 ~]# cd /usr/local/msmtp/etc
[root@bjsd-zabbix-x86v-app01 etc]# ls -a
. .. msmtprc .msmtprc.swp
[root@bjsd-zabbix-x86v-app01 etc]# rm -rf .msmtprc.swp
Vim学习指南 http://www.linuxidc.com/Linux/2013-08/89096.htm
快速学会 Vi编辑器 http://www.linuxidc.com/Linux/2013-08/88586.htm
强大的Vim 编辑器 http://www.linuxidc.com/Linux/2013-07/87544.htm
在CentOS 6.2上搭建Vim开发环境 http://www.linuxidc.com/Linux/2013-07/87363.htm
Vim 7.4a 发布,全新更快的正则表达式引擎 http://www.linuxidc.com/Linux/2013-07/87035.htm
CentOS 5.4 安装高亮Vim编辑工具 http://www.linuxidc.com/Linux/2013-06/86508.htm
Vim技巧分享:C语言设置 http://www.linuxidc.com/Linux/2012-12/77124.htm
Ubuntu中设置Vim的行号 http://www.linuxidc.com/Linux/2012-12/75485.htm
Vim编辑器使用基础教程 http://www.linuxidc.com/Linux/2013-05/84031.htm
本文永久更新链接地址:http://www.linuxidc.com/Linux/2014-05/102255.htm
![]()
----------------------------------------------
按照上面说的,直接 按 D 【应该是删除了临时文件 同名的 .swp文件】,然后再退出,保存。重启网卡服务:
重启服务:service network restart
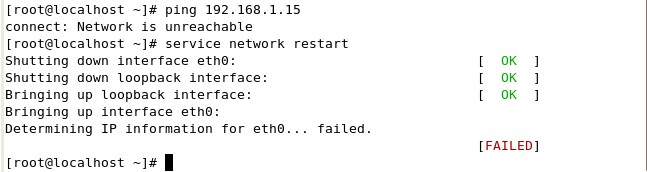
更改网卡配置文件,/etc/sysconfig/network-scripts/ifcfg-eth0