 iOS知识库
版权声明:本文为博主原创文章,未经博主允许不得转载。
原文地址:https://yq.aliyun.com/articles/57554
前言
相比较于React Native的“Learn once, write anywhere”,Weex的口号是“Write once, run everywhere”。考虑到React Native比较任性的向下兼容性,我们也引入了Weex做一番了解。
本文主要分为以下几个部分:
- 构建Hello World程序;
- 集成到现有的iOS工程中;
- 使用Weex的高级特性;
- 如何为Weex做贡献;
一、Weex入门
1.1 Hello Weex
参考官方教程,我们需要先安装Node。在Mac上也可以通过Homebrew直接进行安装:brew install node。
接着我们需要安装Weex CLI:npm install -g weex-toolkit,并确保版本号大于0.1.0:
$ weex --version
info 0.3.4
至此,准备工作已经到位,我们可以开始编写Weex程序了。
创建一个名为helloweex.we的文件,并编写以下代码:
<template>
  <div>
    <text>Hello Weex</text>
  </div>
</template>通过命令行在helloweex.we文件所在的目录下执行如下命令:
$ weex helloweex.we
info Fri Jul 08 2016 14:30:31 GMT+0800 (CST)WebSocket  is listening on port 8082
info Fri Jul 08 2016 14:30:31 GMT+0800 (CST)http is listening on port 8081 - 1
- 2
- 3
- 1
- 2
- 3
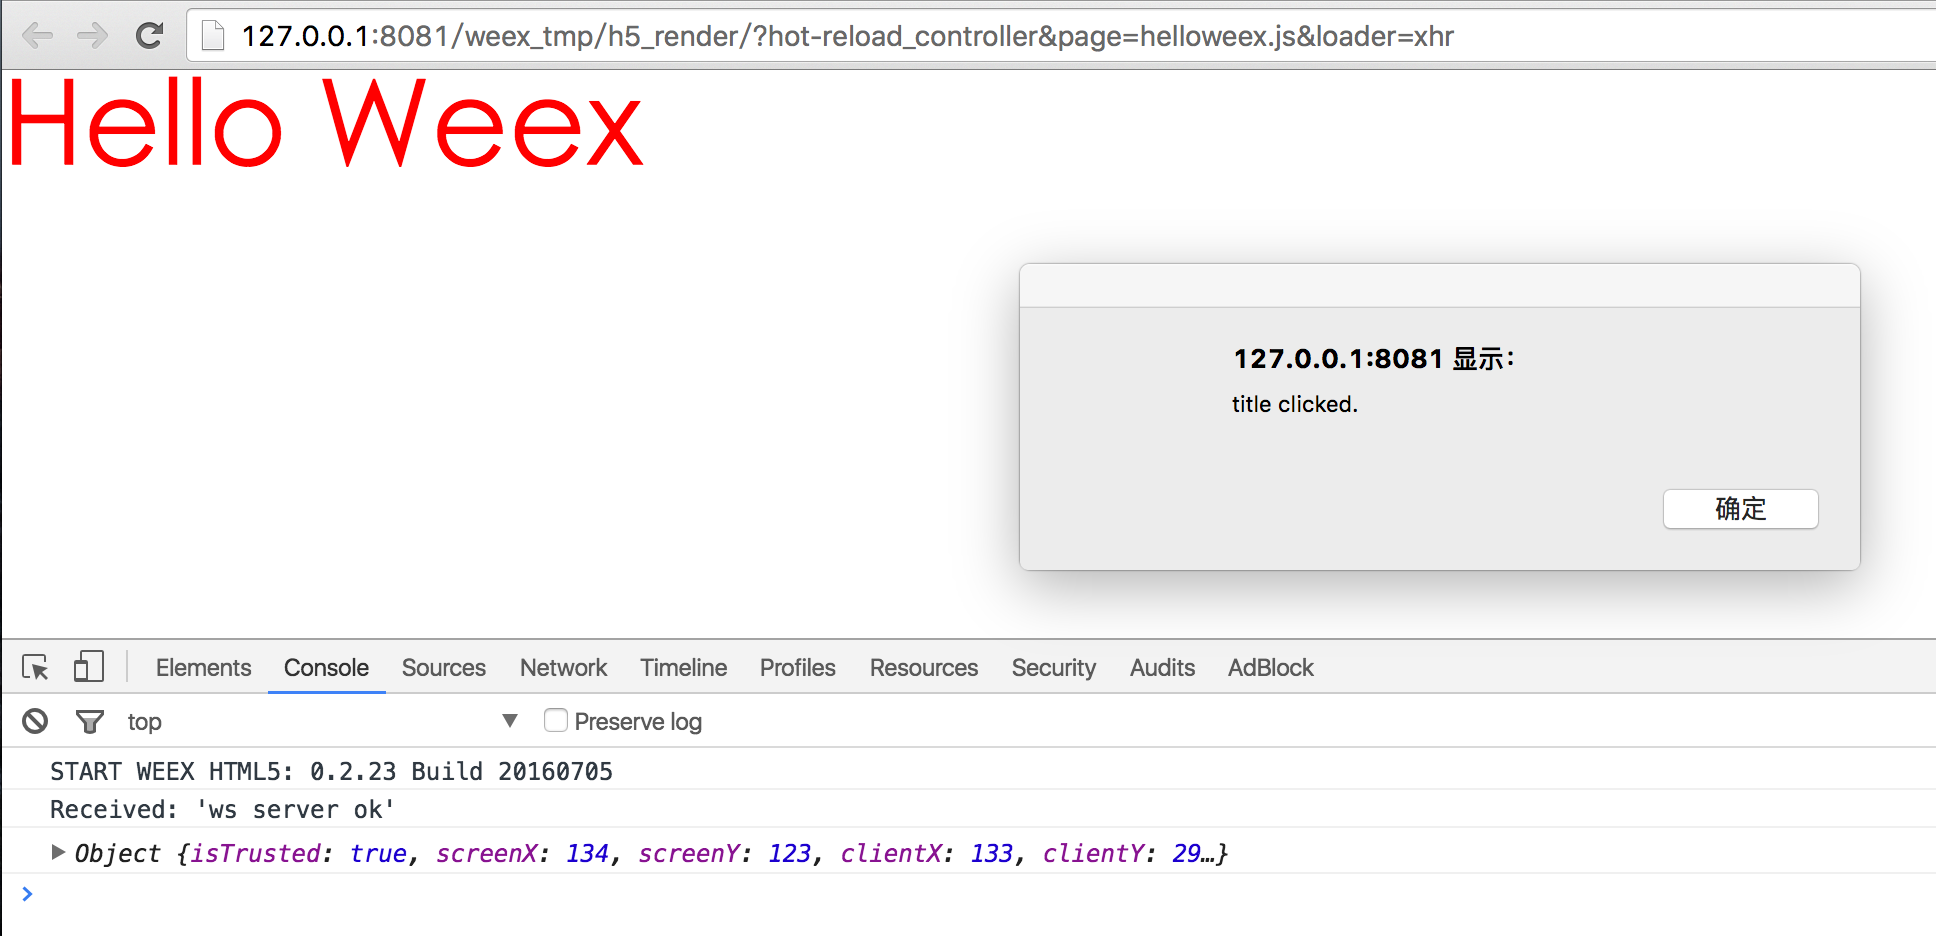
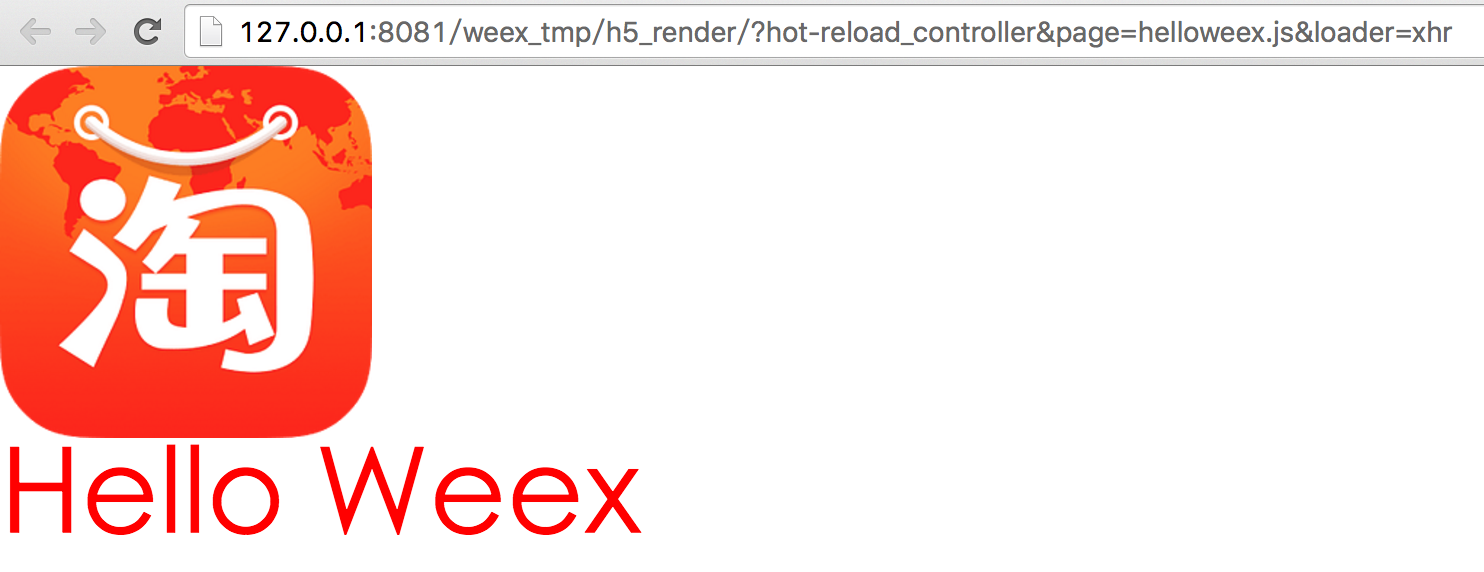
此时,浏览器会打开一个新的标签页展示helloweex.we的执行效果:

注意到此时地址栏的内容http://127.0.0.1:8081/weex_tmp/h5_render/?hot-reload_controller&page=helloweex.js&loader=xhr包含着hot reload字样,所以可以自然联想到当我们在源文件做修改并保存后,该页面会自动刷新展示效果。
1.2 基础结构
上面的示例只是一个非常简单的雏形,而一个比较完整的Weex程序包括三个部分:模板(Template)、样式(Style)和脚本(Script)。
比如我们可以利用上文提到的hot reload,修改文本的颜色并实时查看效果:
<template>
  <div>
    <text class="title">Hello Weex</text>
  </div>
</template>

<style>
  .title { color: red; }
</style>
接着我们添加上第三组成部分:脚本(Script):
<template>
<div>
<text class="title" onclick="onClickTitle">Hello Weex</text>
</div>
</template>
<style>
.title { color: red; }
</style>
<script>
module.exports = {
methods: {
onClickTitle: function (e) {
console.log(e);
alert('title clicked.');
}
}
}
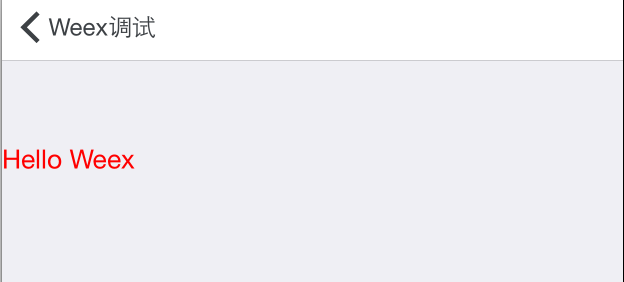
</script>这样一来,当我们点击文本的时候会出现如下效果:
更多语法相关内容可以参考官方文档。
二、集成到iOS工程
2.1 概述
上面是从前端的角度来初步看Weex的基础效果,对于客户端来讲,这类框架的一个优势就是能够结合Native代码发挥作用。比如在人手紧张的情况下可以一次开发,然后应用在不同平台终端上。
所以,这里讨论下如何将其集成到现有的iOS工程项目当中。
- 参考官方文档,我们先从GitHub下载Weex源码。
- 解压后将目录下的
ios/sdk复制到现有的iOS工程目录下,并根据相对路径更新既有工程的podfile,然后执行pod update将Weex iOS SDK集成进既有的iOS项目中; - 在iOS Native代码中初始化Weex SDK,然后创建出要展示Weex程序的ViewController,具体见如下描述;
2.2 在iOS应用上运行Weex程序
在如何集成的文档中,前面说的比较清楚,但是在初始化Weex环境和渲染Weex实例这两个小节中,可能是由于代码是从比较大的项目源码中摘录出来的,所以存在一些不必要或没有上下文的代码。
这里描述下在开发调试阶段运行Weex程序。
2.2.1 确定要运行的Weex程序
创建一个WeexDebugViewController,进行如下布局:
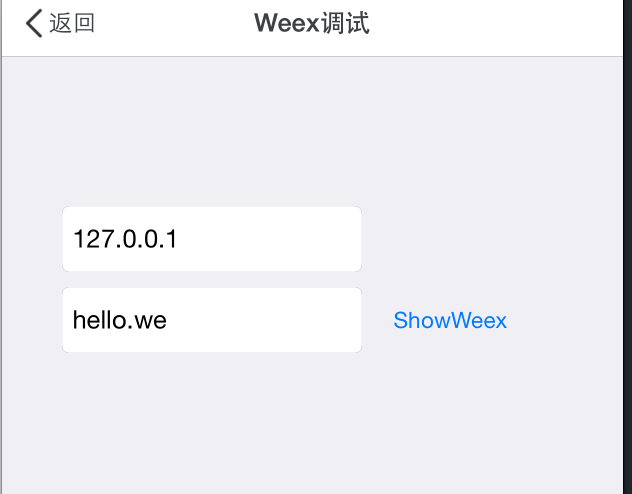
通过填入IP和文件名来定位我们要运行的Weex程序。此外,还可以结合weex helloweex.we --qr -h {ip or hostname}命令来生成二维码,进行扫描演示,不过解析二维码还是为了获取到Weex程序所在位置。
2.2.2 初始化Weex SDK
开发调试阶段我们可以先将Weex SDK的初始化放在这个WeexDebugViewController中:
- (void)initWeex {
    static dispatch_once_t onceToken;
    dispatch_once(&onceToken, ^{
        [WXAppConfiguration setAppGroup:@"AliApp"];
        [WXAppConfiguration setAppName:@"WeexDemo"];
        [WXAppConfiguration setAppVersion:@"1.0.0"];

        [WXSDKEngine initSDKEnviroment];

        [WXLog setLogLevel:WXLogLevelVerbose];
    });
}
2.2.3 运行Weex程序的ViewController
点击ShowWeex按钮时,我们可以根据两个输入框的内容拼接出要运行的Weex程序的位置,然后将其赋值给用来渲染Weex实例的WeexShowcaseViewController:
- (void)showWeex {
    NSString *str = [NSString stringWithFormat:@"http://%@:8081/%@", self.ipField.text, self.filenameField.text];
    WeexShowcaseViewController *vc = [WeexShowcaseViewController new];
    vc.weexUri = [NSURL URLWithString:str];
    [self.navigationController pushViewController:vc animated:YES];
}接着我们来看看WeexShowcaseViewController的源码:
#import <WeexSDK/WeexSDK.h>

@interface WeexShowcaseViewController ()

@property (nonatomic, strong) WXSDKInstance *weexSDK;

@end

@implementation WeexShowcaseViewController

- (void)dealloc {
    [_weexSDK destroyInstance];
}

- (void)viewDidLoad {
    [super viewDidLoad];
    // Do any additional setup after loading the view.

    self.weexSDK.viewController = self;
    self.weexSDK.frame = self.view.frame;

    [self.weexSDK renderWithURL:self.weexUri];

    __weak typeof(self) weakSelf = self;
    self.weexSDK.onCreate = ^(UIView *view) {
        [weakSelf.view addSubview:view];
    };

    self.weexSDK.renderFinish = ^(UIView *view) {
        ;
    };

    self.weexSDK.onFailed = ^(NSError *error) {
        NSLog(@"weexSDK onFailed : %@
", error);
    };
}

- (WXSDKInstance *)weexSDK {
    if (!_weexSDK) {
        _weexSDK = [WXSDKInstance new];
    }
    return _weexSDK;
}
2.2.4 运行起来
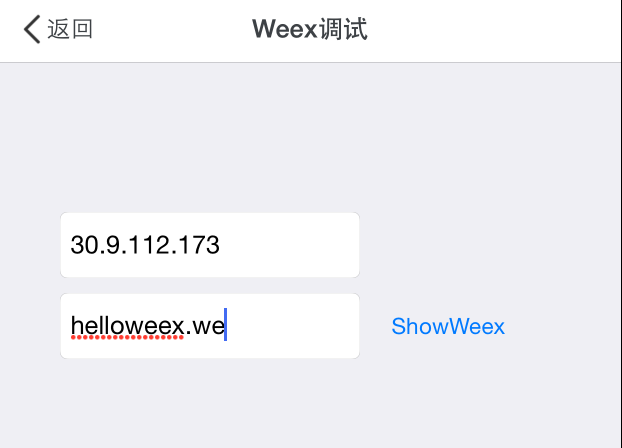
回到终端上,切换到helloweex.we文件所在的目录,将Weex的dev server跑起来:
$ weex -s .
info Fri Jul 08 2016 15:38:59 GMT+0800 (CST)http  is listening on port 8081
info we file in local path . will be transformer to JS bundle
please access http://30.9.112.173:8081/
然后在Native上填入对应的IP和程序文件名:
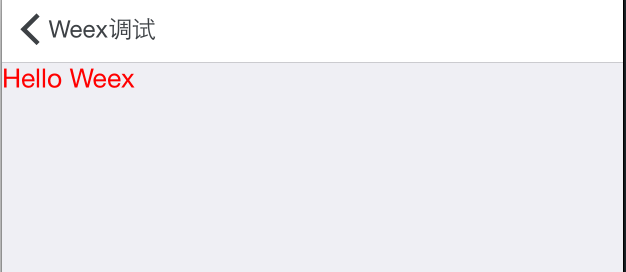
到此,将Weex集成到现有iOS工程中算初步告一段落。
三、Weex进阶
当集成工作完成后,会发觉现有功能不足以满足业务需求,所以Weex支持开发者做一些扩展。
3.1 实现Weex接口协议
之前的helloweex.we示例中只有一个文本元素,现在再添加一个图片元素:
<template>
  <div>
    <image class="thumbnail" src="http://image.coolapk.com/apk_logo/2015/0817/257251_1439790718_385.png"></image>
    <text class="title" onclick="onClickTitle">Hello Weex</text>
  </div>
</template>

<style>
  .title { color: red; }
  .thumbnail {  100; height: 100; }
</style>

<script>
  module.exports = {
    methods: {
      onClickTitle: function (e) {
        console.log(e);
        alert('title clicked.');
      }
    }
  }
</script>然后再执行:$ weex helloweex.we来运行查看效果:
可以在浏览器里看到这次多了一张图片。但是如果是运行在Native端,图片则得不到展示:
这是由于Weex SDK没有提供图片下载能力,需要我们来实现。
3.2 实现图片下载协议WXImgLoaderProtocol
这个基本可以参考官方文档来实现。
3.2.1 定义图片下载Handler
#import <WeexSDK/WeexSDK.h>

@interface WeexImageDownloader : NSObject <WXImgLoaderProtocol>

@end
3.2.2 实现协议接口
这个类必须遵循WXImgLoaderProtocol协议,并实现该协议定义的接口:
#import "WeexImageDownloader.h"
#import <SDWebImage/SDWebImageManager.h>

@implementation WeexImageDownloader

- (id<WXImageOperationProtocol>)downloadImageWithURL:(NSString *)url
                                          imageFrame:(CGRect)imageFrame
                                            userInfo:(NSDictionary *)options
                                           completed:(void(^)(UIImage *image,  NSError *error, BOOL finished))completedBlock {
    return (id<WXImageOperationProtocol>)[[SDWebImageManager sharedManager] downloadImageWithURL:[NSURL URLWithString:url] options:0 progress:^(NSInteger receivedSize, NSInteger expectedSize) {
    } completed:^(UIImage *image, NSError *error, SDImageCacheType cacheType, BOOL finished, NSURL *imageURL) {
        if (completedBlock) {
            completedBlock(image, error, finished);
        }
    }];
}

@end[WXSDKEngine registerHandler:[WeexImageDownloader new] withProtocol:@protocol(WXImgLoaderProtocol)];这样一来,再次运行程序就可以看到图片了:

这样设计的好处主要是考虑了不同App依赖的网络库或者图片下载缓存库不同,避免Weex强依赖于一些第三方库,遵循依赖抽象而不是具体的原则。
BTW,我个人感觉Weex缩写成WX,WeexImageLoaderProtocol缩写成WXImgLoaderProtocol,不是很好看。
3.2 自定义UI组件
如果Weex的内置标签不足以满足要求时,我们可以自定义Native组件,然后暴露给.we文件使用。
比如我们可以定义一个WeexButton,继承自WXComponent,然后将其注册进Weex SDK:
[WXSDKEngine registerComponent:@"weex-button" withClass:[WeexButton class]];这样一来,我们就可以在.we文件中使用这个标签了:
<weex-button class="button" title="hello"></weex-button>标签中的属性我们可以在初始化函数中获得:
- (instancetype)initWithRef:(NSString *)ref
                       type:(NSString*)type
                     styles:(nullable NSDictionary *)styles
                 attributes:(nullable NSDictionary *)attributes
                     events:(nullable NSArray *)events
               weexInstance:(WXSDKInstance *)weexInstance {
    self = [super initWithRef:ref type:type styles:styles attributes:attributes events:events weexInstance:weexInstance];
    if (self) {
        _title = [WXConvert NSString:attributes[@"title"]];
    }
    return self;
}通过这些属性,我们可以在组件生命周期中修改组件的样式,比如设置按钮的title:
- (void)viewDidLoad {
    [super viewDidLoad];

    self.innerButton = [UIButton buttonWithType:UIButtonTypeRoundedRect];
    self.innerButton.frame = self.view.bounds;
    [self.view addSubview:self.innerButton];
    [self.innerButton setTitle:self.title forState:UIControlStateNormal];
    [self.innerButton addTarget:self action:@selector(onButtonClick:) forControlEvents:UIControlEventTouchUpInside];
}
3.3 自定义模块
除了UI组件之外,有些时候我们希望JS层面能够调用Native的一些功能,比如通过JS代码让Native打开一个特定的ViewController。这时候,我们可以自定义一个模块向JS层面暴露API:
@synthesize weexInstance;

WX_EXPORT_METHOD(@selector(call:withParam:callback:))
- (void)call:(NSString *)api withParam:(NSDictionary *)param callback:(WXModuleCallback)callback {- 1
- 2
- 3
- 4
- 1
- 2
- 3
- 4
注意点如下:
1. 需要遵循WXModuleProtocol协议;
2. 需要合成(synthesize)weexInstance属性;
3. 使用WX_EXPORT_METHOD来暴露API;
4. 使用WXModuleCallback进行回调;
完成以上编码后,向Weex SDK注册:[WXSDKEngine registerModule:,就可以在.we文件中使用了:
<script>
  module.exports = {
    methods: {
      onClickTitle: function (e) {
        var mymodule = require('@weex-module/mymodule');
        mymodule.call('api', {}, function(ret) {
        });
      }
    }
  }
</script>
四、为Weex做贡献
由于Weex刚开源不久,如果开发者发现一些问题或者需要改善的地方,可以直接在GitHub上进行fork,修改完后提交Pull Request。