首先什么是 Nacos
Nacos 致力于帮助您发现、配置和管理微服务。Nacos 提供了一组简单易用的特性集,帮助您快速实现动态服务发现、服务配置、服务元数据及流量管理。
Nacos 帮助您更敏捷和容易地构建、交付和管理微服务平台。 Nacos 是构建以“服务”为中心的现代应用架构 (例如微服务范式、云原生范式) 的服务基础设施。
下载Nacos(linux/windows版): https://github.com/alibaba/nacos/releases
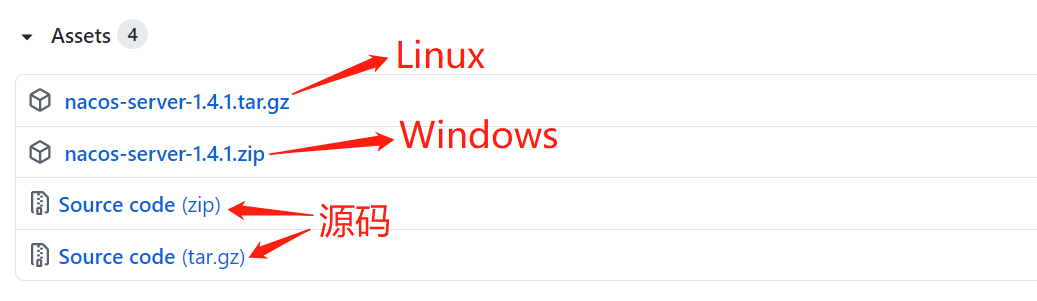
说明:可根据自己的需要下载对应的版本,从官网下载太慢,可以直接下载这个1.2.1版本
链接:https://pan.baidu.com/s/11feU1I1z8A3JkE55UnWE2w
提取码:fvwz
说明:1.4.0以下使用的mysql驱动是8.0以下的,1.4.0以上使用的驱动就是8.0以上的了,所以在家在使用的nacos的时候要注意与mysql的对应版本问题,
否则会因为nacos与mysql的版本不对应导致的nacos无法加载数据源。
下载完Windows版解压后我们可以看看目录结构:

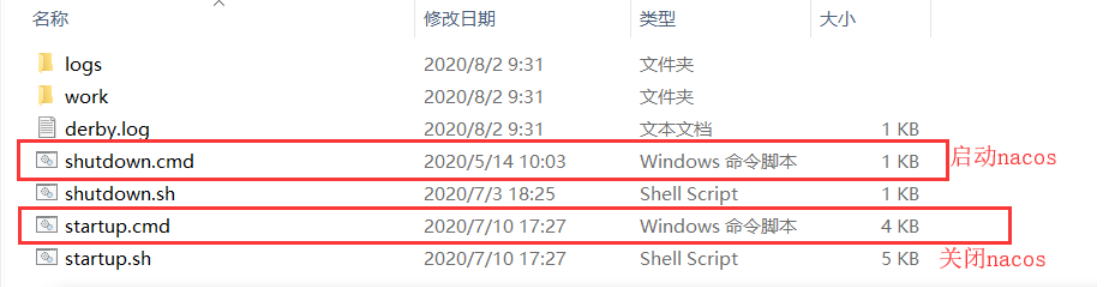
解压后用 cmd 进入解压后的bin目录,运行startup.cmd启动nacos,或者直接双击运行startup.cmd
或者执行命令:startup.cmd -m standalone 其中-m standalone指定为单机模式,否则以cluster集群模式启动。
如果启动报错,可以修改启动文件startup.sh中的 cluster 修改为standalone;比如修改成:export MODE="standalone"
windows系统种则把启动文件startup.cmd中的 cluster 修改为standalone;比如修改成:set MODE="standalone"

这里我们启动成功了,启动失败后窗口会一闪而过。
说明:运行nacos需要先安装jdk并配置系统环境JAVA_HOME。
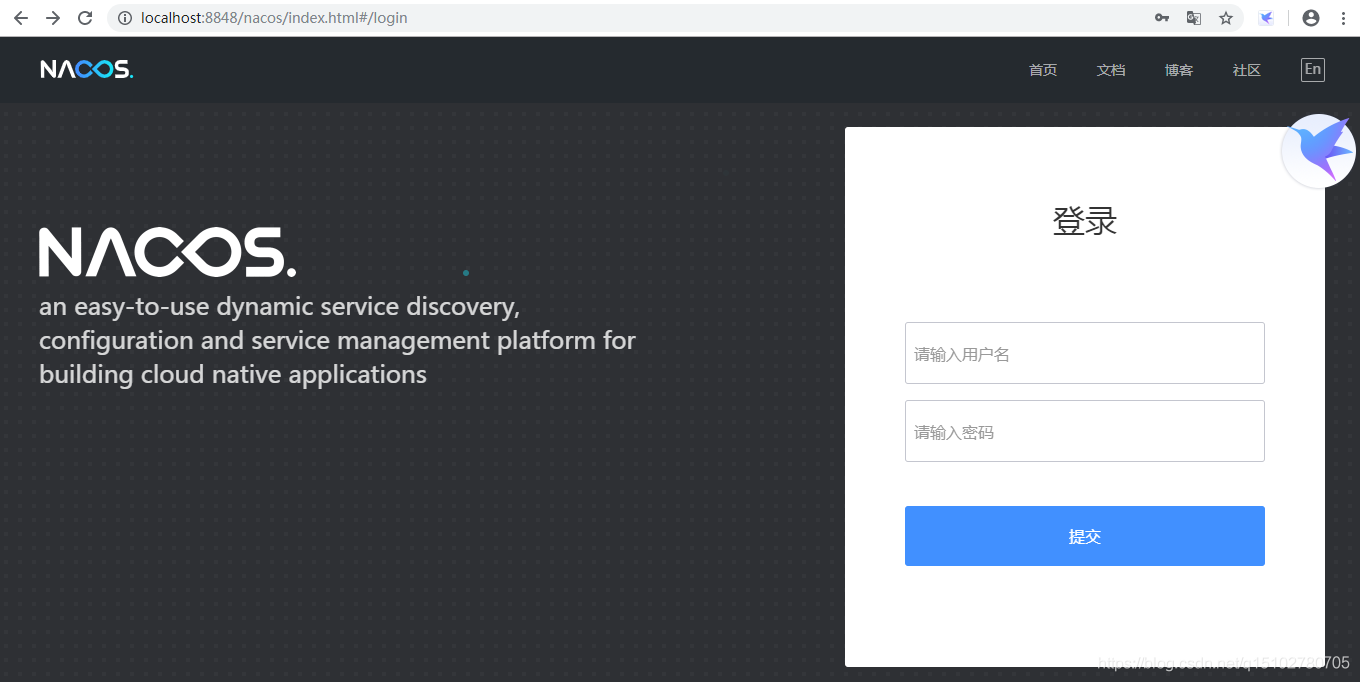
启动nacos服务后,默认端口8848,访问地址:http://localhost:8848/nacos/index.html
登陆账号和密码默认都是 nacos

上面直接运行startup.cmd 方式启动服务,如果将命令窗口关闭后,服务就停了,因为这种方式启动的服务没有注册到Windows服务中。
下面介绍windows服务注册作为参考,我们可以注册nacos服务:
1、安装服务
sc create test3 binPath= "C:\Users\Administrator\Desktop\win32srvDemo\win32srvdemo\Debug\win32srvDemo.exe"
其中:test3为创建的服务名,binPath后面是运行exe文件的所在路径
2、配置服务
有以下集中方式:
sc config 服务名 start= AUTO (自动)
sc config 服务名 start= DEMAND (手动)
sc config 服务名 start= DISABLED (禁用)
例如下面的命令,在XP系统中开机便会自动启动:
sc config test3 start= AUTO
3、开启服务
net start test3
4、停止服务
net stop test3
5、删除服务
sc delete test3
为方便使用,可编辑为bat批处理文件 (新建一个txt文件,自己命名,把后缀改为.bat文件)
1、创建、配置、开启服务,文件命名为start.bat
@echo.服务启动......
@echo off
@sc create nacos binPath="D:\Program Files\nacos\bin\startup.cmd"
@net start nacos
@sc config nacos start= AUTO
@echo off
@echo.启动完毕!
@pause
2、关闭服务,文件命名为stop.bat
@echo.服务关闭
@echo off
@net stop nacos
@echo off
@echo.关闭结束!
@pause
3、删除服务,文件命名为delete.bat
@echo.服务删除
@echo off
@sc delete nacos
@echo off
@echo.删除结束!
@pause
nacos 持久化切换配置
nacos信息使用嵌入式数据库derby实现持久化,现在将其切换成mysql
1. 安装mysql数据库,版本要求:5.6.5+
2. 初始化mysql数据库,数据库初始化文件:nacos-mysql.sql
3. 创建数据库:nacos_config,将该sql文件内容执行
4. 配置数据库连接,修改conf文件夹里面的配置文件application.properties,添加mysql数据源的url、用户名和密码。
5. 重启nacos

1.4.1版本配置文件部分内容如:


#
# Copyright 1999-2018 Alibaba Group Holding Ltd.
#
# Licensed under the Apache License, Version 2.0 (the "License");
# you may not use this file except in compliance with the License.
# You may obtain a copy of the License at
#
#      http://www.apache.org/licenses/LICENSE-2.0
#
# Unless required by applicable law or agreed to in writing, software
# distributed under the License is distributed on an "AS IS" BASIS,
# WITHOUT WARRANTIES OR CONDITIONS OF ANY KIND, either express or implied.
# See the License for the specific language governing permissions and
# limitations under the License.
#

#*************** Spring Boot Related Configurations ***************#
### Default web context path:
server.servlet.contextPath=/nacos
### Default web server port:
server.port=8848

#*************** Network Related Configurations ***************#
### If prefer hostname over ip for Nacos server addresses in cluster.conf:
# nacos.inetutils.prefer-hostname-over-ip=false

### Specify local server's IP:
# nacos.inetutils.ip-address=


#*************** Config Module Related Configurations ***************#
### If use MySQL as datasource:
spring.datasource.platform=mysql

### Count of DB:
db.num=1

### Connect URL of DB:
db.url.0=jdbc:mysql://192.168.3.200:3306/nacos_config?characterEncoding=utf8&connectTimeout=1000&socketTimeout=3000&autoReconnect=true&useUnicode=true&useSSL=false&serverTimezone=UTC
db.user.0=root
db.password.0=winmysql_123zm

### Connection pool configuration: hikariCP
db.pool.config.connectionTimeout=30000
db.pool.config.validationTimeout=10000
db.pool.config.maximumPoolSize=20
db.pool.config.minimumIdle=2

#*************** Naming Module Related Configurations ***************#
### Data dispatch task execution period in milliseconds:
# nacos.naming.distro.taskDispatchPeriod=200

### Data count of batch sync task:
# nacos.naming.distro.batchSyncKeyCount=1000

### Retry delay in milliseconds if sync task failed:
# nacos.naming.distro.syncRetryDelay=5000

### If enable data warmup. If set to false, the server would accept request without local data preparation:
# nacos.naming.data.warmup=true

### If enable the instance auto expiration, kind like of health check of instance:
# nacos.naming.expireInstance=true
下面是我安装nacos过程中遇到的问题和注意事项:
说明:1.4.0以下使用的mysql驱动是8.0以下的,1.4.0以上使用的驱动就是8.0以上的了,所以在家在使用的nacos的时候要注意与mysql的对应版本问题,
否则会因为nacos与mysql的版本不对应导致的nacos无法加载数据源。

修改conf下面的application.properties里面属性后,就可以去bin文件夹下用管理员命令窗口运行startup.cmd或者直接双击启动服务
访问 localhost:8848/nacos/index.html登陆
nacos 默认账户、密码均为:nacos
登录之后可进行密码修改

本版本为nacos-server-1.4.1
安装路径要注意不要出现中文或者数字否则启动不了,会提示“此时不应有 \nacos-server-1.4.1\nacos"\logs\java_heapdump.hprof"。”

启动时报错,提示“Please set the JAVA_HOME variable in your environment, We need java(x64)! jdk8 or later is better!”
原因是1.查看jdk配置环境 , 2.系统环境配置JAVA_HOME
3. 然后要注意在Path系统变量里面需要添加环境变量路径为%JAVA_HOME%\bin

nacos启动报错,nacos默认是以集群方式启动的,所以需要把启动文件startup.sh中的 cluster 修改为standalone;比如修改成:export MODE="standalone"
windows系统种则把启动文件startup.cmd中的 cluster 修改为standalone;比如修改成:set MODE="standalone"
常见问题
nacos无法修改保存数据,控制台报错:org.springframework.dao.TransientDataAccessResourceException: PreparedStatementCallback; SQL [INSERT into permissions (role, resource, action) VALUES (?, ?, ?)]; Could not retrieve transation read-only status server; nested exception is java.sql.SQLException: Could not retrieve transation read-only status server
描述:项目采用nacos+mysql来保存读取配置文件,在nacos中修改配置信息.提示报错.显示的当前只能读,不能写
问题原因:nacos与mysql8.0版本冲突导致的,nacos的jdbc版本太低,需要改动源码,和你的mysql版本一致
<!-- JDBC libs -->
<dependency>
    <groupId>mysql</groupId>
    <artifactId>mysql-connector-java</artifactId>
    <version>8.0.11</version>
</dependency>
随后cmd到源码所在根目录
mvn -Prelease-nacos clean install -U
然后打包出现错误
com.alibaba.nacos.naming.healthcheck.MysqlHealthCheckProcessor
该文件下的
import com.mysql.cj.jdbc.jdbc2.optional.MysqlDataSource;
出现错误,更改为
import com.mysql.cj.jdbc.MysqlDataSource;
即可,然后打包 运行 成功