原理


DataSource向外提供一个 getConnection() 方法,得getConnection者得数据库
AbstractRoutingDataSource 实现了 getConnection() 方法
	// line 166
	@Override
	public Connection getConnection() throws SQLException {
		return determineTargetDataSource().getConnection();
	}

	... 省略若干代码

    // line 190
    /**
	 * Retrieve the current target DataSource. Determines the
	 * {@link #determineCurrentLookupKey() current lookup key}, performs
	 * a lookup in the {@link #setTargetDataSources targetDataSources} map,
	 * falls back to the specified
	 * {@link #setDefaultTargetDataSource default target DataSource} if necessary.
	 * @see #determineCurrentLookupKey()
	 */
	protected DataSource determineTargetDataSource() {
		Assert.notNull(this.resolvedDataSources, "DataSource router not initialized");
		Object lookupKey = determineCurrentLookupKey();
		DataSource dataSource = this.resolvedDataSources.get(lookupKey);
		if (dataSource == null && (this.lenientFallback || lookupKey == null)) {
			dataSource = this.resolvedDefaultDataSource;
		}
		if (dataSource == null) {
			throw new IllegalStateException("Cannot determine target DataSource for lookup key [" + lookupKey + "]");
		}
		return dataSource;
	}

	/**
	 * Determine the current lookup key. This will typically be
	 * implemented to check a thread-bound transaction context.
	 * <p>Allows for arbitrary keys. The returned key needs
	 * to match the stored lookup key type, as resolved by the
	 * {@link #resolveSpecifiedLookupKey} method.
	 */
	@Nullable
	protected abstract Object determineCurrentLookupKey();
然而 ....
AbstractRoutingDataSource 的getConnection() 方法只是调用了 determinTargetDataSource().getConnection() 来获取真正DataSource的getConnection()。
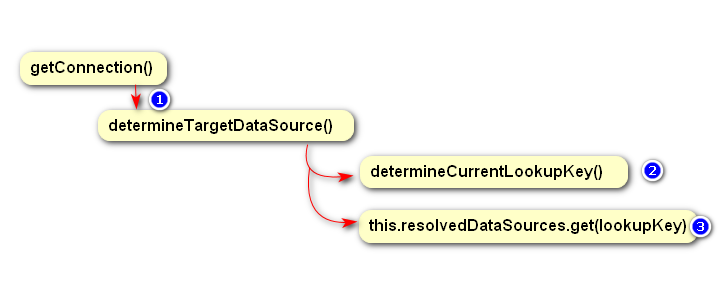
这是典型的装饰模式!!自己没有的功能通过引入其他类来增强。
我们先来看看 AbstractRoutingDataSource 的类结构
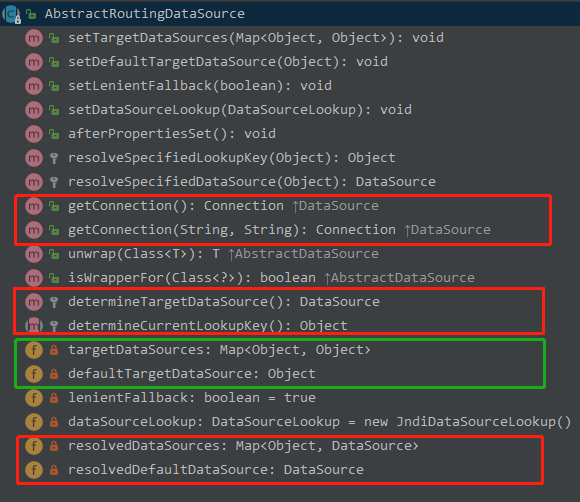
被框框套住的都是重要的。
方法determineCurrentLookupKey() 是留给我们开发者的(就像你家的网线口),我们通过实现该方法在不同数据源之间切换。
实践
1. 配置多数据源
在 application.yml 如下配置
spring:
  datasource:
    # 数据源类型
    type: com.alibaba.druid.pool.DruidDataSource
    # 默认数据源
    default-datasource:
      driver-class-name: com.mysql.cj.jdbc.Driver
      url: jdbc:mysql://localhost:3306/db0?useUnicode=true&characterEncoding=utf8&zeroDateTimeBehavior=convertToNull&useSSL=true&allowMultiQueries=true&serverTimezone=GMT%2B8
      username: root
      password: 123456

    # 多数据源
    target-datasources:
      datasource1:
        driver-class-name: com.mysql.cj.jdbc.Driver
        url: jdbc:mysql://localhost:3306/db1?useUnicode=true&characterEncoding=utf8&zeroDateTimeBehavior=convertToNull&useSSL=true&allowMultiQueries=true&serverTimezone=GMT%2B8
        username: root
        password: 123456

      datasource2:
        driver-class-name: com.mysql.cj.jdbc.Driver
        url: jdbc:mysql://localhost:3306/db2?useUnicode=true&characterEncoding=utf8&zeroDateTimeBehavior=convertToNull&useSSL=true&allowMultiQueries=true&serverTimezone=GMT%2B8
        username: root
        password: 123456

    # druid 默认配置
    druid:
      # 初始连接数
      initial-size: 10
      # 最大连接池数量
      max-active: 100
      # 最小连接池数量
      min-idle: 10
      # 配置获取连接等待超时的时间
      max-wait: 60000
      # 打开PSCache,并且指定每个连接上PSCache的大小
      pool-prepared-statements: true
      max-pool-prepared-statement-per-connection-size: 20
      # 配置间隔多久才进行一次检测,检测需要关闭的空闲连接,单位是毫秒
      timeBetweenEvictionRunsMillis: 60000
      # 配置一个连接在池中最小生存的时间,单位是毫秒
      min-evictable-idle-time-millis: 300000
      validation-query: SELECT 1 FROM DUAL
      test-while-idle: true
      test-on-borrow: false
      test-on-return: false
      stat-view-servlet:
        enabled: true
        url-pattern: /monitor/druid/*
      filter:
        stat:
          log-slow-sql: true
          slow-sql-millis: 1000
          merge-sql: false
        wall:
          config:
            multi-statement-allow: true

# MyBatis
mybatis:
  # 搜索指定包别名
  typeAliasesPackage: com.liuchuanv
  # 配置mapper的扫描,找到所有的mapper.xml映射文件
  mapperLocations: classpath*:mapper/**/*Mapper.xml
  # 加载全局的配置文件
  configLocation: classpath:mybatis-config.xml
此处配置的名称(如 defaultDataSource、targetDataSources)的命名并无特殊要求,只要和下面第n步的 DataSourceConfig 中对应起来就可以
使用 Druid 数据源的话,要在 pom.xml 中引入依赖
    <!--阿里数据库连接池 -->
    <dependency>
        <groupId>com.alibaba</groupId>
        <artifactId>druid-spring-boot-starter</artifactId>
        <version>1.1.10</version>
    </dependency>
2. 实现动态数据源
DynamicDataSource 动态数据源,在多个数据源之间切换
public class DynamicDataSource extends AbstractRoutingDataSource {

    public DynamicDataSource(DataSource defaultTargetDataSource, Map<Object, Object> targetDataSources) {
        super.setDefaultTargetDataSource(defaultTargetDataSource);
        super.setTargetDataSources(targetDataSources);
        super.afterPropertiesSet();
    }

    @Override
    protected Object determineCurrentLookupKey() {
        return DataSourceContextHolder.getDataSourceType();
    }
}
DataSourceContextHolder 数据源上下文,使用线程变量来存储代表当前使用的数据源的key值(每个key值都对应一个数据源,用以区分多数据源)
public class DataSourceContextHolder {

    public static final ThreadLocal<String> CONTEXT_HOLDER = new ThreadLocal<String>();

    public static void setDataSourceType(String dsType) {
        CONTEXT_HOLDER.set(dsType);
    }

    public static String getDataSourceType() {
        return CONTEXT_HOLDER.get();
    }

    public static void removeDataSourceType() {
        CONTEXT_HOLDER.remove();
    }

}
DataSourceType 数据源对应的key(其实单纯的用字符串来表示数据源,替换枚举类DataSourceType也是可以的,但是写代码时要注意字符串统一)
public enum  DataSourceType {
    /** 默认数据源key */
    DEFAULT_DATASOURCE,

    /** 数据源1key*/
    DATASOURCE1,

    /** 数据源2key*/
    DATASOURCE2;
}
3. 将数据源添加到 Spring 容器中
@Configuration
public class DataSourceConfig {

    @Bean
    @ConfigurationProperties(prefix = "spring.datasource.default-datasource")
    public DataSource defaultDataSource() {
        return DruidDataSourceBuilder.create().build();
    }

    @Bean
    @ConfigurationProperties(prefix = "spring.datasource.target-datasources.datasource1")
    public DataSource dataSource1() {
        return DruidDataSourceBuilder.create().build();
    }

    @Bean
    @ConfigurationProperties(prefix = "spring.datasource.target-datasources.datasource2")
    public DataSource dataSource2() {
        return DruidDataSourceBuilder.create().build();
    }

    @Bean
    @Primary
    public DataSource dynamicDataSource(DataSource defaultDataSource, DataSource dataSource1, DataSource dataSource2) {
        // 注意:该方法的参数名称要和前面前面三个datasource对象在Spring容器中的bean名称一样
        // 或者使用 @Qualifier 指定具体的bean
        Map<Object, Object> targetDataSources = new HashMap<>();
        targetDataSources.put(DataSourceType.DEFAULT_DATASOURCE.name(), defaultDataSource);
        targetDataSources.put(DataSourceType.DATASOURCE1.name(), dataSource1);
        targetDataSources.put(DataSourceType.DATASOURCE2.name(), dataSource2);
        return new DynamicDataSource(defaultDataSource, targetDataSources);
    }
}
测试
为了方便,省略了 Service 层
TestController
@RestController
@RequestMapping("/test")
public class TestController {

    @Autowired
    private TestMapper testMapper;

    @GetMapping
    public List<Map<String, Object>> test(String dataSourceIndex) {
        // 根据参数值的不同,切换数据源
        if ("1".equals(dataSourceIndex)) {
            DataSourceContextHolder.setDataSourceType(DataSourceType.DATASOURCE1.name());
        } else if ("2".equals(dataSourceIndex)) {
            DataSourceContextHolder.setDataSourceType(DataSourceType.DATASOURCE2.name());
        }
        List<Map<String, Object>> mapList = testMapper.selectList();
        // 清除线程内部变量数据源key
        DataSourceContextHolder.removeDataSourceType();
        return mapList;
    }
}
TestMapper
@Repository
public interface TestMapper {
    /**
     * 查询列表
     * @return
     */
    List<Map<String, Object>> selectList();
}
TestMapper.xml
<?xml version="1.0" encoding="UTF-8" ?>
<!DOCTYPE mapper PUBLIC "-//mybatis.org//DTD Mapper 3.0//EN" "http://mybatis.org/dtd/mybatis-3-mapper.dtd" >
<mapper namespace="com.liuchuanv.dynamicdatasource.mapper.TestMapper">
	<select id="selectList" resultType="java.util.Map">
		SELECT * FROM test
	</select>
</mapper>
别忘了要准备数据哦!
下面SQL语句,创建3个数据库,然后在3个数据库中都创建一张test表,并各自插入不同的数据。
-- 创建数据库
create database db0 character set utf8 collate utf8_general_ci;
create database db1 character set utf8 collate utf8_general_ci;
create database db2 character set utf8 collate utf8_general_ci;

-- 在数据库db1下执行以下SQL
use db0;
create table test(
	id int(11) primary key auto_increment,
	name varchar(20)
) ;
insert into test(name) values('张三');


-- 在数据库db1下执行以下SQL
use db1;
create table test(
	id int(11) primary key auto_increment,
	name varchar(20)
) ;
insert into test(name) values('李四');

-- 在数据库db2下执行以下SQL
use db2;
create table test(
	id int(11) primary key auto_increment,
	name varchar(20)
) ;
insert into test(name) values('王五');
OK,一切准备就绪,启动应用吧!!!
一启动就出现了各种各样的,似乎无穷无尽的报错!一头黑线。
1. 找不到TestMapper
Field testMapper in com.liuchuanv.dynamicdatasource.controller.TestController required a bean of type 'com.liuchuanv.dynamicdatasource.mapper.TestMapper' that could not be found.
解决方法:在 DynamicdatasourceApplication 头上添加注解 @MapperScan("com.liuchuanv.*.mapper")
2. dynamicDataSource 依赖循环
┌─────┐
|  dynamicDataSource defined in class path resource [com/liuchuanv/dynamicdatasource/common/DataSourceConfig.class]
↑     ↓
|  defaultDataSource defined in class path resource [com/liuchuanv/dynamicdatasource/common/DataSourceConfig.class]
↑     ↓
|  org.springframework.boot.autoconfigure.jdbc.DataSourceInitializerInvoker
└─────┘
解决方法:在 DynamicdatasourceApplication 头上修改注解 @SpringBootApplication(exclude = {DataSourceAutoConfiguration.class})
终于处理好所有的问题,终于能痛痛快快的访问 http://localhost:8080/test

使用的是默认数据源 defaultDataSource

使用的是数据源 dataSource1
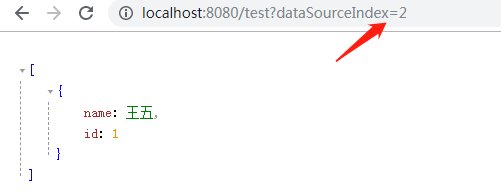
使用的是数据源 dataSource2
建议大家在心里总结一下整个的过程,其实很简单