https://www.openshift.com/blogs/how-to-install-and-configure-a-python-flask-dev-environment-deploy-to-openshift
Why this Tutorial?
Last winter I wanted to learn a new programming language and I chose Python. I've been attending many Python related meetups & participating in hackathons in Philly and NYC with the intention of expanding my Python skills. As I was scouring the net for Python related tutorials and information I found lots of very useful information that enabled me to get a solid foundation of the Python language. Most of the tuts and how to's I read were primarily related to learning and writing console applications (DOS/Terminal console apps). After feeling comfortable enough with Python I wanted to start writing web applications.
When researching how to write apps in Python I was smacked in the face with a ton of options. Unlike the console apps I was writing, it became apparent to me that writing web apps using Python is more complex and involved. I researched the more popular Python web frame works like Django, Pyramid, Flask and Bottle. I wanted to use a framework that would be easy to use/learn with as little dependencies and restrictions as possible. After all my research and experimenting I chose the Flask framework as my weapon of choice. It has a small foot print and decent documentation.
After I picked Flask as my web framework I realized that I needed a place to host my app online. Normally I would just spin up a virtual server on my private virtual host and create a new instance of Apache on a Linux server that I would have to manage and maintain for the life of my app. I've been in the IT game for quite some time now and I'm definitely not down with adding or managing anymore servers than I already have. Coincidentally I met two very friendly and helpful RedHat developer/evangelists at a hack-a-thon in NYC and they introduced me to their Platform as a Service (PaaS) called OpenShift. If you don't know and are asking yourself: What is OpenShift? - it allows developers and software engineers to basically create virtual servers, deploy and host their apps on the web. Best of all it's free and it's compatible with many of the current open source programming languages, frameworks and databases. This service is great for devs like me who don't want to perform double duty as sys admin and developer. OpenShift takes care of the system administration which frees you up to focus on your apps. Anyway we will useOpenShift to host our app in this tutorial.
Now that OpenShift became the home for my app I needed to start learning Flask. I found very little tutorials that covered Flask and they were all written by developers which in my opinion tend to assume the readers have more knowledge then they actually do. The fire ignited and I decided to write a grassroots tutorial for people like myself that want to learn how to write web apps in python and host it on a PaaS like OpenShift.
Let's Get started - Prep Our Dev Box for some PaaS action
Now we need to prepare our box but before we start there are a few things I assume that you are familiar with.
- You will need an active internet connection
- This tutorial assumes you are using a Linux OS (I prefer one of these Fedora, Debian or Ubuntu).
- You know what a terminal, console, command line is. Also when I list commands for you to run in the console the
$symbols should not be typed or included in the command, it just represents the bash prompt. - You should have a very basic understanding of the GIT version control system and how to use it. Use the GIT Docs or this tutorial to learn basic GIT commands. More importantly learn what version control is. Plenty of GIT material on the web, so do a search. I assume that you have a basic understanding of programming in Python, HTML, CSS & JavaScript (JavaScript not so important for this tut) if you're not too familiar then click the links and learn em.
Now let’s get on with it.
Create your app's home in the "Cloud" using the OpenShift PaaS
- Create your FREE OpenShift account Here Very simple sign-up email + password only
- Install the OpenShift Client Tools. Use these directions for your particular Operating System these tools have a command line interface and allow more control over your app. The OpenShift tool requires an installation of Ruby.
When installing Ruby on Linux I recommend that you use the Ruby Version Manager instructions that I wrote in the Other Sources of Reference Material section at the bottom of the page.
Run these commands in the terminal:
$ rhc domain create -n DomainName -l EmailAddress -p password
Create a namespace (a sub domain) for your app and replace the values with your information
$ rhc app create your-apps-name python-2.6
Create your app using the python template. Replace the bold bits with your information
$ cd your-apps-name
Change directories into your newly created application folder your-apps-name
$ git remote add upstream -m master git://github.com/openshift/flask-example.git
Add the upstream repository address to your local git config
$ git pull -s recursive -X theirs upstream master
Get the quick start code from the OpenShift repositories
$ git push
Push your newly created Flask application shell to your OpenShift server.
Here you want to check out your app using the url which will look similar to:http://your-apps-name-DomainName.rhcloud.com
Technically you have a functioning Flask application up and running in the "Cloud" but we're not done yet.
Let's configure Python & Virtualenv on our dev box
In the last section you created and configured the base of your Flask application on OpenShift. Now you have to ensure that you have a Python installation that is compatible with OpenShift. At the time this tut was written OpenShift only supports Python 2.6. I believe that newer versions will be supported in the near future but for now we are going to use Python 2.6.
Currently I'm using Ubuntu 12.04 as my operating system and as of 12.04 the default version installed is Python 2.7. If you are using an older version of Ubuntu you can do $ sudo apt-get install python2.6 to install that version of Python.
I actually prefer to use Virtualenv to isolate my Python development environments. It's a tool that allows you setup an isolated, self-contained Python environment in a folder on your dev box. This way you can experiment with various versions of Python without affecting your system wide configurations. We are going to install virtualenv on Ubuntu. If you are using a different Linux distro or operating system then do a web search and find installation instructions for your specific operating system. Since my distro doesn't have official Python 2.6 packages I had to get a community ported package of Python 2.6 that works on Ubuntu 12.04. Follow these instructions if you are running Ubuntu 12.04 or higher:
Install Python2.6 & virtualenv on Ubuntu 12.04
$ sudo add-apt-repository ppa:fkrull/deadsnakes
Install the PPA
$ sudo apt-get update
Run Update
$ sudo apt-get install python2.6 python2.6-dev
Install Python2.6
$ sudo apt-get install python-virtualenv
Install the virtualenv package
$ python2.6
This command will open the python console and you can verify that Python version 2.6 is installed
Press Control +D keys to quit python
Create & configure your local virtual Python dev environment
Do Not use sudo commands here! These commands should be executed with normal user creds.
In the terminal console type:
$ cd your-apps-name/wsgi/
Change directories to the OpenShift Flask app folder you previously created. The wsgi folder is where our app will live on OpenShift.
$ virtualenv venv --python=python2.6
Creates a folder named venv in the root of your flask app folder that houses your dev environment for this app
$ . venv/bin/activate
Activates your virtual environment for that folder.
Note: You must run this command to activate you virtual dev environmental. Fortunately you only have to run it once per terminal.
You should now have a terminal prompt that looks similar to this:(venv)amr@mybox:~/your-apps-name$
If you see the (venv) bit in your console prompt you are now in virtual mode and are now ready to install locally Flask and other Python related dependencies.
Install Flask into your local virtual dev environment
Now that you have your virtual dev environment active we can have some fun and install your Flask framework to our local environment.
Run this command in a terminal console:
$ pip install flask flask-wtf flask-babel markdown flup
It will install the multiple packages separated by spaces. You will see the packages being downloaded and installed into your local dev environment. These packages are actually being installed into the venv folder that was generated earlier.
Install Flask & dependencies to our OpenShift app
OpenShift uses GIT to deploy apps into your live website. You have your dev box configured with all the Python and Flask packages that you need but now we must config your OpenShift environment so that it also has the packages you just installed. OpenShift uses a setup.py file to configure your app. The setup.py file is where we will list the flask packages that we want to install in our OpenShift gear.
$ cd ..
Changes directory into the root of your-apps-name folder
Use your fav text editor and open the setup.py file found in the root of your apps folder and make the installs_require line look like the example below:
from setuptools import setup
setup(name='ws',
    version='1.0',
    description='just an app',
    author='me',
    author_email='me@gmail.com',
    url='http://www.python.org/sigs/distutils-sig/',
    install_requires=['Flask','flask-wtf','flask-babel','markdown','flup'],
)
Save the setup.py file. The key attribute that we are concerned with is the install_requires=['Flask>=0.9','flask-wtf','flask-babel','markdown','flup'],. The install_requires attribute is a simple array list of strings that represent python modules that your app needs. If you need other modules that are not listed you can just add another element to the file. The setup.py installs the dependencies listed as is the automated way of installing modules. It is equivalent to the pip install commands that were previously used.
Configuring your local GIT repo to ignore
Next we need to tell GIT to ignore our local venv folder so it doesn't get uploaded to our OpenShift repository. Using your fav text editor open the .gitignore and change the contents of your file to match the following:
venv/
.project
*.pyc
*.pyo
*~
Save the .gitignore file. The .gitignore file tells git to ignore all the folders, files and file types that are listed in it.
App folder structure
Let's create the basic folder structure for our app. In the terminal type these commands:
$ cd your-apps-name/wsgi/
Change directories into the root of wsgi
$ mkdir app
The app folder is where we will put our application package
$ mkdir app/static
The static sub-folder is where we will store static files like images, javascripts, and style sheets
$ mkdir app/templates
The static sub-folder is where we will store static files like images, javascripts, and style sheets
$ mkdir tmp
The templates sub-folder is obviously where our templates will go
$ cd app
Change into your app directory
Create our "Hello World"
I hate "hello world" apps but they are a necessary evil for now. Now you will create a __init__.py file. The __init__.py files are required to make Python treat the directories as containing packages; this is done to prevent directories with a common name, such as string, from unintentionally hiding valid modules that occur later on the module search path. In the simplest case,__init__.py can just be an empty file, but it can also execute initialization code for the package.
Anyway, in the root of your app folder create a file named __init__.py so populate & save it with the following code:
from flask import Flask
app = Flask(__name__)
from app import views
The script above simply creates the application object(class Flask) and then imports the views module, which we haven't written yet.
Create a file named views.py in your app folder. Populate & save it with the following:
from app import app
@app.route('/')
@app.route('/index')
def index():
    return "Hello, World!"
Views are the handlers that respond to requests from web browsers. In Flask views are written as Python functions. Each view function is mapped to one or more request URLs. This view returns a string, to be displayed on the client's web browser. The two route decorators above the function create the mappings from urls / and /index to this function.
$ cd ..
Change directories into the root of wsgi where we need to modify a file a create a new one.
Let's finish this & get Hello World running locally. In your wsgi folder there is a file named application, which was created by OpenShift. Open it with your editor, replace all of its contents with this code:
#!/usr/bin/python
import os
virtenv = os.environ['APPDIR'] + '/virtenv/'
os.environ['PYTHON_EGG_CACHE'] = os.path.join(virtenv, 'lib/python2.6/site-packages')
virtualenv = os.path.join(virtenv, 'bin/activate_this.py')
try:
    execfile(virtualenv, dict(__file__=virtualenv))
except IOError:
    pass
from run import app as application
The application file is required by OpenShift and it basically calls the run.py file that you are creating next. In the root of wsgicreate a script called run.py and save it with this code:
from app import app
if __name__ == "__main__":
    app.run(debug = True) #We will set debug false in production
The script simply imports the app variable from our app package and invokes its run method to start the server. The app variable holds the Flask instance, we created it above. Now we can run and test our app locally. Run the following in terminal:
Note: make sure your (venv) is active in your command prompt
$ python run.py
You should see something like the following in the terminal:
* Running on http://127.0.0.1:5000/
* Restarting with reloader
You've just created a local instance of your web application which is only accessible from your dev box. Let’s view your new app in a browser. In a browser paste:
http://localhost:5000/index
Here you should see "Hello World" in the browser. Kool Huh? Well not really but you now have a working flask website being served locally on your dev box. This is great but our ultimate goal is to share this creation with the world online. Now we have to deploy this app to our OpenShift gear.
Ready???
Deploying to OpenShift
So you've got this simple flask app running on your local box and that's awesome but we need to get it on the web. This is going to be very easy so open a terminal and get to typing.
Before you proceed it's important the you are in the root of your app so type:
$ cd your-app-name
$ git add .
$ git commit -a -m "Initial deployment of this app to the web"
$ git push
That should do it! When the OpenShift processes are complete your app will be live on the web. In a browser put your app's url to see it:
http://your-apps-name-DomainName.rhcloud.com
Summary
You now have your local development and OpenShift environments configured. These separate environments will allow you to develop and test your apps locally before publishing online. Once you've tested and vetted your app you can easily deploy it to your live OpenShift gear on the web.
More expansive tutorials to follow
This was a long tutorial but most of the actions we performed will only have to be completed once. I intend to write follow-up tutorials that expand on how to build apps in flask and using OpenShift to serve up your apps but for now enjoy
Build Your App on OpenShift Using Flask, SQLAlchemy, and PostgreSQL 9.2
https://www.openshift.com/blogs/build-your-app-on-openshift-using-flask-sqlalchemy-and-postgresql-92
Let me start this blog by confessing that I am a Java guy who first learned Python three years back but haven't used it much in my day to day work. So, after three long years, I have decided to brush up on my Python skills by developing a simple web application. By simple I don't mean "Hello World" application but an application which does some work like storing data to a database. After spending some time googling "best web framework in Python," I zeroed in on Flask. Flask is a microframework for Python based on Werkzeug and Jinja 2. It is a very easy to learn framework and is based on convention over configuration, which means that many things are preconfigured with sensible defaults.
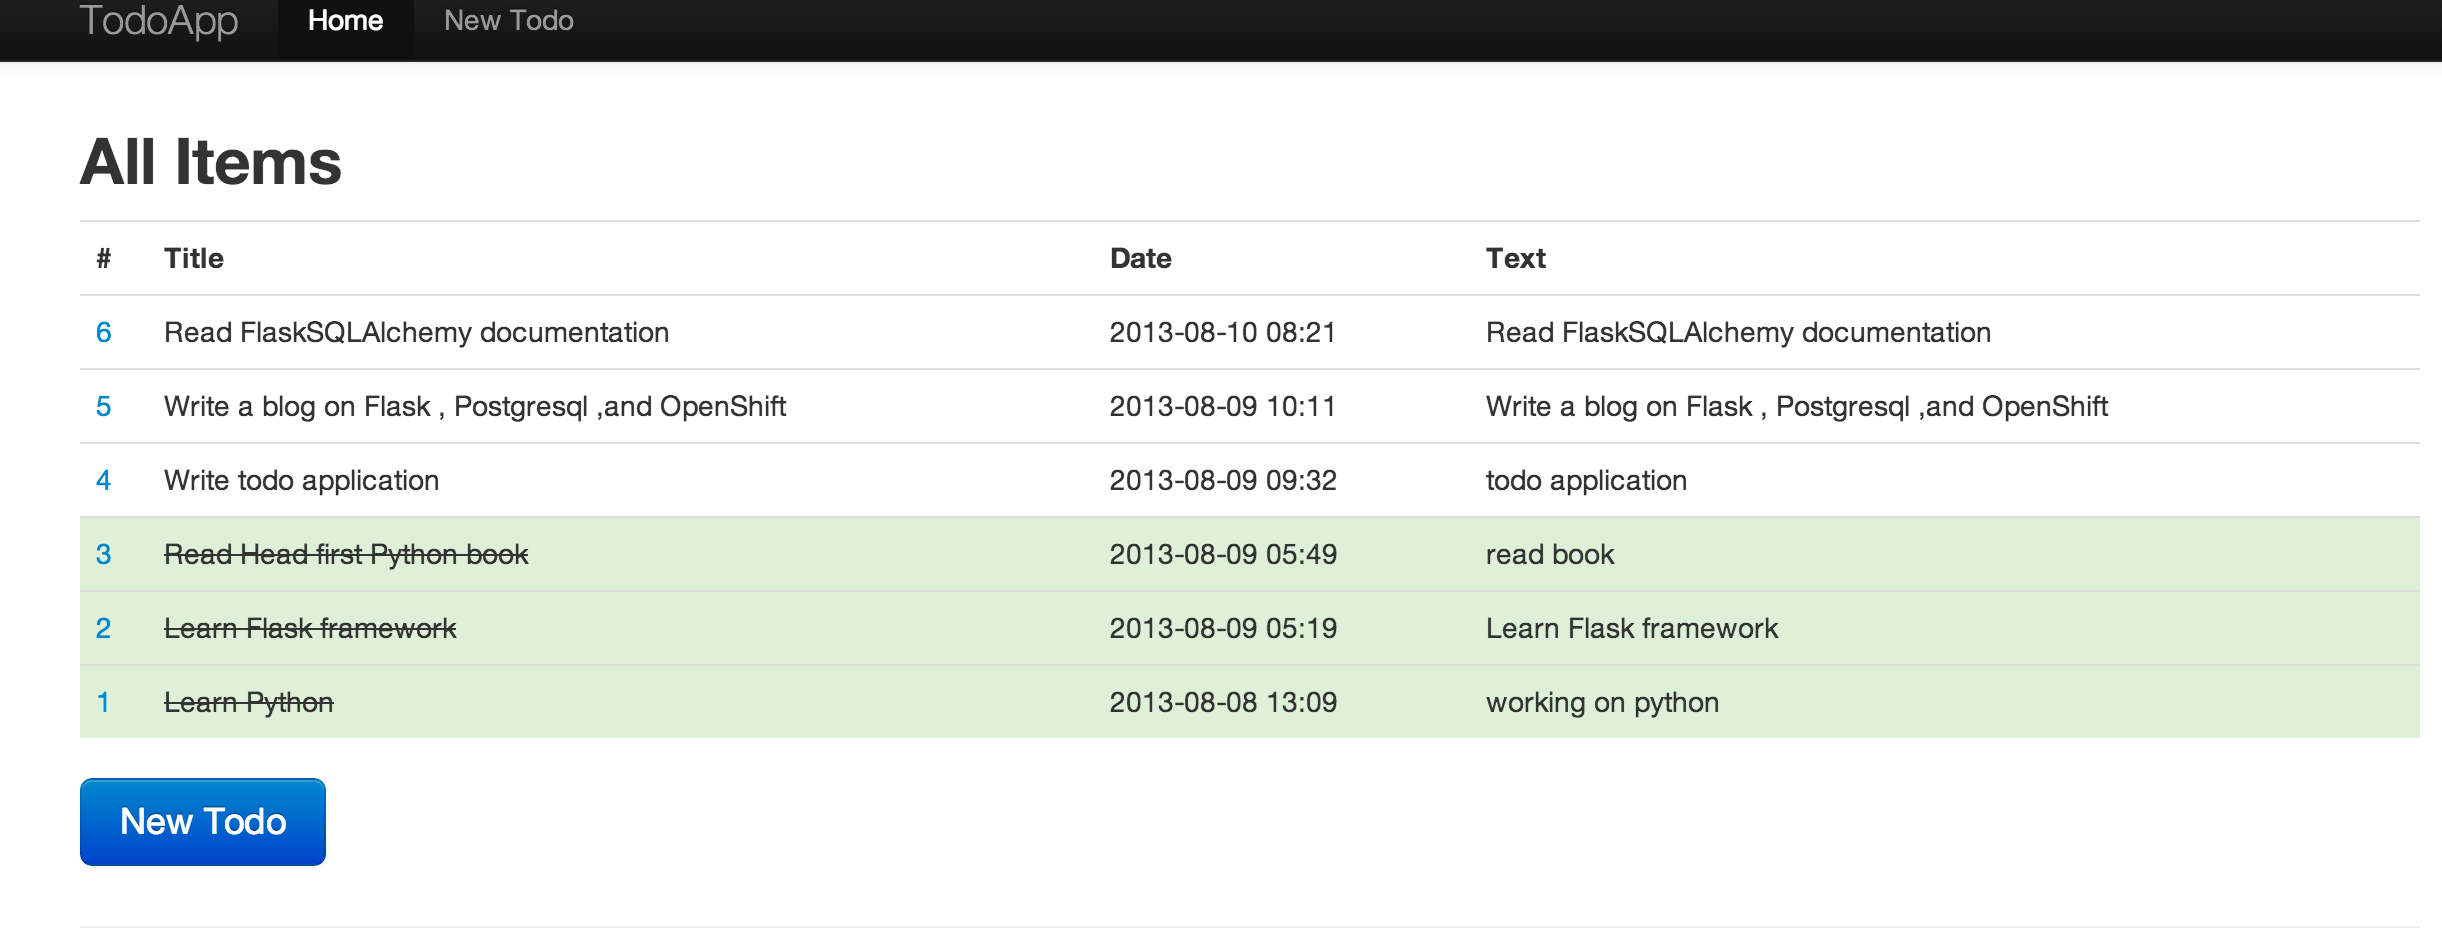
In this blog, we will write a todo application using Flask , Flask-SQLAlchemy , PostgreSQL , and Twitter Bootstrap. The purpose of this blog is not just to help developers write Python Flask web applications but to also help them deploy their application in the Cloud. In this blog, we will deploy our Flask todo application on OpenShift. OpenShift provides scalable hosting for Python web applications. Another purpose of this blog is to help newbie OpenShift Python application developers who want to get started with Python development on OpenShift. Finally, this blog will also show how to connect a Postgresql database from a Python application. By the end of this blog you will be able to see how using a Platform as a Service can quickly get you going with Python and PostgreSQL and we will have a todo application running on OpenShift as shown below.
Prerequisite
Before we can start building the application, we'll have to do few setup tasks :
-
Basic Python knowledge is required.
-
Sign up for an OpenShift Account. It is completely free and instant . Red Hat gives every user three free Gears on which to run your applications. At the time of this writing, the combined resources allocated for each user is 1.5 GB of memory and 3 GB of disk space.
-
Install the rhc client tool on your machine. The rhc is a ruby gem so you need to have ruby 1.8.7 or above on your machine. To install rhc, just type
sudo gem install rhc. If you already have one, make sure it is the latest one. To update your rhc, execute the command shown below.sudo gem update rhc. For additional assistance setting up the rhc command-line tool, see the following page: https://openshift.redhat.com/community/developers/rhc-client-tools-install. -
Setup your OpenShift account using
rhc setupcommand. This command will help you create a namespace and upload your ssh keys to the OpenShift server.
Source code of the application that we will be developing in this blog is on github https://github.com/shekhargulati/todo-flask-openshift-quickstart
Step 1 : Create an OpenShift Python Application
We will start by creating an OpenShift Python 2.7 application. OpenShift also supports Python 2.6 and Python 3.3, but for this blog we will be sticking with Python 2.7. To learn more about the Python 3.3 cartridge, please refer to this blog.
The OpenShift Python 2.7 cartridge by default uses mod_wsgi Apache HTTP Server module that provides a WSGI compliant interface for hosting Python based web applications under Apache.To create a Python 2.7 application named todo, type the command shown below.
$ rhc app create todo python-2.7 postgresql-9.2
The command shown above will create an application container for us, called a gear, and setup all of the required SELinux policies and cgroup configuration. Next, it will install all the required software on your gear. It will also install PotsgreSQL 9.2 on your application gear and will create a database with the same name as the application name. OpenShift will also setup a private git repository with some template code, and then clone the repository to your local system. Finally, OpenShift will propagate the DNS to the outside world.
You can view the application details using the command shown below.
$ rhc show-app --app todo

todo @ http://todo-xxxxx.rhcloud.com/ (uuid: 522425cd500446b3ec000294)
-------------------------------------------------------------------------------
  Domain:  xxxxx
  Created: 11:14 AM
  Gears:   1 (defaults to small)
  Git URL: ssh://522425cd500446b3ec000294@todo-xxxxx.rhcloud.com/~/git/todo.git/
  SSH:     522425cd500446b3ec000294@todo-xxxx.rhcloud.com

  python-2.7 (Python 2.7)
  -----------------------
    Gears: Located with postgresql-9.2

  postgresql-9.2 (PostgreSQL Database 9.2)
  ----------------------------------------
    Gears:          Located with python-2.7
    Connection URL: postgresql://$OPENSHIFT_POSTGRESQL_DB_HOST:$OPENSHIFT_POSTGRESQL_DB_PORT
    Database Name:  todo
    Password:       AXtK_CELQXJK
    Username:       adminiid3lsl
Step 2 : Look at Default Template Application
The default structure of the template application created by OpenShift is shown below.
todo
    wsgi/                    Externally exposed wsgi code goes here
    wsgi/static/          Public static content gets served here
    libs/                      Additional libraries
    data/                    For not-externally exposed wsgi code
    setup.py               Standard setup.py, specify deps here
       app.py.disabled     This file may be used instead of Apache mod_wsgi to run your python web application in a different framework
    .openshift/            Location for OpenShift specific files
        action_hooks/      Various scripts to hook into application lifecycle
        markers/          Marker files for hot deployment , debugging etc
All the application code will be placed in the wsgi folder and application dependencies will be added to setup.py.
Step 3 : Adding Flask and Flask-SQLAlchemy Dependencies
OpenShift uses Setuptools which is a collection of enhancements to the Python distutils , that allow developers to more easily build and distribute Python packages, especially ones that have dependencies on other packages. We will add Flask and Flask-SQLAlchemy dependencies to setup.py as shown below.
from setuptools import setup

setup(name='TodoApp',
      version='1.0',
      description='Todo Application',
      author='Shekhar Gulati',
      author_email='',
      url='http://www.python.org/sigs/distutils-sig/',
     install_requires=['Flask==0.7.2', 'MarkupSafe' , 'Flask-SQLAlchemy==0.16'],
     )
The key attribute in the code shown above is install_requires=['Flask==0.7.2', 'MarkupSafe' , 'Flask-SQLAlchemy==0.16']. Theinstall_requires attribute is used to specify a list of strings that represent python modules that your app needs. If you need other modules that are not listed you can just add new elements to setup.py. The reason we pegged to a certain version is 1) this prevents the build from checking versions with every git push and 2) it also prevents a build from putting in a version that breaks our code without our knowledge.
Step 4 : Make Flask Say Hello
We will start developing our todo application by creating a new file called todoapp.py in wsgi folders. On windows you can just create a new file named todoapp.py, by right clicking in explorer and saying new text file, then change .txt extension with .py extension.
$ cd wsgi
$ touch todoapp.py
Open your favorite editor and add following lines to it.
from flask import Flask

app = Flask(__name__)

@app.route('/')
@app.route('/hello')
def index():
    return "Hello from OpenShift"

if __name__ == '__main__':
    app.run()
The code shown above does following :
- Import the Flask class from the flask module and then create an instance of Flask class. This instance will be our WSGI application.
- Next we define a route which tells Flask that on root('/') and home('/home') url, it should invoke index() function. The index() function just simply returns "Hello from OpenShift" string which will be rendered by the browser.
- Finally, if the name of the application module is equal to "_ _main_ _" then run method is invoked to run the server.
The last change needed to make this "Hello World" application work on OpenShift is to update a file named application which OpenShift created under wsgi folder. Change the content of the file with the one shown below.
#!/usr/bin/python
import os

virtenv = os.environ['OPENSHIFT_PYTHON_DIR'] + '/virtenv/'
os.environ['PYTHON_EGG_CACHE'] = os.path.join(virtenv, 'lib/python2.7/site-packages')
virtualenv = os.path.join(virtenv, 'bin/activate_this.py')
try:
    execfile(virtualenv, dict(__file__=virtualenv))
except IOError:
    pass

from todoapp import app as application
The application file is required by OpenShift and it basically calls the todoapp file that we created earlier.
After all the code changes are done, add the code to the git repository, commit it, and push it to OpenShift gear.
$ git add .
$ git commit -am "hello world from flask"
$ git push
The application will be accessible at http://todo-{domain-name}.rhcloud.com. Replace {domain-name} with your domain name.
Step 5 : Defining your Model
In this blog, we are using Flask-SQLAlchemy which is a Flask extension that adds SQLAlchemy support to our todoapp application.SQLAlchemy is the Python SQL toolkit and Object Relational Mapper that gives application developers the full power and flexibility of SQL.
Open the todoapp.py and add Todo model class to it as shown below.
from datetime import datetime
from flask import Flask
from flask_sqlalchemy import SQLAlchemy

app = Flask(__name__)

app.config.from_pyfile('todoapp.cfg')
db = SQLAlchemy(app)

class Todo(db.Model):
    __tablename__ = 'todos'
    id = db.Column('todo_id', db.Integer, primary_key=True)
    title = db.Column(db.String(60))
    text = db.Column(db.String)
    done = db.Column(db.Boolean)
    pub_date = db.Column(db.DateTime)

    def __init__(self, title, text):
        self.title = title
        self.text = text
        self.done = False
        self.pub_date = datetime.utcnow()

@app.route('/')
@app.route('/hello')
def index():
    return "Hello from OpenShift"

if __name__ == '__main__':
    app.run()
In the code shown above we made the following additions.
- First we imported SQLAlchemy class from flask_sqlalchemy module. This is required to work with Flask-SQLAlchemy.
- Then we created an instance of SQLAlchemy class by passing it application object. The application object was loaded with database configuration which we specified in todoapp.cfg file. We will be creating todoapp.cfg later in this post.
- Next we defined our Todo model by extending db.Model class and declaring all the Todo model attributes.
Next, create a new file called todoapp.cfg in wsgi folder. It will house all our application configuration. On windows you can just create a new file named todoapp.cfg, by right clicking in explorer and saying new text file, then change .txt extension with .cfg extension.
$ cd wsgi
$ touch todoapp.cfg
Add following lines to todoapp.cfg
import os
SQLALCHEMY_DATABASE_URI = os.environ['OPENSHIFT_POSTGRESQL_DB_URL']
SQLALCHEMY_ECHO = False
SECRET_KEY = 'secret key'
DEBUG = True
Once you go into production, you will probably want to turn off DEBUG until you run into problems. This will help with performance since you won't be writing as much to files.
Update the application file under wsgi folder so that it creates the database. Add the two lines at the end of file.
from todoapp import *
db.create_all()
Step 6 : Persisting Todo Items to PostgreSQL
Next we will add a route "/new" which will render a form when a user makes a get request to http://todo-{domain-name}.rhcloud.com/new. And when user submit the form using POST method it will write the todo item to database.
Add following lines to todoapp.py.
from flask import Flask, request, flash, url_for, redirect, render_template, abort

@app.route('/new', methods=['GET', 'POST'])
def new():
    if request.method == 'POST':
            todo = Todo(request.form['title'], request.form['text'])
            db.session.add(todo)
            db.session.commit()
            return redirect(url_for('index'))
    return render_template('new.html')
Flask uses Jinja2 as its templating language. For those of you new to the flask framework, templates basically facilitate the seperation of presentation and processing of your data. Templates are web pages that have mostly static elements and integrate programming logic which produces dynamic content. In the code snippet shown above we are rendering a template called 'new.html'. Create a new folder called templates under wsgi folder and create a new.html in it and add the following lines.
$ cd wsgi
$ mkdir templates
$ cd template
$ touch new.html
Next copy the content shown below in new.html.
{% extends "layout.html" %}
{% block body %}
  <form action="" method=post class="form-horizontal">
    <h2>Create New Todo</h2>
    <div class="control-group">
        <div class="controls">
          <input type="text" id="title" name="title" class="input-xlarge"
            placeholder="Please give title to todo item" value="{{ request.form.title }}"
            required>
        </div>
    </div>

    <div class="control-group">
        <div class="controls">
          <textarea name="text" rows=10 class="input-xlarge" placeholder="describe the todo item" required>{{ request.form.text }}</textarea>
        </div>
    </div>

    <div class="control-group">
        <div class="controls">
          <button type="submit" class="btn btn-success">Create Todo</button>
          <a href="{{ url_for('index') }}">Back to list</a>
        </div>
    </div>
  </form>
{% endblock %}
The new.html template extends another template called layout.html. The layout.html is where we will define the layout of our web application. Create a new file called layout.html in the templates folder under wsgi and following content. Basically, template inheritance makes it possible to keep certain elements on each page like header, footer, etc.
<!doctype html>
<title>TodoApp -- Store your Todo items</title>
<meta name="viewport" content="initial-scale=1.0, user-scalable=no">
<meta charset="utf-8">
<style>
body {
    padding-top: 60px;
    padding-bottom: 100px;
}
</style>
<link href="/static/bootstrap.css" rel="stylesheet">
<link href="/static/bootstrap-responsive.css" rel="stylesheet">
<script src="/static/jquery.js"></script>
<script src="/static/bootstrap.js"></script>

<div class="navbar navbar-inverse navbar-fixed-top">
        <div class="navbar-inner">
            <div class="container">
                <button type="button" class="btn btn-navbar" data-toggle="collapse"
                    data-target=".nav-collapse">
                    <span class="icon-bar"></span> <span class="icon-bar"></span> <span
                        class="icon-bar"></span>
                </button>
                <a class="brand" href="/">TodoApp</a>
                <div class="nav-collapse collapse">
                    <ul class="nav">
                        <li class="active"><a href="/">Home</a></li>
                        <li><a href="/new">New Todo</a></li>
                    </ul>
                </div>
                <!--/.nav-collapse -->
            </div>
        </div>
</div>

{%- for category, message in get_flashed_messages(with_categories=true) %}
  <p class="flask {{ category }}-flash">{{
    "Error: " if category == 'error' }}{{ message }}</p>
{%- endfor %}
<div id="main" class="container">
    {% block body %}{% endblock %}
    <hr>
    <footer id="footer">
                <p>Todo App built using Flask, SQLAlchemy, PostgreSQL , and Twitter Bootstrap</p>
                <p><a href="https://www.openshift.com/" target="_blank"><img alt="Powered by OpenShift" src="https://www.openshift.com/sites/default/files/images/powered-transparent-black.png"></a></p>
    </footer>
</div>
Flask will look for templates in the templates folder. Templates have access to request, session, g objects, as well as the get_flashed_messages() function. We have used get_flashed_messages() method above. This method pulls all flashed messages from the session and returns them. As Flask configured Jinja2 templating engine for our application, HTML escaping is also enabled for the application. This makes sure the application is secure. You should head over to Jinja2 official documentation for more information.
The project uses Twitter bootstrap to beautify the application. Copy the files from https://github.com/shekhargulati/todo-flask-openshift-quickstart/tree/master/wsgi/static and put in static folder under wsgi. The static folder is for serving static files.
$ cd ../static
$ wget https://raw.github.com/shekhargulati/todo-flask-openshift-quickstart/master/wsgi/static/css/bootstrap-responsive.css
$ wget https://raw.github.com/shekhargulati/todo-flask-openshift-quickstart/master/wsgi/static/css/bootstrap.css
$ wget https://raw.github.com/shekhargulati/todo-flask-openshift-quickstart/master/wsgi/static/js/bootstrap.js
$ wget https://github.com/shekhargulati/todo-flask-openshift-quickstart/blob/master/wsgi/static/js/jquery.js
Commit the code and push it to OpenShift gear
$ git add .
$ git commit -am "added functionality to create a new todo"
$ git push
Now if you go to http://todo-{domain-name}.rhcloud.com/new you will see a form where you can create todo items as shown below.

Next, create a new Todo item by entering some details and pressing "Create Todo" button. The application will first save the todo item and then redirect you to index "/" page. To view the persisted todo item we will log into our application gear and run psql PostgreSQL client.
$ rhc ssh --app todo

$ [todo-xxxx.rhcloud.com 5204d6c75973cac7a00001ef]> psql
psql (9.2.4)
Type "help" for help.

todo1=# dt
           List of relations
 Schema | Name  | Type  |    Owner
--------+-------+-------+--------------
 public | todos | table | adminwrqfzbx
(1 row)

todo1=#
To view the created todo item we will run select query as shown below.
todo1=# select * from todos;
 todo_id |         title         |           text           | done |          pub_date
---------+-----------------------+--------------------------+------+----------------------------
       1 | Learn Flask framework | Read Flask Documentation | f    | 2013-08-10 02:51:43.007073
(1 row)

todo1=#
Step 7 : View all Todo Items on Index Page
The next feature that we are going to implement is to show all the todo items on the index page. So, if a user goes to http://tood-{domain-name}.rhcloud.com/ then he/she will see all the todo items.
Update the index() function in todoapp.py with the following lines:
@app.route('/')
def index():
    return render_template('index.html',
        todos=Todo.query.order_by(Todo.pub_date.desc()).all()
    )
Create a new file called index.html in the templates directory and add the following content:
{% extends "layout.html" %}
{% block body %}
<div id="main" class="container">
    <h2>All Items</h2>
    <table class="table table-hover">
      <tr>
        <th>#
        <th>Title
        <th>Date
        <th>Text
      {%- for todo in todos %}
      <tr class={{ "success" if todo.done }}>
        <td><a href="/todos/{{ todo.id }}">{{ todo.id }}</a>
        <td style={{ "text-decoration:line-through" if todo.done }}>{{ todo.title }}
        <td>{{ todo.pub_date.strftime('%Y-%m-%d %H:%M') }}
        <td>{{ todo.text }}</td>
      {%- endfor %}
    </table>
    <p>
      <a href="{{ url_for('new') }}" class="btn btn-large btn-primary">New Todo</a>


</div>
{% endblock %}
Commit the changes and push to OpenShift gear.
$ git add .
$ git commit -am "added index()"
$ git push
Now if you go to http://todo-{domain-name}.rhcloud.com , you will see as shown below. Please replace {domain-name} with your own domain name.

Step 8 : View and Update a Todo Item
The next functionality that we are going to implement is viewing and updating a specific todo item. When a user goes to http://todo-{domain-name}.rhcloud.com/todos/1 then he/she should see a form filled with details of todo item with id 1. A user can change the values and submit the form again. This will update the values of the todo item. A user can update the todo item to mark todo as done. Add a new function to todoapp.py as shown below.
@app.route('/todos/<int:todo_id>', methods = ['GET' , 'POST'])
def show_or_update(todo_id):
    todo_item = Todo.query.get(todo_id)
    if request.method == 'GET':
        return render_template('view.html',todo=todo_item)
    todo_item.title = request.form['title']
    todo_item.text  = request.form['text']
    todo_item.done  = ('done.%d' % todo_id) in request.form
    db.session.commit()
    return redirect(url_for('index'))
The view.html template is shown below. Create a new file with name view.html in templates directory and place the content shown below in it.
{% extends "layout.html" %}
{% block body %}
  <form action="" method=post class="form-horizontal">
    <h2>Create New Todo</h2>
    <div class="control-group">
        <div class="controls">
          <input type="text" id="title" name="title" class="input-xlarge"
            placeholder="Please give title to todo item" value="{{ todo.title }}"
            required>
        </div>
    </div>

    <div class="control-group">
        <div class="controls">
          <textarea name="text" rows=10 class="input-xlarge" placeholder="describle the todo item" required>{{ todo.text }}</textarea>
        </div>
    </div>

    <div class="control-group">
        <div class="controls">
          <input type=checkbox name=done.{{ todo.id }}{{ " checked" if todo.done }}>
        </div>
    </div>


    <div class="control-group">
        <div class="controls">
          <button type="submit" class="btn btn-success">Update Todo</button>
          <a href="{{ url_for('index') }}">Back to list</a>
        </div>
    </div>
  </form>
{% endblock %}
Commit the code and push it to OpenShift gear.
$ git add .
$ git commit -am "added view or update functionality"
$ git push
Now if you go to http://todo-{domain-name}.rhcloud.com/todos/1 then you will see a todo item as shown below.

You can mark the checkbox and press "Update todo" and you will see the todo marked done on the index page.

Conclusion
In this blog we covered how developers can build web applications in Python using Flask framework and PostgreSQL database and deploy it to OpenShift. If you are looking to host your Python application then give OpenShift a try.
What's Next?
- Sign up for OpenShift Online
- Get your own private Platform As a Service (PaaS) by evaluating OpenShift Enterprise
- Need Help? Ask the OpenShift Community your questions in the forums
- Showcase your awesome app in the OpenShift Developer Spotlight. Get in the OpenShift Application Gallery today.
1、所有的程序放在wsgi文件夹下,
application文件的写法:
#!/usr/bin/python
import os
import sys
sys.path.insert(0, os.path.dirname(__file__) or '.')
PY_DIR = os.path.join(os.environ['OPENSHIFT_HOMEDIR'], "python")
virtenv = PY_DIR + '/virtenv/'
PY_CACHE = os.path.join(virtenv, 'lib', '2.6', 'site-packages')
os.environ['PYTHON_EGG_CACHE'] = os.path.join(PY_CACHE)
virtualenv = os.path.join(virtenv, 'bin/activate_this.py')
try:
execfile(virtualenv, dict(__file__=virtualenv))
except IOError:
pass
from run import app as application
run就是含有app.run()的一个文件
2、run文件里的app.run()不能运行,最好这样写:
#!/usr/bin/python
# -*- coding: UTF-8 -*-
from app import app
if __name__ == "__main__":
app.run(debug = True)
3、setup.py里面的name应该是:https://xxxxx.rhcloud.com,而不是控制台里面的实例名字。
4、flask-sqlalchemy连接数据库的url应该这样写:
app.config['SQLALCHEMY_DATABASE_URI'] = os.environ['OPENSHIFT_MYSQL_DB_URL'] + 'xxx'
xxx是自己创建的数据库。
如果使用openshift创建数据库时以创建的数据库,那么连接应该这样写:
app.config['SQLALCHEMY_DATABASE_URI'] = os.environ['OPENSHIFT_MYSQL_DB_URL'] + os.environ['OPENSHIFT_APP_NAME']
忙了一晚上,就折腾了这样一点,唉。。。。
其实在使用中sqlalchemy和flask-sqlalchemy还是有点区别的的,sqlalchemy中使用query查询,而flask-sqlalchemy中使用basequery查询,他们是子类与父类的关系,flask-sqlalchemy中分页写的很明白了,但是对于我这种认识英文,又不能很好的理解英文的人来说,看文档还很吃力,这里记录一下。
这是文档地址:http://pythonhosted.org/Flask-SQLAlchemy/api.html#utilities
具体的使用方法:
paginate = User.query.paginate(page, POSTS_PER_PAGE, False)
object_list = paginate.items
return render_template('simplecd_list.html',pagination = paginate,object_list = object_list)
User是我的model,page是显示的第几页页数,POSTS_PER_PAGE每页显示多少条,paginate.items才是分页好的数据,下面是一个分页导航的例子:
<div class="pagination ">
<div class="row-fluid">
<div class="span3 offset2">
{% if pagination.has_prev %}
<a href="/index/{{ pagination.prev_num }}">previous</a>
{% endif %}
</div>
<div class="span3 ">
<a href="">Page {{ pagination.page }} of {{ pagination.pages }}.</a>
</div>
<div class="span3 ">
{% if pagination.has_next %}
<a href="/index/{{ pagination.next_num }}">next</a>
{% endif %}
</div>
</div>
</div>