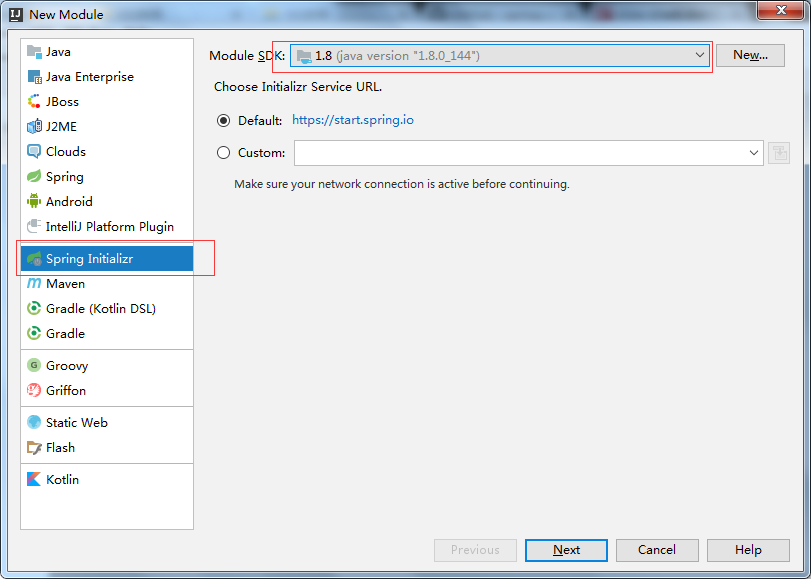
一.在你建立的工程下创建 Module 选择Spring initializr创建。
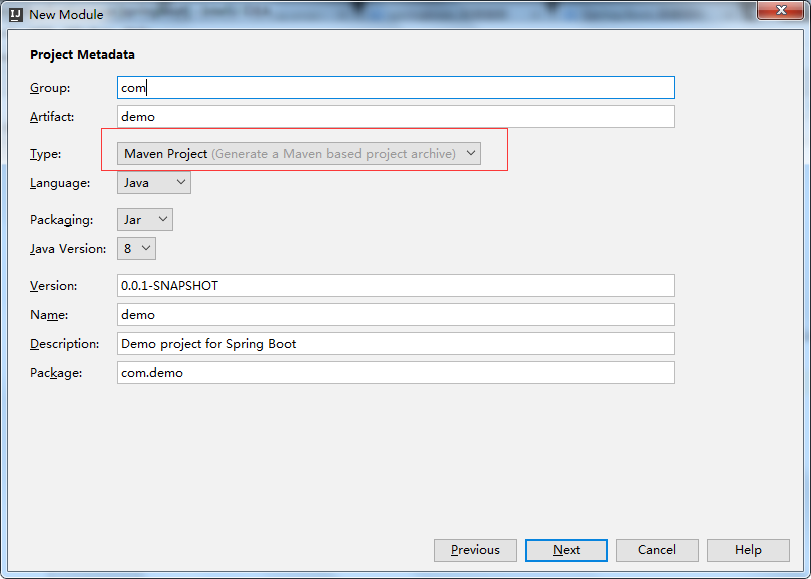
二.在Type处选择: Maven Project(项目的构建工具)
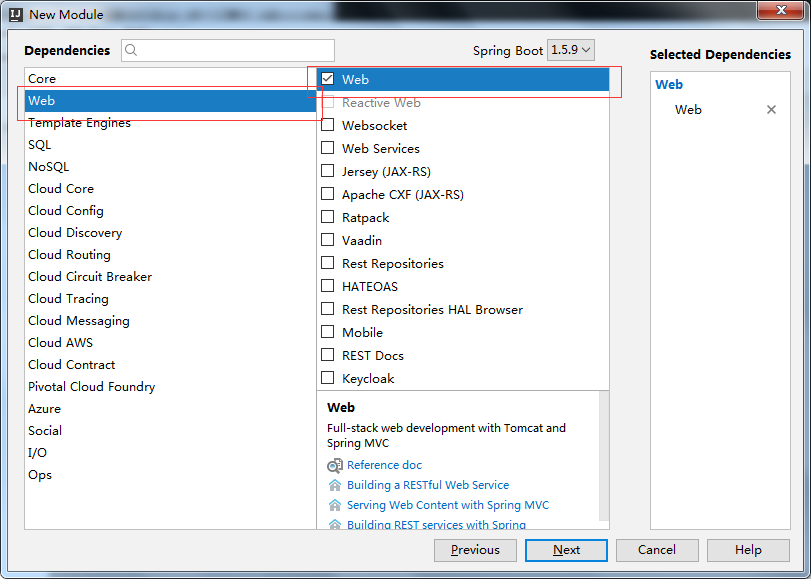
三.创建依赖时勾上web,mybatis,mysql(这个看你个人需要吧,可以自主选择)

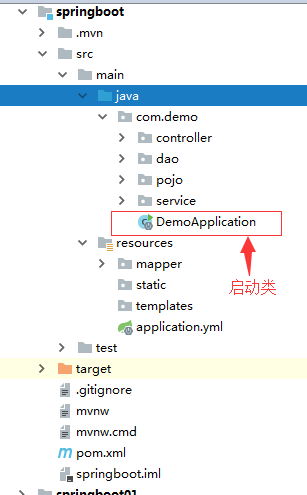
建立好的项目结构如下:
DemoApplication代码:
@ComponentScan(basePackages = {"com.example.demo.web", "com.example.demo.config"})
@SpringBootApplication(exclude = DataSourceAutoConfiguration.class)
@PropertySource(value = { "classpath:config/jdbc.properties"}, ignoreResourceNotFound = false)//未找到文件时报错
public class DemoApplication {

   public static void main(String[] args) {
      //方式一
//    SpringApplication.run(DemoApplication.class, args);
      //方式二
      SpringApplication SpringApplication = new SpringApplication(DemoApplication.class);
      SpringApplication.setBannerMode(Banner.Mode.OFF);//关闭banner图
      SpringApplication.run(args);
   }
}
注意要加exclude = DataSourceAutoConfiguration.class,否则没有配置数据源时会报错:
Failed to configure a DataSource: 'url' attribute is not specified and no embedded datasource could be configured.
Reason: Failed to determine a suitable driver class
启动方式:
1、启动类中右键执行main方法;
2、Terminal命令行中直接执行命令:mvn spring-boot:run (点击X号close session即关闭项目)
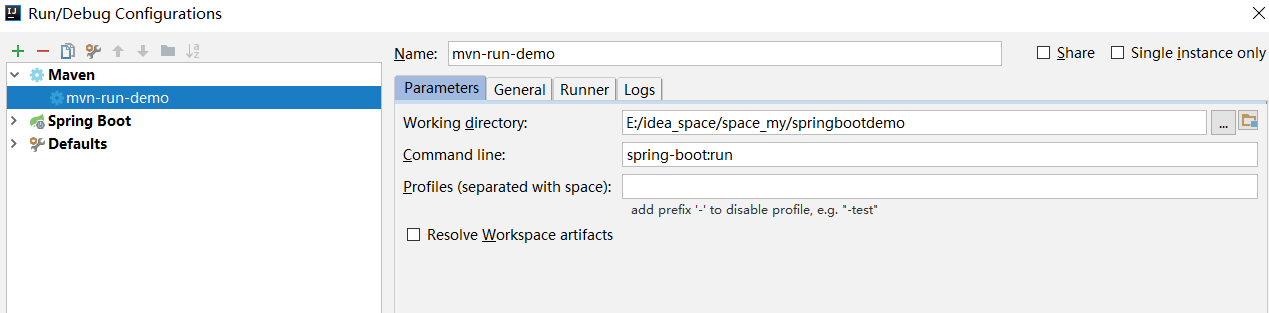
3、edit Configurations中添加maven命令,注意Command line中只有spring-boot:run,没有mvn
4、执行mvn install生成jar包,执行命令如:java -jar demo-0.0.1-SNAPSHOT.jar 启动
启动banner图设置:
打开地址生成banner文案:http://patorjk.com/software/taag/#p=display&h=3&v=3&f=4Max&t=springboot
复制生成的文本保存到banner.txt放到maven项目resouces目录下,启动即可看到效果。若要更改命名或者存放位置可通过配置更改:
banner.location= classpath:banner.txt
若要关闭可通过:
代码方式:SpringApplication.setBannerMode(Banner.Mode.OFF);
配置方式:spring.main.banner-mode= off(默认console)
自定义消息转化器
方式一:
在@Configuration的类中添加消息转化器的@bean加入到Spring容器,就会被Spring Boot自动加入到容器中。
@Bean
@ConditionalOnMissingBean//bean不存在情况下创建
public StringHttpMessageConverter stringHttpMessageConverter(){
   StringHttpMessageConverter converter  = new StringHttpMessageConverter(Charset.forName("UTF-8"));
   return converter;
}
效果相当于在xml文件中配置bean标签,此配置在spring容器中的名字即方法名,故一般方法名即是bean名
方式二:
自定义springmvc配置
有些时候我们需要自已配置SpringMVC而不是采用默认,比如说增加一个拦截器,这个时候就得通过实现WebMvcConfigurer然后重写父类中的configureMessageConverters方法进行扩展。
@Configuration
public class NewMvcConfig implements WebMvcConfigurer{

    @Override
    public void addInterceptors(InterceptorRegistry registry) {
        HandlerInterceptor handlerInterceptor = new HandlerInterceptor() {
            @Override
            public boolean preHandle(HttpServletRequest request, HttpServletResponse response, Object handler)
                    throws Exception {
                System.out.println("新 de 自定义拦截器............");
                return true;
            }

            @Override
            public void postHandle(HttpServletRequest request, HttpServletResponse response, Object handler,
                                   ModelAndView modelAndView) throws Exception {

            }

            @Override
            public void afterCompletion(HttpServletRequest request, HttpServletResponse response, Object handler,
                                        Exception ex) throws Exception {
            }
        };
        registry.addInterceptor(handlerInterceptor).addPathPatterns("/**");
    }

    // 自定义消息转化器的第二种方法
    @Override
    public void configureMessageConverters(List<HttpMessageConverter<?>> converters) {
        StringHttpMessageConverter converter  = new StringHttpMessageConverter(Charset.forName("UTF-8"));
        converters.add(converter);
    }

}
@PropertySource({"classpath:static/testpro.properties"})引入properties文件
可通过注解:@Value("${test.my.name}")在bean属性中直接获取properties属性值
@ImportResource({"classpath:config.xml","classpathsome.xml"})引入xml文件
整合mybatis
Mybatis和Spring Boot的整合有两种方式:
第一种:使用mybatis官方提供的Spring Boot整合包实现,地址:https://github.com/mybatis/spring-boot-starter
第二种:使用mybatis-spring整合的方式,也就是我们传统的方式
这里我们推荐使用第二种,因为这样我们可以很方便的控制Mybatis的各种配置。
1、springbootapplication类中配置数据源类
@Value("${jdbc.url}")
private String jdbcUrl;
@Value("${jdbc.driverClassName}")
private String jdbcDriverClassName;
@Value("${jdbc.username}")
private String jdbcUsername;
@Value("${jdbc.password}")
private String jdbcPassword;

@Bean(destroyMethod = "close")
public DataSource dataSource() {
   DruidDataSource dataSource = new DruidDataSource();

   dataSource.setDriverClassName(jdbcDriverClassName);
   dataSource.setUrl(jdbcUrl);
   dataSource.setUsername(jdbcUsername);
   dataSource.setPassword(jdbcPassword);
   return dataSource;
}
2、创建mybatis配置类
@Configuration
public class MyBatisConfig {

    @Autowired
    private DataSource dataSource;

    @Bean
    @ConditionalOnMissingBean //当容器里没有指定的Bean的情况下创建该对象
    public SqlSessionFactoryBean sqlSessionFactory() {
        SqlSessionFactoryBean sqlSessionFactoryBean = new SqlSessionFactoryBean();
        // 设置数据源
        sqlSessionFactoryBean.setDataSource(dataSource);
        // 设置mybatis的主配置文件
        ResourcePatternResolver resolver = new PathMatchingResourcePatternResolver();
        Resource mybatisConfigXml = resolver.getResource("classpath:config/mybatis-config.xml");
        sqlSessionFactoryBean.setConfigLocation(mybatisConfigXml);
        // 设置别名包
        sqlSessionFactoryBean.setTypeAliasesPackage("com.example.demo.model");
        //mapper文件路径匹配
        Resource[] mapperResourceList = null;
        try {
            mapperResourceList = new PathMatchingResourcePatternResolver().getResources("classpath*:mapper/**/*.xml");
        } catch (IOException e) {
            e.printStackTrace();
        }
        sqlSessionFactoryBean.setMapperLocations(mapperResourceList);

        return sqlSessionFactoryBean;
    }
}
3、创建mapper接口扫描类
@Configuration
@AutoConfigureAfter(MyBatisConfig.class) //保证在MyBatisConfig实例化之后再实例化该类
public class MapperScannerConfig {

    @Bean
    public MapperScannerConfigurer mapperScannerConfigurer() {
        MapperScannerConfigurer mapperScannerConfigurer = new MapperScannerConfigurer();
        mapperScannerConfigurer.setBasePackage("com.example.demo.dao");
        return mapperScannerConfigurer;
    }
}
4、设置事务管理
当引入jdbc依赖之后,Spring Boot会自动默认分别注入DataSourceTransactionManager或JpaTransactionManager,所以我们不需要任何额外配置就可以用@Transactional注解进行事务的使用。
<dependency>
   <groupId>org.springframework.boot</groupId>
   <artifactId>spring-boot-starter-jdbc</artifactId>
</dependency>
注意引入配置文件:
@PropertySource(value = { "classpath:config/jdbc.properties"}, ignoreResourceNotFound = false)//最好设置未找到文件时报错
mybatis-config.xml文件内容:
<?xml version="1.0" encoding="UTF-8"?>
<!DOCTYPE configuration PUBLIC "-//mybatis.org//DTD Config 3.0//EN" "http://mybatis.org/dtd/mybatis-3-config.dtd">
<configuration>

    <!-- 全局参数 -->
    <settings>
        <!-- 使全局的映射器启用或禁用缓存。 -->
        <setting name="cacheEnabled" value="true"/>
        <!-- 全局启用或禁用延迟加载。当禁用时,所有关联对象都会即时加载。 -->
        <setting name="lazyLoadingEnabled" value="true"/>
        <!-- 设置关联对象加载的形态,此处为按需加载字段(加载字段由SQL指 定),不会加载关联表的所有字段,以提高性能 -->
        <setting name="aggressiveLazyLoading" value="false"/>
        <!-- 是否允许单条sql 返回多个数据集  (取决于驱动的兼容性) default:true -->
        <setting name="multipleResultSetsEnabled" value="true"/>
        <!-- 是否可以使用列的别名 (取决于驱动的兼容性) default:true -->
        <setting name="useColumnLabel" value="true"/>
        <!-- 允许JDBC 生成主键。需要驱动器支持。如果设为了true,这个设置将强制使用被生成的主键,有一些驱动器不兼容不过仍然可以执行。  default:false  -->
        <setting name="useGeneratedKeys" value="false"/>
        <!-- 指定 MyBatis 如何自动映射 数据基表的列 NONE:不隐射 PARTIAL:部分  FULL:全部  -->
        <setting name="autoMappingBehavior" value="PARTIAL"/>
        <!-- 这是默认的执行类型  (SIMPLE: 简单; REUSE: 执行器可能重复使用prepared statements语句;BATCH: 执行器可以重复执行语句和批量更新)  -->
        <setting name="defaultExecutorType" value="SIMPLE"/>
        <!-- 使用驼峰命名法转换字段,自动映射数据库下划线 到驼峰字段。 -->
        <setting name="mapUnderscoreToCamelCase" value="true"/>
        <!-- 允许使用rowbounds嵌套语句 -->
        <setting name="safeRowBoundsEnabled" value="false"/>
        <!-- 设置本地缓存范围 session:就会有数据的共享  statement:语句范围 (这样就不会有数据的共享 ) defalut:session -->
        <setting name="localCacheScope" value="SESSION"/>
        <!-- 设置但JDBC类型为空时,某些驱动程序 要指定值,default:OTHER,插入空值时不需要指定类型 -->
        <!-- <setting name="jdbcTypeForNull" value="NULL"/> -->
        <!-- 指定对象的方法启用懒加载 -->
        <setting name="lazyLoadTriggerMethods" value="equals,clone,hashCode,toString"/>
    </settings>

      <plugins>
          <!-- 分页插件 -->
          <plugin interceptor="com.github.pagehelper.PageInterceptor">
            <!-- 数据库类型,可选值为oracle,mysql,mariadb,sqlite,hsqldb,postgresql -->
            <!-- <property name="dialect" value="mysql"/> -->
        </plugin>
      </plugins>

      <!-- <typeAliases>
        <package name="com.xiaomu.context.config.model"/>
    </typeAliases> -->

</configuration>
整合redis
1、引入springbootredis
<dependency>
   <groupId>org.springframework.boot</groupId>
   <artifactId>spring-boot-starter-data-redis</artifactId>
   <!-- 1.5的版本默认采用的连接池技术是jedis  2.0以上版本默认连接池是lettuce, 在这里采用jedis,所以需要排除lettuce的jar -->
   <exclusions>
      <exclusion>
         <groupId>redis.clients</groupId>
         <artifactId>jedis</artifactId>
      </exclusion>
      <exclusion>
         <groupId>io.lettuce</groupId>
         <artifactId>lettuce-core</artifactId>
      </exclusion>
   </exclusions>
</dependency>
<dependency>
   <groupId>com.alibaba</groupId>
   <artifactId>fastjson</artifactId>
   <version>1.2.29</version>
</dependency>
<!-- 添加jedis客户端 -->
<dependency>
   <groupId>redis.clients</groupId>
   <artifactId>jedis</artifactId>
</dependency>
<!--spring2.0集成redis所需common-pool2-->
<!-- 必须加上,jedis依赖此  -->
<!-- spring boot 2.0 的操作手册有标注 大家可以去看看 地址是:https://docs.spring.io/spring-boot/docs/2.0.3.RELEASE/reference/htmlsingle/-->
<dependency>
   <groupId>org.apache.commons</groupId>
   <artifactId>commons-pool2</artifactId>
   <version>2.4.2</version>
</dependency>
2、application.properties配置文件中配置redis
# 连接工厂使用的数据库索引(默认为0)
spring.redis.database= 0
# Redis服务器主机。
spring.redis.host= 127.0.0.1
# redis服务器端口
spring.redis.port= 6380
# 登录redis服务器的密码。
spring.redis.password=
# 给定时间池可以分配的最大连接数。 使用负值为无限制。
spring.redis.pool.max-active= 100
# 池中“空闲”连接的最大数量。 使用负值来表示无限数量的空闲连接。
spring.redis.pool.max-idle= 10
# 连接分配在池耗尽之前在抛出异常之前应阻止的最大时间量(以毫秒为单位)。 使用负值无限期地阻止。
spring.redis.pool.max-wait= -1
# 定义池中维护的最小空闲连接数。 此设置只有在正值时才有效果。
spring.redis.pool.min-idle= 0
# 连接超时(毫秒)。
spring.redis.timeout= 1000
3、配置redisconfig,配置的redisTemplate用于存取对象,普通字符串存取直接使用StringRedisTemplate即可
@Configuration
public class RedisConfig{

    @Bean
    public RedisTemplate<String, Object> redisTemplate(JedisConnectionFactory jedisConnectionFactory ) {
        //设置序列化
        Jackson2JsonRedisSerializer jackson2JsonRedisSerializer = new Jackson2JsonRedisSerializer(Object.class);
        ObjectMapper om = new ObjectMapper();
        om.setVisibility(PropertyAccessor.ALL, JsonAutoDetect.Visibility.ANY);
        om.enableDefaultTyping(ObjectMapper.DefaultTyping.NON_FINAL);
        jackson2JsonRedisSerializer.setObjectMapper(om);
        // 配置redisTemplate
        RedisTemplate<String, Object> redisTemplate = new RedisTemplate<String, Object>();
        redisTemplate.setConnectionFactory(jedisConnectionFactory);
        RedisSerializer stringSerializer = new StringRedisSerializer();
        redisTemplate.setKeySerializer(stringSerializer); // key序列化
        redisTemplate.setHashKeySerializer(stringSerializer); // Hash key序列化
        redisTemplate.setValueSerializer(jackson2JsonRedisSerializer); // value序列化
        redisTemplate.setHashValueSerializer(jackson2JsonRedisSerializer); // Hash value序列化
        redisTemplate.afterPropertiesSet();
        return redisTemplate;
    }

}
4、写redis工具方法


@Component
public class RedisClient {


    @Autowired
    private RedisTemplate<String, Object> redisTemplate;
    @Autowired
    private StringRedisTemplate stringRedisTemplate;

    /**
     * 删除缓存
     * @param key 可以传一个值 或多个
     */
    @SuppressWarnings("unchecked")
    public void del(String... key) {
        if (key != null && key.length > 0) {
            if (key.length == 1) {
                redisTemplate.delete(key[0]);
            } else {
                redisTemplate.delete(CollectionUtils.arrayToList(key));
            }
        }
    }

    /**
     * 普通缓存获取
     * @param key 键
     * @return 值
     */
    public String get(String key) {
        return key == null ? null : stringRedisTemplate.opsForValue().get(key);
    }

    public Object getObj(String key) {
        return key == null ? null : redisTemplate.opsForValue().get(key);
    }

    /**
     * 普通缓存放入
     * @param key 键
     * @param value 值
     * @return true成功 false失败
     */
    public boolean set(String key, String value) {
        try {
            stringRedisTemplate.opsForValue().set(key, value);
            return true;
        } catch (Exception e) {
            e.printStackTrace();
            return false;
        }
    }

    public boolean set(String key, Object value) {
        try {
            redisTemplate.opsForValue().set(key, value);
            return true;
        } catch (Exception e) {
            e.printStackTrace();
            return false;
        }
    }
}
配置freemarker
1、引入freemarker依赖
<dependency>
   <groupId>org.springframework.boot</groupId>
   <artifactId>spring-boot-starter-freemarker</artifactId>
</dependency>
2、配置freemarker
spring.freemarker.template-loader-path=classpath:/page/
spring.freemarker.charset=utf-8
spring.freemarker.cache=false
spring.freemarker.suffix=.ftl
3、写controller和页面(model类或者map放值都可以加入到页面)
@RequestMapping(value="testpage",method= RequestMethod.GET)
public String testPage(Map<String,Object> map, Model model){
    model.addAttribute("test1","test值放入");
    map.put("test","test值放入2");
    return "page";
}
配置拦截器
1、写拦截器实现
@Component
public class LoginInterceptor implements HandlerInterceptor {

    @Override
    public boolean preHandle(HttpServletRequest request, HttpServletResponse response, Object handler)
            throws Exception {
        System.out.println("拦截器先行方法。。。123 ");
        return true;
    }

    @Override
    public void postHandle(HttpServletRequest request, HttpServletResponse response, Object handler,
                           ModelAndView modelAndView) throws Exception {

    }

    @Override
    public void afterCompletion(HttpServletRequest request, HttpServletResponse response, Object handler,
                                Exception ex) throws Exception {
        System.out.println("拦截器后置方法。。。abc");
    }
}
2、继承WebMvcConfigurationSupport添加拦截器并设置拦截路径
@Configuration
public class SpringMVCConfig extends WebMvcConfigurationSupport {

    @Override
    public void addInterceptors(InterceptorRegistry registry) {
        // 添加拦截器并设置拦截路径
        registry.addInterceptor(new LoginInterceptor()).addPathPatterns("/test*/**");
    }
}
打包部署
1、更改包属性为war工程:<packaging>war</packaging>
2、添加tomcat依赖并设置为provider
<dependency>
   <groupId>org.springframework.boot</groupId>
   <artifactId>spring-boot-starter-tomcat</artifactId>
   <scope>provided</scope>
</dependency>
3、springboot入口类继承SpringBootServletInitializer并重写configure方法
@ComponentScan(basePackages = {"com.example.demo"})
@SpringBootApplication(exclude = DataSourceAutoConfiguration.class)
@PropertySource(value = { "classpath:config/jdbc.properties"}, ignoreResourceNotFound = false)
public class DemoApplication extends SpringBootServletInitializer{
   //。。。
   //重写方法用于部署到tomcat中运行
   @Override
   protected SpringApplicationBuilder configure(SpringApplicationBuilder builder) {
//    return super.configure(builder);
      return builder.sources(DemoApplication.class);
   }
}
4、执行maven命令package打包成war包部署即可。
说明:打包后的war包解压后WEB-INFO目录下没有web.xml文件,web入口由继承的SpringBootServletInitializer类在org目录下生成了很多关于项目入口的类
springboot整合缓存cache
第一步: 导入spring-boot-starter-cache模块
<dependency>
   <groupId>org.springframework.boot</groupId>
   <artifactId>spring-boot-starter-cache</artifactId>
</dependency>
注:配置文件中spring.cache.type=redis指定缓存类型
第二步: @EnableCaching开启缓存
@ComponentScan(basePackages = {"com.example.demo"})
@SpringBootApplication(exclude = DataSourceAutoConfiguration.class)
@PropertySource(value = { "classpath:config/jdbc.properties"}, ignoreResourceNotFound = false)
@EnableCaching
public class DemoApplication extends SpringBootServletInitializer{
    ...
}
第三步: 使用缓存注解
//@CachePut: 既调用方法,又更新缓存数据;同步更新缓存
//修改了数据库的某个数据,同时更新缓存
//运行:
// 1.先调用目标方法
// 2.将目标方法的结果缓存起来
@Override
@CachePut(value=CACHE_NAME,key = "#sysmenu.autoId")
public SysMenu updateMenu(SysMenu sysmenu) {
   sysMenuDao.update(sysmenu);
   return sysmenu;
}

//@CacheEvict:缓存清除
//key:指定要清除的数据
//allEntries = true : 指定清除这个缓存中的所有数据
//beforeInvocation=fales: 默认代表缓存清除操作是在方法执行之后执行;如果出现异常缓存就不会清除
//beforeInvocation=true  代表清除缓存操作是在方法运行之前执行,无论方法是否出现异常,缓存都清除
@Override
@CacheEvict(value=CACHE_NAME,key = "#menu_id", beforeInvocation = true)
public void delete(String menu_id) {
   sysMenuDao.delete(menu_id);
}

@Override
public int add(SysMenu sysMenu) {
   return sysMenuDao.add(sysMenu);
}

//查询时根据指定的参数查询缓存有无数据,有则直接返回,无则调用方法后将返回值放入缓存
//注意unless条件为真不缓存,记得指定结果为空不缓存,否则查询会缓存空结果导致若有此值新增将查询不到正确数据
@Override
@Cacheable(value=CACHE_NAME,key = "#autoId", unless = "#result==null")
public SysMenu getByAutoId(String autoId){
   return sysMenuDao.getByAutoId(autoId);
}
注解及参数说明:
@Cacheable
@Cacheable 的作用 主要针对方法配置,能够根据方法的请求参数对其结果进行缓存
|
参数 |
解释 |
example |
|
value |
缓存的名称,在 spring 配置文件中定义,必须指定至少一个 |
例如: @Cacheable(value=”mycache”) @Cacheable(value={”cache1”,”cache2”} |
|
key |
缓存的 key,可以为空,如果指定要按照 SpEL 表达式编写,如果不指定,则缺省按照方法的所有参数进行组合 |
@Cacheable(value=”testcache”,key=”#userName”) |
|
condition |
缓存的条件,可以为空,使用 SpEL 编写,返回 true 或者 false,只有为 true 才进行缓存 |
@Cacheable(value=”testcache”,condition=”#userName.length()>2”) |
@CachePut
@CachePut 的作用 主要针对方法配置,能够根据方法的请求参数对其结果进行缓存,和 @Cacheable 不同的是,它每次都会触发真实方法的调用
|
参数 |
解释 |
example |
|
value |
缓存的名称,在 spring 配置文件中定义,必须指定至少一个 |
@CachePut(value=”my cache”) |
|
key |
缓存的 key,可以为空,如果指定要按照 SpEL 表达式编写,如果不指定,则缺省按照方法的所有参数进行组合 |
@CachePut(value=”testcache”,key=”#userName”) |
|
condition |
缓存的条件,可以为空,使用 SpEL 编写,返回 true 或者 false,只有为 true 才进行缓存 |
@CachePut(value=”testcache”,condition=”#userName.length()>2”) |
@CacheEvict
@CachEvict 的作用 主要针对方法配置,能够根据一定的条件对缓存进行清空
|
参数 |
解释 |
example |
|
value |
缓存的名称,在 spring 配置文件中定义,必须指定至少一个 |
@CacheEvict(value=”my cache”) |
|
key |
缓存的 key,可以为空,如果指定要按照 SpEL 表达式编写,如果不指定,则缺省按照方法的所有参数进行组合 |
@CacheEvict(value=”testcache”,key=”#userName”) |
|
condition |
缓存的条件,可以为空,使用 SpEL 编写,返回 true 或者 false,只有为 true 才进行缓存 |
@CacheEvict(value=”testcache”,condition=”#userName.length()>2”) |
|
allEntries |
是否清空所有缓存内容,缺省为 false,如果指定为 true,则方法调用后将立即清空所有缓存 |
@CachEvict(value=”testcache”,allEntries=true) |
|
beforeInvocation |
是否在方法执行前就清空,缺省为 false,如果指定为 true,则在方法还没有执行的时候就清空缓存,缺省情况下,如果方法执行抛出异常,则不会清空缓存 |
@CachEvict(value=”testcache”,beforeInvocation=true) |
@CacheConfig
@Cacheable(value="xxx")注解在类上,统一声明方法中的value属性,如果你在你的方法写别的名字,那么依然以方法的名字为准。
参考:https://blog.csdn.net/u012240455/article/details/80844361