参考博客:https://www.cnblogs.com/yuanchenqi/articles/8719520.html
一、实现登录验证
1.创建User和Token表
User表用作用户名密码认证,Token表用于存放用户每次成功登陆后的随机Token。
在models.py中添加以下两张表:
# 用户表
class User(models.Model):
    username = models.CharField(max_length=32)
    password = models.CharField(max_length=32)


# token表
class Token(models.Model):
    user = models.OneToOneField("User", on_delete=models.CASCADE)
    token = models.CharField(max_length=128)
执行命令,生成数据库表:
python manage.py makemigrations
python manage.py migrate
2.实现登录验证操作
添加路由条目:
urlpatterns = [
    path('admin/', admin.site.urls),
    re_path('^publishes/$', views.PublishView.as_view(), name="publish"),
    re_path('^publishes/(?P<pk>d+)/$', views.PublishDetailView.as_view(), name="publishdetail"),
    re_path('^books/$', views.BookView.as_view(), name="book"),
    re_path('^books/(?P<pk>d+)/$', views.BookDetailView.as_view(), name="bookdetail"),
    re_path('^authors/$', views.AuthorViewSet.as_view({"get": "list", "post": "create"}), name="author"),
    re_path('^authors/(?P<pk>d+)/$', views.AuthorViewSet.as_view(
        {"get": "retrieve", "put": "update", "patch": "partial_update", "delete": "destroy"}), name="authordetail"),
    re_path('^login/$', views.LoginView.as_view(), name="login"),
]
实现视图类LoginView:
# 导入User和Token的model类
from .models import User
from .models import Token


# 生成一个随机token,username和ctime的MD5加密值
def get_random_str(user):
    import hashlib
    import time
    # 获取当前时间
    ctime = str(time.time())
    # username的md5
    md5 = hashlib.md5(bytes(user, encoding='utf-8'))
    # 加上ctime
    md5.update(bytes(ctime, encoding='utf-8'))
    return md5.hexdigest()


class LoginView(APIView):
    def post(self, request):
        res = {'code': 1000, "msg": None}
        try:
            # 从post请求中获取用户提交的用户名和密码
            username = request.data.get("username")
            password = request.data.get("password")
            # 判断数据库中的数据是否匹配
            user_obj = User.objects.filter(username=username, password=password).first()
            # 如果不匹配,返回登录失败
            if not user_obj:
                res['code'] = 1001
                res['msg'] = "用户名或密码错误"
            else:
                # 如果匹配,则生成一个随机token
                token = get_random_str(username)
                # 如果token已经存在,则更新,如果不存在,则创建
                Token.objects.update_or_create(user=user_obj, defaults={'token': token})
                res["token"] = token
        except Exception as e:
            res['code'] = 1002
            res['msg'] = e

        return HttpResponse(json.dumps(res))
二、实现token认证
1.实现token认证
要实现认证,只需要在需要认证的视图类中添加 authentication_classes 列表。restframe认证组件会自动去该列表中寻找认证使用的类(类由我们来定义)。例如BookView视图类中:
class BookView(APIView):
    authentication_classes = [TokenAuth,]
    pass
查看restframework调用authentication_classes中类的源码,可以看到TokenAuth中必须实现 authenticate方法,以及 authenticate_header 方法:
class TokenAuth(object):
    # 认证token过程
    def authenticate(self, request):
        token = request.GET.get("token")
        token_obj = Token.objects.filter(token=token).first()
        if not token_obj:
            raise exceptions.AuthenticationFailed("验证失败")
        return (token_obj.user, token_obj)

    def authenticate_header(self, request):
        return None
或者,继承 BaseAuthentication也可以:
from rest_framework.authentication import BaseAuthentication

class TokenAuth(BaseAuthentication):
    # 认证token过程
    def authenticate(self, request):
        token = request.GET.get("token")
        token_obj = Token.objects.filter(token=token).first()
        if not token_obj:
            raise exceptions.AuthenticationFailed("验证失败")
        return (token_obj.user, token_obj)
然后应用于BookView:
class BookView(APIView):
    authentication_classes = [TokenAuth]

    def get(self, request):
        book_list = Book.objects.all()
        bs = BookModelSerializers(book_list, many=True, context={'request': request})

        return Response(bs.data)

    def post(self, request):
        bs = BookModelSerializers(data=request.data)
        if bs.is_valid():
            bs.save()
            return Response(bs.data)
        else:
            return Response(bs.errors)
这样,我们想要通过GET请求获取book数据的时候,就需要先访问login页面,获取token,然后在GET请求中附带token,才能正确获取book数据:
2.测试
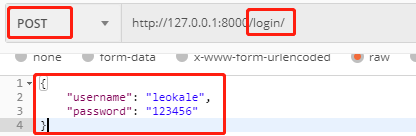
POST请求访问http://127.0.0.1:8000/login/,附带用户名和密码,进行登录验证:
获得返回值:
{"code": 1000, "msg": null, "token": "91dc33a308cd4e8b04e14bb3d23d492b"}
然后GET请求访问http://127.0.0.1:8000/books/?token=91dc33a308cd4e8b04e14bb3d23d492b:

获得返回结果:
[{"id":8,"publish":"http://127.0.0.1:8000/publishes/1/","title":"Python2标准库3","price":99,"pub_date":"2012-11-20T13:03:33Z","authors":[1,2]},{"id":9,"publish":"http://127.0.0.1:8000/publishes/1/","title":"Python2标准库4","price":99,"pub_date":"2012-11-20T13:03:33Z","authors":[1,2]},{"id":10,"publish":"http://127.0.0.1:8000/publishes/1/","title":"Python2标准库5","price":99,"pub_date":"2012-11-20T13:03:33Z","authors":[1,2]},{"id":11,"publish":"http://127.0.0.1:8000/publishes/1/","title":"Python2标准库6","price":99,"pub_date":"2012-11-20T13:03:33Z","authors":[1,2]},{"id":12,"publish":"http://127.0.0.1:8000/publishes/1/","title":"Python2标准库7","price":99,"pub_date":"2012-11-20T13:03:33Z","authors":[1,2]},{"id":13,"publish":"http://127.0.0.1:8000/publishes/1/","title":"Python2标准库","price":99,"pub_date":"2012-11-20T13:03:33Z","authors":[1,2]},{"id":14,"publish":"http://127.0.0.1:8000/publishes/1/","title":"Python3","price":99,"pub_date":"2020-01-20T13:03:04Z","authors":[3]},{"id":15,"publish":"http://127.0.0.1:8000/publishes/1/","title":"JAVA","price":99,"pub_date":"2020-01-20T13:03:04Z","authors":[3]},{"id":16,"publish":"http://127.0.0.1:8000/publishes/1/","title":"JAVA","price":99,"pub_date":"2020-01-20T13:03:04Z","authors":[3]},{"id":17,"publish":"http://127.0.0.1:8000/publishes/1/","title":"JAVA","price":99,"pub_date":"2020-01-20T13:03:04Z","authors":[3]},{"id":18,"publish":"http://127.0.0.1:8000/publishes/1/","title":"hello","price":99,"pub_date":"2020-01-20T13:03:04Z","authors":[3]}]
如果未携带token,或携带的token错误:
返回结果:
{"detail":"验证失败"}
三、restframework配置
1.引子
在第二节中,我们实现了token的生成和认证,在认证时,我们使用自定义的TokenAuth类来进行认证,但是如果在每个视图类中都加上 authentication_classes 列表,比较冗余。
我们观察restframe的源码,可以看到,当我们不添加 authentication_classes 列表变量时,APIView中 authentication_classes 变量会读取一个默认值:
class APIView(View):

    # The following policies may be set at either globally, or per-view.
    renderer_classes = api_settings.DEFAULT_RENDERER_CLASSES
    parser_classes = api_settings.DEFAULT_PARSER_CLASSES
    authentication_classes = api_settings.DEFAULT_AUTHENTICATION_CLASSES
    throttle_classes = api_settings.DEFAULT_THROTTLE_CLASSES
    ...
    ...
继续查看api_settings所属类的源码:
class APISettings:
    def __init__(self, user_settings=None, defaults=None, import_strings=None):
        if user_settings:
            self._user_settings = self.__check_user_settings(user_settings)
        self.defaults = defaults or DEFAULTS
        self.import_strings = import_strings or IMPORT_STRINGS
        self._cached_attrs = set()
    ...
    ...
这里的DEFAULTS就是restframework的默认配置:


DEFAULTS = {
    # Base API policies
    'DEFAULT_RENDERER_CLASSES': [
        'rest_framework.renderers.JSONRenderer',
        'rest_framework.renderers.BrowsableAPIRenderer',
    ],
    'DEFAULT_PARSER_CLASSES': [
        'rest_framework.parsers.JSONParser',
        'rest_framework.parsers.FormParser',
        'rest_framework.parsers.MultiPartParser'
    ],
    'DEFAULT_AUTHENTICATION_CLASSES': [
        'rest_framework.authentication.SessionAuthentication',
        'rest_framework.authentication.BasicAuthentication'
    ],
    'DEFAULT_PERMISSION_CLASSES': [
        'rest_framework.permissions.AllowAny',
    ],
    'DEFAULT_THROTTLE_CLASSES': [],
    'DEFAULT_CONTENT_NEGOTIATION_CLASS': 'rest_framework.negotiation.DefaultContentNegotiation',
    'DEFAULT_METADATA_CLASS': 'rest_framework.metadata.SimpleMetadata',
    'DEFAULT_VERSIONING_CLASS': None,

    # Generic view behavior
    'DEFAULT_PAGINATION_CLASS': None,
    'DEFAULT_FILTER_BACKENDS': [],

    # Schema
    'DEFAULT_SCHEMA_CLASS': 'rest_framework.schemas.openapi.AutoSchema',

    # Throttling
    'DEFAULT_THROTTLE_RATES': {
        'user': None,
        'anon': None,
    },
    'NUM_PROXIES': None,

    # Pagination
    'PAGE_SIZE': None,

    # Filtering
    'SEARCH_PARAM': 'search',
    'ORDERING_PARAM': 'ordering',

    # Versioning
    'DEFAULT_VERSION': None,
    'ALLOWED_VERSIONS': None,
    'VERSION_PARAM': 'version',

    # Authentication
    'UNAUTHENTICATED_USER': 'django.contrib.auth.models.AnonymousUser',
    'UNAUTHENTICATED_TOKEN': None,

    # View configuration
    'VIEW_NAME_FUNCTION': 'rest_framework.views.get_view_name',
    'VIEW_DESCRIPTION_FUNCTION': 'rest_framework.views.get_view_description',

    # Exception handling
    'EXCEPTION_HANDLER': 'rest_framework.views.exception_handler',
    'NON_FIELD_ERRORS_KEY': 'non_field_errors',

    # Testing
    'TEST_REQUEST_RENDERER_CLASSES': [
        'rest_framework.renderers.MultiPartRenderer',
        'rest_framework.renderers.JSONRenderer'
    ],
    'TEST_REQUEST_DEFAULT_FORMAT': 'multipart',

    # Hyperlink settings
    'URL_FORMAT_OVERRIDE': 'format',
    'FORMAT_SUFFIX_KWARG': 'format',
    'URL_FIELD_NAME': 'url',

    # Input and output formats
    'DATE_FORMAT': ISO_8601,
    'DATE_INPUT_FORMATS': [ISO_8601],

    'DATETIME_FORMAT': ISO_8601,
    'DATETIME_INPUT_FORMATS': [ISO_8601],

    'TIME_FORMAT': ISO_8601,
    'TIME_INPUT_FORMATS': [ISO_8601],

    # Encoding
    'UNICODE_JSON': True,
    'COMPACT_JSON': True,
    'STRICT_JSON': True,
    'COERCE_DECIMAL_TO_STRING': True,
    'UPLOADED_FILES_USE_URL': True,

    # Browseable API
    'HTML_SELECT_CUTOFF': 1000,
    'HTML_SELECT_CUTOFF_TEXT': "More than {count} items...",

    # Schemas
    'SCHEMA_COERCE_PATH_PK': True,
    'SCHEMA_COERCE_METHOD_NAMES': {
        'retrieve': 'read',
        'destroy': 'delete'
    },
}
前面代码中,使用 api_settings.DEFAULT_AUTHENTICATION_CLASSES ,api_settings没有这个属性,所以会自动调用 APISettings 的__getattr__()方法:
def __getattr__(self, attr):
    if attr not in self.defaults:
        raise AttributeError("Invalid API setting: '%s'" % attr)
    try:
        # Check if present in user settings
        val = self.user_settings[attr]
    except KeyError:
        # Fall back to defaults
        val = self.defaults[attr]
    # Coerce import strings into classes
    if attr in self.import_strings:
        val = perform_import(val, attr)
    # Cache the result
    self._cached_attrs.add(attr)
    setattr(self, attr, val)
    return val
__getattr__()方法先判断DEFAULTS中是否存在 DEFAULT_AUTHENTICATION_CLASSES ,如果不存在则报错。然后去user_settings中获取 DEFAULT_AUTHENTICATION_CLASSES 的值,user_settings是一个属性方法:
@property
def user_settings(self):
    if not hasattr(self, '_user_settings'):
        self._user_settings = getattr(settings, 'REST_FRAMEWORK', {})
    return self._user_settings
这段代码会先去django的settings中查看是否存在名为"REST_FRAMEWORK"的配置项。所以我们要使用自定义的认证类,可以在django的settings中配置REST_FRAMEWORK来指定。
首先,将TokenAuth类从views.py移到单独的一个模块,例如utils.py:
# utils.py

from rest_framework import exceptions
from .models import Token
from rest_framework.authentication import BaseAuthentication

class TokenAuth(BaseAuthentication):
    # 认证token过程
    def authenticate(self, request):
        token = request.GET.get("token")
        token_obj = Token.objects.filter(token=token).first()
        if not token_obj:
            raise exceptions.AuthenticationFailed("验证失败")
        return (token_obj.user, token_obj)
然后在django的settings中添加配置:
REST_FRAMEWORK = {
    "DEFAULT_AUTHENTICATION_CLASSES": ["demo.utils.TokenAuth"]
}
这样,我们的所有视图类在被访问时都会使用TokenAuth类来对token进行验证,但是在访问/login/页面时,由于还没有登录认证,所以不能进行token验证。
可以在LoginView视图类中,加上一个空的 authentication_classes 列表来处理:
class LoginView(APIView):
    authentication_classes = []
    ...
    ...
这样,访问/login/的时候不会验证token,而访问其他资源的时候会验证token。
ღ♋