Spring概述
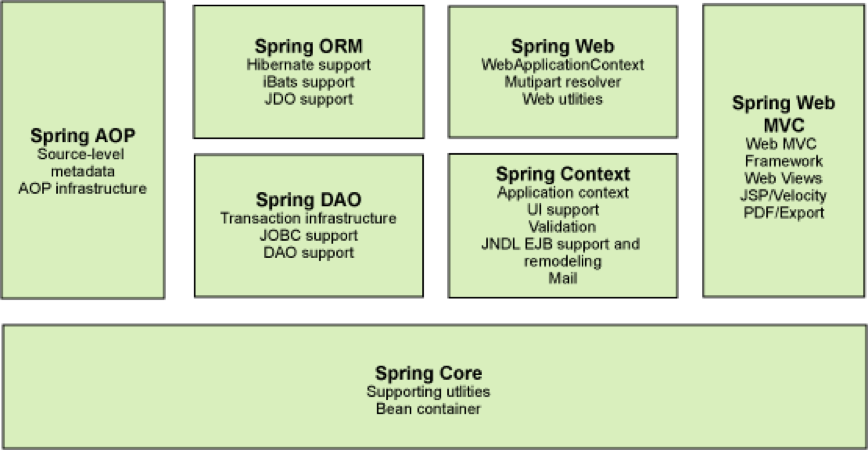
Spring的设计严格遵从的OCP(开闭原则),保证对修改的关闭,也就是外部无法改变spring内部的运行流程;提供灵活的扩展接口,也就是可以通过extends,implements重写方法从而改变类的加载行为。下图内容为Spring框架里提供的各种功能模块。
#1 Spring IoC
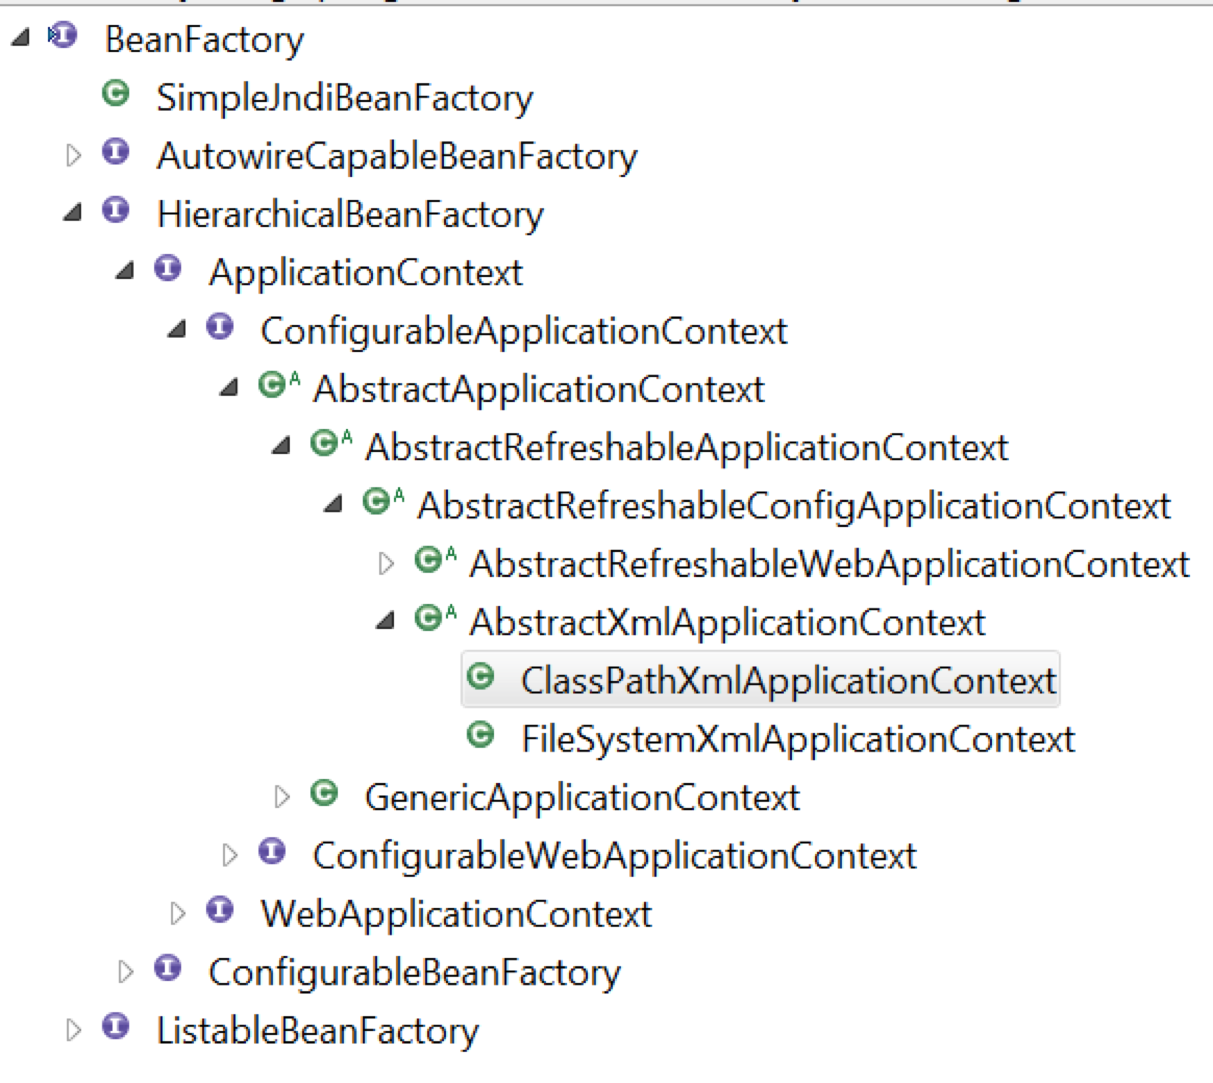
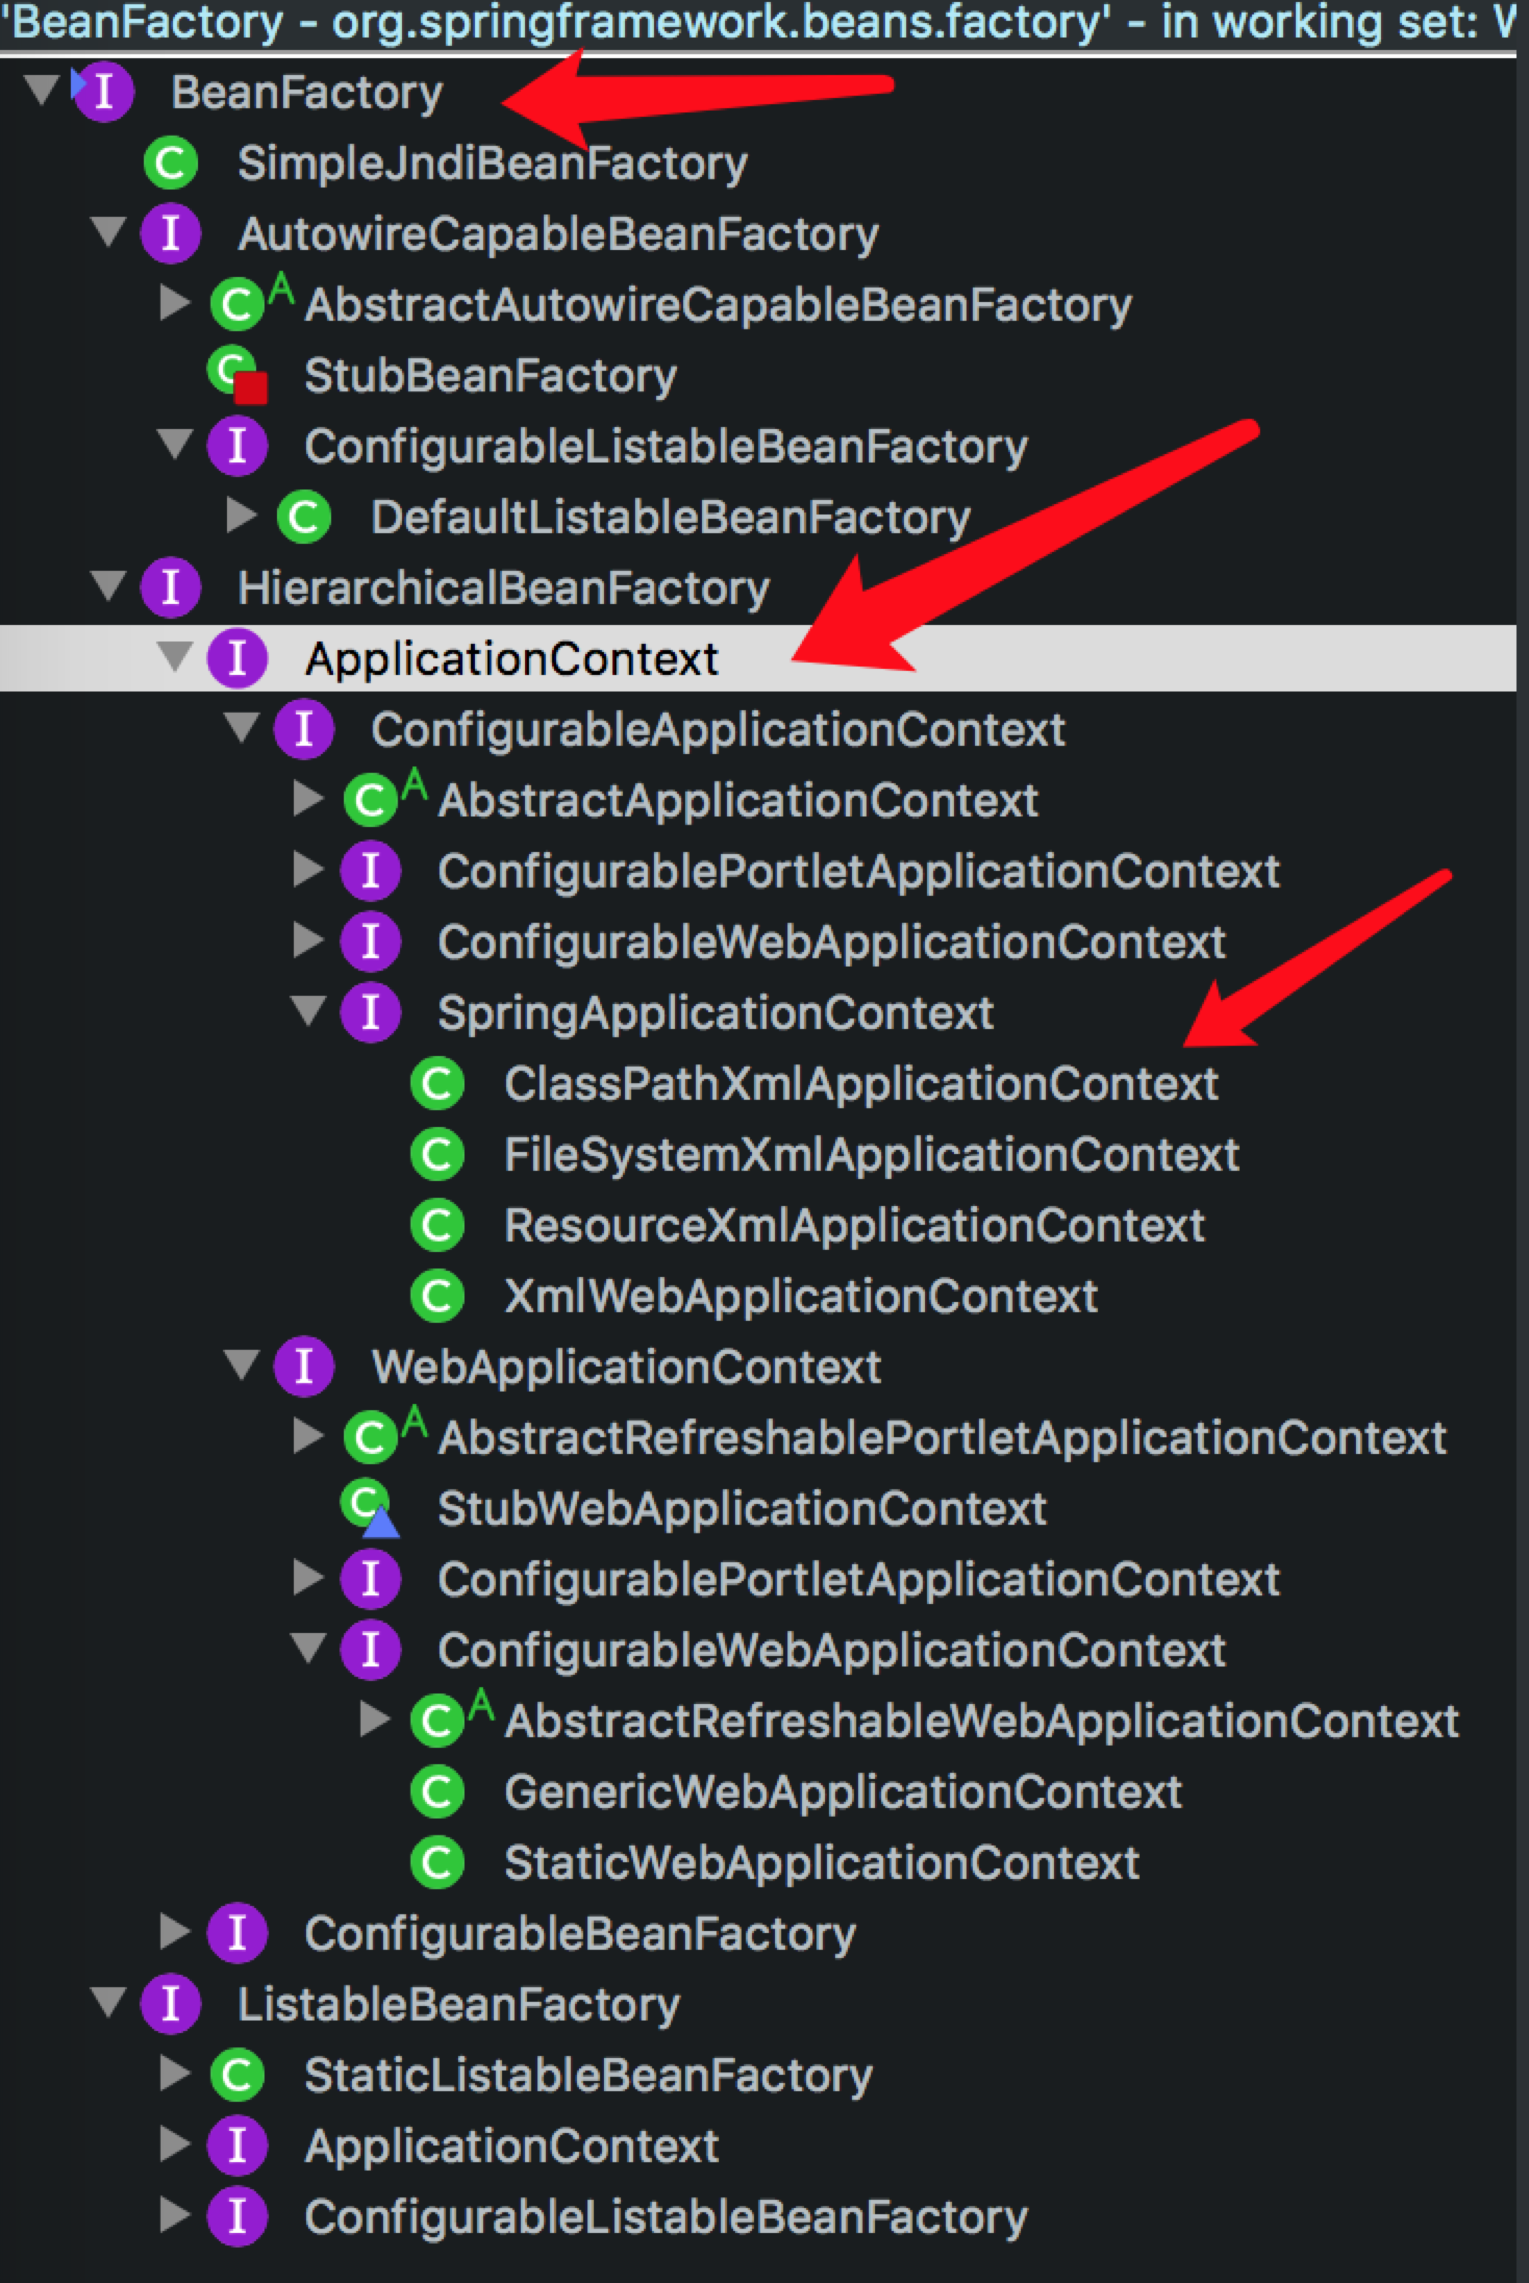
目的是解决对象之间的耦合依赖关系,使用IOC容器来管理这些依赖关系,并降低框架对业务代码的侵入性(non-invasively);常用容器接口为ApplicationContext,常用容器实现为ClassPathXmlApplicationContext(相对路径,默认路径为WEB-INF/classes)和FileSystemXmlApplicationContext(绝对路径搜索,默认路径为工程根目录)。
IoC容器有两个主要的容器系列,一个是实现BeanFactory接口的简单容器系列,一个是实现ApplicationContext接口的集成了企业服务的上下文容器系列,而BeanDefinition就是这些容器管理的对象以及依赖关系的抽象。
以FileSystemXmlApplicationContext容器为例介绍Spring IoC容器的初始化过程,包括
-1 ResourceLoader定位xml文件并生成ClassPathResource
-2 BeanDefinitionReader解析bean依赖并生成BeanDefinition
-3 BeanDefinitionRegistry向IoC容器注册BeanDefinition
#2 Spring AOP
目的是解决业务功能之间的耦合依赖关系,以声明的形式将公用功能织入到业务功能中去;Spring集成了AspectJ作为一种特定实现。
#3 Spring MVC
目的是解决Web端功能之间的耦合依赖关系,以DispatcherServlet为核心实现对Web请求的拦截、分发、处理、ModelAndView数据的返回以及页面生成。
#4 Spring ORM
目的是简化数据持久层的操作,不仅提供JdbcTemplate作为直接操作JDBC的通用模板,并提供与ORM框架的集成接口(如Hibernate)。
#5 Spring Transaction
目的是简化数据持久层的事务操作,典型的AOP封装,事务操作由集成的ORM框架(如Hibernate)实现。
使用spring IoC加载bean和注入dependency bean
-1 BeanFactory是IOC容器装配bean的核心接口,定义了各种getBean()的方式和Bean类型的判断,采用的是延迟加载;
-2 ApplicationContext在BeanFactory的基础上增加了MessageSource国际化,EventListener时间监听,ResourceLoader资源加载等新接口;
-3 ClassPathXmlApplicationContext用于加载本地class路径上的xml配置文件,
ApplicationContext会在容器启动的时候就加载bean,一般通过ContextLoaderListener进行配置。
-1 <context:annotation-config/>:Spring容器对于类的装配一般是使用xml进行,但如果使用比如@Autowired等标签的话就需要添加本标签,表示可在已经通过xml注册了的java bean中使用annotation进行配置;通过配置<context:annotation-config/>标签spring自动在容器中装配了四个PostProcessor,用于处理java类上加注的标签:
AutowiredAnnotationBeanPostProcessor:@Autowired
CommonAnnotationBeanPostProcessor:@Resource,@PostConstruct,@PreDestroy
PersistenceAnnotationBeanPostProcessor:@PersistenceContext
RequiredAnnotationBeanPostProcessor:@Required
-2 <context:component-scan/>:不仅具有<context:annotation-config/>的功能,还可以指定需要IOC容器进行扫描的包目录,自动注册标注了@Component等类标识的java类,也就是说不再需要xml配置注册功能;
-3 <context: property-placeholder/>:如果需要在bean装配阶段使用配置文件的key/value,可以通过本标签添加;然后使用"${setting.service.url}"就可以访问service.properties文件内的配置;
-4 <util:properties id="serviceProperties" location="classpath:service.properties"/>:将配置文件实例化成java.utils.Properties实例,并注入成为bean的属性,而在java bean中使用;
-5 @value(“${setting.service.url}”):获取service.properties文件的key/value,并注入java bean中对应的属性;
 1 <?xml version="1.0" encoding="UTF-8"?>
 2 <beans xmlns="http://www.springframework.org/schema/beans"
 3   xmlns:xsi="http://www.w3.org/2001/XMLSchema-instance"
 4   xmlns:util="http://www.springframework.org/schema/util"
 5   xmlns:jaxws="http://cxf.apache.org/jaxws"
 6   xmlns:http="http://cxf.apache.org/transports/http/configuration"
 7   xmlns:context="http://www.springframework.org/schema/context"
 8   xsi:schemaLocation="">
 9   <context:annotation-config />
10   <context:component-scan base-package="com.active.leo.helloworld" />
11   <context:property-placeholder location="classpath:service.properties" />
12   <import resource="webmvc-config.xml" />
13 </beans>
使用spring IoC进行Bean装配
通过注解开启Bean的自动检测:
-1 在配置文件中开启bean自动检测的功能,需要指定扫描的Java包路径;component-scan已经包含开启annotation-config功能。
-2 如果注解后添加string则显示指定bean名字,否则bean名字为首字母小写的类型名,如@Component(“specificName”);同时可通过添加@Scope(“prototype”)来指定bean的生成范围;
-3 Bean的不同类型的注解:
@Component:对应通用Bean
@Controller:对应控制层Bean,如Spring MVC Controller
@Service:对应业务层Bean,如Struts Action
@Repository:对应持久层Bean,如DAO
@RestController:@Controller和@ResponseBody的复合形式,返回json格式的string
@RequestBody:表示controller某个参数可以接受json的string,并自动进行解析到java object model上,front-end side需要使用JSON.stringify(jsonObject)处理json对象;
使用注解装配对象,Annotation Injection先于XML Injection被解析执行,但是后者会覆盖前者相同的设置,比如如果<property/>或者<constructor-arg/>也针对同一属性进行装配,则@Autowired装配的内容被覆盖;自动装配不能指定简单类型,如String;并且容易造成匹配歧义从而抛出异常;
Spring提供的@Autowired:
-1 直接修饰类变量,无需setter方法;
-2优先byType;
-3如果没有找到bean或者byType匹配得到的bean有多个,则抛出异常;
-4如果byType匹配得到的bean有多个,可以使用@Qualifier(“[id]”)限定Bean ID;
-5如果没有找到bean,抛出异常;可以使用@Autowired(required=false)要求不进行装配,但不推荐;
<bean id="instrument1" class="com.active.leo.helloworld.InstrumentImpl" />
<bean id="instrument2" class="com.active.leo.helloworld.InstrumentImpl2" />
@Autowired
@Qualifier("instrument2")
private Instrument instrument;
@Autowired应用于属性或者属性的setter方法,表示相关的property必须有且仅有一个匹配项;@Autowired是基于类型匹配的,所以如果一个bean是collection或者map则不能用@Autowired而需要使用@Resource。
JSR-330提供的@Inject
-1 JCP为统一依赖注入规范而推出的一种模型;
-2与@Autowired基本相同,除了没有required属性,因此必须进行装配,否则异常;
-3可以修饰类属性,类方法和类构造器;
-4如果byType匹配得到的bean有多个,可以使用@Named(“[id]”)限定Bean ID;
JSR-250提供的@Resource
-1 @Resource优先按 byName自动注入,而@Autowired优先按byType自动注入;
-2 @Resource有两个重要的属性,分别是name和type,name索引bean的名字,而type索引bean的类型
@Resource(name="myMovieFinder", type=” MyMovieFinder”)
-3 @Resource装配顺序:
(1) 同时指定name和type,则从context找唯一匹配的bean装配,找不到则异常;
(2) 仅指定name,则从context中找名称(id)匹配的bean装配,找不到则异常;
(3) 仅指定type,则从context中找type匹配的bean装配,找不到或者找到多个都异常;
(4) 同时没有指定name和type,则首先自动按照byName方式进行装配;如果没有匹配,则回退为一个原始类型(UserDao)通过反射机制使用byName自动注入策略,如果匹配则自动装配,否则异常;
指定Bean的作用范围和生命周期:<bean ………. Scope=”…….” />
#1 Singleton:缺省值,一个Spring IoC容器中至多仅生成一个instance,被依赖者共享;非线程安全,普通类变量会在多个thread之间共享,可以使用ThreadLocal进行线程隔离;
#2 Prototype:每次调用都会生成一个新的instance,不同依赖者使用不同的实例;线程安全,每次request thread都会生成一个新的instance;
#3 Request:WebApplicationContext中一次HTTP请求中至多仅生成一个instance
#4 Session:WebApplicationContext中一个HTTP Session中至多仅生成一个instance
#5 Global Session:WebApplicationContext中一个Global HTTP Session中至多仅生成一个instance
#6 Application:WebApplicationContext中一个ServletContext中至多仅生成一个instance
-1 <aop:scoped-proxy/>:用于解决将一个shorter-lived scoped bean注入到一个longer-lived scoped bean时,shorter-lived scoped bean提前失效的场景;由于singleton类仅有一次注入bean的机会(init或者get used),因此解决思路是在一开始就在longer-lived scoped bean(singleton)中注入一个proxy class作为代理类,如果shorter-lived scoped bean(session)已经失效,代理类会使用当前session scope的shorter-lived bean。
-2 属性depends-on:配置文件属性depends-on或者标注@Depends-on用于解决bean之间的依赖加载顺序;
1 <bean id="userPreferences" class="com.foo.UserPreferences" scope="session">
2   <aop:scoped-proxy/>
3 </bean>
4 <!-- a singleton-scoped bean injected with a proxy to the above bean -->
5 <bean id="userService" class="com.foo.SimpleUserService" depends-on="nameService">
6   <property name="userPreferences" ref="userPreferences"/>
7 </bean>
定制Bean的初始化和销毁动作
执行顺序为@PostConstruct -> InitializingBean -> init-method。
方法一:使用标注@PostConstruct和@PreDestroy;在bean的java类文件中添加。
这两个标注由CommonAnnotationBeanPostProcessor进行处理,@PostConstruct标注的方法在bean constructor和Dependency Injection执行完成之后执行。
1 @PostConstruct
2 public void  init(){
3     System.out.println("init  method”);
4 }
5 @PreDestroy
6 public void  dostory(){
7     System.out.println("destory method");
8 }
方法二:使用接口InitializingBean和DisposableBean ,由于需要实现接口,代码侵入性稍微强,因此不推荐使用;
 1 public class PersonService  implements InitializingBean,DisposableBean {
 2     @Override
 3     public void destroy() throws Exception {
 4         // TODO Auto-generated method stub
 5         System.out.println("init  method");
 6     }
 7     @Override
 8     public void afterPropertiesSet() throws Exception {
 9         // TODO Auto-generated method stub
10         System.out.println("init  method");
11     }
12 }
方法三:使用xml配置属性init-method和destroy-method,或者在<beans/>中添加批量设置的属性default-init-method或者default-destroy-method;
1 <bean id="initAndDestroySeqBean"
2     class="com.chj.spring.InitAndDestroySeqBean"
3     init-method="initMethod"
4     destroy-method="destroyMethod"/>
如果POJO需要获取容器的某些消息,可以实现下述接口;但是一旦实现这些接口之后就与Spring框架强耦合;
1 public interface ApplicationContextAware {
2 void setApplicationContext(ApplicationContext applicationContext)
3      throws BeansException;
4 }
5 public interface BeanNameAware {
6     void setBeanName(string name) throws BeansException;
7 }
Bean继承
当需要创建同一个class或者同一个parent class的多个不同状态的instance时,使用parent属性可以有效减少配置文件中需要填写的属性值;
 1 <bean id="inheritedTestBean" abstract="true"
 2         class="org.springframework.beans.TestBean">
 3     <property name="name" value="parent"/>
 4     <property name="age" value="1"/>
 5 </bean>
 6 <bean id="inheritsWithDifferentClass"
 7         class="org.springframework.beans.DerivedTestBean"
 8         parent="inheritedTestBean" init-method="initialize">
 9     <property name="name" value="override"/>
10     <!-- the age property value of 1 will be inherited from parent -->
11 </bean>
#1 inheritsTestBean中的abstract=true表示当前bean不能实例化;如果一个singleton bean不打算进行实例化,则需要加上abstract=true属性。
#2 inheritsWithDifferentClass中的class属性不需要extends自parent class,但必须与parent class bean定义的属性匹配;并且可省略,表示使用parent指定bean的class属性;