1- 安装gcc c++编译器
yum install gcc gcc-c++ cmake
2- 安装nginx-1.8.1及依赖包
2.1- 安装nginx依赖包
yum -y install pcre-devel openssl openssl-devel zlib zlib-devel
2.2- 安装nginx
mkdir -p /server/source
cd  /server/source
wget http://nginx.org/download/nginx-1.8.1.tar.gz
tar -xvzf nginx-1.8.1.tar.gz
cd nginx-1.8.1
./configure --prefix=/usr/local/nginx-1.8.1 --with-http_stub_status_module --with-http_ssl_module
make && make install
2.3- 启动nginx并开机启动
/usr/local/ nginx-1.8.1/sbin/nginx
ln -s /usr/local/nginx-1.8.1/ /usr/local/nginx
echo "/usr/local/nginx/sbin/nginx" >/etc/rc.local
2.4- 配置环境变量
touch /etc/profile.d/nginx.sh
echo "export PATH=/usr/local/nginx/sbin:$PATH" >/etc/profile.d/nginx.sh
source /etc/profile.d/nginx.sh
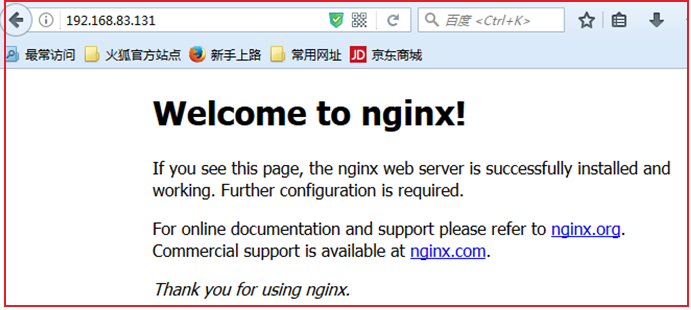
2.5- 完成效果
在浏览器输入centos7所在服务器的IP地址
3- 安装php-7.0.6 【自动安装脚本: https://files-cdn.cnblogs.com/files/lemanlai/install_php.sh 】
3.1- 安装PHP依赖包
yum -y install libxml2-devel libxml2 libxml2-devel curl
 curl-devel  libjpeg-devel libpng-devel freetype-devel libxslt-devel
3.2- 安装PHP
./configure
--prefix=/usr/local/php
--with-config-file-path=/etc
--enable-inline-optimization
--disable-debug
--disable-rpath
--enable-shared
--enable-opcache
--enable-fpm
--with-fpm-user=nginx
--with-fpm-group=nginx
--with-mysql=mysqlnd
--with-mysqli=mysqlnd
--with-pdo-mysql=mysqlnd
--with-gettext
--enable-mbstring
--with-iconv
--with-mhash
--with-openssl
--enable-bcmath
--enable-soap
--with-libxml-dir
--enable-pcntl
--enable-shmop
--enable-sysvmsg
--enable-sysvsem
--enable-sysvshm
--enable-sockets
--with-curl
--with-zlib
--enable-zip
--with-bz2
--without-sqlite3
--without-pdo-sqlite
--with-pear
3.3- 安装及连接
make && make install
3.4- 启动
3.4.1- 添加nginx用户
useradd nginx -s /bin/nologin
3.4.2- 复制默认配置文件
cd /usr/local/php/etc
cp php-fpm.conf.default php-fpm.conf

cd /server/source/php-7.0.6
cp php.ini-development /usr/local/php/etc/php.ini

cd /usr/local/php/etc/php-fpm.d/
cp www.conf.default www.conf
3.4.5- 启动
/usr/local/php/sbin/php-fpm
echo "/usr/ php/nginx/sbin/php-fpm" >/etc/rc.local
3.5- 设置PHP在nginx中运行
vi /usr/local/nginx-1.8.0/conf/nginx.conf
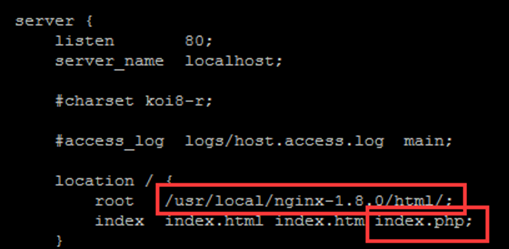
root 后面改成web目录
index 后面加上index.php
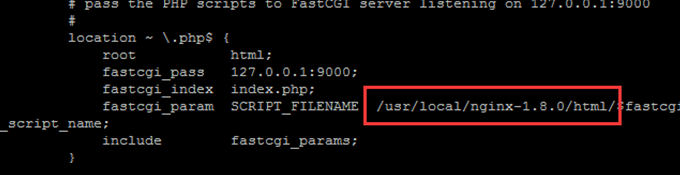
将#号去掉,将在红框中设置成web目录
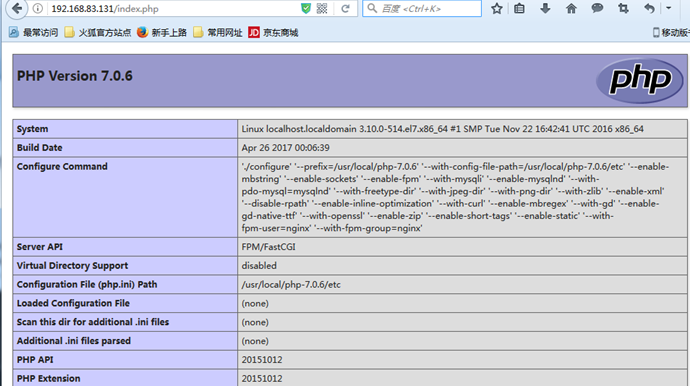
3.6- 测试php在nginx运行效果
cd /usr/local/nginx-1.8.0/html
touch index.php
vi index.php
<?php phpinfo(); ?>

重启nginx
ps -axu |grep nginx

杀掉nginx进程
Kill 9 37995
重启nginx服务
/usr/local/nginx/sbin/nginx
浏览器输入:服务器IP/index.php
效果如下:
4- 安装mysql-5.7.18及依赖包
yum -y install cmake ncurses-devel
4.1- mysql依赖包
cd /server/source
wget https://dev.mysql.com/get/Downloads/MySQL-5.7/mysql-community-common-5.7.18-1.el7.x86_64.rpm
wget https://dev.mysql.com/get/Downloads/MySQL-5.7/mysql-community-libs-5.7.18-1.el7.x86_64.rpm
wget https://dev.mysql.com/get/Downloads/MySQL-5.7/mysql-community-client-5.7.18-1.el7.x86_64.rpm
rpm -ivh mysql-community-common-5.7.18-1.el7.x86_64.rpm
rpm -ivh mysql-community-libs-5.7.18-1.el7.x86_64.rpm
rpm -ivh mysql-community-client-5.7.18-1.el7.x86_64.rpm
4.2- yum mysql安装
wget https://dev.mysql.com/get/Downloads/MySQL-5.7/mysql-community-server-5.7.18-1.el7.x86_64.rpm
rpm -ivh mysql-community-server-5.7.18-1.el7.x86_64.rpm
#创建mysql数据库文件目录并修改所有者
mkdir /data/mysql -p
chown mysql.mysql /data/mysql
#指定数据库目录和用户初始化数据库
mysqld --initialize --user=mysql --datadir=/data/mysql
#启动服务并设置开机启动
systemctl start mysqld
systemctl enable mysqld

#查看初始密码
vi /var/log/mysqld.log

#输入初始密码
mysql -u root -p
#修改root密码
alter user 'root'@'localhost'  identified  by  '密码';