初学wpf,经常被Binding搞晕,以下记录写Binding的基础。
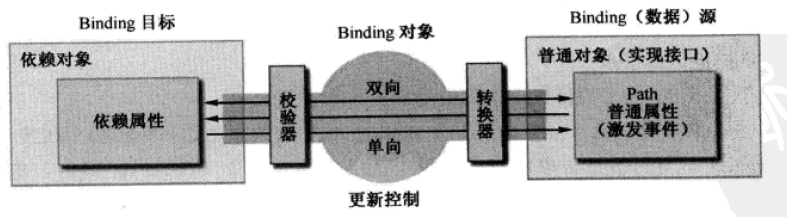
首先,盗用张图。这图形象的说明了Binding的机理。
对于Binding,意思是数据绑定,基本用法是:
1、在xmal中使用
如下,在TextBox上绑定了Slider的Value,WPF将会机智的进行双向绑定,即TextBox和Slider中任何一方改变,另外一方也将更随跟新。
        <TextBox Height="20" Margin="0,0,10,87" Text="{Binding ElementName=slider1,Path=Value}" BorderThickness="1"/>
        <Slider Maximum="100" Margin="0,50,0,35" Name="slider1"/>
上面的TextBox相当与下面的。Mode就是数据绑定的方向。
<TextBox Height="20" Margin="0,0,10,87" Text="{Binding ElementName=slider1,Path=Value,Mode=TwoWay}" BorderThickness="1"/>
控制Binding数据流向的属性是Model,它的类型是BindingModel的枚举。BindingModel可以取值为TwoWay、OneWay、OneTime、OneWayToSource和Default。这里的Default指的是Binding的模式会根据目标是实际情况来确定,如果是可以编辑的(TextBox的Text属性),Default就采用双向模式。如果是TextBlock,不可编辑,就使用单向模式。
如果我们在TextBox里面输入一个恰当的值按Tab键、让焦点离开TextBox,则Slider手柄就会跳转至相应的值那里。
为什么一定要在TextBox失去焦点以后才改变值呢?这就引出了Binding的另外一个属性-----UpdateSourceTrigger,它的类型是UpdateSourceTrigger枚举,可取值为PropertyChanged、LostFous、Explicit和Default。显然,对于Text的Default行为与LostFocus一致,我们只需要把这个值改成PropertyChanged,则Slider就会随着输入值的变化而变化了。
即加入以下带代码:
UpdateSourceTrigger=PropertyChanged
注意:
顺便提一句,Binding还具有NotifyOnSourceUpdated属性和NotifyOnTargetUpdated两个bool类型是属性。如果设置为True,则在源或目标被更新以后就会触发相应的SourceUpdated事件和TargetUpdated事件。实际工作中我们可以监听这两个事件来找出来哪些数据或控件被更新了。
2、在后台c#代码中使用
等效与上面的代码
this.textbox1.SetBinding(TextBox.TextProperty, new Binding("Value") { ElementName = slider1.Name,Mode=BindingMode.TwoWay});
或者是
this.textbox1.SetBinding(TextBox.TextProperty, new Binding("Value") { Source=slider1, Mode = BindingMode.TwoWay });
这里的ElementName与Source之间是有区别的,Source是object类型的,能接受的是一个对象,而ElementName是string型的,之恩能够接受名称。下面这样做是不行地
3、Binding的数据校验
inding的ValidationRules属性是Collection<ValidationRule>,从它的名称和数据类型我们可以得知可以为每个Binding设置多个数据校验条件,每一个条件是一个ValidationRule对象。ValidationRule是一个抽象类,在使用的时候我们需要创建它的派生类并实现它的Validate方法的返回值是ValidateionResult类型对象,如果通过验证,就把ValidateionResult对象的IsValidate属性设为true,反之,则需要将IsValidate设置为false并为其ErrorContent属性设置一个合适的消息内容(一般是字符串)。
下面这个程序的UI绘制一个TextBox和一个Slider,然后在后台C#代码中建立Binding把它们关联起来---- 已Slide为源,TextBox为目标。Slider的取值范围是0~100,也就是说我们需要验证TextBox中输入的值是不是在0~100之间。
先定义一个ValidationRule的子类。
    class RangeValidationRule : ValidationRule
    {
        public override ValidationResult Validate(object value, System.Globalization.CultureInfo cultureInfo)
        {
            double d = 0;
            if (double.TryParse(value.ToString(), out d))
            {
                if (d >= 0 && d <= 100)
                {
                    return new ValidationResult(true, null);
                }
            }
            return new ValidationResult(false, "ErrorContent");
        }
    }
然后在后台C#代码中这样定义binding。
Binding bind =new Binding("Value") { UpdateSourceTrigger= UpdateSourceTrigger.PropertyChanged,Source=slider1, Mode= BindingMode.TwoWay}; ValidationRule rule = new RangeValidationRule();
rule.ValidatesOnTargetUpdated = true;
bind.ValidationRules.Add(rule);
至于怎么在xmal中实现上面的数据校验,我还没做过,等有时间在探索。
4、关于path
尽管在XAML代码中或者Binding类的构造器参数列表中我们使用字符串来表示Path,但Path的实际类型是PropertyPath。
这样用获取Text的长度属性
Binding Path=Text.Length,ElementName=textBox1,Mode=OneWay
获取第四个字符
Binding Path=Text[3]
有的时候我们会在代码中我们看大Path是一个“.”或者干脆没有Path的Binding,着实让人摸不着头脑。原来这是一种比较特殊的情况---Binding源本身就是一种数据且不需要Path来指明。典型的string,int等基本类型都是这样,他们是实例本身就是数据,我们无法指定通过那个属性来访问这个数据,这是我们只需要将这个数据设置为.就可以了。在XAML中这个.可以忽略不写,但是在C#中编程必须要带上。
   <StackPanel Height="184" Name="stackPanel1" Width="288">
            <StackPanel.Resources>
                <String:String x:Key="myString">
                    菩提本无树,何处染尘埃。
          </String:String>

       </StackPanel.Resources>
        <TextBlock Height="23" Name="textBlock1" Text="{Binding Path=.,Source={StaticResource ResourceKey=myString}}" />
    </StackPanel>
或者
<TextBlock Height="23" Name="textBlock1" Text="{Binding .,Source={StaticResource ResourceKey=myString}}" />
或者
<TextBlock Height="23" Name="textBlock1" Text="{Binding Source={StaticResource ResourceKey=myString}}" />
后台C#写法
string myString = "菩提本无树,明镜亦无台。本来无一物,何处染尘埃。";
this.textBlock1.SetBinding(TextBlock.TextProperty, new Binding(".") { Source=myString});
5、最后,谈谈数据绑定一点心得
wpf的数据绑定主要是为了达到数据驱动UI的目的,说到底,还是为了通知UI,数据已经改变了。。。。
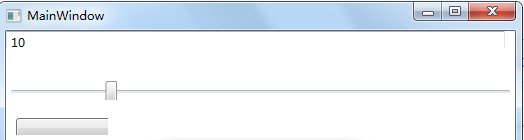
WPF的绝大多数控件都实现了INotifyPropertyChanged,所以当我们绑定两个控件时,一个控件的值改变,另一个的值也就能实时更新,这样才有了我们在上面的TextBox和Slider中改变任意一个的值,另外一个实时改变,这里为了做个验证,我在Slider上绑定一个实例属性,看看属性的值改变的时候Slider的值是不是跟着改变,理论上是不会的。
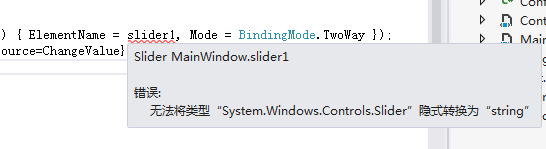
        public MainWindow()
        {
            InitializeComponent();
            //this.textbox1.SetBinding(TextBox.TextProperty, new Binding("Value") { ElementName = slider1.Name, Mode = BindingMode.TwoWay });
            this.slider1.SetBinding(Slider.ValueProperty, new Binding(".") { Source = ChangeValue });
            //ValidationRule rule = new RangeValidationRule();
            //rule.ValidatesOnTargetUpdated = true;


        }
        private int changeValue=20;

        public int ChangeValue
        {
            get { return changeValue; }
            set { changeValue = value; }
        }

        private void Button_Click_1(object sender, RoutedEventArgs e)
        {
            changeValue += 10;
        }
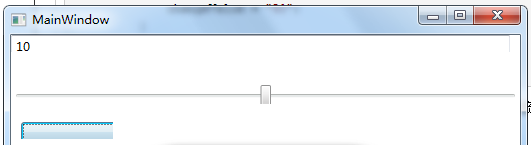
单击button并没有发现Slider的值跟着改变,这里说明ChangeValue并不是依赖属性的前提下并不能实时通知UI的Slider,自己的值改变的事。
这里就引出了依赖属性的学习。如果吧ChangeValue定义成依赖属性,就可以是实现实时通知UI的功能了。
6、在5中,我们将clr属性绑定到Slider后,发现clr属性的值改变的时候Slider的值并不会跟着改变。说明clr属性并不具有实时通知UI界面的能力。这里,我知道2种方法实现这种实时通知的功能。一种是继承INotifyPropertyChanged接口,这个接口的实现在MVVM架构里面经常拿来使用。另外一种就是WPF的依赖属性来实现了。尽管MainWindow类没有实现INotifyPropertyChanged接口,当属性的值发送改变时与之关联的binding对象依然可以得到通知,依赖属性默认的带有这种功能,天生就是合格的数据源。
我们看下用下面的代码
xmal:
<TextBox Name="textbox1" Height="20" Margin="0,0,10,87" BorderThickness="1"/>
        <Slider Maximum="100" Margin="0,50,0,35" Name="slider1"/>
        <Button Width="100" Height="20" Margin="10,87,407,0" Click="Button_Click_1"></Button>
c#:
public partial class MainWindow : Window
    {
        public MainWindow()
        {
            InitializeComponent();
            //this.textbox1.SetBinding(TextBox.TextProperty, new Binding("Value") { ElementName = slider1.Name, Mode = BindingMode.TwoWay });
            this.slider1.SetBinding(Slider.ValueProperty, new Binding("changeValue") { Source = this, Mode = BindingMode.TwoWay });
            this.textbox1.SetBinding(TextBox.TextProperty, new Binding(".") { Source = clrValue });
            //this.textbox1.SetBinding(TextBox.TextProperty, new Binding("clrValue") { Source = this });//这样写的话程序运行时textbox1是空白,不显示clrValue的初始化值
            //ValidationRule rule = new RangeValidationRule();
            //rule.ValidatesOnTargetUpdated = true;


        }

        private string clrValue="10";

        public string ClrValue
        {
            get { return clrValue; }
            set { clrValue = value; }
        }

        public string changeValue
        {
            get { return (string)GetValue(changeValueProperty); }
            set { SetValue(changeValueProperty, value); }
        }

        // Using a DependencyProperty as the backing store for changeValue.  This enables animation, styling, binding, etc...
        public static readonly DependencyProperty changeValueProperty =
            DependencyProperty.Register("changeValue", typeof(string), typeof(MainWindow), new PropertyMetadata("20"));


        //private int changeValue=20;
        //public int ChangeValue
        //{
        //    get { return changeValue; }
        //    set { changeValue = value; }
        //}

        private void Button_Click_1(object sender, RoutedEventArgs e)
        {
            clrValue = "80";
            changeValue = "50";
        }

    }
上面的代码定义了一个clr属性clrValue和一个依赖属性changeValue,依赖属性绑定到Slider上,clr属性绑定到textbox上,button单击是两个属性的值都发生了变化,我们看看哪个的变化能实时通知到UI界面上。
程序运行时:
单击button后,发现textbox里面的值没变,而slider的值变了,说明依赖属性的值改变了能实时通知到UI。这就能力对于clr属性来说本身是没有的,如果clr属性的类实现了INotifyPropertyChange接口,那它也就具有这种能力。
一个类实现INotifyPropertyChanged接口,线面是最简的实现
  class NotificationObject:INotifyPropertyChanged
    {
        public event PropertyChangedEventHandler PropertyChanged;
        public void RaisePropertyChanged(string propertyName)
        {
            if (PropertyChanged != null)
            {
                PropertyChanged(this, new PropertyChangedEventArgs(propertyName));
            }
        }
    }
然后需要具有通知UI能力的类只需继承自这个类就行了,这个Model的Myproperty的改变就能实现通知UI了
class Model : NotificationObject
    {
        private string _MyProperty = "Hello!";

        public string Myproperty
        {
            get { return _MyProperty; }
            set
            {
                _MyProperty = value;
                this.RaisePropertyChanged("Myproperty");
            }
        }

        public void Copy(object obj)
        {
            this.Myproperty += " en,Hello!";
        }
    }
7、就上面6中的数据绑定而言,我有一些不解,先记录下来,等以后彻底理解了就来详细说明。
看代码
this.slider1.SetBinding(Slider.ValueProperty, new Binding("changeValue") { Source = this, Mode = BindingMode.TwoWay });
//this.slider1.SetBinding(Slider.ValueProperty, new Binding(".") { Source = changValue, Mode = BindingMode.TwoWay });//这样写不能实现实时通知UI
this.textbox1.SetBinding(TextBox.TextProperty, new Binding(".") { Source = clrValue });
//this.textbox1.SetBinding(TextBox.TextProperty, new Binding("clrValue") { Source = this });//这样写的话程序运行时textbox1是空白,不显示clrValue的初始化值

在上面的代码中,我发现对于依赖属性,如果使用第一行的写法,也就是Binding的双引号里面放属性名,Source里面放this,可以实现实时通知UI的功能,如果按照第二行的
写法,程序运行时能显示changeValue的初始值,而不能实现通知UI值改变的功能。
而对于clr属性来说,也就是Binding的双引号里面放点,Source里面放属性名,这样才能在程序运行时让textbox显示属性的值,乳沟按第二种写法,textbox显示的是空白。
以上两种写法导致的的差异的原因,作为新学的我来说还是不能理解,希望能尽快搞懂。
写博客真费功夫以上内容参考了很多深入浅出WPF中的内容。