网络基础管理
1. 网卡命名
1.1 传统网卡命名机制
传统命名:
- 以太网eth[0,1,2,...]
wlan[0,1,2,...]
1.2 网络接口名称组成格式
- 基于固件丶设备结构丶设备类型
- 由两个字母开头标识固件
- 以太网卡以en开头
- 无线网卡以wl开头
- 设备结构
- o:主板上集成的设备的设备索引号
- s:扩展槽的索引号
- x:基于MAC地址的命名
- p
s :基于物理位置拓扑的命名。如enp2s1,表示PCI总线上第2个总线的第1个插槽的设备索引号
1.3 回归传统命名
- 修改网络配置文件
[root@localhost ~]# cd /etc/sysconfig/network-scripts/
[root@localhost network-scripts]# mv ifcfg-ens160 ifcfg-eth0
[root@localhost network-scripts]# vi ifcfg-eth0

TYPE=Ethernet
BOOTPROTO=dhcp
DEFROUTE=yes
IPV4_FAILURE_FATAL=no
NAME=eth0
UUID=00b3034d-1507-4422-987a-a2902b2a9d3a
DEVICE=eth0
ONBOOT=yes
[root@localhost network-scripts]#
- 编辑/etc/default/grub配置文件,在以GRUB_CMDLINE_LINUX开头的行内rhgb的前面加上net.ifnames=0 biosdevname=0
[root@localhost ~]# vi /etc/default/grub

GRUB_TIMEOUT=5
GRUB_DISTRIBUTOR="$(sed 's, release .*$,,g' /etc/system-release)"
GRUB_DEFAULT=saved
GRUB_DISABLE_SUBMENU=true
GRUB_TERMINAL_OUTPUT="console"
GRUB_CMDLINE_LINUX="crashkernel=auto resume=/dev/mapper/rhel-swap rd.lvm.lv=rhel/root rd.lvm.lv=rhel/swap net.ifnames=0 biosdevname=0 rhgb quiet"
GRUB_DISABLE_RECOVERY="true"
GRUB_ENABLE_BLSCFG=true
- 为grub2生成其配置文件
[root@localhost ~]# grub2-mkconfig -o /etc/grub2.cfg
Generating grub configuration file ...
done
[root@localhost ~]#
- 重启系统
[root@localhost ~]# reboot
Connection closing...Socket close.

Connection closed by foreign host.

Disconnected from remote host(192.168.91.133) at 16:10:01.
2. 网络管理常用名令
2.1 ifconfig
//网卡配置信息含义如下:

UP: 网卡处于活动状态
BROADCAST: 支持广播
RUNNING: 网线已接入
MULTICAST: 支持组播
MTU: 最大传输单元(字节),即此接口一次所能传输的最大封包

inet: 显示IPv4地址行
inet6: 显示IPv6地址行
link/enther: 指设备硬件(MAC)地址
txqueuelen: 传输缓存区长度大小
RX packets: 接收的数据包
TX packets: 发送的数据包
errors: 总的收包的错误数量
dropped: 由于各种原因, 导致拷贝在内存过程中被丢弃
collisions: 网络信号冲突情况, 值不为0则可能存在网络故障
- 安装ifconfig命令
[root@localhost ~]# mount /dev/cdrom /mnt
mount: /mnt: WARNING: device write-protected, mounted read-only.
[root@localhost ~]# rpm -ivh /mnt/BaseOS/Packages/net-tools-2.0-0.51.20160912git.el8.x86_64.rpm
warning: /mnt/BaseOS/Packages/net-tools-2.0-0.51.20160912git.el8.x86_64.rpm: Header V3 RSA/SHA256 Signature, key ID fd431d51: NOKEY
Verifying...                          ################################# [100%]
Preparing...                          ################################# [100%]
Updating / installing...
   1:net-tools-2.0-0.51.20160912git.el################################# [100%]
[root@localhost ~]#
- 查看当前处于活动状态的所有网络接口
- lo 是回环网卡,每台主机上都有 地址是127.0.0.1,只能本地访问,为了测试网络协议有没有问题
ifconfig //查看当前处于活动状态的所有网络接口
[root@localhost ~]# ifconfig
eth0: flags=4163<UP,BROADCAST,RUNNING,MULTICAST>  mtu 1500
        inet 192.168.91.133  netmask 255.255.255.0  broadcast 192.168.91.255
        inet6 fe80::20c:29ff:fe44:5384  prefixlen 64  scopeid 0x20<link>
        ether 00:0c:29:44:53:84  txqueuelen 1000  (Ethernet)
        RX packets 300  bytes 24903 (24.3 KiB)
        RX errors 0  dropped 0  overruns 0  frame 0
        TX packets 178  bytes 26764 (26.1 KiB)
        TX errors 0  dropped 0 overruns 0  carrier 0  collisions 0

lo: flags=73<UP,LOOPBACK,RUNNING>  mtu 65536
        inet 127.0.0.1  netmask 255.0.0.0
        inet6 ::1  prefixlen 128  scopeid 0x10<host>
        loop  txqueuelen 1000  (Local Loopback)
        RX packets 0  bytes 0 (0.0 B)
        RX errors 0  dropped 0  overruns 0  frame 0
        TX packets 0  bytes 0 (0.0 B)
        TX errors 0  dropped 0 overruns 0  carrier 0  collisions 0
[root@localhost ~]#
- ifconfig eth0 //仅查看eth0网卡状态
[root@localhost ~]# ifconfig eth0
eth0: flags=4163<UP,BROADCAST,RUNNING,MULTICAST>  mtu 1500
        inet 192.168.91.133  netmask 255.255.255.0  broadcast 192.168.91.255
        inet6 fe80::20c:29ff:fe44:5384  prefixlen 64  scopeid 0x20<link>
        ether 00:0c:29:44:53:84  txqueuelen 1000  (Ethernet)
        RX packets 335  bytes 27653 (27.0 KiB)
        RX errors 0  dropped 0  overruns 0  frame 0
        TX packets 202  bytes 29728 (29.0 KiB)
        TX errors 0  dropped 0 overruns 0  carrier 0  collisions 0
[root@localhost ~]#
- ifconfig lo down //关闭lo网卡
[root@localhost ~]# ifconfig lo down
[root@localhost ~]# ifconfig
eth0: flags=4163<UP,BROADCAST,RUNNING,MULTICAST>  mtu 1500
        inet 192.168.91.133  netmask 255.255.255.0  broadcast 192.168.91.255
        inet6 fe80::20c:29ff:fe44:5384  prefixlen 64  scopeid 0x20<link>
        ether 00:0c:29:44:53:84  txqueuelen 1000  (Ethernet)
        RX packets 441  bytes 35387 (34.5 KiB)
        RX errors 0  dropped 0  overruns 0  frame 0
        TX packets 239  bytes 33186 (32.4 KiB)
        TX errors 0  dropped 0 overruns 0  carrier 0  collisions 0

[root@localhost ~]#
- ifconfig lo up //启用lo网卡
[root@localhost ~]# ifconfig lo up
[root@localhost ~]# ifconfig -a
eth0: flags=4163<UP,BROADCAST,RUNNING,MULTICAST>  mtu 1500
        inet 192.168.91.133  netmask 255.255.255.0  broadcast 192.168.91.255
        inet6 fe80::20c:29ff:fe44:5384  prefixlen 64  scopeid 0x20<link>
        ether 00:0c:29:44:53:84  txqueuelen 1000  (Ethernet)
        RX packets 581  bytes 45303 (44.2 KiB)
        RX errors 0  dropped 0  overruns 0  frame 0
        TX packets 288  bytes 38408 (37.5 KiB)
        TX errors 0  dropped 0 overruns 0  carrier 0  collisions 0

lo: flags=73<UP,LOOPBACK,RUNNING>  mtu 65536    //显示启用状态,正在运行中
        inet 127.0.0.1  netmask 255.0.0.0
        inet6 ::1  prefixlen 128  scopeid 0x10<host>
        loop  txqueuelen 1000  (Local Loopback)
        RX packets 0  bytes 0 (0.0 B)
        RX errors 0  dropped 0  overruns 0  frame 0
        TX packets 0  bytes 0 (0.0 B)
        TX errors 0  dropped 0 overruns 0  carrier 0  collisions 0

[root@localhost ~]#
- ifconfig -a //查看所有网卡的状态信息,包括禁用和启用的网卡
[root@localhost ~]# ifconfig -a
eth0: flags=4163<UP,BROADCAST,RUNNING,MULTICAST>  mtu 1500
        inet 192.168.91.133  netmask 255.255.255.0  broadcast 192.168.91.255
        inet6 fe80::20c:29ff:fe44:5384  prefixlen 64  scopeid 0x20<link>
        ether 00:0c:29:44:53:84  txqueuelen 1000  (Ethernet)
        RX packets 489  bytes 38819 (37.9 KiB)
        RX errors 0  dropped 0  overruns 0  frame 0
        TX packets 257  bytes 35090 (34.2 KiB)
        TX errors 0  dropped 0 overruns 0  carrier 0  collisions 0

lo: flags=8<LOOPBACK>  mtu 65536    //显示关闭状态
        inet 127.0.0.1  netmask 255.0.0.0
        loop  txqueuelen 1000  (Local Loopback)
        RX packets 0  bytes 0 (0.0 B)
        RX errors 0  dropped 0  overruns 0  frame 0
        TX packets 0  bytes 0 (0.0 B)
        TX errors 0  dropped 0 overruns 0  carrier 0  collisions 0
[root@localhost ~]#
- ifconfig eth0:0 1.1.1.1/32 //临时给eth0加个ip
[root@localhost ~]# ifconfig eth0:0 1.1.1.1/32
[root@localhost ~]# ip a
1: lo: <LOOPBACK,UP,LOWER_UP> mtu 65536 qdisc noqueue state UNKNOWN group default qlen 1000
    link/loopback 00:00:00:00:00:00 brd 00:00:00:00:00:00
    inet 127.0.0.1/8 scope host lo
       valid_lft forever preferred_lft forever
    inet6 ::1/128 scope host
       valid_lft forever preferred_lft forever
2: eth0: <BROADCAST,MULTICAST,UP,LOWER_UP> mtu 1500 qdisc mq state UP group default qlen 1000
    link/ether 00:0c:29:44:53:84 brd ff:ff:ff:ff:ff:ff
    inet 192.168.91.133/24 brd 192.168.91.255 scope global dynamic noprefixroute eth0
       valid_lft 1310sec preferred_lft 1310sec
    inet 1.1.1.1/0 brd 255.255.255.255 scope global eth0:0
       valid_lft forever preferred_lft forever
    inet6 fe80::20c:29ff:fe44:5384/64 scope link
       valid_lft forever preferred_lft forever
[root@localhost ~]#
2.2 ip
- 语法:ip [ OPTIONS ] OBJECT { COMMAND | help }
OBJECT:- link:网络接口属性
- addr:协议地址
- route:路由
- ip link show //查看网络接口所有地址
[root@localhost ~]# ip link show
1: lo: <LOOPBACK,UP,LOWER_UP> mtu 65536 qdisc noqueue state UNKNOWN mode DEFAULT group default qlen 1000
    link/loopback 00:00:00:00:00:00 brd 00:00:00:00:00:00
2: eth0: <BROADCAST,MULTICAST,UP,LOWER_UP> mtu 1500 qdisc mq state UP mode DEFAULT group default qlen 1000
    link/ether 00:0c:29:44:53:84 brd ff:ff:ff:ff:ff:ff
[root@localhost ~]#
- ip link set DEV {up|down} //启用|禁用网络接口
[root@localhost ~]# ip link set lo down
[root@localhost ~]# ip link set lo up
[root@localhost ~]#
- ip addr del ADDRESS dev DEV //删除IP(1.1.1.1)地址
[root@localhost ~]# ip addr del 1.1.1.1/0 dev eth0
[root@localhost ~]# ip a s eth0
2: eth0: <BROADCAST,MULTICAST,UP,LOWER_UP> mtu 1500 qdisc mq state UP group default qlen 1000
    link/ether 00:0c:29:44:53:84 brd ff:ff:ff:ff:ff:ff
    inet 192.168.91.133/24 brd 192.168.91.255 scope global dynamic noprefixroute eth0
       valid_lft 1053sec preferred_lft 1053sec
    inet6 fe80::20c:29ff:fe44:5384/64 scope link
       valid_lft forever preferred_lft forever
[root@localhost ~]#
- ip addr add ADDRESS dev DEV //添加一个IP(192.168.1.1)地址
[root@localhost ~]# ip addr add 192.168.1.1/24 dev eth0
[root@localhost ~]# ip a s eth0
2: eth0: <BROADCAST,MULTICAST,UP,LOWER_UP> mtu 1500 qdisc mq state UP group default qlen 1000
    link/ether 00:0c:29:44:53:84 brd ff:ff:ff:ff:ff:ff
    inet 192.168.91.133/24 brd 192.168.91.255 scope global dynamic noprefixroute eth0
       valid_lft 1679sec preferred_lft 1679sec
    inet 192.168.1.1/24 scope global eth0
       valid_lft forever preferred_lft forever
    inet6 fe80::20c:29ff:fe44:5384/64 scope link
       valid_lft forever preferred_lft forever
[root@localhost ~]#
- ip -s link show //显示报文统计信息
[root@localhost ~]# ip -s link show
1: lo: <LOOPBACK> mtu 65536 qdisc noqueue state DOWN mode DEFAULT group default qlen 1000
    link/loopback 00:00:00:00:00:00 brd 00:00:00:00:00:00
    RX: bytes  packets  errors  dropped overrun mcast
    0          0        0       0       0       0
    TX: bytes  packets  errors  dropped carrier collsns
    0          0        0       0       0       0
2: eth0: <BROADCAST,MULTICAST,UP,LOWER_UP> mtu 1500 qdisc mq state UP mode DEFAULT group default qlen 1000
    link/ether 00:0c:29:44:53:84 brd ff:ff:ff:ff:ff:ff
    RX: bytes  packets  errors  dropped overrun mcast
    147877     1952     0       0       0       0
    TX: bytes  packets  errors  dropped carrier collsns
    78344      716      0       0       0       0
[root@localhost ~]#
2.3 route
Linux主机之间是使用IP进行通信, 假设A主机和B主机同在一个网段内且网卡都处于激活状态, 则A具备和B直接通信的能力, 但如果A主机和B主机处于两个不同的网段, 则A必须通过路由器才能和B通信, 路由器属于IT设备的基础设施, 每一个网段都应该至少有一个网关
- route //查看当前路由表
[root@localhost ~]# route
Kernel IP routing table
Destination     Gateway         Genmask         Flags Metric Ref    Use Iface
default         _gateway        0.0.0.0         UG    100    0        0 eth0
192.168.1.0     0.0.0.0         255.255.255.0   U     0      0        0 eth0
192.168.91.0    0.0.0.0         255.255.255.0   U     100    0        0 eth0
[root@localhost ~]#
- route -n //以数字的方式显示各主机或端口等相关信息
[root@localhost ~]# route -n
Kernel IP routing table
Destination     Gateway         Genmask         Flags Metric Ref    Use Iface
0.0.0.0         192.168.91.2    0.0.0.0         UG    100    0        0 eth0
192.168.1.0     0.0.0.0         255.255.255.0   U     0      0        0 eth0
192.168.91.0    0.0.0.0         255.255.255.0   U     100    0        0 eth0
[root@localhost ~]#
//增加路由
//语法:route add [-net|-host] target [netmask Nm] [gw Gw]  [[dev] If]

//增加网段路由
[root@localhost ~]# route add -net 172.16.12.0/24 gw 172.16.12.2 dev eth1
[root@localhost ~]# route add -net 0.0.0.0/0 gw 172.16.12.2 dev eth1

//增加主机路由
[root@localhost ~]# route add -host 172.16.12.128 gw 172.16.12.2

//删除路由
[root@localhost ~]# route del -net 172.16.12.0/24
[root@localhost ~]# route del -net 0.0.0.0/0 gw 172.16.12.2
2.4 hostname与hostnamectl
- hostname //查看主机名
[root@localhost ~]# hostname
localhost.localdomain
[root@localhost ~]#
- hostname临时修改主机名,修改主机名后需要重新登录用户才会显示效果
[root@localhost ~]# hostname Linux001
[root@localhost ~]# cat /etc/hostname
localhost.localdomain
//rhel7系统建议使用hostnamectl修改和查看主机名
//设定永久名称
[root@localhost ~]# hostnamectl set-hostname linux002
[root@localhost ~]# cat /etc/hostname
linux002
3. **hostnamectl** //查看主机信息
[root@localhost ~]# hostnamectl
   Static hostname: localhost.localdomain
         Icon name: computer-vm
           Chassis: vm
        Machine ID: a7d848e98dc04bdd9967cabeb66529b3
           Boot ID: 511be11619044c0cb13d9fb9a26856b3
    Virtualization: vmware
  Operating System: Red Hat Enterprise Linux 8.2 (Ootpa)
       CPE OS Name: cpe:/o:redhat:enterprise_linux:8.2:GA
            Kernel: Linux 4.18.0-193.el8.x86_64
      Architecture: x86-64
[root@localhost ~]#
注意:
在Linux中以命令方式修改网络配置只在当前状态有效,重启后将失效。故若想使修改的配置重启后依然有效,则必须编辑配置文件进行配置的修改。
3.网络相关配置文件
3.1 网络接口配置文件
网络接口即网卡,其配置文件的路径是/etc/sysconfig/network-scripts/ifcfg-INTERFACE_NAME
[root@localhost ~]# vi /etc/sysconfig/network-scripts/ifcfg-eth1
TYPE=Ethernet                                //类型是以太网
BOOTPROTO=static
NAME=eth1                                    //网卡名称
UUID=03be31f5-a3c1-4f8d-88b3-aea6e85c869f    //设备的唯一标识符
DEVICE=eth1                                  //设备名称
ONBOOT=yes                                   //系统启动激活必须是YES
IPADDR=172.16.12.130                         //IP地址
NETMASK=255.255.255.0                        //子网掩码
GATEWAY=172.16.12.2                          //网关
DNS1=172.16.12.2                             //第一个必须是DNS1,最多三个DNS

/**网卡配置说明**/
//参数                    说明
BOOTPROTO=none          //引导协议,可选值有{static|none|dhcp|bootp}。如果要使用静态地址,使用static或none都可以
NM_CONTROLLED           //NM是NetworkManager的简写,NM是由RHEL研发的在RHEL6中取代network脚本来实现网络管理、配置的服务脚本
    //可选值有{ yes | no }
    //此项是设定此网卡是否接受NM控制。CentOS6建议设为“no”
TYPE                    //接口类型。常见的接口类型有:Ethernet,Bridge
UUID                    //设备的惟一标识
HWADDR                  //硬件地址,要与硬件中的地址保持一致,可省
IPADDR=172.16.12.130    //固定IP地址
PREFIX=24               //子网掩码
NETMASK=255.255.255.0   //子网掩码
GATEWAY=172.16.12.2     //默认网关
DNS1=172.16.12.2        //第一个DNS服务器指向
DNS2                    //第二个DNS服务器指向
DNS3                    //第三个DNS服务器指向
DEVICE=eth1             //关联的设备名称,要与文件名的后半部"INTERFACE_NAME"保持一致
NAME="eth1"             //连接名称
ONBOOT=yes              //在系统引导时是否自动激活此网络接口,可选值有{ yes | no }
DEFROUTE=yes            //将接口设定为默认路由[yes|no]
USERCTL={yes|no}        //是否允许普通用户控制此接口的启用与禁用
PEERDNS={yes|no}        //是否在BOOTPROTO为dhcp时接受由dhcp服务器指定的DNS地址,此项设为yes时获得的DNS地址将直接覆盖至/etc/resolv.conf文件中
通过写配置文件添加2个IP怎么操作:
注意:如需添加多个IP地址,需要加上编号
[root@localhost ~]# cd /etc/sysconfig/network-scripts/
[root@localhost network-scripts]# vi ifcfg-eth0
TYPE=Ethernet
BOOTPROTO=static
DEFROUTE=yes
IPV4_FAILURE_FATAL=no
NAME=eth0
DEVICE=eth0
UUID=00b3034d-1507-4422-987a-a2902b2a9d3a
ONBOOT=yes
IPADDR0=192.168.91.10            //第一个IP
PREFIX0=24                       //第一个子网掩码
GATEWAY0=192.168.91.2            //只能有一个网关
DNS1=114.114.114.114             //第一个DNS
DNS2=8.8.8.8                     //第二个DNS
IPADDR1=192.168.91.20            //第二个IP
PREFIX1=24                       //第二个子网掩码
[root@localhost network-scripts]# systemctl restart NetworkManager        //重启网卡
[root@localhost network-scripts]# ip a                                    //此时并不会显示添加IP
1: lo: <LOOPBACK,UP,LOWER_UP> mtu 65536 qdisc noqueue state UNKNOWN group default qlen 1000
    link/loopback 00:00:00:00:00:00 brd 00:00:00:00:00:00
    inet 127.0.0.1/8 scope host lo
       valid_lft forever preferred_lft forever
    inet6 ::1/128 scope host
       valid_lft forever preferred_lft forever
2: eth0: <BROADCAST,MULTICAST,UP,LOWER_UP> mtu 1500 qdisc mq state UP group default qlen 1000
    link/ether 00:0c:29:44:53:84 brd ff:ff:ff:ff:ff:ff
    inet 192.168.91.10/24 brd 192.168.91.255 scope global noprefixroute eth0
       valid_lft forever preferred_lft forever
    inet6 fe80::20c:29ff:fe44:5384/64 scope link
       valid_lft forever preferred_lft forever
[root@localhost network-scripts]# cd
[root@localhost ~]# ifdown eth0;ifup eth0         //禁止再启用eth0,才可以看到配置的第二个IP
[root@localhost ~]# ip a
1: lo: <LOOPBACK,UP,LOWER_UP> mtu 65536 qdisc noqueue state UNKNOWN group default qlen 1000
    link/loopback 00:00:00:00:00:00 brd 00:00:00:00:00:00
    inet 127.0.0.1/8 scope host lo
       valid_lft forever preferred_lft forever
    inet6 ::1/128 scope host
       valid_lft forever preferred_lft forever
2: eth0: <BROADCAST,MULTICAST,UP,LOWER_UP> mtu 1500 qdisc mq state UP group default qlen 1000
    link/ether 00:0c:29:44:53:84 brd ff:ff:ff:ff:ff:ff
    inet 192.168.91.10/24 brd 192.168.91.255 scope global noprefixroute eth0
       valid_lft forever preferred_lft forever
    inet 192.168.91.20/24 brd 192.168.91.255 scope global secondary noprefixroute eth0    //显示了第二个配置的IP地址
       valid_lft forever preferred_lft forever
    inet6 fe80::20c:29ff:fe44:5384/64 scope link
       valid_lft forever preferred_lft forever
[root@localhost ~]#
添加一个新网卡并配置新网卡
[root@localhost ~]# cd/etc/sysconfig/network-scripts/
[root@localhost network-scripts]# vi ifcfg-eth1
TYPE=Ethernet
NAME=eth1
DEVICE=eth1
BOOTPROTO=static
ONBOOT=yes
IPADDR=192.168.1.1
PREFIX=24
GATEWAY=192.168.1.254
DNS1=114.114.114.114
[root@localhost network-scripts]# cd
[root@localhost ~]# ifdown eth1;ifup eth1
Connection 'eth1' successfully deactivated (D-Bus active path: /org/freedesktop/NetworkManager/ActiveConnection/3)
Connection successfully activated (D-Bus active path: /org/freedesktop/NetworkManager/ActiveConnection/5)
[root@localhost ~]# ip a
1: lo: <LOOPBACK,UP,LOWER_UP> mtu 65536 qdisc noqueue state UNKNOWN group default qlen 1000
    link/loopback 00:00:00:00:00:00 brd 00:00:00:00:00:00
    inet 127.0.0.1/8 scope host lo
       valid_lft forever preferred_lft forever
    inet6 ::1/128 scope host
       valid_lft forever preferred_lft forever
2: eth0: <BROADCAST,MULTICAST,UP,LOWER_UP> mtu 1500 qdisc mq state UP group default qlen 1000
    link/ether 00:0c:29:44:53:84 brd ff:ff:ff:ff:ff:ff
    inet 192.168.91.10/24 brd 192.168.91.255 scope global noprefixroute eth0
       valid_lft forever preferred_lft forever
    inet 192.168.91.20/24 brd 192.168.91.255 scope global secondary noprefixroute eth0
       valid_lft forever preferred_lft forever
    inet6 fe80::20c:29ff:fe44:5384/64 scope link
       valid_lft forever preferred_lft forever
3: eth1: <BROADCAST,MULTICAST,UP,LOWER_UP> mtu 1500 qdisc mq state UP group default qlen 1000
    link/ether 00:0c:29:44:53:8e brd ff:ff:ff:ff:ff:ff
    inet 192.168.1.1/24 brd 192.168.1.255 scope global noprefixroute eth1
       valid_lft forever preferred_lft forever
    inet6 fe80::20c:29ff:fe44:538e/64 scope link
       valid_lft forever preferred_lft forever
[root@localhost ~]#
3.2 路由配置文件
路由配置文件的路径是
/etc/sysconfig/network-scripts/route-INTERFACE_NAME
- 方法一
给eth0添加2条路由
[root@localhost ~]# cd /etc/sysconfig/network-scripts/
[root@localhost network-scripts]# vi route-eth1
ADDRESS0=192.168.1.0
NETMASK0=255.255.255.0
GATEWAY0=192.168.1.254
ADDRESS1=192.168.1.0
NETMASK1=255.255.255.0
GATEWAY1=192.168.2.254
[root@localhost network-scripts]# systemctl restart NetworkManager
[root@localhost network-scripts]# ifdown eth1;ifup eth1
[root@localhost network-scripts]# route -n
Kernel IP routing table
Destination     Gateway         Genmask         Flags Metric Ref    Use Iface
0.0.0.0         192.168.91.2    0.0.0.0         UG    100    0        0 eth0
192.168.1.0     0.0.0.0         255.255.255.0   U     101    0        0 eth1
192.168.1.0     192.168.1.254   255.255.255.0   UG    101    0        0 eth1
192.168.1.0     192.168.2.254   255.255.255.0   UG    101    0        0 eth1
192.168.2.254   0.0.0.0         255.255.255.255 UH    101    0        0 eth1
192.168.91.0    0.0.0.0         255.255.255.0   U     100    0        0 eth0
192.168.91.0    0.0.0.0         255.255.255.0   U     100    0        0 eth0
删除eth0的路由
[root@localhost ~]# cd /etc/sysconfig/network-scripts/
[root@localhost network-scripts]# rm -rf route-eth1
[root@localhost network-scripts]# ls
ifcfg-eth0  ifcfg-eth1
[root@localhost network-scripts]# ifdown eth1;ifup eth1
Connection 'eth1' successfully deactivated (D-Bus active path: /org/freedesktop/NetworkManager/ActiveConnection/4)
Connection successfully activated (D-Bus active path: /org/freedesktop/NetworkManager/ActiveConnection/6)
[root@localhost network-scripts]# route -n
Kernel IP routing table
Destination     Gateway         Genmask         Flags Metric Ref    Use Iface
0.0.0.0         192.168.91.2    0.0.0.0         UG    100    0        0 eth0
192.168.1.0     0.0.0.0         255.255.255.0   U     101    0        0 eth1
192.168.91.0    0.0.0.0         255.255.255.0   U     100    0        0 eth0
192.168.91.0    0.0.0.0         255.255.255.0   U     100    0        0 eth0
[root@localhost network-scripts]#
- 方法二
给eth0添加2条路由 //via 是下一跳
[root@localhost ~]# cd /etc/sysconfig/network-scripts/
[root@localhost network-scripts]# vi route-eth1
192.168.1.0/24 via 192.168.1.254
192.168.2.0/24 via 192.168.2.254
192.168.3.0/24 via 192.168.3.254
[root@localhost network-scripts]# ifdown eth1;ifup eth1
Connection 'eth1' successfully deactivated (D-Bus active path: /org/freedesktop/NetworkManager/ActiveConnection/8)
Connection successfully activated (D-Bus active path: /org/freedesktop/NetworkManager/ActiveConnection/10)
[root@localhost network-scripts]# route -n
Kernel IP routing table
Destination     Gateway         Genmask         Flags Metric Ref    Use Iface
0.0.0.0         192.168.91.2    0.0.0.0         UG    100    0        0 eth0
192.168.1.0     0.0.0.0         255.255.255.0   U     101    0        0 eth1
192.168.1.0     192.168.1.254   255.255.255.0   UG    101    0        0 eth1
192.168.2.0     192.168.2.254   255.255.255.0   UG    101    0        0 eth1
192.168.2.254   0.0.0.0         255.255.255.255 UH    101    0        0 eth1
192.168.3.0     192.168.3.254   255.255.255.0   UG    101    0        0 eth1
192.168.3.254   0.0.0.0         255.255.255.255 UH    101    0        0 eth1
192.168.91.0    0.0.0.0         255.255.255.0   U     100    0        0 eth0
192.168.91.0    0.0.0.0         255.255.255.0   U     100    0        0 eth0
[root@localhost network-scripts]#
3.3 DNS配置文件
DNS配置文件路径是/etc/resolv.conf
[root@localhost ~]# vi /etc/resolv.conf
nameserver DNS_IP_1
nameserver DNS_IP_2
nameserver DNS_IP_3
4. NetworkManager管理网络
-
RHEL/CentOS7系统默认使用NetworkManager来提供网络服务,这是一种动态管理网络配置的守护进程,能够让网络设备保持连接状态。
-
NetworkManager提供的命令行和图形配置工具对网络进行设定, 设定保存的配置文件在/etc/sysconfig/network-scripts目录下, 工具有 nmcli, nmtui, nm-connection-editor
-
device物理设备, 例如 ens33,enp2s0,virbr0,team0
connection连接设置, 具体网络配置方案
通过图形化来配置IP
- nmtui //图形化界面
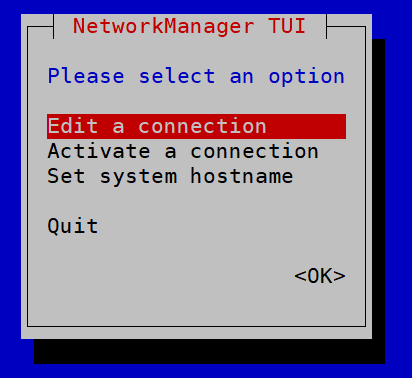
- 进入页面配置IP


使用nmcli命令查看设备以及连接情况
- nmcli device //查看设备状态
[root@localhost ~]# nmcli dev
DEVICE  TYPE      STATE      CONNECTION
eth0    ethernet  connected  eth0
eth1    ethernet  connected  eth1
lo      loopback  unmanaged  --
[root@localhost ~]#
- nmcil dev show eth0 //查看eth0网卡的i详细配置
[root@localhost ~]# nmcli dev show eth0
GENERAL.DEVICE:                         eth0
GENERAL.TYPE:                           ethernet
GENERAL.HWADDR:                         00:0C:29:44:53:84
GENERAL.MTU:                            1500
GENERAL.STATE:                          100 (connected)
GENERAL.CONNECTION:                     eth0
GENERAL.CON-PATH:                       /org/freedesktop/NetworkManage>
WIRED-PROPERTIES.CARRIER:               on
IP4.ADDRESS[1]:                         192.168.91.10/24
IP4.ADDRESS[2]:                         192.168.91.20/24
IP4.GATEWAY:                            192.168.91.2
IP4.ROUTE[1]:                           dst = 0.0.0.0/0, nh = 192.168.>
IP4.ROUTE[2]:                           dst = 192.168.91.0/24, nh = 0.>
IP4.ROUTE[3]:                           dst = 192.168.91.0/24, nh = 0.>
IP4.DNS[1]:                             114.114.114.114
IP4.DNS[2]:                             8.8.8.8
IP6.ADDRESS[1]:                         fe80::20c:29ff:fe44:5384/64
IP6.GATEWAY:                            --
IP6.ROUTE[1]:                           dst = fe80::/64, nh = ::, mt =>
IP6.ROUTE[2]:                           dst = ff00::/8, nh = ::, mt = >
[root@localhost ~]#
- nmcli connection //查看连接状态
[root@localhost ~]# nmcli connection
NAME                UUID                                  TYPE      DE>
eth0                00b3034d-1507-4422-987a-a2902b2a9d3a  ethernet  et>
eth1                9c92fad9-6ecb-3e6c-eb4d-8a47c6f50c04  ethernet  et>
Wired connection 1  f2b3e373-01b9-338b-99d2-764a02255abd  ethernet  -->
[root@localhost ~]#
- nmcli connection show //查看指设备连接的详细情况
[root@localhost ~]# nmcli con show "System eth1"
connection.id:                          System eth1
connection.uuid:                        9c92fad9-6ecb-3e6c-eb4d-8a47c6>
connection.stable-id:                   --
connection.type:                        802-3-ethernet
connection.interface-name:              eth1
connection.autoconnect:                 yes
connection.autoconnect-priority:        0
connection.autoconnect-retries:         -1 (default)
connection.multi-connect:               0 (default)
connection.auth-retries:                -1
connection.timestamp:                   1606577122
connection.read-only:                   no
connection.permissions:                 --
connection.zone:                        --
connection.master:                      --
connection.slave-type:                  --
connection.autoconnect-slaves:          -1 (default)
connection.secondaries:                 --
connection.gateway-ping-timeout:        0
connection.metered:                     unknown
connection.lldp:                        default
connection.mdns:                        -1 (default)
connection.llmnr:                       -1 (default)
connection.wait-device-timeout:         -1
802-3-ethernet.port:                    --
802-3-ethernet.speed:                   0
802-3-ethernet.duplex:                  --
802-3-ethernet.auto-negotiate:          no
802-3-ethernet.mac-address:             --
802-3-ethernet.cloned-mac-address:      --
802-3-ethernet.generate-mac-address-mask:--
802-3-ethernet.mac-address-blacklist:   --
[root@localhost ~]#
5. 网络检测工具与故障排查
5.1 ping
ping命令的目的在于测试另一台主机是否可达, 如果ping不到某台主机,就说明对方主机已经出现了问题, 但是不排除由于链路中的防火墙、ping被丢弃等原因造成ping不通的情况
-
ping命令常用选项:
-c 指定ping的次数
-i 指定ping包的发送间隔
-w 如果ping没有回应, 则在指定超时时间后退出- 以ping -c 2 百度 为例
[root@localhost ~]# ping -c 2 www.baidu.com
PING www.baidu.com (14.215.177.38) 56(84) bytes of data.
64 bytes from 14.215.177.38 (14.215.177.38): icmp_seq=1 ttl=128 time=79.1 ms
64 bytes from 14.215.177.38 (14.215.177.38): icmp_seq=2 ttl=128 time=84.2 ms

--- www.baidu.com ping statistics ---
2 packets transmitted, 2 received, 0% packet loss, time 186ms
rtt min/avg/max/mdev = 79.124/81.684/84.244/2.560 ms
[root@localhost ~]#
- 以ping -i 2 -c 3 百度为例
[root@localhost ~]# ping -i 2 -c 3 www.baidu.com
PING www.baidu.com (14.215.177.38) 56(84) bytes of data.
64 bytes from 14.215.177.38 (14.215.177.38): icmp_seq=1 ttl=128 time=575 ms
64 bytes from 14.215.177.38 (14.215.177.38): icmp_seq=2 ttl=128 time=177 ms
64 bytes from 14.215.177.38 (14.215.177.38): icmp_seq=3 ttl=128 time=77.4 ms

--- www.baidu.com ping statistics ---
3 packets transmitted, 3 received, 0% packet loss, time 8ms
rtt min/avg/max/mdev = 77.354/276.373/574.683/214.830 ms
[root@localhost ~]#
5.2 host与nslook
host/nslookup命令用于查询DNS记录
- 安装host命令 配置yum源的方式安装host命令
[root@localhost ~]# mount /dev/cdrom /mnt
[root@localhost ~]# cd /etc/yum.repos.d/
[root@localhost yum.repos.d]# pwd
/etc/yum.repos.d
[root@localhost yum.repos.d]# vi xx.repo
[root@localhost yum.repos.d]# ls
redhat.repo  xx.repo
[root@localhost yum.repos.d]#  cat xx.repo
[BaseOS]
name=baseos
baseurl=file:///mnt/BaseOS
gpgcheck=0
enabled=1
[AppStream]
name=AppStream
baseurl=file:///mnt/AppStream
gpgcheck=0
enabled=1
[root@localhost yum.repos.d]# yum clear all
[root@localhost yum.repos.d]# yum -y install bind-utils
Updating Subscription Management repositories.
Unable to read consumer identity
This system is not registered to Red Hat Subscription Management. You can use subscription-manager to register.
baseos                                 2.7 MB/s | 2.8 kB     00:00
AppStream                               92 MB/s | 5.8 MB     00:00
Dependencies resolved.
=======================================================================
 Package           Arch      Version                Repository    Size
=======================================================================
Installing:
 bind-utils        x86_64    32:9.11.13-3.el8       AppStream    443 k
Installing dependencies:
 bind-libs         x86_64    32:9.11.13-3.el8       AppStream    171 k
 bind-libs-lite    x86_64    32:9.11.13-3.el8       AppStream    1.2 M
 bind-license      noarch    32:9.11.13-3.el8       AppStream    100 k
 python3-bind      noarch    32:9.11.13-3.el8       AppStream    147 k

Transaction Summary
=======================================================================
Install  5 Packages

Total size: 2.0 M
Installed size: 4.7 M
Downloading Packages:
Running transaction check
Transaction check succeeded.
Running transaction test
Transaction test succeeded.
Running transaction
  Preparing        :                                               1/1
  Installing       : bind-license-32:9.11.13-3.el8.noarch          1/5
  Installing       : bind-libs-lite-32:9.11.13-3.el8.x86_64        2/5
  Installing       : bind-libs-32:9.11.13-3.el8.x86_64             3/5
  Installing       : python3-bind-32:9.11.13-3.el8.noarch          4/5
  Installing       : bind-utils-32:9.11.13-3.el8.x86_64            5/5
  Running scriptlet: bind-utils-32:9.11.13-3.el8.x86_64            5/5
  Verifying        : bind-libs-32:9.11.13-3.el8.x86_64             1/5
  Verifying        : bind-libs-lite-32:9.11.13-3.el8.x86_64        2/5
  Verifying        : bind-license-32:9.11.13-3.el8.noarch          3/5
  Verifying        : bind-utils-32:9.11.13-3.el8.x86_64            4/5
  Verifying        : python3-bind-32:9.11.13-3.el8.noarch          5/5
Installed products updated.

Installed:
  bind-libs-32:9.11.13-3.el8.x86_64
  bind-libs-lite-32:9.11.13-3.el8.x86_64
  bind-license-32:9.11.13-3.el8.noarch
  bind-utils-32:9.11.13-3.el8.x86_64
  python3-bind-32:9.11.13-3.el8.noarch

Complete!
- 解析百度域名
[root@localhost ~]# host www.baidu.com
www.baidu.com has address 14.215.177.38
www.baidu.com has address 14.215.177.39
www.baidu.com is an alias for www.a.shifen.com.
www.baidu.com is an alias for www.a.shifen.com.
5.3 netstat
- -r //显示路由表
[root@localhost ~]# netstat -r
Kernel IP routing table
Destination     Gateway         Genmask         Flags   MSS Window  irtt Iface
default         _gateway        0.0.0.0         UG        0 0          0 eth0
default         _gateway        0.0.0.0         UG        0 0          0 eth1
192.168.1.0     0.0.0.0         255.255.255.0   U         0 0          0 eth1
- -rn //以数字方式显示路由表
[root@localhost ~]# netstat -rn
Kernel IP routing table
Destination     Gateway         Genmask         Flags   MSS Window  irtt Iface
0.0.0.0         192.168.91.2    0.0.0.0         UG        0 0          0 eth0
0.0.0.0         192.168.1.254   0.0.0.0         UG        0 0          0 eth1
192.168.1.0     0.0.0.0         255.255.255.0   U         0 0          0 eth1
192.168.91.0    0.0.0.0         255.255.255.0   U         0 0          0 eth0
192.168.91.0    0.0.0.0         255.255.255.0   U         0 0          0 eth0
[root@localhost ~]#
- -t //显示建立的tcp连接
[root@localhost ~]# netstat -t
Active Internet connections (w/o servers)
Proto Recv-Q Send-Q Local Address           Foreign Address         State
tcp        0      0 localhost.localdoma:ssh 192.168.91.1:65347      ESTABLISHED
[root@localhost ~]#
- -u //显示udp连接
[root@localhost ~]# netstat -u
Active Internet connections (w/o servers)
Proto Recv-Q Send-Q Local Address           Foreign Address         State
udp        0      0 localhost.localdo:50646 114.114.114.114:domain  ESTABLISHED
[root@localhost ~]#
- -l //显示监听状态的连接 Listent
[root@localhost ~]# netstat -l
Active Internet connections (only servers)
Proto Recv-Q Send-Q Local Address           Foreign Address         State
tcp        0      0 0.0.0.0:ssh             0.0.0.0:*               LISTEN
tcp6       0      0 [::]:ssh                [::]:*                  LISTEN
raw    88960      0 0.0.0.0:icmp            0.0.0.0:*               7
raw    95488      0 0.0.0.0:icmp            0.0.0.0:*               7
raw    95488      0 0.0.0.0:icmp            0.0.0.0:*               7
- -p //显示监听指定的套接字的进程号及进程名
[root@localhost ~]# netstat -p
Active Internet connections (w/o servers)
Proto Recv-Q Send-Q Local Address           Foreign Address         State       PID/Program name
tcp        0      0 localhost.localdoma:ssh 192.168.91.1:65347      ESTABLISHED 1636/sshd: root [pr
udp        0      0 localhost.localdo:50646 public1.114dns.c:domain ESTABLISHED 2304/ping
- -a //显示所有状态的连接
[root@localhost ~]# netstat -a
Active Internet connections (servers and established)
Proto Recv-Q Send-Q Local Address           Foreign Address         State
tcp        0      0 0.0.0.0:ssh             0.0.0.0:*               LISTEN
- -antlp
[root@localhost ~]# netstat -antlp
Active Internet connections (servers and established)
Proto Recv-Q Send-Q Local Address           Foreign Address         State       PID/Program name
tcp        0      0 0.0.0.0:22              0.0.0.0:*               LISTEN      1119/sshd
tcp        0     36 192.168.91.10:22        192.168.91.1:65347      ESTABLISHED 1636/sshd: root [pr
tcp6       0      0 :::22                   :::*                    LISTEN      1119/sshd
[root@localhost ~]#
5.4 ss
ss是一种网络状态查看工具,取代netstat
//语法:ss [options] [ FILTER ]
//常用的options:
    -t:tcp协议相关
    -u:udp协议相关
    -w:裸套接字相关
    -x:unix套接字相关
    -l:listen状态的连接
    -a:所有
    -n:数字格式
    -p:相关的程序及pid
    -e:扩展的信息
    -m:内存用量
    -o:显示计时器信息
- 常用组合
- -tan
[root@localhost ~]# ss -tan
State        Recv-Q       Send-Q             Local Address:Port               Peer Address:Port
LISTEN       0            128                      0.0.0.0:22                      0.0.0.0:*
ESTAB        0            36                 192.168.91.10:22                 192.168.91.1:65347
LISTEN       0            128                         [::]:22                         [::]:*
[root@localhost ~]#
- -tanl
[root@localhost ~]# ss -tanl
State        Recv-Q       Send-Q              Local Address:Port               Peer Address:Port
LISTEN       0            128                       0.0.0.0:22                      0.0.0.0:*
LISTEN       0            128                          [::]:22                         [::]:*
[root@localhost ~]#
- -antlp
[root@localhost ~]# ss -antlp
State   Recv-Q   Send-Q     Local Address:Port     Peer Address:Port
LISTEN  0        128              0.0.0.0:22            0.0.0.0:*      users:(("sshd",pid=1119,fd=5))
LISTEN  0        128                 [::]:22               [::]:*      users:(("sshd",pid=1119,fd=7))
[root@localhost ~]#
- -anu
[root@localhost ~]# ss -anu
State       Recv-Q       Send-Q             Local Address:Port                 Peer Address:Port
ESTAB       0            0                  192.168.91.10:50646             114.114.114.114:53
[root@localhost ~]#