Linear space lighting is a term that game developers are becoming ever more used to hearing as games reach for the next level of realism with physically based rendering models (PBR). Though linear space and its counterpart, gamma space, are fairly simple and important concepts to understand, many developers don't learn what these terms really mean. This document will define gamma and linear space, how they differ, and how it applies to the Unity engine.
LINEAR SPACE
First we need to know what linear color space is. Simply, it means that numerical intensity values correspond proportionally to their perceived intensity. This means that the colors can be added and multiplied correctly. A color space without that property is called ”non-linear”. Below is an example where an intensity value is doubled in a linear and a non-linear color space. While the corresponding numerical values in linear space are correct, in the non-linear space (gamma = 0.45, more on this later) we can’t simply double the value to get the correct intensity.
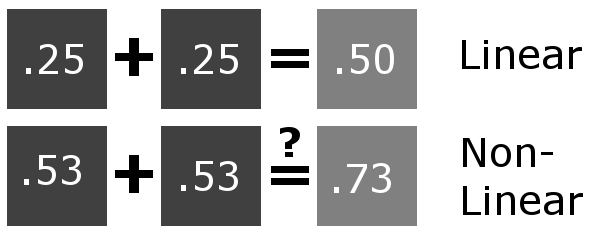
Doubling the intensity of a dark grey square in a linear and non-linear space
GAMMA SPACE
The need for gamma arises for two main reasons: The first is that screens have a non-linear response to intensity. The other is that the human eye can tell the difference between darker shades better than lighter shades. This means that when images are compressed to save space, we want to have greater accuracy for dark intensities at the expense of lighter intensities. Both of these problems are resolved using gamma correction, which is to say the intensity of every pixel in an image is put through a power function. Specifically, gamma is the name given to the power applied to the image.
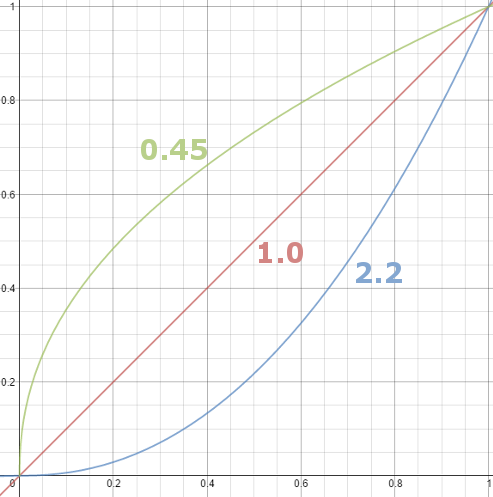
A graph of pow(x, gamma)
Looking at the above graph, it is apparent that any gamma aside from 1 is a non-linear space.
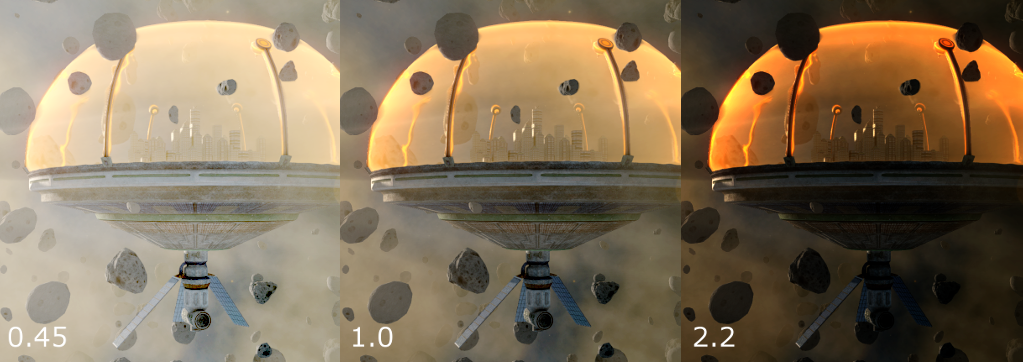
Two common gamma values applied to the center image
Most images are stored with a gamma of 0.45 applied to them, which will have the effect demonstrated in the above left image. The darker regions of the image are now recorded using a greater range of values while bright ranges are compressed. Images stored like this are in “gamma space”. For example, a neutral grey in an image doesn’t have a numerical intensity of 0.5, rather it is around 0.73, while pure whites and blacks remain the same. This is the default behavior of nearly every digital camera, as well as image editing applications and so on. In fact, nearly every image you see on your computer has that gamma applied to it.
You may be wondering why images display correctly, and don’t look too bright. This is where the non-linear response of displays comes in. CRT screens, simply by how they work, apply a gamma of around 2.2, and modern LCD screens are designed to mimic that behavior. A gamma of 2.2, the reciprocal of 0.45, when applied to the brightened images will darken them, leaving the original image.
For example, the above left image represents what is stored on your computer, and when that is displayed, the result looks like the center image. The left image has been “gamma corrected”, which means it has a gamma value such that it will be displayed correctly after the screen’s gamma is applied to the image. If instead the computer is storing the center image, which has not been gamma corrected, the displayed result looks like the right image, clearly unwanted behavior.
COLOR SPACES AND THE RENDERING PIPELINE
When using the gamma pipeline in rendering, textures are passed into shaders, gamma corrected. Next the lighting is calculated. After, the final image is output to the display and adjusted by the display’s gamma value. This behavior, while simple, is not physically correct. In real life, light behaves linearly, which means that each contribution from multiple light sources added together give the correct intensity. Because of this, shading is done in linear space, but in the gamma pipeline the input colors and textures remain in gamma space. This means the result of the shading is not truly accurate, but after the display’s correction it is often good enough. However, with increasing demand for immersive, photo-real rendering, this is no longer a suitable method.
Therefore, typical practice in PBR is to use a linear pipeline. Here, the input colors and textures have their gamma correction removed before shading, putting them into linear space. When shaded, the result is physically correct because the shading process and inputs are all in the same space. After, any post effects should be computed while the frame is still in linear space, as post effects are typically linear, much like shading. Finally the image is then gamma corrected so it will have the proper intensity after the display’s gamma adjustments.

A comparison of Gamma and Linear pipelines
Above you can see the difference between the end result of the gamma and linear pipelines on a simple sphere. Notice the brighter specular highlight and stronger falloff of the light in gamma space. These are examples of unrealistic behavior, and will make achieving photo-realism difficult.
COLOR SPACES IN UNITY
Fortunately, Unity is able to switch between color spaces very easily, and for many projects will seamlessly work with your rendering pipeline. By default, Unity uses gamma space as only PC, Xbox, and PlayStation platforms support linear rendering. For these platforms, to change between linear and gamma space, go to:
Edit -> Project Settings -> Player -> Other Settings
Here, there will be an option called Color Space, where you can choose either Linear or Gamma. It’s as easy as that! Shaders should now receive non-gamma corrected textures. Do note that if your project is already in development, you’ll likely need to rework the lighting and various textures to produce a good result, since the rendered scene will not look the same as before. If you had any lightmaps baked, they will need to be re-baked to be correct.
When linear color space and HDR are used, all post effects will be done by Unity in a full linear space. However, when only linear color space is enabled, Unity will use a gamma framebuffer, but fortunately when reading and writing to this buffer, Unity will automatically convert the values’ color space properly so that the image effects are still done in linear space.
Although Unity does not support the default linear pipeline on some platforms such as mobile. It is possible to do so yourself within shaders. This is done by applying the pow() function to gamma corrected input textures to transform the inputs to linear space, and applying pow() again before returning the result to put it back in gamma space. Note that this method will be computationally expensive, so be aware of the capabilities of your target devices and use it only where needed.
CONCLUSION
Hopefully, you have gained a further understanding of gamma and linear space and now know where to begin applying these principles to your projects. If you are making a lot of custom changes to Unity’s rendering pipeline, shaders, and post effects, you’ll need to strongly grasp the fundamentals to avoid common mistakes in color management that can drag your image quality down. When implemented correctly however, a linear rendering pipeline is a key part on the road to delivering immersive, realistic worlds.
线性空间照明是一个术语,游戏开发人员越来越习惯使用基于物理的渲染模型(PBR)来达到逼真的游戏水平。尽管线性空间及其对应的伽玛空间是相当容易理解的重要概念,但许多开发人员并未了解这些术语的真正含义。本文档将定义gamma和线性空间,它们之间的区别以及如何将其应用于Unity引擎。
线性空间
首先,我们需要知道什么是线性色彩空间。简单来说,这意味着数值强度值与其感知强度成比例地对应。这意味着可以正确添加和倍增颜色。没有该属性的色彩空间称为“非线性”。以下是在线性和非线性色彩空间中将强度值加倍的示例。尽管线性空间中的相应数值正确无误,但在非线性空间中(伽玛= 0.45,后面会详细介绍),我们不能简单地将该值加倍以获得正确的强度。
将线性和非线性空间中的深灰色正方形的强度加倍
伽玛空间
对伽玛的需求产生的原因主要有两个:第一个原因是屏幕对强度具有非线性响应。另一个是人眼可以更好地分辨出较暗的阴影与较亮的阴影之间的区别。这意味着在压缩图像以节省空间时,我们希望以较暗的强度为代价,以更高的精度获得暗强度。使用伽马校正解决了这两个问题,也就是说,图像中每个像素的强度都经过了幂函数处理。具体地说,伽玛是赋予图像功率的名称。
pow(x,gamma)的图
从上图可以看出,除1以外的任何伽玛都是非线性空间。
两个常见的伽玛值应用于中心图像
大多数图像在存储时都应用了0.45的伽玛,这将在左上方的图像中显示效果。现在,使用较大的值范围记录图像的较暗区域,同时压缩较亮的范围。这样存储的图像位于“伽马空间”中。例如,图像中的中性灰色的数值强度不为0.5,而是约为0.73,而纯白色和黑色保持不变。这是几乎所有数码相机以及图像编辑应用程序等的默认行为。实际上,您在计算机上看到的几乎所有图像都已应用了该灰度系数。
您可能想知道为什么图像可以正确显示并且看起来不太亮。这就是显示器出现非线性响应的地方。简单地通过CRT屏幕的工作方式,可以应用大约2.2的伽马值,而现代LCD屏幕旨在模仿这种行为。当伽玛值为2.2时,倒数为0.45,应用于加亮的图像会使它们变暗,从而保留原始图像。
例如,左上方的图像表示计算机上存储的内容,并且在显示该内容时,结果看起来像是中心图像。左图像已经过“伽玛校正”,这意味着它具有伽玛值,以便在将屏幕的伽玛值应用于图像后可以正确显示。相反,如果计算机存储的中心图像尚未经过伽马校正,则显示的结果看起来像正确的图像,显然是不希望有的行为。
色彩空间和渲染管线
在渲染中使用伽玛管道时,纹理将传递到着色器中,并进行伽玛校正。接下来,计算照明。之后,最终图像将输出到显示器,并通过显示器的伽玛值进行调整。这种行为虽然简单,但在物理上并不正确。在现实生活中,光的行为呈线性关系,这意味着将多个光源的每种贡献加在一起便得出正确的强度。因此,阴影是在线性空间中完成的,但是在伽玛管线中,输入的颜色和纹理仍保留在伽玛空间中。这意味着阴影的结果并非真正准确,但是在校正显示器后,它通常已经足够好了。但是,随着对沉浸式逼真的渲染的需求不断增加,这已不再是一种合适的方法。
因此,PBR中的典型做法是使用线性管线。在这里,输入的颜色和纹理在阴影之前已移除其伽马校正,从而将它们置于线性空间中。着色时,结果在物理上是正确的,因为着色过程和输入都在同一空间中。之后,应该在帧仍处于线性空间中时计算任何后期效果,因为后期效果通常是线性的,就像阴影一样。最后,对图像进行伽玛校正,以便在调整显示器的伽玛之后具有适当的强度。
Gamma和线性管道的比较
在上方,您可以看到简单球体上的gamma值和线性管线的最终结果之间的差异。请注意,伽玛空间中的高光镜面反射高光和更强的衰减。这些是不真实行为的示例,并且将使实现照片级真实感变得困难。
UNITY中的色彩空间
幸运的是,Unity能够非常轻松地在色彩空间之间进行切换,并且对于许多项目而言,它们将与您的渲染管道无缝配合。默认情况下,Unity使用伽玛空间,因为只有PC,Xbox和PlayStation平台支持线性渲染。对于这些平台,要在线性空间和伽马空间之间切换,请转到:
编辑->项目设置->播放器->其他设置
在这里,将有一个称为“色彩空间”的选项,您可以在其中选择“线性”或“伽玛”。就这么简单!着色器现在应该接收非伽玛校正的纹理。请注意,如果您的项目已经在开发中,则由于渲染的场景看起来与以前不一样,您可能需要重新制作照明和各种纹理以产生良好的效果。如果您烘焙了任何光照贴图,则需要重新烘焙它们才能正确。
使用线性色彩空间和HDR时,所有后期效果将由Unity在完整的线性空间中完成。但是,当仅启用线性色彩空间时,Unity将使用gamma帧缓冲区,但幸运的是,在对该缓冲区进行读写时,Unity将自动正确转换值的色彩空间,以便图像效果仍在线性空间中完成。
尽管Unity在某些平台(例如移动设备)上不支持默认的线性管道。您可以在着色器中自己这样做。这是通过将pow()函数应用于经过伽马校正的输入纹理以将输入转换为线性空间,并在返回结果以将其放回伽玛空间之前再次应用pow()来完成的。请注意,此方法的计算量很大,因此请注意目标设备的功能,并仅在需要时使用它。
结论
希望您对伽马和线性空间有了进一步的了解,并且现在知道从哪里开始将这些原理应用于您的项目。如果要对Unity的渲染管道,着色器和后期效果进行大量自定义更改,则需要牢牢掌握基础知识,以避免色彩管理中的常见错误,这些错误会降低图像质量。但是,如果正确实现,则线性渲染管线是交付沉浸式逼真的世界的关键部分。