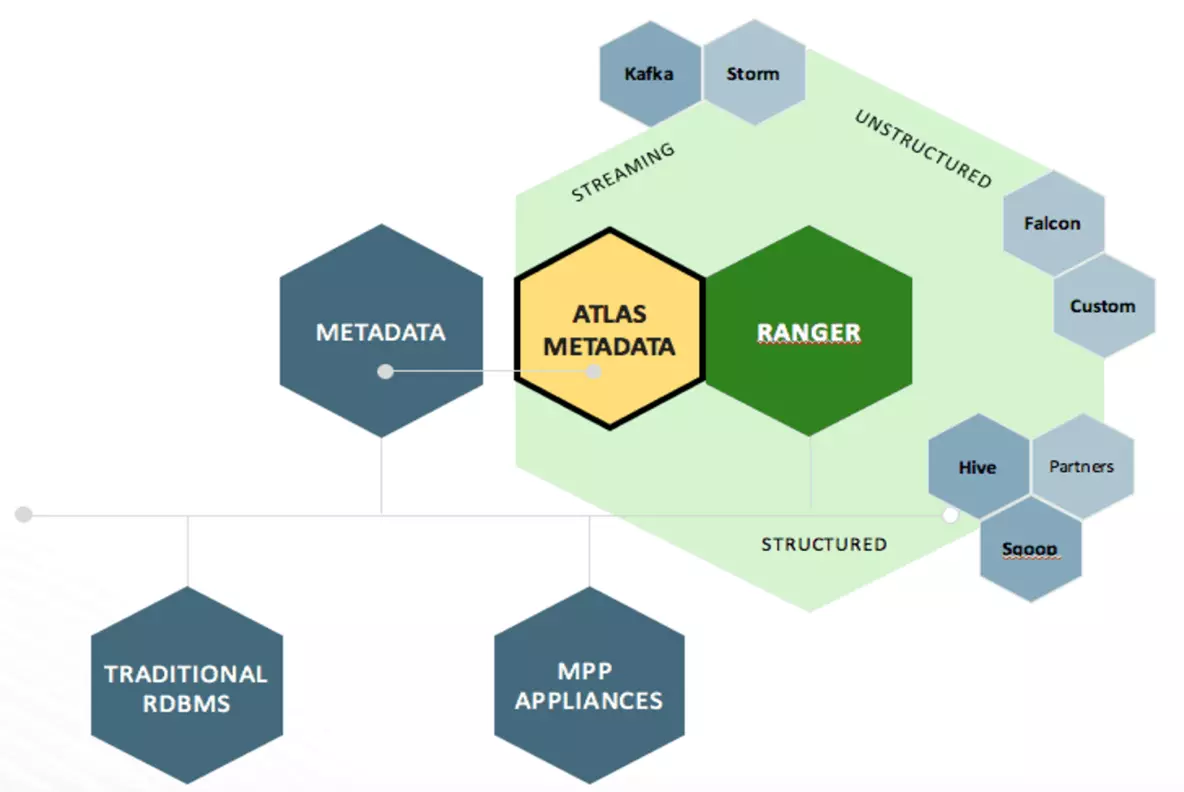
atlas 是apache下的大数据的元数据管理和数据治理平台,是Hadoop社区为解决Hadoop生态系统的元数据治理问题而产生的开源项目,它为Hadoop集群提供了包括数据分类、集中策略引擎、数据血缘、安全和生命周期管理在内的元数据治理核心能力。支持对hive、storm、kafka、hbase、sqoop等进行元数据管理以及以图库的形式展示数据的血缘关系。
• 各种Hadoop和非Hadoop元数据的预定义类型
• 为要管理的元数据定义新类型的能力
• 类型可以具有原始属性、复杂属性、对象引用;可以从其他类型继承。
• 类型的实例,称为实体,捕获元数据对象细节及其关系
• REST API与类型和实例一起工作更容易集成
• 动态创建分类的能力,如PII、ExIPRESION、DATAAL质量、敏感
• 分类可以包括属性,如EXPIRES_ON分类中的expiry_date 属性
• 实体可以与多个分类相关联,从而能够更容易地发现和安全执行。
• 通过谱系传播分类-自动确保分类跟随数据经过各种处理
• 直观的UI,以查看数据的传承,因为它通过各种处理
• REST API访问和更新血统
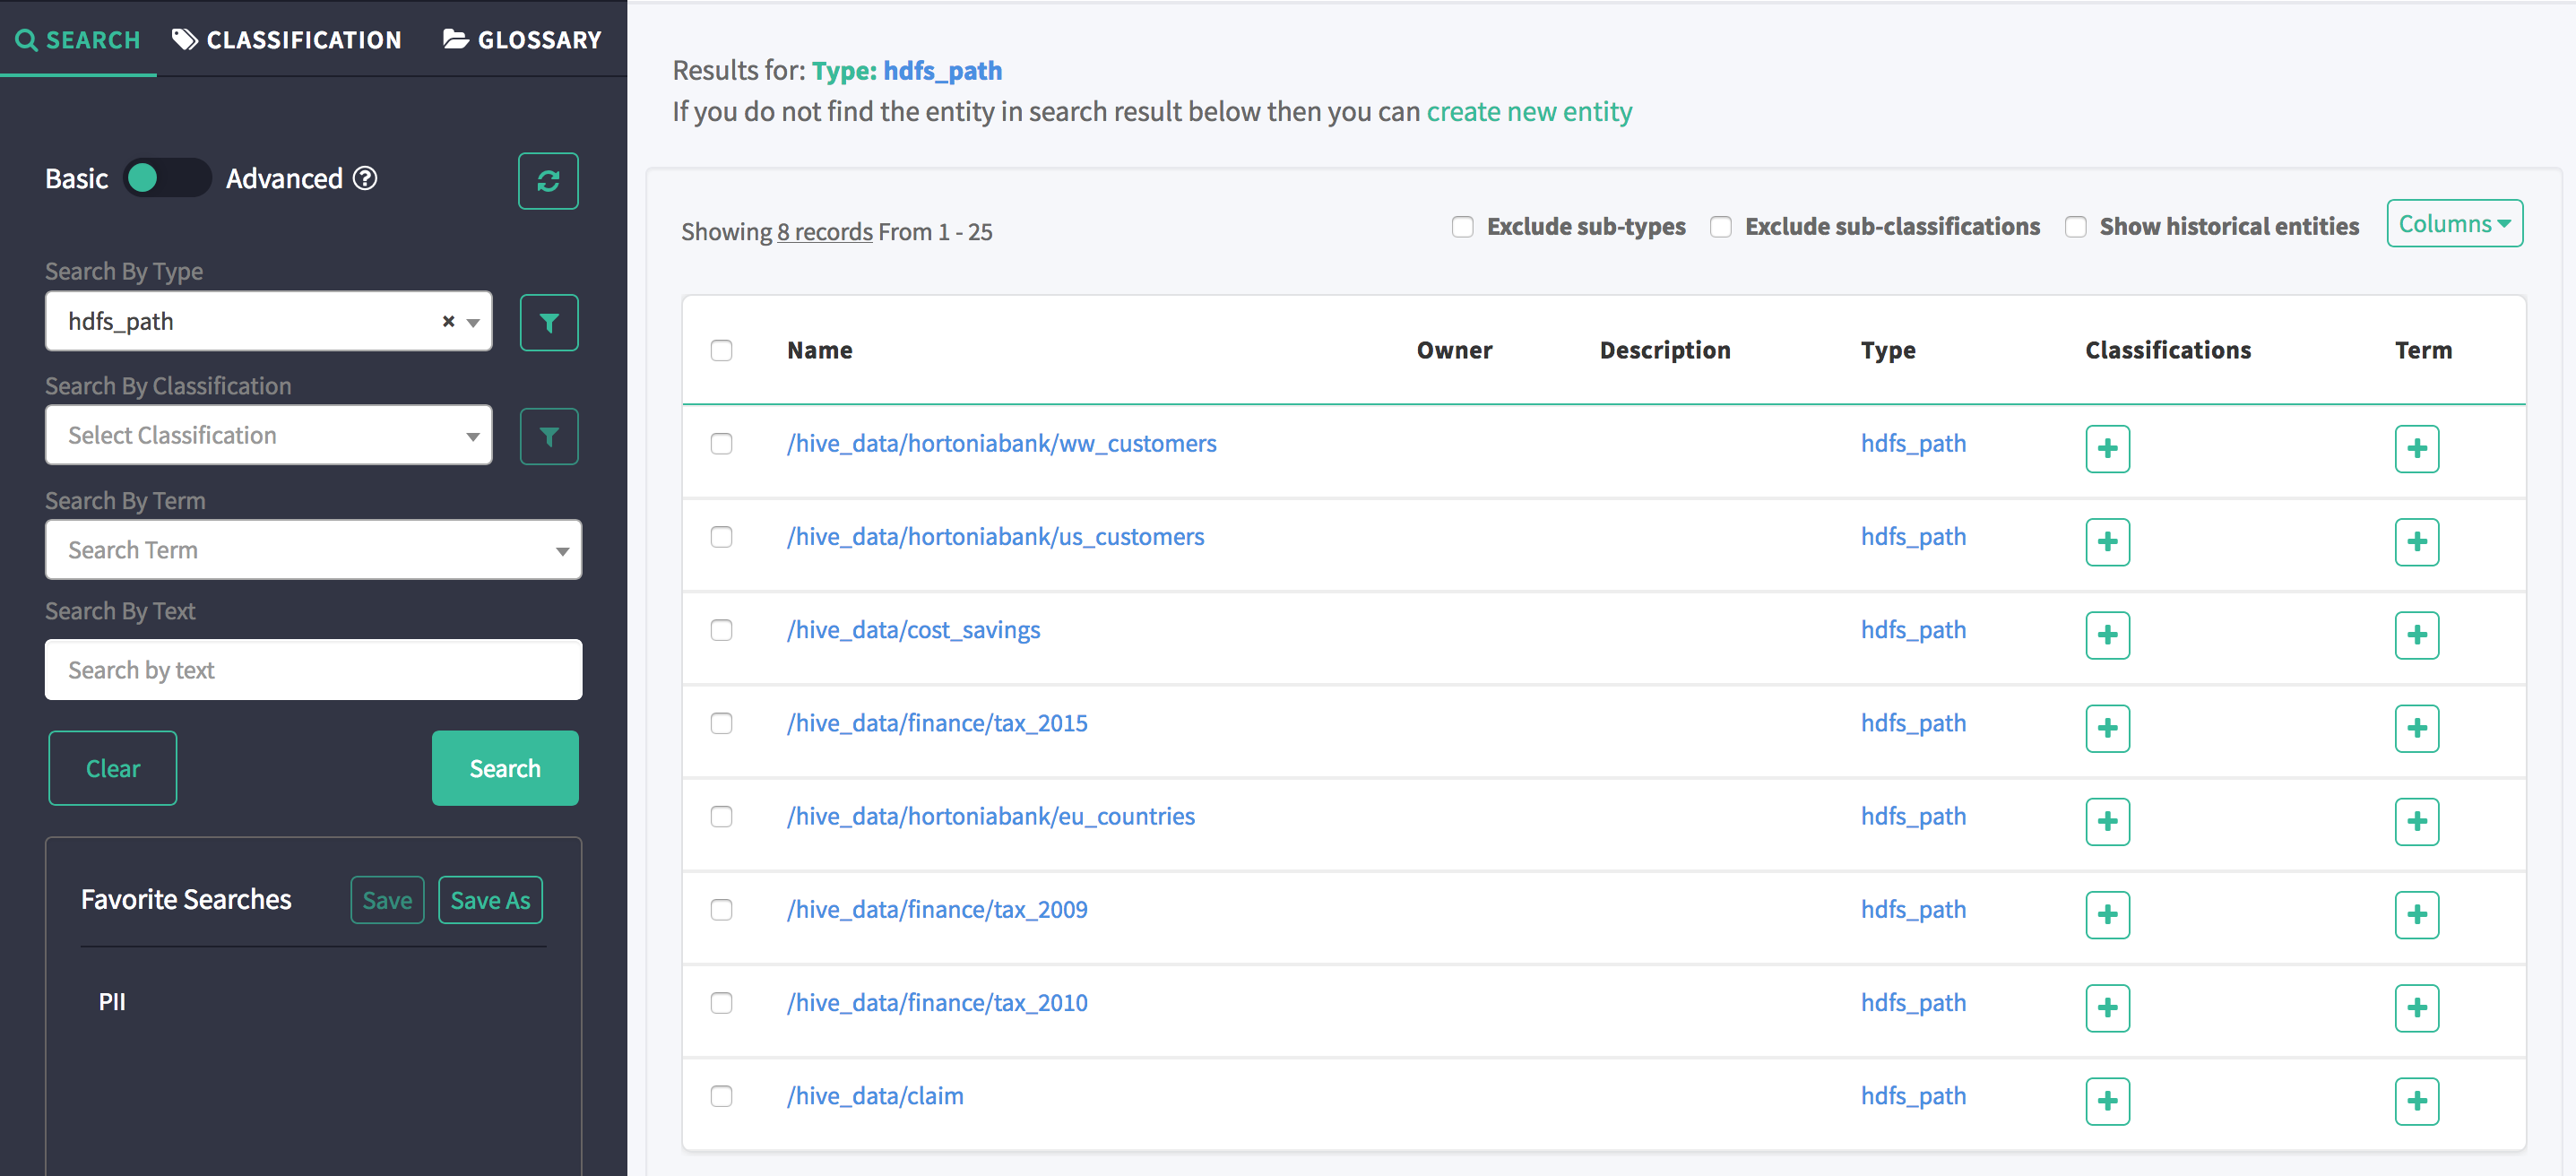
• 通过类型、分类、属性值或自由文本搜索实体的直观UI
• 丰富的 REST API 实现复杂的标准搜索
• 搜索实体的SQL类查询语言——领域特定语言(DSL)
• 用于元数据访问的细粒度安全性,允许对实体实例和操作(如添加/更新/删除分类)的访问进行控制
• 与Apache Ranger的集成使得基于与Apache Atlas中的实体相关联的分类的数据访问的授权/数据屏蔽成为可能。例如:
• 谁可以访问被分类为PII、敏感的数据
• 客户服务用户只能看到被列为国家标识的列的最后4位数字
一、架构
整体架构实现如下图所示:

Type System: Atlas allows users to define a model for the metadata objects they want to manage. The model is composed of definitions called ‘types’. Instances of ‘types’ called ‘entities’ represent the actual metadata objects that are managed. The Type System is a component that allows users to define and manage the types and entities. All metadata objects managed by Atlas out of the box (like Hive tables, for e.g.) are modelled using types and represented as entities. To store new types of metadata in Atlas, one needs to understand the concepts of the type system component.
One key point to note is that the generic nature of the modelling in Atlas allows data stewards and integrators to define both technical metadata and business metadata. It is also possible to define rich relationships between the two using features of Atlas.
Graph Engine: Internally, Atlas persists metadata objects it manages using a Graph model. This approach provides great flexibility and enables efficient handling of rich relationships between the metadata objects. Graph engine component is responsible for translating between types and entities of the Atlas type system, and the underlying graph persistence model. In addition to managing the graph objects, the graph engine also creates the appropriate indices for the metadata objects so that they can be searched efficiently. Atlas uses the JanusGraph to store the metadata objects.
Atlas采用了分布式图数据库JanusGraph作为数据存储( 具体介绍可以参考:https://docs.janusgraph.org/),目的在于用有向图灵活的存储、查询数据血缘关系。Atlas定义了一套atlas-graphdb-api,允许采用不同的图数据库引擎来实现api,便于切换底层存储。所以Atlas读写数据的过程可以看作就是将图数据库对象映射成Java类的过程,基本流程如下:

JanusGraph 的数据的底层存储支持Hbase、cassandra、embeddedcassandra、berkeleyje、inmemory(直接存储在内存中)等。
Ingest / Export: The Ingest component allows metadata to be added to Atlas. Similarly, the Export component exposes metadata changes detected by Atlas to be raised as events. Consumers can consume these change events to react to metadata changes in real time.
atlas 的搜索引擎支持solr和ElasticSearch
Applications:
Atlas Admin UI: This component is a web based application that allows data stewards and scientists to discover and annotate metadata. Of primary importance here is a search interface and SQL like query language that can be used to query the metadata types and objects managed by Atlas. The Admin UI uses the REST API of Atlas for building its functionality.- Atlas Admin UI: 该组件是一个基于 Web 的应用程序,允许数据管理员和科学家发现和注释元数据。Admin UI提供了搜索界面和 类SQL的查询语言,可以用来查询由 Atlas 管理的元数据类型和对象。Admin UI 使用 Atlas 的 REST API 来构建其功能。
Tag Based Policies: Apache Ranger is an advanced security management solution for the Hadoop ecosystem having wide integration with a variety of Hadoop components. By integrating with Atlas, Ranger allows security administrators to define metadata driven security policies for effective governance. Ranger is a consumer to the metadata change events notified by Atlas.
- Tag Based Policies: Apache Ranger 是针对 Hadoop 生态系统的高级安全管理解决方案,与各种 Hadoop 组件具有广泛的集成。通过与 Atlas 集成,Ranger 允许安全管理员定义元数据驱动的安全策略,以实现有效的治理。 Ranger 是由 Atlas 通知的元数据更改事件的消费者。
- Business Taxonomy:从元数据源获取到 Atlas 的元数据对象主要是一种技术形式的元数据。为了增强可发现性和治理能力,Atlas 提供了一个业务分类界面,允许用户首先定义一组代表其业务域的业务术语,并将其与 Atlas 管理的元数据实体相关联。业务分类法是一种 Web 应用程序,目前是 Atlas Admin UI 的一部分,并且使用 REST API 与 Atlas 集成。
- 在HDP2.5中,Business Taxonomy是提供了Technical Preview版本,需要在Atlas > Configs > Advanced > Custom application-properties中添加atlas.feature.taxonomy.enable=true并重启atlas服务来开启
Integration
Users can manage metadata in Atlas using two methods:
API: All functionality of Atlas is exposed to end users via a REST API that allows types and entities to be created, updated and deleted. It is also the primary mechanism to query and discover the types and entities managed by Atlas.
Messaging: In addition to the API, users can choose to integrate with Atlas using a messaging interface that is based on Kafka. This is useful both for communicating metadata objects to Atlas, and also to consume metadata change events from Atlas using which applications can be built. The messaging interface is particularly useful if one wishes to use a more loosely coupled integration with Atlas that could allow for better scalability, reliability etc. Atlas uses Apache Kafka as a notification server for communication between hooks and downstream consumers of metadata notification events. Events are written by the hooks and Atlas to different Kafka topics.
Metadata source
Atlas 支持与许多元数据源的集成,将来还会添加更多集成。目前,Atlas 支持从以下数据源获取和管理元数据:
- Hive:通过hive bridge, atlas可以接入Hive的元数据,包括hive_db/hive_table/hive_column/hive_process
- Sqoop:通过sqoop bridge,atlas可以接入关系型数据库的元数据,包括sqoop_operation_type/ sqoop_dbstore_usage/sqoop_process/sqoop_dbdatastore
- Falcon:通过falcon bridge,atlas可以接入Falcon的元数据,包括falcon_cluster/falcon_feed/falcon_feed_creation/falcon_feed_replication/ falcon_process
- Storm:通过storm bridge,atlas可以接入流式处理的元数据,包括storm_topology/storm_spout/storm_bolt
Atlas集成大数据组件的元数据源需要实现以下两点:
- 首先,需要基于atlas的类型系统定义能够表达大数据组件元数据对象的元数据模型(例如Hive的元数据模型实现在org.apache.atlas.hive.model.HiveDataModelGenerator);
- 然后,需要提供hook组件去从大数据组件的元数据源中提取元数据对象,实时侦听元数据的变更并反馈给atlas;
元数据处理的整体流程入下图所示:

- 在Atlas中查询某一个元数据对象时往往需要遍历图数据库中的多个顶点与边,相比关系型数据库直接查询一行数据要复杂的多,当然使用图数据库作为底层存储也存在它的优势,比如可以支持复杂的数据类型和更好的支持血缘数据的读写。
二、安装与配置
1、atlas 只提供源码,不提供打好的安装包,源码下载页面:http://atlas.apache.org/#/Downloads
2、源码下载完后,按照如下方式进行打包:
tar xvfz apache-atlas-1.0.0-sources.tar.gz
cd apache-atlas-sources-1.0.0/ export MAVEN_OPTS="-Xms2g -Xmx2g" 安装:mvn clean -DskipTests install打包:mvn clean -DskipTests package -Pdist打包时增加 hbase和solr打入: mvn clean -DskipTests package -Pdist,embedded-hbase-solr打包时增加cassandra和solr打入:mvn clean package -Pdist,embedded-cassandra-solr
3、配置与启动
tar -xzvf apache-atlas-{project.version}-server.tar.gz
cd atlas-{project.version}/conf,编辑atlas-application.properties配置文件
Graph Persistence engine - HBase配置:
atlas.graph.storage.backend=hbase

atlas.graph.storage.hostname=<ZooKeeper Quorum>

atlas.graph.storage.hbase.table=atlas
Graph Index Search Engine配置:
Graph Search Index - Solr:
atlas.graph.index.search.backend=solr5
atlas.graph.index.search.solr.mode=cloud
atlas.graph.index.search.solr.wait-searcher=true
# ZK quorum setup for solr as comma separated value. Example: 10.1.6.4:2181,10.1.6.5:2181
atlas.graph.index.search.solr.zookeeper-url=
# SolrCloud Zookeeper Connection Timeout. Default value is 60000 ms
atlas.graph.index.search.solr.zookeeper-connect-timeout=60000
# SolrCloud Zookeeper Session Timeout. Default value is 60000 ms
atlas.graph.index.search.solr.zookeeper-session-timeout=60000
Graph Search Index - Elasticsearch (Tech Preview):
atlas.graph.index.search.backend=elasticsearch
atlas.graph.index.search.hostname=<hostname(s) of the Elasticsearch master nodes comma separated>
atlas.graph.index.search.elasticsearch.client-only=true
Notification Configs:
atlas.kafka.auto.commit.enable=false
#Kafka servers. Example: localhost:6667
atlas.kafka.bootstrap.servers=
atlas.kafka.hook.group.id=atlas
#Zookeeper connect URL for Kafka. Example: localhost:2181
atlas.kafka.zookeeper.connect=
atlas.kafka.zookeeper.connection.timeout.ms=30000
atlas.kafka.zookeeper.session.timeout.ms=60000
atlas.kafka.zookeeper.sync.time.ms=20
#Setup the following configurations only in test deployments where Kafka is started within Atlas in embedded mode
#atlas.notification.embedded=true
#atlas.kafka.data={sys:atlas.home}/data/kafka
#Setup the following two properties if Kafka is running in Kerberized mode.
#atlas.notification.kafka.service.principal=kafka/_HOST@EXAMPLE.COM
#atlas.notification.kafka.keytab.location=/etc/security/keytabs/kafka.service.keytab
Client Configs:
atlas.client.readTimeoutMSecs=60000
atlas.client.connectTimeoutMSecs=60000
# URL to access Atlas server. For example: http://localhost:21000
atlas.rest.address=
SSL config:
atlas.enableTLS=false
High Availability Properties:
# Set the following property to true, to enable High Availability. Default = false.
atlas.server.ha.enabled=true
# Specify the list of Atlas instances
atlas.server.ids=id1,id2
# For each instance defined above, define the host and port on which Atlas server listens.
atlas.server.address.id1=host1.company.com:21000
atlas.server.address.id2=host2.company.com:31000
# Specify Zookeeper properties needed for HA.
# Specify the list of services running Zookeeper servers as a comma separated list.
atlas.server.ha.zookeeper.connect=zk1.company.com:2181,zk2.company.com:2181,zk3.company.com:2181
# Specify how many times should connection try to be established with a Zookeeper cluster, in case of any connection issues.
atlas.server.ha.zookeeper.num.retries=3
# Specify how much time should the server wait before attempting connections to Zookeeper, in case of any connection issues.
atlas.server.ha.zookeeper.retry.sleeptime.ms=1000
# Specify how long a session to Zookeeper should last without inactiviy to be deemed as unreachable.
atlas.server.ha.zookeeper.session.timeout.ms=20000
# Specify the scheme and the identity to be used for setting up ACLs on nodes created in Zookeeper for HA.
# The format of these options is <scheme:identity>.
# For more information refer to
http://zookeeper.apache.org/doc/r3.2.2/zookeeperProgrammers.html#sc_ZooKeeperAccessControl
# The 'acl' option allows to specify a scheme, identity pair to setup an ACL for.
atlas.server.ha.zookeeper.acl=sasl:client@comany.com
# The 'auth' option specifies the authentication that should be used for connecting to Zookeeper.
atlas.server.ha.zookeeper.auth=sasl:client@company.com
# Since Zookeeper is a shared service that is typically used by many components,
# it is preferable for each component to set its znodes under a namespace.
# Specify the namespace under which the znodes should be written. Default = /apache_atlas
atlas.server.ha.zookeeper.zkroot=/apache_atlas
# Specify number of times a client should retry with an instance before selecting another active instance, or failing an operation.
atlas.client.ha.retries=4
# Specify interval between retries for a client.
atlas.client.ha.sleep.interval.ms=5000
cd atlas-{project.version}
bin/atlas_start.py
本文作者:张永清,转载请出名博客园出处。https://www.cnblogs.com/laoqing/p/12674762.html
启动后,默认端口伟21000,通过http://ip:21000进行访问:
三、设置Hive Hook
支持的Hive Model:
Hive model includes the following types:
- Entity types:
- hive_db
- super-types: Asset
- attributes: qualifiedName, name, description, owner, clusterName, location, parameters, ownerName
- hive_table
- super-types: DataSet
- attributes: qualifiedName, name, description, owner, db, createTime, lastAccessTime, comment, retention, sd, partitionKeys, columns, aliases, parameters, viewOriginalText, viewExpandedText, tableType, temporary
- hive_column
- super-types: DataSet
- attributes: qualifiedName, name, description, owner, type, comment, table
- hive_storagedesc
- super-types: Referenceable
- attributes: qualifiedName, table, location, inputFormat, outputFormat, compressed, numBuckets, serdeInfo, bucketCols, sortCols, parameters, storedAsSubDirectories
- hive_process
- super-types: Process
- attributes: qualifiedName, name, description, owner, inputs, outputs, startTime, endTime, userName, operationType, queryText, queryPlan, queryId, clusterName
- hive_column_lineage
- super-types: Process
- attributes: qualifiedName, name, description, owner, inputs, outputs, query, depenendencyType, expression
- hive_db
- Enum types:
- hive_principal_type
- values: USER, ROLE, GROUP
- hive_principal_type
- Struct types:
- hive_order
- attributes: col, order
- hive_serde
- attributes: name, serializationLib, parameters
- hive_order
本文作者:张永清,转载请出名博客园出处。https://www.cnblogs.com/laoqing/p/12674762.html
在hive的 hive-site.xml 配置文件中增加如下配置:
<property>
    <name>hive.exec.post.hooks</name>
      <value>org.apache.atlas.hive.hook.HiveHook</value>
  </property>
- untar apache-atlas-${project.version}-hive-hook.tar.gz
cd apache-atlas-hive-hook-${project.version}
Copy entire contents of folder apache-atlas-hive-hook-${project.version}/hook/hive to <atlas package>/hook/hive
Add 'export HIVE_AUX_JARS_PATH=<atlas package>/hook/hive' in hive-env.sh of your hive configuration
Copy <atlas-conf>/atlas-application.properties to the hive conf directory.
atlas-application.properties的配置示例如下:
atlas.hook.hive.synchronous=false # whether to run the hook synchronously. false recommended to avoid delays in Hive query completion. Default: false
atlas.hook.hive.numRetries=3      # number of retries for notification failure. Default: 3
atlas.hook.hive.queueSize=10000   # queue size for the threadpool. Default: 10000
atlas.cluster.name=primary # clusterName to use in qualifiedName of entities. Default: primary
atlas.kafka.zookeeper.connect=                    # Zookeeper connect URL for Kafka. Example: localhost:2181
atlas.kafka.zookeeper.connection.timeout.ms=30000 # Zookeeper connection timeout. Default: 30000
atlas.kafka.zookeeper.session.timeout.ms=60000    # Zookeeper session timeout. Default: 60000
atlas.kafka.zookeeper.sync.time.ms=20             # Zookeeper sync time. Default: 20
Importing Hive Metadata
Usage 1: <atlas package>/hook-bin/import-hive.sh
Usage 2: <atlas package>/hook-bin/import-hive.sh [-d <database regex> OR --database <database regex>] [-t <table regex> OR --table <table regex>]
Usage 3: <atlas package>/hook-bin/import-hive.sh [-f <filename>]
           File Format:
             database1:tbl1
             database1:tbl2
             database2:tbl1
未完待续,最近会把后续的补充完整