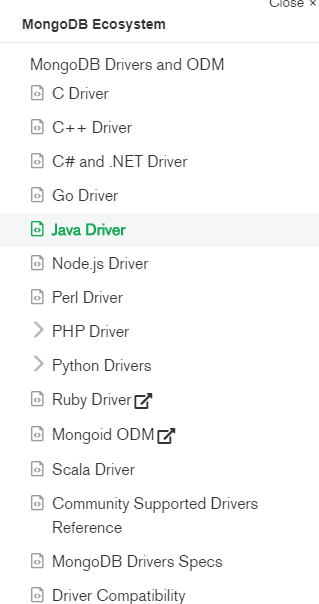
MongoDB 是一个基于分布式文件存储的数据库。由 C++ 语言编写,一般生产上建议以共享分片的形式来部署。 但是MongoDB官方也提供了其它语言的客户端操作API。如下图所示:
提供了C、C++、C#、.net、GO、java、Node.js、PHP、python、scala等各种语言的版本,如下图所示:
MongoDB的操作分为同步操作和异步操作以及响应式编程操作
一、同步操作API
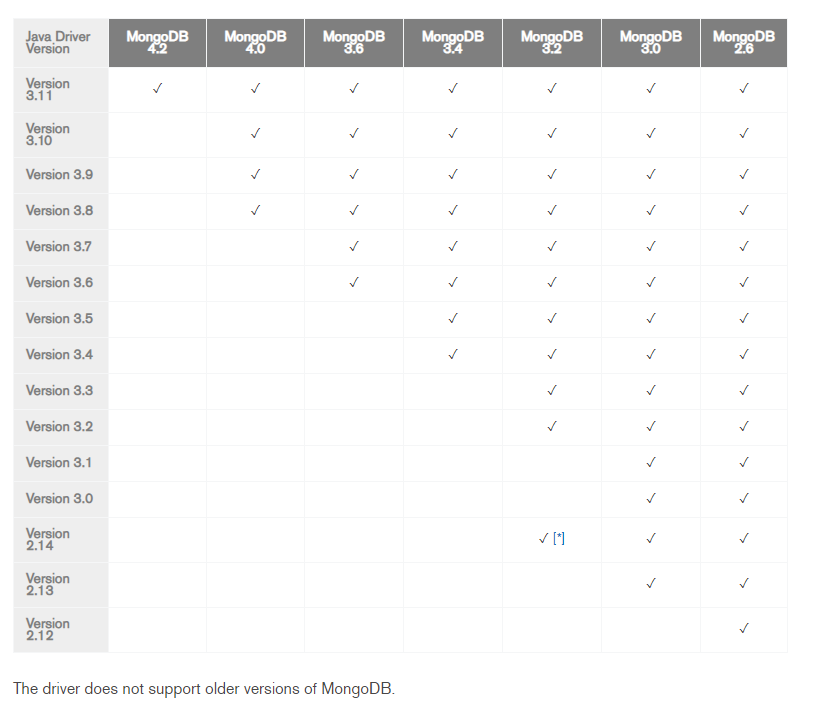
官方JAVA API的路径:https://docs.mongodb.com/ecosystem/drivers/java/ 我们这里以3.11的java 版本为例。各个版本的API对MongoDB服务的支持情况。
使用API时,先引入maven依赖
<!-- https://mvnrepository.com/artifact/org.mongodb/mongo-java-driver -->
<dependency>
    <groupId>org.mongodb</groupId>
    <artifactId>mongo-java-driver</artifactId>
    <version>3.11.1</version>
</dependency>
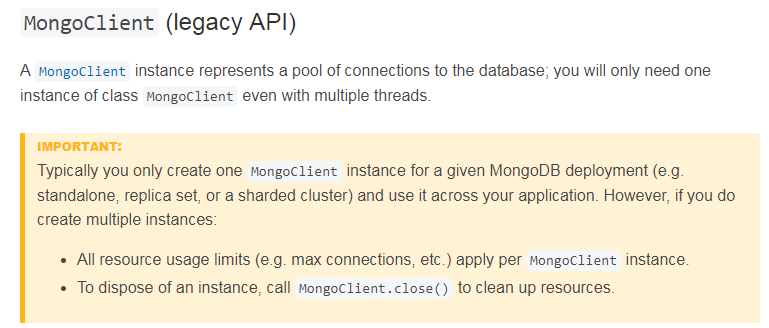
1、关于MongoDB Client的初始化和关闭。
从官方介绍来看,一般建议Client只需要一个建立一个长连接实例,然后使用时,都使用这个实例就可以,也就是可以用java的单例模式来创建连接实例。
//mongoClient连接
protected static MongoClient mongoClient;
 public synchronized static MongodbClient getInstance(String mongodbUrl) {
        if (null == mongoClient) {
            mongoClient = MongoClients.create(mongodbUrl);
            if(null != mongoClient){
                log.info("mongoClient init success!");
            }
            else{
                log.info("mongoClient init failed!");
            }
        }
        return mongodbClient;
    }
直接通过mongodb的host和port来创建client:
MongoClient mongoClient = MongoClients.create("mongodb://host1:27017");
client连接到一个 Replica Set:
本文作者:张永清,转载请注明出处:MongoDB Java API操作很全的整理以及共享分片模式下的常见操作整理
MongoClient mongoClient = MongoClients.create("mongodb://host1:27017,host2:27017,host3:27017");

MongoClient mongoClient = MongoClients.create("mongodb://host1:27017,host2:27017,host3:27017/?replicaSet=myReplicaSet");
或者通过MongoClientSettings.builder() 来辅助生成连接字符串来创建client:
MongoClient mongoClient = MongoClients.create( MongoClientSettings.builder() .applyToClusterSettings(builder -> builder.hosts(Arrays.asList( new ServerAddress("host1", 27017), new ServerAddress("host2", 27017), new ServerAddress("host3", 27017)))) .build());
连接关闭:
    public void close() {
        if(null!=mongoClient){
            mongoClient.close();
            mongoClient=null;
        }
    }
2、关于MongoDB 的基本操作
//创建Collection
 public void createCollection(String dataBaseName,String collectionName){
        getDatabase(dataBaseName).createCollection(collectionName);
    }
//查询dataBaseName
public MongoDatabase getDatabase(String dataBaseName){ return mongoClient.getDatabase(dataBaseName); }
//查询Collection
public List<String> listCollectionNames(String dataBaseName){
 List<String> stringList = new ArrayList<String>();
mongoClient.getDatabase(dataBaseName).listCollectionNames().forEach((Consumer<? super String>) t->{ stringList.add(t); });
 return stringList; }

public MongoCollection<Document> getCollectionByName(String dataBaseName, String collectionName){ return getDatabase(dataBaseName).getCollection(collectionName); }
3、关于MongoDB 的查询操作
    //通过id(objectid)精确查询
	public FindIterable<Document>  findMongoDbDocById(String dataBaseName, String collectionName, String id){
        BasicDBObject searchDoc = new BasicDBObject().append("_id", id);
       return getCollectionByName(dataBaseName,collectionName).find(searchDoc);
    }
    //通过id(objectid)模糊查询
    public FindIterable<Document>  findMongoDbDocByIdRegex(String dataBaseName, String collectionName, String id){
        BasicDBObject searchDoc = new BasicDBObject().append("_id", new BasicDBObject("$regex",id));
        return getCollectionByName(dataBaseName,collectionName).find(searchDoc);
    }
	//通过开始id和结束id 查询(根据objectId范围查询)
    public FindIterable<Document>  findMongoDbDocById(String dataBaseName, String collectionName, String startId,String endId){
        BasicDBObject searchDoc = new BasicDBObject().append("_id", new BasicDBObject("$gte", startId).append("$lte", endId));
        return getCollectionByName(dataBaseName,collectionName).find(searchDoc);
    }
    public FindIterable<Document> findMongoDbDoc(String dataBaseName, String collectionName,BasicDBObject basicDBObject){
        return getCollectionByName(dataBaseName,collectionName).find(basicDBObject);
    }
	//限制查询返回的条数
    public FindIterable<Document> findMongoDbDoc(String dataBaseName, String collectionName,BasicDBObject basicDBObject,Integer limitNum){
        return findMongoDbDoc(dataBaseName,collectionName,basicDBObject).limit(limitNum) ;
    }
    public FindIterable<Document>  findMongoDbDocById(String dataBaseName, String collectionName, String startId,String endId,Integer limitNum){
        return findMongoDbDocById(dataBaseName,collectionName,startId,endId).limit(limitNum);
    }

    /**
     * 降序查询(排序)
     * @param dataBaseName
     * @param collectionName
     * @param startId
     * @param endId
     * @param sortField  排序字段
     * @return
     */
    public FindIterable<Document>  findMongoDbDocByIdDescSort(String dataBaseName, String collectionName, String startId,String endId,String sortField){
      return findMongoDbDocById(dataBaseName,collectionName,startId,endId).sort(new Document().append(sortField, -1));
    }
    public FindIterable<Document>  findMongoDbDocByIdDescSort(String dataBaseName, String collectionName, String startId,String endId,String sortField,Integer limitNum){
        return findMongoDbDocByIdDescSort(dataBaseName,collectionName,startId,endId,sortField).limit(limitNum);
    }

    /**
     * 降序查询(排序)
     * @param dataBaseName
     * @param collectionName
     * @param startId
     * @param endId
     * @param sortField  排序字段
     * @return
     */
    public FindIterable<Document>  findMongoDbDocByIdAscSort(String dataBaseName, String collectionName, String startId,String endId,String sortField){
        return findMongoDbDocById(dataBaseName,collectionName,startId,endId).sort(new Document().append(sortField, 1));
    }
    public FindIterable<Document>  findMongoDbDocByIdAscSort(String dataBaseName, String collectionName, String startId,String endId,String sortField,Integer limitNum){
        return findMongoDbDocByIdAscSort(dataBaseName,collectionName,startId,endId,sortField).limit(limitNum);
    }
4、关于MongoDB 的插入操作
   //插入操作,注意插入时,如果数据已经存在会报错,插入时必须数据不存在,不会自动进行覆盖
   //插入单条记录
   public void insertDoc(String dataBaseName, String collectionName, Document document){
        getCollectionByName(dataBaseName,collectionName).insertOne(document);
    }
	//插入多条记录
    public void insertDoc(String dataBaseName, String collectionName,List<? extends Document> listData){
        getCollectionByName(dataBaseName,collectionName).insertMany(listData);
    }
5、关于MongoDB 的更新操作
	//更新单条
    public void updateDoc(String dataBaseName, String collectionName, Bson var1, Bson var2){
        getCollectionByName(dataBaseName,collectionName).updateOne(var1,var2);
    }
    public void updateDoc(String dataBaseName, String collectionName, Bson var1, List<? extends Bson> list){
        getCollectionByName(dataBaseName,collectionName).updateOne(var1,list);
    }
	//批量更新
    public void updateDocs(String dataBaseName, String collectionName, Bson var1, Bson var2){
        getCollectionByName(dataBaseName,collectionName).updateMany(var1,var2);
    }
    public void updateDocs(String dataBaseName, String collectionName, Bson var1, List<? extends Bson> list){
        getCollectionByName(dataBaseName,collectionName).updateMany(var1,list);
    }
6、关于MongoDB 的删除操作
//单条删除
  public DeleteResult deleteDoc(String dataBaseName, String collectionName, Bson var1){
        return getCollectionByName(dataBaseName,collectionName).deleteOne(var1);
    }
//批量删除
    public DeleteResult deleteDocs(String dataBaseName, String collectionName,Bson var1){
       return getCollectionByName(dataBaseName,collectionName).deleteMany(var1);
    }
7、关于MongoDB 的替换操作
本文作者:张永清,转载请注明出处:MongoDB Java API操作很全的整理以及共享分片模式下的常见操作整理
//存在就替换,不存在的话就插入
public UpdateResult replaceDoc(String dataBaseName, String collectionName, Bson var1, Document var2,ReplaceOptions var3){
    return getCollectionByName(dataBaseName,collectionName).replaceOne(var1,var2,var3);
}
public UpdateResult replaceDoc(String dataBaseName, String collectionName, Bson var1, Document var2){ return getCollectionByName(dataBaseName,collectionName).replaceOne(var1,var2); }
//调用示例(设置存在就替换,不存在的话就插入)
                            Document documentQuery = new Document("_id", docId);
                            Document document = new Document("_id", docId);
                            ReplaceOptions replaceOptions = new ReplaceOptions();
                            replaceOptions.upsert(true);
String dataBaseName="zhangyonqing";
String collectionName="zhangyonqing";
replaceDoc(dataBaseName,collectionName,documentQuery,document,replaceOptions);
8、关于MongoDB 的bulkWrite操作 (批量写入),对于数据很多时,效率很高
    public BulkWriteResult bulkWrite(String dataBaseName, String collectionName, List<? extends WriteModel<? extends Document>> listData){
       return getCollectionByName(dataBaseName,collectionName).bulkWrite(listData);
    }
9、关于MongoDB 的分页查询
mongodb的分页查询可以有多种思路来实现。
思路一:采用类似mysql的limit start end 的这种。
获取到总的数量:
    //查询总数
    public long countDocs(String dataBaseName, String collectionName,Bson var1){
        if(null==var1){
            return getCollectionByName(dataBaseName,collectionName).countDocuments();
        }
       return getCollectionByName(dataBaseName,collectionName).countDocuments(var1);
    }
// 分页查询,采用skip+limit的方式,在用了总数后,就可以分页了,skip的意思是前面跳过多少数据。但是这种方式在数据量大的时候效率不高,因为skip会导致全表扫描。
    public FindIterable<Document> findMongoDbDoc(String dataBaseName, String collectionName,BasicDBObject basicDBObject,Integer skip,Integer limit){
        return getCollectionByName(dataBaseName,collectionName).find(basicDBObject).skip(skip).limit(limit);
    }
思路二:利用limit 以及排序的方式,获取分页的上一页的最后一条记录的objectId,然后使用排序+$gte操作(大于)+limit 来获取当页的数据。找到一个可以排序的字段,比如objectId或者时间字段都可以排序。这个也是mongodb官方推荐的方式,这种做饭可以避免全表扫描。
思路三:在数据量不大的时候,使用代码进行分页。比如从mongodb中查询出一个list对象后,对list对象做代码分页。
public class ListUtil {
    public static List getPagingList(List list,Integer start,Integer length){
        start = start<0?0:start;
        //默认为10
        length = length<=0?10:length;
        Integer size = list.size();
        if(start>size){
            start = size;
        }
        Integer toIndex = (start+length-1)>=size?size:(start+length-1);
        if(toIndex<=0){
            toIndex = size;
        }
        return list.subList(start,toIndex);
    }
二、异步操作API
mongodb异步驱动程序提供了异步api,可以利用netty或java 7的asynchronoussocketchannel实现快速、无阻塞的i/o,maven依赖
<dependencies>
<dependency>
<groupId>org.mongodb</groupId>
<artifactId>mongodb-driver-async</artifactId>
<version>3.11.1</version>
</dependency>
</dependencies>
官方地址:http://mongodb.github.io/mongo-java-driver/3.11/driver-async/getting-started/installation/
异步操作必然会涉及到回调,回调时采用ResultCallback<Document>
本文作者:张永清,转载请注明出处:MongoDB Java API操作很全的整理以及共享分片模式下的常见操作整理
SingleResultCallback<Document> callbackPrintDocuments = new SingleResultCallback<Document>() {
   @Override
   public void onResult(final Document document, final Throwable t) {
       System.out.println(document.toJson());
   }
};

SingleResultCallback<Void> callbackWhenFinished = new SingleResultCallback<Void>() {
    @Override
    public void onResult(final Void result, final Throwable t) {
        System.out.println("Operation Finished!");
    }
};
异步insert操作
collection.insertMany(documents, new SingleResultCallback<Void>() {
    @Override
    public void onResult(final Void result, final Throwable t) {
        System.out.println("Documents inserted!");
    }
});
异步删除操作
collection.deleteMany(gte("i", 100), new SingleResultCallback<DeleteResult>() {
    @Override
    public void onResult(final DeleteResult result, final Throwable t) {
        System.out.println(result.getDeletedCount());
    }
});
异步更新操作
collection.updateMany(lt("i", 100), inc("i", 100),
    new SingleResultCallback<UpdateResult>() {
        @Override
        public void onResult(final UpdateResult result, final Throwable t) {
            System.out.println(result.getModifiedCount());
        }
    });
异步统计操作
collection.countDocuments(
  new SingleResultCallback<Long>() {
      @Override
      public void onResult(final Long count, final Throwable t) {
          System.out.println(count);
      }
  });
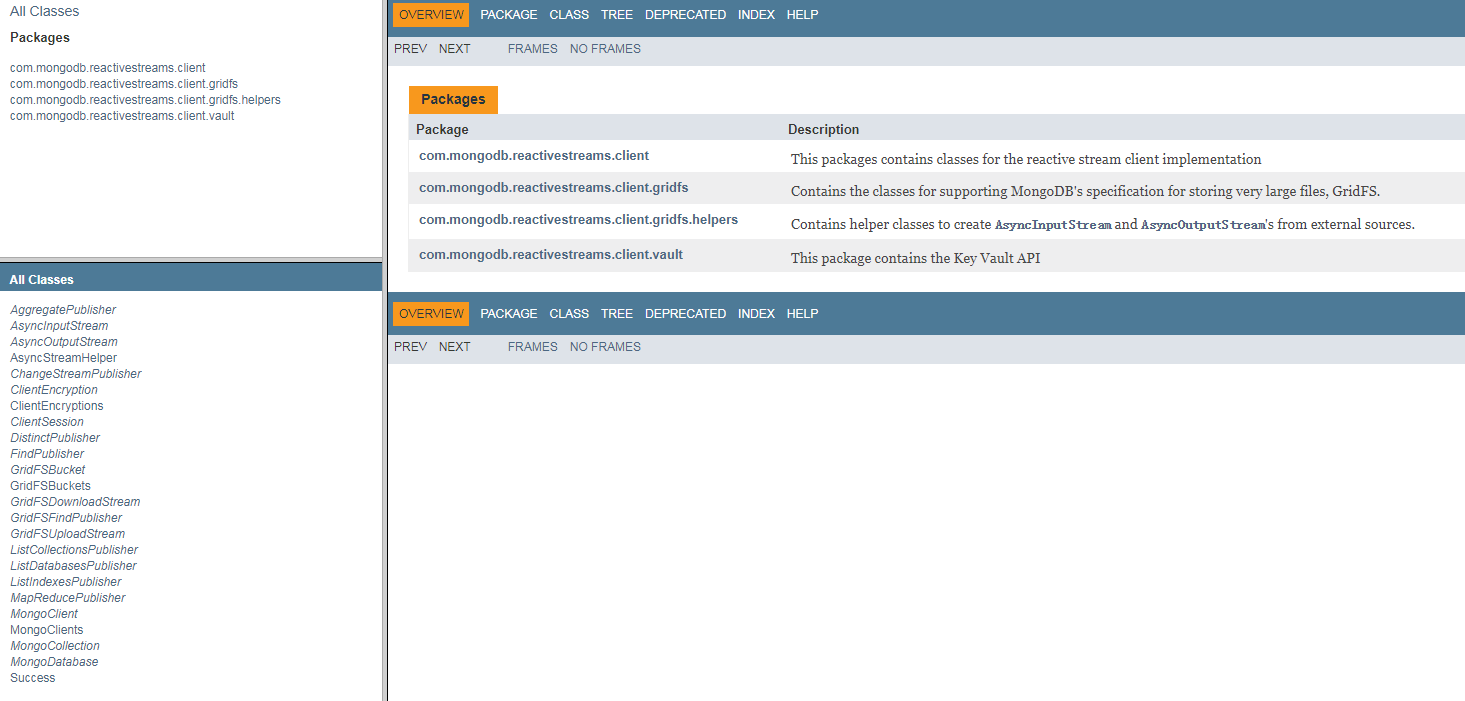
三、MongoDB Reactive Streams 操作API
官方的MongoDB reactive streams Java驱动程序,为MongoDB提供异步流处理和无阻塞处理。
完全实现reactive streams api,以提供与jvm生态系统中其他reactive streams的互操作,一般适合于大数据的处理,比如spark,flink,storm等。
<dependencies>
    <dependency>
        <groupId>org.mongodb</groupId>
        <artifactId>mongodb-driver-reactivestreams</artifactId>
        <version>1.12.0</version>
    </dependency>
</dependencies>
官方地址:http://mongodb.github.io/mongo-java-driver-reactivestreams/
会包含如下三部分:
- Publisher:Publisher 是数据的发布者。Publisher 接口只有一个方法 subscribe,用于添加数据的订阅者,也就是 Subscriber。
- Subscriber: 是数据的订阅者。Subscriber 接口有4个方法,都是作为不同事件的处理器。在订阅者成功订阅到发布者之后,其 onSubscribe(Subscription s) 方法会被调用。
- Subscription:表示的是当前的订阅关系。
API问的地址:http://mongodb.github.io/mongo-java-driver-reactivestreams/1.12/javadoc/
代码示例:
//建立连接
MongoClient mongoClient = MongoClients.create(mongodbUrl);
//获得数据库对象
MongoDatabase database = client.getDatabase(databaseName);
//获得集合
MongoCollection collection = database.getCollection(collectionName);

//异步返回Publisher
FindPublisher publisher = collection.find();

//订阅实现
publisher.subscribe(new Subscriber() {
    @Override
    public void onSubscribe(Subscription str) {
        System.out.println("start...");
        //执行请求
        str.request(Integer.MAX_VALUE);
    }
    @Override
    public void onNext(Document document) {
        //获得文档
        System.out.println("Document:" + document.toJson());
    }

    @Override
    public void onError(Throwable t) {
        System.out.println("error occurs.");
    }

    @Override
    public void onComplete() {
        System.out.println("finished.");
    }
});
个人github参考代码:https://github.com/597365581/bigdata_tools/tree/master/yongqing-bigdata-tools/yongqing-mongodb-tool
四、MongoDB 共享分片模式安装
这里以mongodb4.2.0版本和操作系统CentOS Linux release 7.6.1810 (Core) 为例:
1、从官网下载mongodb-linux-x86_64-rhel7的安装包。
分片模式安装包括三部分:shard、config、router
MongoDB分片模式下的架构图如下:
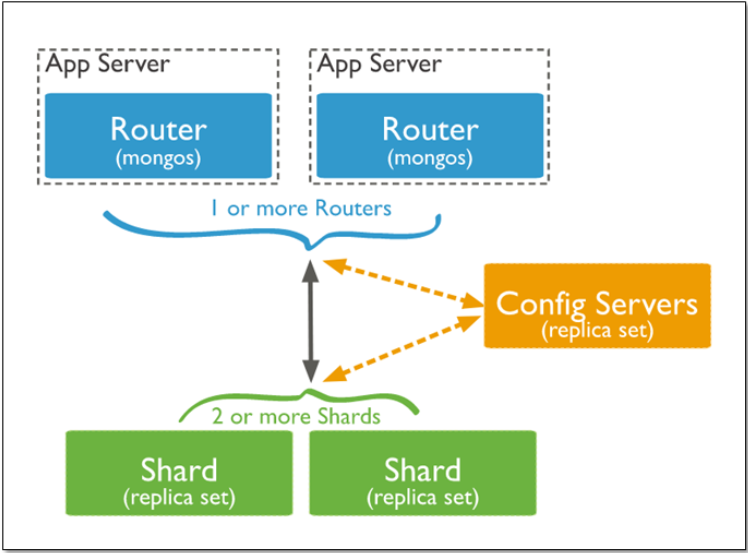
(1)mongos :数据路由,和客户端打交道的模块。mongos本身没有任何数据,他也不知道该怎么处理这数据,去找config server
(2)config server:所有存、取数据的方式,所有shard节点的信息,分片功能的一些配置信息。可以理解为真实数据的元数据。
(3)shard:真正的数据存储位置,以chunk为单位存数据。
Mongos本身并不持久化数据,Sharded cluster所有的元数据都会存储到Config Server,而用户的数据会分散存储到各个shard。Mongos启动后,会从配置服务器加载元数据,开始提供服务,将用户的请求正确路由到对应的碎片。
Mongos的路由功能
当数据写入时,MongoDB Cluster根据分片键设计写入数据。
当外部语句发起数据查询时,MongoDB根据数据分布自动路由至指定节点返回数据。
分片的主要目的:
高数据量和吞吐量的数据库应用会对单机的性能造成较大压力,大的查询量会将单机的CPU耗尽,大的数据量对单机的存储压力较大,最终会耗尽系统的内存而将压力转移到磁盘IO上。
为了解决这些问题,有两个基本的方法: 垂直扩展和水平扩展。
垂直扩展:增加更多的CPU和存储资源来扩展容量。
水平扩展:将数据集分布在多个服务器上。水平扩展即分片。
分片设计思想:
分片为应对高吞吐量与大数据量提供了方法。使用分片减少了每个分片需要处理的请求数,因此,通过水平扩展,集群可以提高自己的存储容量和吞吐量。举例来说,当插入一条数据时,应用只需要访问存储这条数据的分片,使用分片减少了每个分片存储的数据。
分片的好处:
1.对集群进行抽象,让集群“不可见”:
MongoDB自带了一个叫做mongos的专有路由进程。mongos就是掌握统一路口的路由器,其会将客户端发来的请求准确无误的路由到集群中的一个或者一组服务器上,同时会把接收到的响应拼装起来发回到客户端。
2.保证集群总是可读写:
MongoDB通过多种途径来确保集群的可用性和可靠性。将MongoDB的分片和复制功能结合使用,在确保数据分片到多台服务器的同时,也确保了每分数据都有相应的备份,这样就可以确保有服务器换掉时,其他的从库可以立即接替坏掉的部分继续工作。
3.使集群易于扩展:
当系统需要更多的空间和资源的时候,MongoDB使我们可以按需方便的扩充系统容量。
2、部署shard,这里我们部署3个shard
创建shard1.config 配置文件,文件内容:
#数据路径
dbpath=/data3/mongodb/data/shard1
#日志路径
logpath=/opt/mongodb/mongodb-linux-x86_64-rhel70-4.2.0/shard/logs/shard1.log
port=37017
logappend=true
#是否后台运行
fork=true
quiet=true
journal=true
shardsvr=true
replSet=shard1RS/10.100.xx.xx:37017
bind_ip=0.0.0.0
创建shard2.config 配置文件,文件内容:
dbpath=/data1/mongodb/data/shard2
logpath=/opt/mongodb/mongodb-linux-x86_64-rhel70-4.2.0/shard/logs/shard2.log
port=47017
logappend=true
fork=true
quiet=true
journal=true
shardsvr=true
replSet=shard2RS/10.100.xx.xx:47017
bind_ip=0.0.0.0
创建shard3.config 配置文件,文件内容:
dbpath=/data1/mongodb/data/shard3
logpath=/opt/mongodb/mongodb-linux-x86_64-rhel70-4.2.0/shard/logs/shard3.log
port=57017
logappend=true
fork=true
quiet=true
journal=true
shardsvr=true
replSet=shard3RS/10.100.xx.xx:57017
bind_ip=0.0.0.0
分别启动上面的3个共享分片
启动方式:mongod -f 配置文件对应的路径
mongod -f /opt/mongodb/mongodb-linux-x86_64-rhel70-4.2.0/shard/shard1.config
mongod -f /opt/mongodb/mongodb-linux-x86_64-rhel70-4.2.0/shard/shard2.config
mongod -f /opt/mongodb/mongodb-linux-x86_64-rhel70-4.2.0/shard/shard3.config
如果需要限制内存的大小,可以在启动参数后面增加--wiredTigerCacheSizeGB 0.2 ,这里的0.2 代表缓存的大小。
关于MongoDB缓存的介绍:
With WiredTiger, MongoDB utilizes both the WiredTiger internal cache and the filesystem cache.
Starting in MongoDB 3.4, the default WiredTiger internal cache size is the larger of either:
- 50% of (RAM - 1 GB), or
- 256 MB.
For example, on a system with a total of 4GB of RAM the WiredTiger cache will use 1.5GB of RAM (0.5 * (4 GB - 1 GB) = 1.5 GB). Conversely, a system with a total of 1.25 GB of RAM will allocate 256 MB to the WiredTiger cache because that is more than half of the total RAM minus one gigabyte (0.5 * (1.25 GB - 1 GB) = 128 MB < 256 MB).
By default, WiredTiger uses Snappy block compression for all collections and prefix compression for all indexes. Compression defaults are configurable at a global level and can also be set on a per-collection and per-index basis during collection and index creation.
Different representations are used for data in the WiredTiger internal cache versus the on-disk format:
- Data in the filesystem cache is the same as the on-disk format, including benefits of any compression for data files. The filesystem cache is used by the operating system to reduce disk I/O.
- Indexes loaded in the WiredTiger internal cache have a different data representation to the on-disk format, but can still take advantage of index prefix compression to reduce RAM usage. Index prefix compression deduplicates common prefixes from indexed fields.
- Collection data in the WiredTiger internal cache is uncompressed and uses a different representation from the on-disk format. Block compression can provide significant on-disk storage savings, but data must be uncompressed to be manipulated by the server.
Via the filesystem cache, MongoDB automatically uses all free memory that is not used by the WiredTiger cache or by other processes.
To adjust the size of the WiredTiger internal cache, see storage.wiredTiger.engineConfig.cacheSizeGB and --wiredTigerCacheSizeGB. Avoid increasing the WiredTiger internal cache size above its default value.
NOTE
The storage.wiredTiger.engineConfig.cacheSizeGB limits the size of the WiredTiger internal cache. The operating system will use the available free memory for filesystem cache, which allows the compressed MongoDB data files to stay in memory. In addition, the operating system will use any free RAM to buffer file system blocks and file system cache.
To accommodate the additional consumers of RAM, you may have to decrease WiredTiger internal cache size.
The default WiredTiger internal cache size value assumes that there is a single mongod instance per machine. If a single machine contains multiple MongoDB instances, then you should decrease the setting to accommodate the other mongod instances.
If you run mongod in a container (e.g. lxc, cgroups, Docker, etc.) that does not have access to all of the RAM available in a system, you must set storage.wiredTiger.engineConfig.cacheSizeGB to a value less than the amount of RAM available in the container. The exact amount depends on the other processes running in the container. See memLimitMB.
To view statistics on the cache and eviction rate, see the wiredTiger.cache field returned from the serverStatus command.
更多信息,可以参考http://docs.mongodb.com/manual/faq/diagnostics/#memory-diagnostics-for-the-wiredtiger-storage-engine
3、部署config,这里我们部署1个config
创建mongo.config配置文件,文件内容:
dbpath=/data3/mongodb/config/data
logpath=/opt/mongodb/mongodb-linux-x86_64-rhel70-4.2.0/config/logs/mongoconfig.log
port=27017
logappend=true
fork=true
quiet=true
journal=true
configsvr=true
replSet=configRS/10.100.xx.xx:27017
bind_ip=0.0.0.0
maxConns=100
启动config :mongod -f 配置文件对应的路径
mongod -f /opt/mongodb/mongodb-linux-x86_64-rhel70-4.2.0/config/mongo.config
4、部署router,这里我们部署1个router
创建router.config配置文件,文件内容:
logpath=/opt/mongodb/mongodb-linux-x86_64-rhel70-4.2.0/router/logs/mongorouter.log
port=17017
logappend=true
fork=true
quiet=true
configdb=configRS/10.100.xx.xx:27017
bind_ip=0.0.0.0
启动router:mongos -f 配置文件对应的路径
mongos -f /opt/mongodb/mongodb-linux-x86_64-rhel70-4.2.0/router/router.config
5、 初始化shard server,配置每个shard的副本集
连接到每一台共享分片
mongo 10.100.xx.xx:37017
备注有每个分片配置几个副本集是可以自己选择的,下面这个是配置1个副本集
rs.initiate({_id:"shard1RS",members:[{_id:1,host:"10.100.xx.xx:37017",priority:2},{_id:2,host:"192.168.xx.xx:37017"}]})
mongo 10.100.xx.xx:47017
rs.initiate({_id:"shard2RS",members:[{_id:1,host:"10.100.xx.xx:47017",priority:2},{_id:2,host:"192.168.xx.xx:47017"}]})
mongo 10.100.xx.xx:57017
rs.initiate({_id:"shard2RS",members:[{_id:1,host:"10.100.xx.xx:57017",priority:2},{_id:2,host:"192.168.xx.xx:57017"}]})
6、 配置分片
通过路由连接到mongo:mongo 10.100.xx.xx:17017
连接成功后切换到admin模式:use admin
添加对应的3个分片
db.runCommand({"addShard":"shard1RS/10.100.xx.xx:37017" ,"maxsize":1024})
db.runCommand({"addShard":"shard2RS/10.100.xx.xx2:47017" ,"maxsize":1024})
db.runCommand({"addShard":"shard3RS/10.100.xx.xx:57017" ,"maxsize":1024})
判断当前是否是shard集群:db.runCommand({isdbgrid:1});
查看分片的状态信息:可用命令db.runCommand({listshards:1})
7、 其他操作
删除分片:
use admin
db.runCommand( { removeShard: "shard1RS" } )
给集群新增用户:
首先使用带有“userAdmin”角色的用户登录集群,执行如下命令
use admin
db.createUser(
{
"user" : "backupUser",
"pwd" : "123",
roles: [{role:"backup", db:"admin"}]
}
)
db.auth("backupUser","123") //使新增的用户生效
至此,就完成了新增一个用户备份整个集群的用户
给集群用户新增权限:
use admin
db.grantRolesToUser(
"pubUser",
[{role:"readWrite", db:"Philippines"},
{role:"readWrite", db:"Italy"},
{role:"readWrite", db:"India"},
{role:"readWrite", db:"Japan"}]
)
查询所有DB的分片存储信息,包括chunks数、shard key信息:
db.printShardingStatus()
获取collection各个分片的数据存储情况:
db.collection.getShardDistribution()
显示本mongos集群所有DB的信息, 包含了Shard Key信息:
sh.status()
仅显示分片:
use config
db.shards.find()
balancer是sharded集群的负载均衡工具,新建集群的时候默认开启,除非你在config里把它关闭掉:
db.settings.find()
手动启动balancer:
sh.startBalancer()
判断当前balancer是否在跑:
sh.isBalancerRunning()
五、MongoDB 分片模式下如何选择分片键
分片键shard key:
MongoDB中数据的分片是以集合为基本单位的,集合中的数据通过片键(Shard key)被分成多部分。其实片键就是在集合中选一个键,用该键的值作为数据拆分的依据。
所以一个好的片键对分片至关重要。片键必须是一个索引,通过sh.shardCollection加会自动创建索引(前提是此集合不存在的情况下)。一个自增的片键对写入和数据均匀分布就不是很好,因为自增的片键总会在一个分片上写入,后续达到某个阀值可能会写到别的分片。但是按照片键查询会非常高效。
随机片键对数据的均匀分布效果很好。注意尽量避免在多个分片上进行查询。在所有分片上查询,mongos会对结果进行归并排序。
对集合进行分片时,你需要选择一个片键,片键是每条记录都必须包含的,且建立了索引的单个字段或复合字段,MongoDB按照片键将数据划分到不同的数据块中,并将数据块均衡地分布到所有分片中。
为了按照片键划分数据块,MongoDB使用基于范围的分片方式或者 基于哈希的分片方式。
注意:
分片键是不可变。
分片键必须有索引。
分片键大小限制512bytes。
分片键用于路由查询。
MongoDB不接受已进行collection级分片的collection上插入无分片
键的文档(也不支持空值插入)
以范围为基础的分片Sharded Cluster:
Sharded Cluster支持将单个集合的数据分散存储在多shard上,用户可以指定根据集合内文档的某个字段即shard key来进行范围分片(range sharding)。
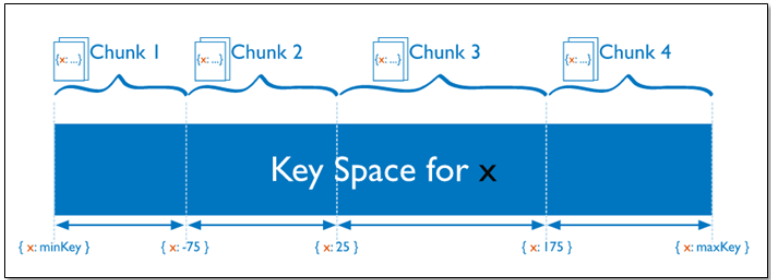
对于基于范围的分片,MongoDB按照片键的范围把数据分成不同部分。
假设有一个数字的片键:想象一个从负无穷到正无穷的直线,每一个片键的值都在直线上画了一个点。MongoDB把这条直线划分为更短的不重叠的片段,并称之为数据块,每个数据块包含了片键在一定范围内的数据。在使用片键做范围划分的系统中,拥有”相近”片键的文档很可能存储在同一个数据块中,因此也会存储在同一个分片中。
基于哈希的分片:
分片过程中利用哈希索引作为分片的单个键,且哈希分片的片键只能使用一个字段,而基于哈希片键最大的好处就是保证数据在各个节点分布基本均匀。
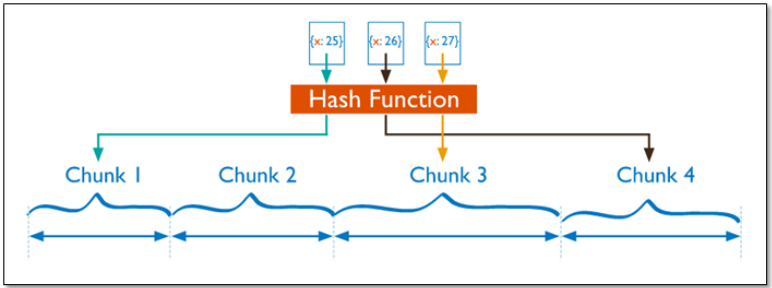
对于基于哈希的分片,MongoDB计算一个字段的哈希值,并用这个哈希值来创建数据块。在使用基于哈希分片的系统中,拥有”相近”片键的文档很可能不会存储在同一个数据块中,因此数据的分离性更好一些。
Hash分片与范围分片互补,能将文档随机的分散到各个chunk,充分的扩展写能力,弥补了范围分片的不足,但不能高效的服务范围查询,所有的范围查询要分发到后端所有的Shard才能找出满足条件的文档。
分片键选择建议:
1、递增的sharding key
数据文件挪动小。(优势)
因为数据文件递增,所以会把insert的写IO永久放在最后一片上,造成最后一片的写热点。同时,随着最后一片的数据量增大,将不断的发生迁移至之前的片上。
2、随机的sharding key
数据分布均匀,insert的写IO均匀分布在多个片上。(优势)
大量的随机IO,磁盘不堪重荷。
3、混合型key
大方向随机递增,小范围随机分布。
为了防止出现大量的chunk均衡迁移,可能造成的IO压力。我们需要设置合理分片使用策略(片键的选择、分片算法(range、hash))
分片注意:
分片键是不可变、分片键必须有索引、分片键大小限制512bytes、分片键用于路由查询。
MongoDB不接受已进行collection级分片的collection上插入无分片键的文档(也不支持空值插入)、
数据库开启分片:
在共享分片模式下,创建完数据库后,需要对数据库开启分片功能,并对数据库下的表的字段指定分片算法
通过路由连接到mongoDb后,使用use admin 切换到admin模式。
开启数据库分片的命令:db.runCommand({"enablesharding":"数据库名称"}) ,例如对对库hdctest开启分片 :db.runCommand({"enablesharding":"hdctest"})
对库hdctest下的表person按字段ID配置hash分片算法 :db.runCommand({"shardcollection":"hdctest.person","key":{_id:'hashed'}})
对库hdctest下的表person按字段ID配置按照id升序或者降序配置分片算法(升序和降序 用1和-1表示):
db.runCommand({shardcollection:"hdctest.person",key:{_id:1}})
另外需要注意的是:对表中按照字段进行分片时,需要预先创建索引才能配置分片算法(索引和分片算法保持一致,对id进行分片,那么就对id创建索引)。
按照id升序索引:db.person.createIndex( {"_id": 1},{"name":'idx_id'})
按照createTime 降序索引:db.person.createIndex( {"createTime": -1 },{"name":'idx_createTime'})
六、MongoDB 如何创建索引
1.为普通字段添加索引,并且为索引命名
db.集合名.createIndex( {"字段名": 1 },{"name":'idx_字段名'})
说明: (1)索引命名规范:idx_<构成索引的字段名>。如果字段名字过长,可采用字段缩写。
(2)字段值后面的 1 代表升序;如是 -1 代表 降序。
2.为内嵌字段添加索引
db.集合名.createIndex({"字段名.内嵌字段名":1},{"name":'idx_字段名_内嵌字段名'})
3.通过后台创建索引
db.集合名.createIndex({"字段名":1},{"name":'idx_字段名',background:true})
4:组合索引
db.集合名.createIndex({"字段名1":-1,"字段名2":1},{"name":'idx_字段名1_字段名2',background:true})
5.设置TTL 索引
db.集合名.createIndex( { "字段名": 1 },{ "name":'idx_字段名',expireAfterSeconds: 定义的时间,background:true} )
说明 :expireAfterSeconds为过期时间(单位秒)
6.createIndex() 接收可选参数汇总
| Parameter | Typ | Description |
| background | Boolean | 建索引过程会阻塞其它数据库操作,background可指定以后台方式创建索引,即增加 "background" 可选参数。 "background" 默认值为false。 |
| unique | Boolean | 建立的索引是否唯一。指定为true创建唯一索引。默认值为false. |
| name | string | 索引的名称。如果未指定,MongoDB的通过连接索引的字段名和排序顺序生成一个索引名称。 |
| sparse | Boolean | 对文档中不存在的字段数据不启用索引;这个参数需要特别注意,如果设置为true的话,在索引字段中不会查询出不包含对应字段的文档.。默认值为 false. |
| expireAfterSeconds | integer | 指定一个以秒为单位的数值,完成 TTL设定,设定集合的生存时间。 |
| weights | document | 索引权重值,数值在 1 到 99,999 之间,表示该索引相对于其他索引字段的得分权重。 |
| default_language | string | 对于文本索引,该参数决定了停用词及词干和词器的规则的列表。 默认为英语 |