在使用nose自带的xunit生成xml文件生成测试报告后,领导说报告不够炫,没有百分比效果,且在web自动化时的截图不美观,html很多情况下没有显示图片(nose框架截图方法这里),正好,allure_report报告框架满足所有要求。
一、介绍
这里可以查看官方信息,http://allure.qatools.ru/,报告还支持中文
还有前辈写的实践之路:https://testerhome.com/topics/5738
二、基于nose框架
从官网介绍中,我们可以得知,allure支持python nose框架
1) 安装:
nose下allure的插件官网:https://pypi.python.org/pypi/nose-allure-plugin
这里我们使用pip安装,安装过程中会自动安装pytest、lxml、six、eunum34等插件
C:UsersAdministrator>pip install nose-allure-plugin
目前只支持python2的版本,python3的同学请绕行
如果在安装过程中出现以下问题:
Building lxml version 3.8.0.
Building without Cython.
ERROR: 'xslt-config' 不是内部或外部命令,也不是可运行的程序
或批处理文件。

......

    Could not find function xmlCheckVersion in library libxml2. Is libxml2 insta
lled?
    ****************************************************************************
*****
    error: command 'C:\Users\Administrator\AppData\Local\Programs\Common\
Microsoft\Visual C++ for Python\9.0\VC\Bin\cl.exe' failed with exit status
2
可以指定lxml版本安装:
pip install lxml==3.6.0
然后再次安装
pip install nose-allure-plugin
安装完成后,可以输入nosetests -h,可能看到以下几个参数,表示安装成功
--logdir=LOGDIR
--not-clear-logdir
--feature=FEATURE
--story=STORY
--issue=ISSUE
--severity=SEVERITY
2)使用
根据官网的例子熟悉下
import nose

class TestBar(object):

    @nose.allure.severity(nose.allure.severity_level.CRITICAL)
    def test_bar(self):
        pass

    # custom severity
    @nose.allure.severity("hard")
    def test_bar(self):
        pass
运行:
nosetests -v -s allure_learn.py --with-allure --logdir=tmp --severity="critical, hard"
这里的--logdir是产生xml文件的路径,如果是在windows下请更改格式,运行完成后,在--logdir下会产生对应的xml文件

3)在web自动化下生成截图的方法
这点是allure report最方便的地方,不用指定文件名自动生成截图
看以下脚本
import nose,sys
from selenium import webdriver
from allure.constants import AttachmentType

class TestBar():

    @classmethod
    def setUpClass(cls):
        cls.driver = webdriver.Firefox()
        cls.driver.get("http://www.baidu.com")

    @nose.allure.severity(nose.allure.severity_level.CRITICAL)
    def test_bar(self):
        assert 1==2
        nose.allure.attach('screenshot',self.driver.get_screenshot_as_png(), type= AttachmentType.PNG)

    # custom severity
    @nose.allure.severity("hard")
    def test_bar_xx(self):
        assert 4==4
        #nose.allure.attach('screenshot', self.driver.get_screenshot_as_png(), type='png')   -----该方法错误
        nose.allure.attach('screenshot', self.driver.get_screenshot_as_png(), type=AttachmentType.PNG)
运行后,我们可以看到在对应的目录下生成了报xml报告且还有截图文件
但这个代码不实用,我们在实际项目中,肯定是运行测试失败后才截图,成功就不截图
这里,使用tearDown方法,并判断用例成功与否,失败则截图,
def tearDown(self):
        if sys.exc_info()[0]:
            nose.allure.attach('screenshot',self.driver.get_screenshot_as_png(), type= AttachmentType.PNG)
4)集成进jenkins生成report
jenkins怎么安装,网管上也有说明,http://wiki.qatools.ru/display/AL/Allure+Jenkins+Plugin,这里不介绍
博主在linux下安装时,发现From Maven Central一项是空是,没有版本可以选择,查看后发现,是安装插件时,在jenkins updates文件夹下没有生成对应的文件,手工添加解决
在$jenkins_home/updates查看是否存在文件ru.yandex.qatools.allure.jenkins.tools.AllureCommandlineInstaller,如果不存在,手工创建,并输入以下内容
{"list":[{"id":"2.2.1","name":"2.2.1","url":"https://dl.bintray.com/qameta/generic/io/qameta/allure/allure/2.2.1/allure-2.2.1.zip"},{"id":"2.2.0","name":"2.2.0","url":"https://dl.bintray.com/qameta/generic/io/qameta/allure/allure/2.2.0/allure-2.2.0.zip"},{"id":"2.1.1","name":"2.1.1","url":"https://dl.bintray.com/qameta/generic/io/qameta/allure/allure/2.1.1/allure-2.1.1.zip"},{"id":"2.1.0","name":"2.1.0","url":"https://dl.bintray.com/qameta/generic/io/qameta/allure/allure/2.1.0/allure-2.1.0.zip"},{"id":"2.0.1","name":"2.0.1","url":"https://dl.bintray.com/qameta/generic/io/qameta/allure/allure/2.0.1/allure-2.0.1.zip"},{"id":"2.0.0","name":"2.0.0","url":"https://dl.bintray.com/qameta/generic/io/qameta/allure/allure/2.0.0/allure-2.0.0.zip"},{"id":"1.5.4","name":"1.5.4","url":"https://oss.sonatype.org/content/repositories/releases/ru/yandex/qatools/allure/allure-commandline/1.5.4/allure-commandline-1.5.4-standalone.zip"},{"id":"1.5.3","name":"1.5.3","url":"https://oss.sonatype.org/content/repositories/releases/ru/yandex/qatools/allure/allure-commandline/1.5.3/allure-commandline-1.5.3-standalone.zip"},{"id":"1.5.2","name":"1.5.2","url":"https://oss.sonatype.org/content/repositories/releases/ru/yandex/qatools/allure/allure-commandline/1.5.2/allure-commandline-1.5.2-standalone.zip"},{"id":"1.5.1","name":"1.5.1","url":"https://oss.sonatype.org/content/repositories/releases/ru/yandex/qatools/allure/allure-commandline/1.5.1/allure-commandline-1.5.1-standalone.zip"},{"id":"1.5.0","name":"1.5.0","url":"https://oss.sonatype.org/content/repositories/releases/ru/yandex/qatools/allure/allure-commandline/1.5.0/allure-commandline-1.5.0-standalone.zip"},{"id":"1.4.23.HOTFIX1","name":"1.4.23.HOTFIX1","url":"https://oss.sonatype.org/content/repositories/releases/ru/yandex/qatools/allure/allure-commandline/1.4.23.HOTFIX1/allure-commandline-1.4.23.HOTFIX1-standalone.zip"},{"id":"1.4.23","name":"1.4.23","url":"https://oss.sonatype.org/content/repositories/releases/ru/yandex/qatools/allure/allure-commandline/1.4.23/allure-commandline-1.4.23-standalone.zip"},{"id":"1.4.22","name":"1.4.22","url":"https://oss.sonatype.org/content/repositories/releases/ru/yandex/qatools/allure/allure-commandline/1.4.22/allure-commandline-1.4.22-standalone.zip"},{"id":"1.4.21","name":"1.4.21","url":"https://oss.sonatype.org/content/repositories/releases/ru/yandex/qatools/allure/allure-commandline/1.4.21/allure-commandline-1.4.21-standalone.zip"},{"id":"1.4.20","name":"1.4.20","url":"https://oss.sonatype.org/content/repositories/releases/ru/yandex/qatools/allure/allure-commandline/1.4.20/allure-commandline-1.4.20-standalone.zip"},{"id":"1.4.19","name":"1.4.19","url":"https://oss.sonatype.org/content/repositories/releases/ru/yandex/qatools/allure/allure-commandline/1.4.19/allure-commandline-1.4.19-standalone.zip"},{"id":"1.4.18","name":"1.4.18","url":"https://oss.sonatype.org/content/repositories/releases/ru/yandex/qatools/allure/allure-commandline/1.4.18/allure-commandline-1.4.18-standalone.zip"},{"id":"1.4.17","name":"1.4.17","url":"https://oss.sonatype.org/content/repositories/releases/ru/yandex/qatools/allure/allure-commandline/1.4.17/allure-commandline-1.4.17.zip"}]}
再次查看,From Maven Central中有版本选择了
构建后说明:
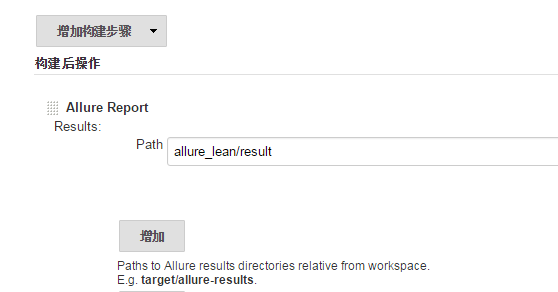
这里的path是之前使用nosetests 生成xml时对应的文件夹,但文件夹又是基于job的工作空间的相对目录,写绝对目录是不行的
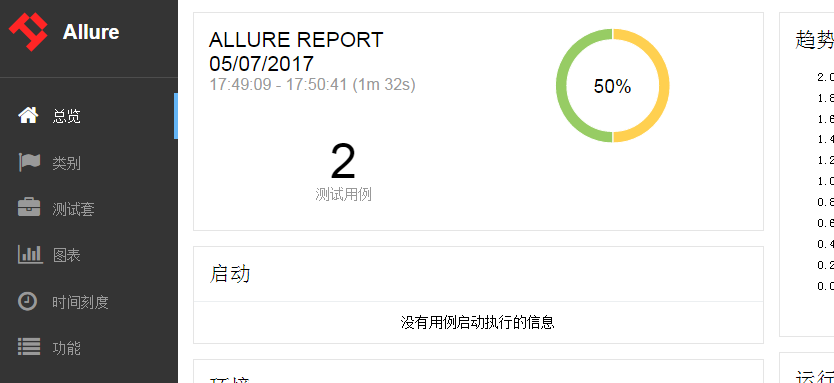
5)查看结果
生成完成后,可以产生这样的效果图:
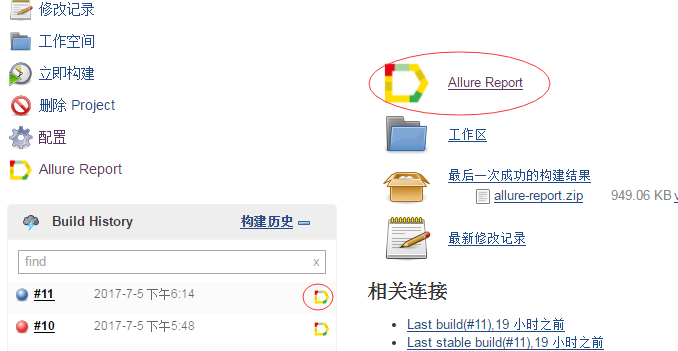
点击查看:
在对应失败的用例下,有截图显示,

更新一下:
有同学在使用时,不想每次用jenkins来生成数据来查看报告,可以自行下载allure commandline工具,用以下方式来生成报告:
allure generate directory-with-results/ -o directory-with-report
生成完成后,点击index.html文件,发现数据未显示出来
原来少最做一步,要开启服务才可以查看,命令如下:
allure report open
如果还觉得麻烦的,还要在运行完测试用例后直接输入以下命令:
allure serve directory-results
其中dirceotry-results是你生成xml的路径
---------------------11.16更新------------------------
在实际使用时,allure在执行时会将report生成的截图和xml删除,有时候分步骤使用时,会是一个麻烦事,
所以在nose使用时,可以使用参数:
--not-clear-logdir
来避免清空文件夹,如下:
nosetests --with-allure --logdir=results --not-clear-logdir
然后在windows下时,运行完几个测试后,还需手工清除截图及xml,这里记录下bat使用:
del /s /Q allure-results
    ----表示:只删除文件而不能删除子文件夹
---------------------2018.1.9更新------------------------
又来更新了,allure在首页界面有个环境信息,本来我觉得用处不大,但是TMD运营又提需求,多环境同时跑时,最后出的报告要看出是什么环境跑的,正好allure正好有该功能,很简单,只要在代码中加入下面一行:
nose.allure.environment(URL='http://192.168.1.1', Username=u'huzhq',project=u'afdffd')
生成的报告就有该信息