CBV加装饰器
第一种 @method_decorator(装饰器) 加在get上
第二种 @method_decorator(login_auth,name='get') 加在类上
第三种 @method_decorator(login_auth) 加在dispatch上 3.7的要return super().dispatch
def login(request):
    if request.method == 'POST':
        username = request.POST.get('username')
        pwd = request.POST.get('pwd')
        if username == 'jason' and pwd == '123':
            request.session['name'] = 'jason'
            return redirect('/home/')
    return render(request,'login.html')


from functools import wraps
def login_auth(func):
    @wraps(func)
    def inner(request,*args,**kwargs):
        if request.session.get('name'):
            return func(request,*args,**kwargs)
        return redirect('/login/')
    return inner
导入装饰器 翻译 decorators 装饰
from django.utils.decorators import method_decorator
被装饰的类
@method_decorator(login_auth,name='get')    #第二种  name参数必须指定
class MyHome(View):
    @method_decorator(login_auth)    #第三种  get和post都会被装饰
    def dispatch(self,request,*args,**kwargs):
        super().dispatch(request,*args,**kwargs)

    @method_decorator(login_auth)  #第一种
    def get(self,request):
        return HttpResponse('get')

    def post(self,request):
        return HttpResponse('post')
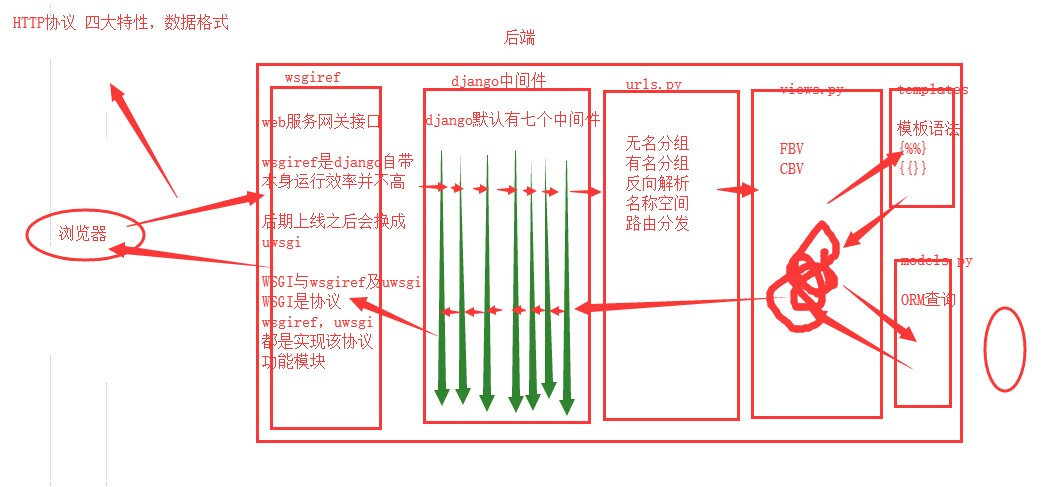
自定义django中间件
什么是中间件?
django请求生命周期完整版,中间件类似于django的门卫,数据在进入和离开时都需要经过中间件
中间件能干嘛?
控制用户访问频率,全局登录校验,用户访问白名单,黑名单,反爬相关等
用来帮你全局相关的功能校验
django默认有7个中间件,但是django暴露给用户可以自定义中间件并且里面可以写五种方法
中间件的使用(5个固定的方法)
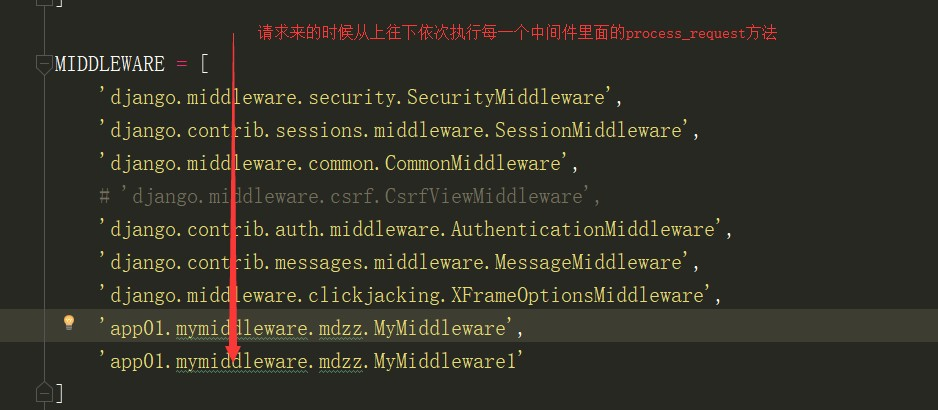
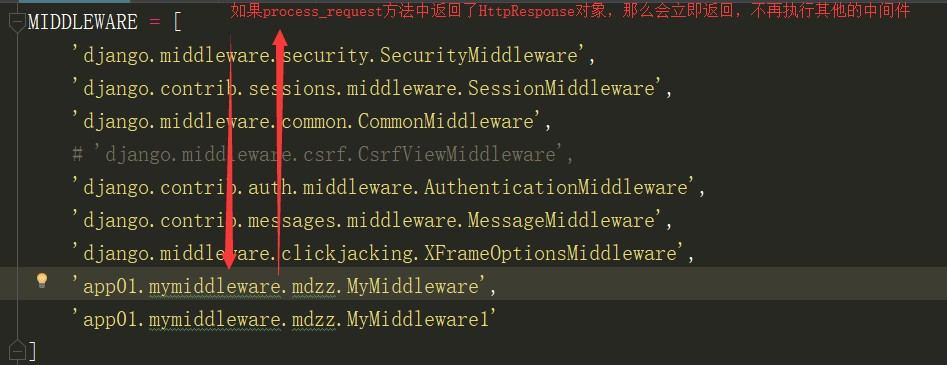
process_request:请求来的时候从上往下依次执行每一个中间件里面的process_request方法(如果没有直接通过)
process_request(self,request)
process_response:响应走的时候会从下往上依次执行每一个中间件里面的process_response方法(如果没有直接通过)
process_response(self,request,response)

return response

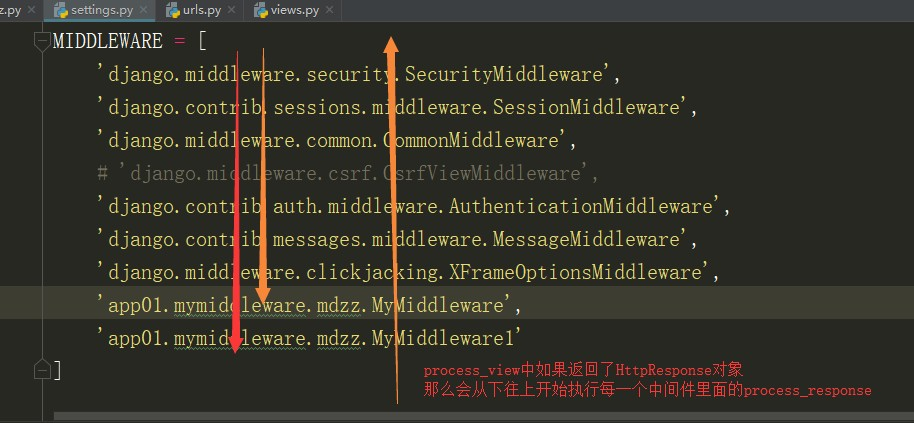
process_view:路由匹配成功执行视图之前自动触发(从上往下依次执行)
process_view(self, request, view_func, view_args, view_kwargs)
process_exception:当视图函数报错了,自动触发(从下往上依次执行)
process_exception(self,request,exception)
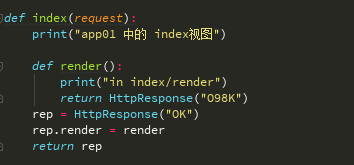
process_template_response:视图函数返回的对象有一个render()方法(或者表名对象是一个TemplateResponse对象或等价方法)(从上往下依次执行)
process_template_response(self,request,response)

return response
完整的流程图
自定义中间件
新建一个任意名字的文件夹,里面新建一个任意名字py文件
from django.utils.deprecation import MiddlewareMixin

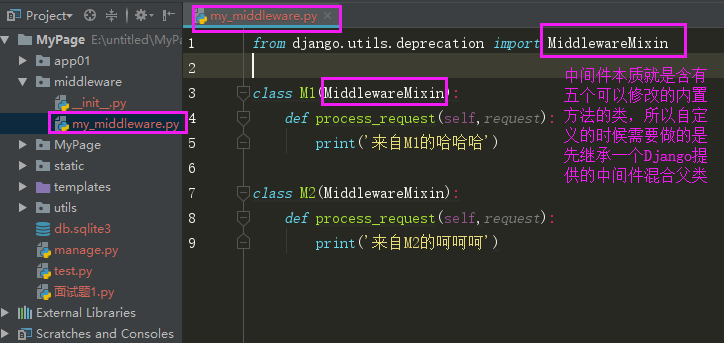
class MyMiddleware(MiddlewareMixi):
    def process_request(self,request):
        print(''我是第一个自定义中间件里面的process_request方法')
        #return HttpResponse('heieheihei')

    def process_response(self,request,response):
        print('我是第一个自定义中间件里面的process_response方法')
        return response    #必须将response形参接收的数据返回,不然直接报错

    def process_view(self,request,view_func,view_args,view_kwargs):
      print('我是第一个自定义中间件里面的process_view方法')
      print(view_func.__name__,view_func)

    def process_exception(self,request,exception):
        print('我是第一个自定义中间件里面的process_exception方法')
        print(exception)

    def process_template_response(self,request,response):
        print('我是第一个自定义中间件里面的process_template_response方法')
        return response
自定义完之后再项目settings.py文件下引用
MIDDLEWARE = [
    'django.middleware.security.SecurityMiddleware',
    'django.contrib.sessions.middleware.SessionMiddleware',
    'django.middleware.common.CommonMiddleware',
    'django.middleware.csrf.CsrfViewMiddleware',
    'django.contrib.auth.middleware.AuthenticationMiddleware',
    'django.contrib.messages.middleware.MessageMiddleware',
    'django.middleware.clickjacking.XFrameOptionsMiddleware',
    # 'app01.mymiddleware.mdzz.MyMiddleware',  #自定义中间件1   应用.文件夹.自定义py文件.自定义中间件类名
    # 'app01.mymiddleware.mdzz.MyMiddleware1'    #自定义中间件2
]
csrf(跨站请求伪造)
由来:钓鱼网站 拿到银行转账的路径,做一个跟银行一模一样的页面,向银行转账接口提交数据,当用户在钓鱼网站输入对方账户名和转账金额之后,点击发送,其实内部是将对方账户换成了钓鱼网站的造假人员的账户。造成你转账转错账户的情况


<!DOCTYPE html>
<html lang="en">
<head>
    <meta charset="UTF-8">
    <title>Title</title>
    <script src="https://cdn.bootcss.com/jquery/3.4.1/jquery.min.js"></script>
    <link rel="stylesheet" href="/static/bootstrap-3.3.7/css/bootstrap.min.css">
    <script src="/static/bootstrap-3.3.7/js/bootstrap.min.js"></script>
</head>
<body>
<h1>正经的网站</h1>
<form action="/index3/" method="post">
{#    {% csrf_token %}#}
    <p>username:<input type="text" name="username"></p>
    <p>money:<input type="text" name="money"></p>
    <p>others:<input type="text" name="others"></p>
    <input type="submit">
</form>
</body>
</html>
钓鱼网站提交连接也是银行的转账接口
<!DOCTYPE html>
<html lang="en">
<head>
    <meta charset="UTF-8">
    <title>Title</title>
    <script src="https://cdn.bootcss.com/jquery/3.4.1/jquery.min.js"></script>
    <link rel="stylesheet" href="/static/bootstrap-3.3.7/css/bootstrap.min.css">
    <script src="/static/bootstrap-3.3.7/js/bootstrap.min.js"></script>
</head>
<body>
<h1>钓鱼网站</h1>
<form action="http://127.0.0.1:8000/transfer/" method="post">
    <p>username:<input type="text" name="username"></p>
    <p>money:<input type="text" name="money"></p>
    <p>others:<input type="text"></p>
    <input type="text" name="others" value="jason" style="display:none">
    <input type="submit">
</form>
</body>
</html>
如何区分钓鱼网站和正经网站?在正经网站返回页面的时候,在form表单中偷偷塞一个特殊的字符串,后端记下该页面对应的字符串的值,等用户发post请求来的时候,我先去校验特殊的字符串是否匹配
如何去写这个特殊的字符串?
模板语法有一个固定的写法 必须写在form表单内
{% csrf_token %}
表单中偷偷塞的特殊的字符串
{% csrf_token %}
<input type='hidden' name='csrfmiddlewaretoke' value='"2vzoo1lmSWgLTdI2rBQ4PTptJQKRQTRwnqeWRGcpdAQGagRp8yKg8RX2PdkF4aqh">

Ps:value是动态生成的,每一次刷新都不一样
ajax中如何设置csrf_token 把k和v放在data里面
<form action="/index3/" method="post">
{#    {% csrf_token %}#}
    <p>username:<input type="text" name="username"></p>
    <p>money:<input type="text" name="money"></p>
    <p>others:<input type="text" name="others"></p>
    <input type="submit">
</form>
<button>ajax</button>
<script>
    $('button').click(function () {
        $.ajax({
            url:'',
            type:'post',
            data:{'name':'jason','csrfmiddlewaretoken':$('[name="csrfmiddlewaretoken"]').val()},
            success:function (data) {
                console.log(data)
            }
        })
    })
</script>
第二种ajax提交 data:{'csrfmiddlewaretoken':'{{ csrf_token}}'}
csrf_token导入
form django.views.decorators.csrf import csrf_exempt,csrf_protect
csrf 装饰FBV
不校验csrf
@csrf_exempt
def index1(request):
    return HttpResponse('ok')
校验csrf
@csrf_protect
def index2(request):
    return HttpResonse('ok')
csrf装饰给CBV
先导入装饰器语法
from django.utils.decorators import method_decorator
校验csrf
@method_decorator(csrf_protect,name='post')  #第三种
class Index3(View):

    @method_decorator(csrf_protect)    #第二种
    def dispatch(self,request,*args,**kwargs):
        super().dispatch(request,*args,**kwargs)

    def get(self,request):
        return HttpResponse('get')

    @method_decortaor(csrf_protect)    #第一种
    def post(self,request):
        return HttpResponse('post')
不校验csrf (只有两种 每种都是全都不校验)
@method_decorator(csrf_exempt,name='dispatch')    #第二种
class Index3(View):

    @method_decorator(csrf_exempt)    #第一种
    def dispatch(slef,request,*args,**kwargs):
        super().dispatch(request,*args,**kwargs)

    def get(self,request):
        return HttpResponse('get')

    def post(self,request):
        return HttpResponse('post')
csrf装饰CBV需要注意
csrf_protect 跟正常的CBV装饰器一样 三种
csrf_exempt 只能有下面两种方式
@method_decorator(csrf_exempt,name='dispatch') #一种
class Index3(View):
#@method_decorator(csrf_exempt) #二种
def dispatch(self,request,*args,**kwargs):
super().dispatch(request,*args,**kwargs)
其实都是给dispatch加
Auth认证模块
执行数据库迁移的那两命令式,即使我们没有建表,django也会创建好多张表 auth_user表存放的用户相关的数据
auth_user表记录的添加
创建超级用户(不可手动插入,因为密码是加密的)
可以使用命令行createsuperuser 会让你输入用户名和密码 但是都是明文输入
简单使用auth认证 auth.authenticate(校验条件)
from django.contrib import auth
def login(request):
    if request.method == 'POST':
        name = request.POST.get('name')
        pwd = request.POST.get('pwd')
        #models.User.objects.filter(username=username,password=pwd)
        user_obj = auth.authenticate(request,username=username,password=pwd)
        #authenticate 验证
        if user_obj:
            #设置用户状态
            #request.session['name'] = 'jason'
            auth.login(request,user_obj)  #一旦记录了 ,可以在任意的地方通过request.user获取到当前登录对象
            return HttpResponse('ok')
    return render(request,'auth_login.html')
只要登录成功执行了auth.login(request,user_obj)
之后在其他任意的视图函数中都通过request.user获取当前登录用户对象
如果没有执行auth.login
request.user打印出来的是匿名用户
如何判断request.user用户是否通过auth.login登录呢?
request.user.is_authenticated()
为何auth.login之后,其他视图函数中就可以通过request.user拿到当前登录对象呢?
其实就是把用户信息放到django_session表
注销 auth.logout(request)
def auth_logout(request):
    auth.logout(request)    #等价于request.session.flush()
    return HttpResponse('ok')
需要找到这张表
from django.contrib.auth.models import User
注册 User.objects.create_user 普通用户 User.objectes.create_superuser 超级用户
def auth_register(request):
    if request.method = 'POST':
        username = request.POST.get('username')
        password = request.POST.get('password')
        user_obj = auth.authenticate(request,username=username)
        #校验用户
        if user_obj:
            return HttpResponse('当前用户已存在')

        #User.objectes.create(username=username,password=password)    不能再用create创建
        #User.objects.create_user(username=username,password=password)    #创建普通用户
        User.objects.create_superuser(username=username,password=password,email='123@163.com')    #创建超级用户
    return render(request,'auth_register.html')
更改密码 request.user.check_password('密码') 校验密码 request.user.set_password('新密码') 设置新的密码 request.user.save() 保存
def auth_password(request):
    print(request.user.password)    #密文
    is_res = request.user.check_password('jason123')    #校验密码是否一致
    if is_res:
        request.user.set_password('666')    #设置新密码
        request.user.save()    #修改密码必须save保存 不然无效
    return HttpResponse('ok')
装饰器校验是否登录及跳转
auth装饰器
from django.contrib.auth.decorators import login_required
被装饰函数
@login_required(login_url='/login/',redirect_field_name = 'old')
#没登录会跳转login页面,并且后面会拼接上你上一次想访问的页面路径/login/?next=/你想访问的路径/    可以通过参数修改next键名
def auth_home(request):
    return HttpResponse('home必须登录才能访问')
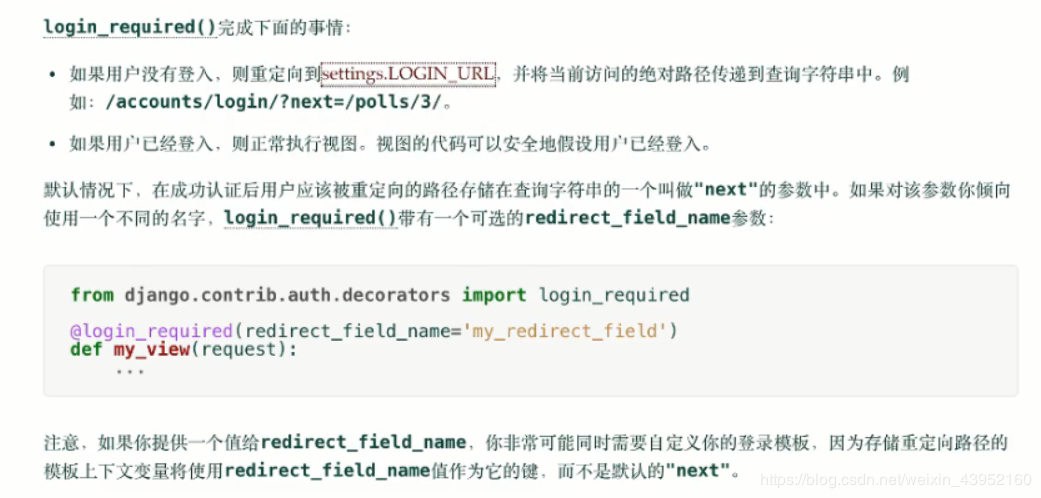
如果我所有视图函数都需要装饰并跳转到login页面,那么我要写好多份 为了一劳永逸
#可以在项目配置文件中指定auth校验登录不合法统一跳转到某一个路径
LOGIN_URL = '/login/'    #全局配置
def login(request):
    if request.method == 'POST':
        username = request.POST.get('username')
        password = request.POST.get('password')
        if username == 'jason' and password =='123':
            #相当于比对完之后 之前都是重定向 或者Httoresonse ok
            path = request.GET.get('next')

            print(path)

            if path:
                obj = redirect(path)
            else:
                obj = redirect('/home/')
            obj.set_cookie('name','jason',expires=5)
            return obj
    return render(request,'login.html')


from functools import wraps
def login_auth(func):
    @wraps(func)
    def inner(request,*args,**kwargs):

        path = request.get_full_path()

        if request.COOKIES.get('name'):
            return func(request,*args,**kwargs)
        return redirect('/login/?next=%s'%path)
    return inner

@login_auth
def home(request):
    return HttpResponse('我是home页面,只有登录了才能看到')
自定义模型表引用auth功能
如何扩张auth_user表?
一对一关联(不推荐)
from django.contrib.auth.model import User

class UserDetail(models.Model):
    phone = models.CharField(max_length=11)
    user = models.OnoToOneField(to=User)  #User表在之前创建了 所以可以直接写to=User
面向对象的继承
导入语法
from django.contrilb.auth.models import User,AbstractUser
class UserInfo(AbstractUser):
    phone = models.CharField(max_length=32)
    avatar = models.CharField(max_length=32)
告诉django不在使用默认的auth_user,而使用我们自己定义的表
语法:AUTH_USER_MODEL= ‘app名.models里面对相应的模型表名’
在项目settings.py文件中配置
AUTH_USER_MODEL= 'app01.UserInfo'
自定义认证系统默认使用的数据表之后,我们我们就可以像使用默认的auth_user表那样使用我们的UserInfo表了
库里面也没有auth_user表了,原来auth表的操作方法,现在全部用自定义的表均可实现