上一篇:前后端分离初体验一:前端环境搭建
参考:https://www.bilibili.com/video/BV137411B7vB
B站UP:楠哥教你学Java
框架:vue + springboot
项目已上传至GitHub:
前端:https://github.com/ownzyuan/vuetest_01
后端:https://github.com/ownzyuan/springboot_vue_test_01/tree/master
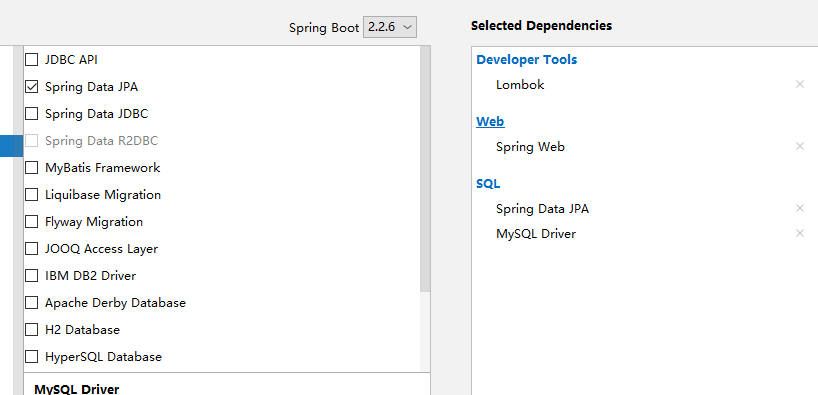
创建SpringBoot项目
为方便测试,使用了 jpa 和 lombok
配置application.yml
spring:
   datasource:
     #注意使用时区
     url: jdbc:mysql://localhost:3306/test?serverTimezone=UTC&useUnicode=true&characterEncoding=UTF-8
     username: root
     password: 123456
     driver-class-name: com.mysql.cj.jdbc.Driver
   jpa:
     #打印Sql到控制台
     show-sql: true
     properties:
       hibernate:
         #format_sql:格式化打印出来的sql,不会一行全显示
         format_sql: true
 server:
   port: 8181
导入数据库+实体类

Book
package com.zy.entity; import lombok.Data; import javax.persistence.Entity; import javax.persistence.Id; @Entity @Data public class Book { //指定id为主键 @Id private Integer id; private String name; private String author; }
测试操作数据库
repository / BookRepository
继承 JpaRepository, 其中泛型 < Book, Integer>,Book是实体类,Integer是主键类型
package com.zy.repository; import com.zy.entity.Book; import org.springframework.data.jpa.repository.JpaRepository; public interface BookRepository extends JpaRepository<Book,Integer> { }
测试
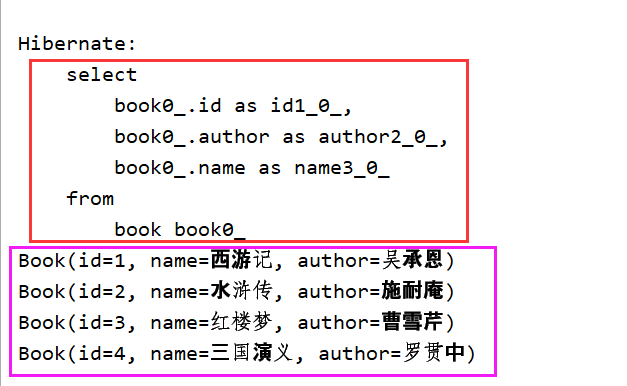
package com.zy.repository; import com.zy.entity.Book; import org.junit.jupiter.api.Test; import org.springframework.beans.factory.annotation.Autowired; import org.springframework.boot.test.context.SpringBootTest; import java.util.List; import static org.junit.jupiter.api.Assertions.*; @SpringBootTest class BookRepositoryTest { @Autowired private BookRepository bookRepository; @Test void testBook(){ List<Book> bookList = bookRepository.findAll(); bookList.forEach(System.out::println); } }
输出到页面上
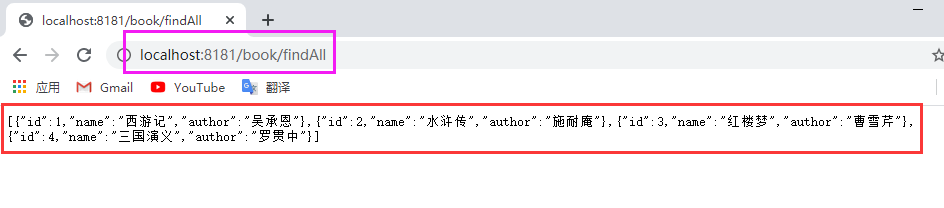
package com.zy.controller; import com.zy.entity.Book; import com.zy.repository.BookRepository; import org.springframework.beans.factory.annotation.Autowired; import org.springframework.stereotype.Controller; import org.springframework.web.bind.annotation.GetMapping; import org.springframework.web.bind.annotation.RequestMapping; import org.springframework.web.bind.annotation.ResponseBody; import java.util.List; @ResponseBody @Controller @RequestMapping("/book") public class BookHandler { @Autowired private BookRepository bookRepository; @GetMapping("/findAll") public List<Book> findAll(){ List<Book> bookList = bookRepository.findAll(); return bookList; } }
交互
1.前端:axios
基于promise用于浏览器和node.js的http客户端
特点
-
自动转换JSON数据
-
支持浏览器和node.js
-
支持promise
-
能拦截请求和响应
-
能转换请求和响应数据
-
能取消请求
-
浏览器端支持防止CSRF(跨站请求伪造)
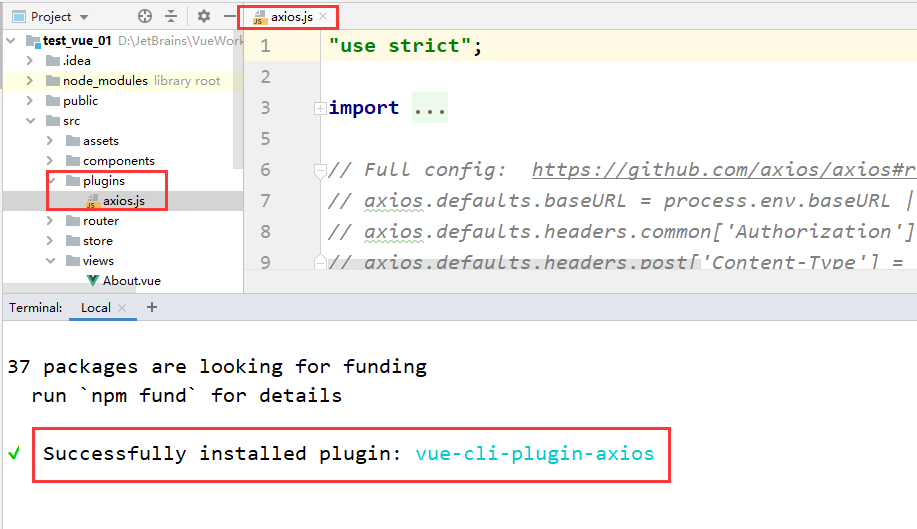
安装 axios
Terminal 中输入 vue add axios
安装完成
2.后端:配置WebMvcConfig
package com.zy.config; import org.springframework.context.annotation.Configuration; import org.springframework.web.servlet.config.annotation.CorsRegistry; import org.springframework.web.servlet.config.annotation.WebMvcConfigurer; @Configuration public class CrosConfig implements WebMvcConfigurer { @Override public void addCorsMappings(CorsRegistry registry) { registry.addMapping("/**") .allowedOrigins("*") .allowedMethods("GET","HEAD","POST","DELETE","OPTIONS") .allowCredentials(true) .maxAge(3600) .allowedHeaders("*"); } }
addCorsMappings 会与之后的拦截器发生冲突,但用于测试暂时使用
3.前端:配置Book.vue
created
初始化操作,每当页面被加载,就会使用里面的方法
get( Url )
请求类型,括号中写对应url
then()
回调,括号中可以写方法
<template> <div> <table> <tr> <td>编号</td> <td>书名</td> <td>作者</td> </tr> <!--books:被遍历的数组 ,item:每次遍历的对象--> <tr v-for="item in books"> <td>{{item.id}}</td> <td>{{item.name}}</td> <td>{{item.author}}</td> </tr> </table> </div> </template> <script> export default { name: "Book", data() { return { msg: 'Hello', books: [] } }, //初始化操作,每当页面被加载,就会使用里面的方法 created(){ //get(Url):请求类型,括号中写对应url then():回调,括号中可以写方法 axios.get('http://localhost:8181/book/findAll').then(function (resp) { console.log(resp) }) } } </script> <style scoped> </style>
4.同时启动测试
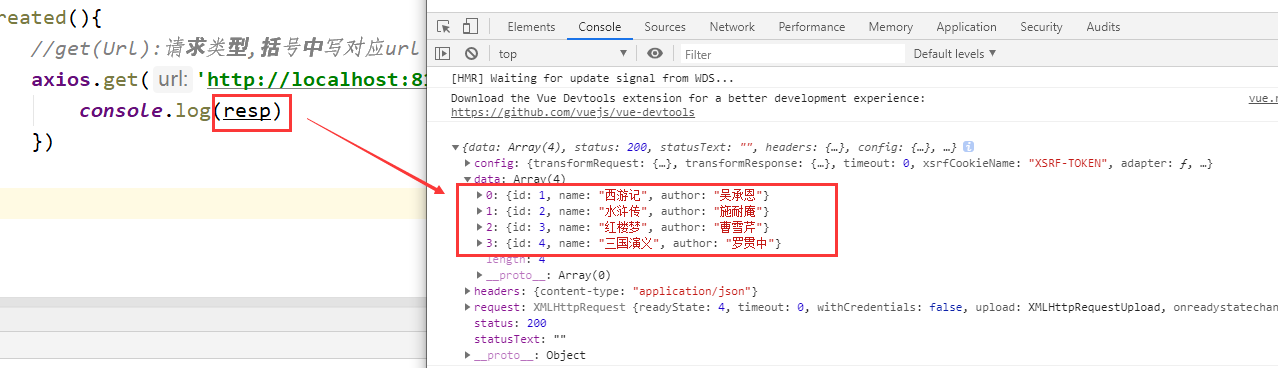
resp中已经能获得后端给的数据了
说明交互已经成功,就差输出到页面上
5.数据输出到前端页面上
改进Book.vue
created() {
     axios.get('http://localhost:8181/book/findAll/').then(function (resp) {
         this.books = resp.data;
     })
 }
测试:books未定义
因为这个this是在回调中的this,所以无法指向上面的books

自定义this
created(){
     const _this = this;
     axios.get('http://localhost:8181/book/findAll').then(function (resp) {
         _this.books = resp.data;
     })
 }

成功输出到页面上