Specifically we’ll have a look at how we can replace the SharePoint Welcome control with a custom control that meets the following requirements:
- Displays username and password fields in anonymous mode.
- Allow us to login securely (via HTTPS) from a unsecured page (e.g. the homepage).
- Display logged in username and ‘my account’ type navigation links in logged in mode.
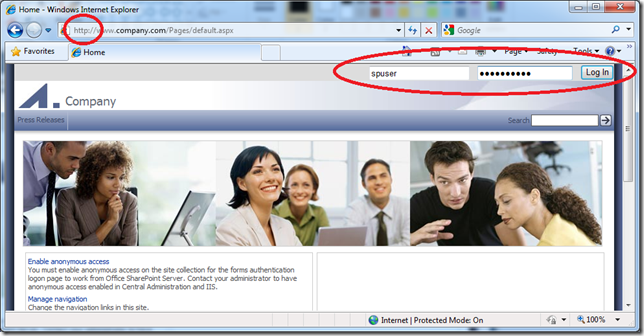
The screen shot below shows what this will look like to anonymous users (note login form top right):
Step 1 – Create a custom login control
The first step to enable this scenario is to create a custom user control that shows us a login form to anonymous users, and a welcome message to authenticated users. We can do this really easily adding ASP.NET login controls to our master page as shown below:
<asp:LoginView ID="LoginView1" runat="server">
<AnonymousTemplate>
<asp:Login ID="Login1" runat="server">
</asp:Login>
</AnonymousTemplate>
<LoggedInTemplate>
Welcome <asp:LoginName ID="LoginName1" runat="server" /> |
<a href="/my-account/">My Account</a> |
<asp:LoginStatus ID="LoginStatus1" runat="server" />
</LoggedInTemplate>
</asp:LoginView>
The result for anonymous users using the default login template is shown below:
Step 2 – Customise the login control layout
We can then customise the layout by creating our own LayoutTemplate for the login control. A simple example is shown below:
<asp:Login ID="Login1" runat="server">
<LayoutTemplate>
<asp:TextBox ID="UserName" Text="username"
runat="server"></asp:TextBox>
<asp:RequiredFieldValidator ID="UserNameRequired" runat="server"
ControlToValidate="UserName" ErrorMessage="User Name is required."
ToolTip="User Name is required."
ValidationGroup="ctl00$ctl00$Login1">*</asp:RequiredFieldValidator>
<asp:TextBox ID="Password" Text="password" TextMode="Password"
runat="server"></asp:TextBox>
<asp:RequiredFieldValidator ID="PasswordRequired" runat="server"
ControlToValidate="Password" ErrorMessage="Password is required."
ToolTip="Password is required."
ValidationGroup="ctl00$ctl00$Login1">*</asp:RequiredFieldValidator>
<asp:Literal ID="FailureText" runat="server"
EnableViewState="False"></asp:Literal>
<asp:Button ID="LoginButton" runat="server" CommandName="Login" Text="Log
In" ValidationGroup="ctl00$ctl00$Login1" />
</LayoutTemplate>
</asp:Login>
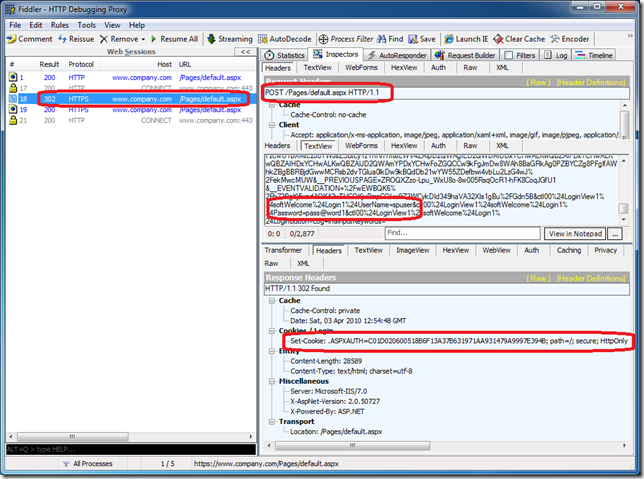
At this point if we try and log on the browser is going to post the username and password back to the server using HTTP (i.e. back to the page we originally requested). We can verify this using a HTTP monitoring tool such as Fiddler as shown below:
This shows us that the request is over HTTP and is a POST request so is sending data. We can see theusername and password and since this is not over SSL it is sent in clear text. We also see that theauthentication cookie is sent back also over HTTP (i.e. the Set-Cookie statement).
Step 3 – Configure the login control to send data securely
If we don’t want to place the homepage under HTTPS we need to configure the sending (i.e. the HTTP POST) to use SSL. The easiest way to do this is in ASP.NET is to set the PostBackUrl of the Login form to be an absolute URL to the secure version of the current page.
To do this in the code behind file for our login control we can add the following:
protected void Page_Load(object sender, EventArgs e)
{
// ensure we send credentials over a secure connection
if(!HttpContext.Current.Request.IsSecureConnection)
{
string postbackUrl = HttpContext.Current.Request.Url.AbsoluteUri.Replace("http", "https");
Button loginBtn = (Button)Login1.FindControl("LoginButton");
loginBtn.PostBackUrl = postbackUrl;
}
}
This code checks whether we are already on an HTTPS page and if so no action is required. If we are not on an SSL page the code finds the LoginButton and sets the PostBackUrl property to the HTTPS version of the current page.
Step 4 – Update redirect rules
Additionally we need to allow our SSL redirection module to allow POST requests over HTTPS to all pages on the site. If you followed the example in the previous post to configure this using the IIS Url Rewrite module you will need to edit the HTTPS to HTTP rule by adding the following condition:
- Condition input: {REQUEST_METHOD}
- Check if input string: Matches the pattern
- Pattern: GET
This updates the rule that redirects HTTPS requests to HTTP so that it only applies to GET requests (i.e. POST requests will be allowed via HTTPS). Now when we click the ‘Log In’ button shown below from an HTTP page our details are sent via SSL.
Step 5 – Verify the login credentials are sent via HTTPS
We can verify this by using a tool such as Fiddler to inspect the individual requests.
The above diagram shows:
- The HTTP GET request to the homepage (request number 1 top left)
- The HTTPS POST request to the homepage (top left and right highlights)
- Inside the HTTPS POST we can see our username and password. As this is part of an HTTPS request we know this information is encrypted.
- The HTTPS response from the server (bottom right)
- Inside the HTTPS response we see the Set-Cookie statement. Again as this is an HTTPS request we know this cookie is secure.
Another way to verify that the authentication was completed over a secure channel is to set the ‘requireSSL’ attribute of the ‘forms’ element in the web.config to true as shown below:
<authentication mode="Forms">
<forms loginUrl="https://www.company.com/pages/login.aspx" requireSSL="true" />
</authentication>
This specifies that the authentication cookie should only be sent via SSL. If we had tried to login from an unsecured (HTTP) page, this would have given us the following error as it would have been trying to create the authentication cookie over an unsecure channel:
“The application is configured to issue secure cookies. These cookies require the browser to issue the request over SSL (https protocol). However, the current request is not over SSL.”
Since we have configured the authentication request to be over SSL, however, this will not occur and we can be sure our login credentials are secured. There are some other implications of requiring the authentication cookie to only be transferred via SSL we will cover in the following posts.


