本文参考
本篇文章是对《Netty In Action》一书第五章"ByteBuf"的学习摘记,主要内容为JDK 的ByteBuffer替代品ByteBuf的优越性
你可能注意到我跳过了第四章"传输",因为第四章主要是对各种传输类型的简单介绍和如何选择的说明,在之后的几个章节中,我们还会再碰到,如用于单元测试的Embedded传输
ByteBuf工作方式
ByteBuf provides two pointer variables to support sequential read and write operations readerIndex for a read operation and writerIndex for a write operation respectively. The following diagram shows how a buffer is segmented into three areas by the two pointers:
+----------------------------------------+---------------------------------------+------------------------------------+
| discardable bytes | readable bytes | writable bytes |
| | (CONTENT) | |
+----------------------------------------+---------------------------------------+------------------------------------+
| | | |
0 <= readerIndex <= writerIndex <= capacity
JDK 的ByteBuffer只有一个索引,必须调用flip()方法在读模式和写模式之间进行切换,而ByteBuf 维护了两个不同的索引:一个用于读取,一个用于写入,两个索引将缓冲区划分成 3 部分。从 ByteBuf 读取时, readerIndex 将会被递增已经被读取的字节数。同样地,写入 ByteBuf 时, writerIndex 也会被递增
如果打算读取字节直到 readerIndex 达到和 writerIndex 同样的值时会发生什么?在那时,我们将会到达"可以读取的"数据的末尾。ByteBuf和数组有诸多相似之处,就如同试图读取超出数组末尾的数据一样,试图读取超出该点的数据将会触发一个 IndexOutOfBoundsException
Just like an ordinary primitive byte array, ByteBuf uses zero-based indexing. It means the index of the first byte is always 0 and the index of the last byte is always capacity - 1.
For example, to iterate all bytes of a buffer, you can do the following, regardless of its internal implementation:
for (int i = 0; i < buffer.capacity(); i ++) {
byte b = buffer.getByte(i);
System.out.println((char) b);
}
上面的示例代码实现了随机访问索引,注意名称以 read 或者 write 开头的 ByteBuf 方法,将会推进其对应的索引,而名称以 set 或者 get 开头的操作则不会
可以指定 ByteBuf 的最大容量。试图移动写索引(即 writerIndex)超过这个值将会触发一个异常(默认的限制是 Integer.MAX_VALUE)
ByteBuf使用模式
堆缓冲区 / 支撑数组
最常用的 ByteBuf 模式是将数据存储在 JVM 的堆空间中。这种模式被称为支撑数组 (backing array),它能在没有使用池化的情况下提供快速的分配和释放
当 hasArray()方法返回 false 时,尝试访问支撑数组将触发一个 Unsupported OperationException
public static void heapBuffer() {
ByteBuf heapBuf = BYTE_BUF_FROM_SOMEWHERE; //get reference form somewhere
//检查 ByteBuf 是否有一个支撑数组
if (heapBuf.hasArray()) {
//如果有,则获取对该数组的引用
byte[] array = heapBuf.array();
//计算第一个字节的偏移量
int offset = heapBuf.arrayOffset() + heapBuf.readerIndex();
//获得可读字节数
int length = heapBuf.readableBytes();
//使用数组、偏移量和长度作为参数调用你的方法
handleArray(array, offset, length);
}
}
直接缓冲区
直接缓冲区的内容将驻留在常规的会被垃圾回收的堆之外。如果数据包含在一个在堆上分配的缓冲区中,那么在通过套接字发送它之前,JVM将会在内部把缓冲区复制到一个直接缓冲区中
直接缓冲区的主要缺点是,相对于基于堆的缓冲区,它们的分配和释放都较为昂贵,并且因为数据不是在堆上,所以不得不进行一次复制
public static void directBuffer() {
ByteBuf directBuf = BYTE_BUF_FROM_SOMEWHERE; //get reference form somewhere
//检查 ByteBuf 是否由数组支撑。如果不是,则这是一个直接缓冲区
if (!directBuf.hasArray()) {
//获取可读字节数
int length = directBuf.readableBytes();
//分配一个新的数组来保存具有该长度的字节数据
byte[] array = new byte[length];
//将字节复制到该数组
directBuf.getBytes(directBuf.readerIndex(), array);
//使用数组、偏移量和长度作为参数调用你的方法
handleArray(array, 0, length);
}
}
复合缓冲区
复合缓冲区为多个ByteBuf提供一个聚合视图,可以根据需要添加或者删除ByteBuf 实例,ByteBuf子类——CompositeByteBuf实现了这个模式,提供了一个将多个缓冲区表示为单个合并缓冲区的虚拟表示
注意,CompositeByteBuf中的ByteBuf实例可能同时包含直接内存分配和非直接内存分配。 如果其中只有一个实例,那么对 CompositeByteBuf 上的 hasArray()方法的调用将返回该组件上的hasArray()方法的值;否则返回false
It is recommended to create a new buffer using the helper methods in Unpooled rather than calling an individual implementation's constructor.
public static void byteBufComposite() {
CompositeByteBuf messageBuf = Unpooled.compositeBuffer();
ByteBuf headerBuf = BYTE_BUF_FROM_SOMEWHERE; // can be backing or direct
ByteBuf bodyBuf = BYTE_BUF_FROM_SOMEWHERE; // can be backing or direct
//将 ByteBuf 实例追加到 CompositeByteBuf
messageBuf.addComponents(headerBuf, bodyBuf);
//...
//删除位于索引位置为 0(第一个组件)的 ByteBuf
messageBuf.removeComponent(0); // remove the header
//循环遍历所有的 ByteBuf 实例;
for (ByteBuf buf : messageBuf) {
System.out.println(buf.toString());
}
}
访问复合缓冲区的方式和访问直接缓冲区的方式相同
public static void byteBufCompositeArray() {
CompositeByteBuf compBuf = Unpooled.compositeBuffer();
//获得可读字节数
int length = compBuf.readableBytes();
//分配一个具有可读字节数长度的新数组
byte[] array = new byte[length];
//将字节读到该数组中
compBuf.getBytes(compBuf.readerIndex(), array);
//使用偏移量和长度作为参数使用该数组
handleArray(array, 0, array.length);
}
Discardable Bytes可丢弃字节
上图标记为可丢弃字节的分段包含了已经被读过的字节。通过调用 discardReadBytes()方法,可以丢弃它们并回收空间。这个分段的初始大小为 0,存储在readerIndex中, 会随着read操作的执行而增加(get操作不会移动readerIndex)
下图展示了缓冲区上调用discardReadBytes()方法后的结果。可以看到,可丢弃字节分段中的空间已经变为可写的了。注意,在调用discardReadBytes()之后,对可写分段的内容并没有任何的保证,因为只是移动了可以读取的字节以及writerIndex,而没有对所有可写入的字节进行擦除写
BEFORE discardReadBytes()
+----------------------------+----------------------+----------------------+
| discardable bytes | readable bytes | writable bytes |
+----------------------------+----------------------+----------------------+
| | | |0 <= readerIndex <= writerIndex <= capacity
AFTER discardReadBytes()
+-------------------------------------+------------------------------------------------+
| readable bytes | writable bytes (got more space) |
+-------------------------------------+------------------------------------------------+
| | |readerIndex (0) <= writerIndex (decreased) <= capacity
Please note that there is no guarantee about the content of writable bytes after calling discardReadBytes(). The writable bytes will not be moved in most cases and could even be filled with completely different data depending on the underlying buffer implementation.
注意不要频繁地调用 discardReadBytes()方法使得可写分段最大化,这极有可能会导致内存复制,因为可读字节(图中标记为 CONTENT 的部分)必须被移动到缓冲区的开始位置。我们建议只在有真正需要的时候才这样做,例如,当内存非常宝贵的时候
Readable Bytes可读字节
This segment is where the actual data is stored. Any operation whose name starts with read or skip will get or skip the data at the current readerIndex and increase it by the number of read bytes. If the argument of the read operation is also a ByteBuf and no destination index is specified, the specified buffer's writerIndex is increased together.
If there's not enough content left, IndexOutOfBoundsException is raised. The default value of newly allocated, wrapped or copied buffer's readerIndex is 0.
// Iterates the readable bytes of a buffer.
ByteBuf buffer = ...;
while (buffer.isReadable()) {
System.out.println(buffer.readByte());
}
isReadable() -> 如果至少有一个字节可供读取,则返回true
readableBytes() -> 返回可被读取的字节数
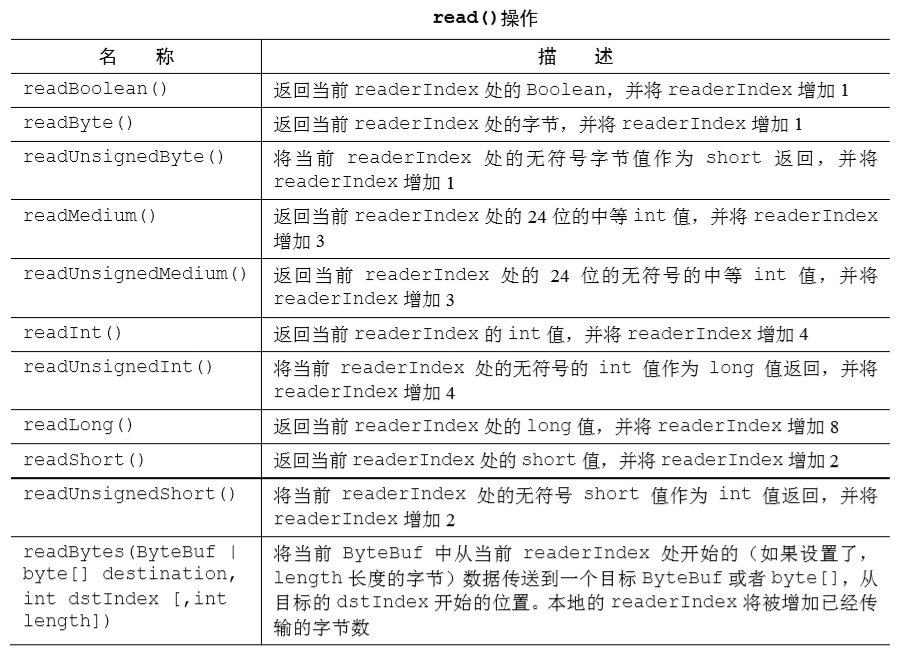
ByteBuf 的可读字节分段存储了实际数据。任何名称以 read 或者 skip 开头的操作都将检索或者跳过位于当前 readerIndex的数据,并且将它增加已读字节数。如果被调用的方法需要一个ByteBuf参数作为写入的目标,并且没有指定目标索引参数, 那么该目标缓冲区的writerIndex也将被增加,例如: readBytes(ByteBuf dest);
如果尝试在缓冲区的可读字节数已经耗尽时从中读取数据,那么将会引发一个 IndexOutOfBoundsException。新分配的、包装的或者复制的缓冲区的默认的 readerIndex 值为 0
在前面第二章的学习摘记中,我们使用了ByteBuf的toString()方法,该方法根据指定的字符集名称,将所有可读字节解码为字符串,但是不会修改readerIndex和writerIndex
@Override
public void channelRead(ChannelHandlerContext ctx, Object msg) {
ByteBuf in = (ByteBuf) msg;
//将消息记录到控制台
System.out.println("Server received: " + in.toString(CharsetUtil.UTF_8));
//将接收到的消息写给发送者,而不冲刷出站消息
ctx.write(in);
}
Writable Bytes可写字节
This segment is a undefined space which needs to be filled. Any operation whose name starts with write will write the data at the current writerIndex and increase it by the number of written bytes. If the argument of the write operation is also a ByteBuf, and no source index is specified, the specified buffer's readerIndex is increased together.
If there's not enough writable bytes left, IndexOutOfBoundsException is raised. The default value of newly allocated buffer's writerIndex is 0. The default value of wrapped or copied buffer's writerIndex is the capacity of the buffer.
// Fills the writable bytes of a buffer with random integers.
ByteBuf buffer = ...;
while (buffer.maxWritableBytes() >= 4) {
buffer.writeInt(random.nextInt());
}
isWritable() -> 如果至少有一个字节可被写入,则返回true
writableBytes() -> 返回可被写入的字节数
可写字节分段是指一个拥有未定义内容的、写入就绪的内存区域。任何名称以 write 开头的操作都将从当前的 writerIndex 处 开始写数据,并将它增加已经写入的字节数。如果写操作的目标也是 ByteBuf,并且没有指定 源索引的值,则源缓冲区的readerIndex也同样会被增加相同的大小,例如:writeBytes(ByteBuf dest);
如果尝试往目标写入超过目标容量的数据,将会引发一个IndexOutOfBoundException。新分配的缓冲区的 writerIndex 的默认值为 0。包装的或者复制的缓冲区的默认的 writerIndex 值为 缓冲区容量大小
索引管理
调用markReaderIndex()、markWriterIndex()、resetWriterIndex() 和resetReaderIndex()可以标记和重置 ByteBuf 的 readerIndex 和 writerIndex
调用readerIndex(int)或者writerIndex(int)可以将索引移动到指定位置。若索引设置到一个无效的位置,将导致一个IndexOutOfBoundsException
调用 clear()方法可以将 readerIndex 和 writerIndex 都设置为 0,但并不会清除内存中的内容,所以调用 clear()比调用 discardReadBytes()轻量得多,因为它将只是重置索引而不会复制任何的内存
查找操作
调用ByteBuf的indexOf()方法,或借助ByteProcessor,这个接口只定义了一个方法boolean process(byte value)
ByteProcessor针对一些常见的值定义了许多便利的方法,使用起来十分方便
ByteBuf buffer = BYTE_BUF_FROM_SOMEWHERE; //get reference form somewhere
int index = buffer.forEachByte(ByteProcessor.FIND_CR);
FIND_NUL -> Aborts on a NUL (0x00)
FIND_NON_NUL -> Aborts on a non-NUL (0x00)
FIND_CR -> Aborts on a CR (' ')
FIND_NON_CR -> Aborts on a non-CR (' ')
FIND_LF -> Aborts on a LF (' ')
FIND_NON_LF -> Aborts on a non-LF (' ')
FIND_SEMI_COLON -> Aborts on a semicolon (';')
FIND_COMMA -> Aborts on a comma (',')
FIND_ASCII_SPACE -> Aborts on a ascii space character (' ')
FIND_CRLF -> Aborts on a CR (' ') or a LF (' ')
FIND_NON_CRLF -> Aborts on a byte which is neither a CR (' ') nor a LF (' ')
FIND_LINEAR_WHITESPACE -> Aborts on a linear whitespace (a (' ' or a ' ')
FIND_NON_LINEAR_WHITESPACE -> Aborts on a byte which is not a linear whitespace (neither ' ' nor ' ')
Derived Buffers派生缓冲区
派生缓冲区为ByteBuf提供了以专门的方式来呈现其内容的视图。这类视图是通过以下方法被创建的
duplicate() -> Returns a buffer which shares the whole region of this buffer.
slice()-> Returns a slice of this buffer's readable bytes.
slice(int, int) -> Returns a slice of this buffer's sub-region.
readSlice(int length) -> Returns a new slice of this buffer's sub-region starting at the current readerIndex and increases the readerIndex by the size of the new slice (= length)
Note that the duplicate(), slice(), slice(int, int) and readSlice(int) does NOT call retain() on the returned derived buffer, and thus its reference count will NOT be increased. If you need to create a derived buffer with increased reference count, consider using retainedDuplicate(), retainedSlice(), retainedSlice(int, int) and readRetainedSlice(int) which may return a buffer implementation that produces less garbage
另外,注意上面四个方法生成的派生缓冲区和原缓冲区的数据是共享的,即修改其中一方的数据会影响另一方,但是他们的readIndex和writeIndex是独立的
如果需要一个现有缓冲区的真实副本,使用copy()或者copy(int, int)方法,由这个调用所返回的ByteBuf拥有独立的数据副本
@Test
public void byteBufCopy() {
Charset utf8 = Charset.forName("UTF-8");
//创建 ByteBuf 以保存所提供的字符串的字节
ByteBuf buf = Unpooled.copiedBuffer("Netty in Action rocks!", utf8);
//创建该 ByteBuf 从索引 0 开始到索引 15 结束的分段的副本
ByteBuf copy = buf.copy(0, 15);
//将打印"Netty in Action"
System.out.println(copy.toString(utf8));
//更新索引 0 处的字节
buf.setByte(0, (byte)'J');
//将会成功,因为数据不是共享的
assert buf.getByte(0) != copy.getByte(0);
}
下面是对于slice()方法的测试
@Test
public void byteBufSlice() {
Charset utf8 = Charset.forName("UTF-8");
//创建一个用于保存给定字符串的字节的 ByteBuf
ByteBuf buf = Unpooled.copiedBuffer("Netty in Action rocks!", utf8);
//创建该 ByteBuf 从索引 0 开始到索引 15 结束的一个新切片
ByteBuf sliced = buf.slice(0, 15);
//将打印"Netty in Action"
System.out.println(sliced.toString(utf8));
//更新索引 0 处的字节
buf.setByte(0, (byte)'J');
//将会成功,因为数据是共享的,对其中一个所做的更改对另外一个也是可见的
assert buf.getByte(0) == sliced.getByte(0);
}
读/写操作
get()和set()操作,从给定的索引开始,并且保持索引不变,在上面派生缓冲区的代码示例中已经用到了setByte()方法将索引位置0处的字符更改为 'J'
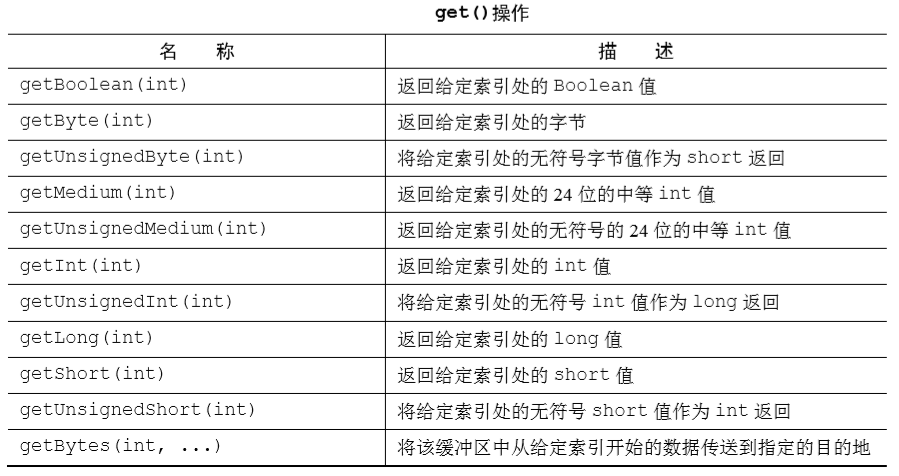
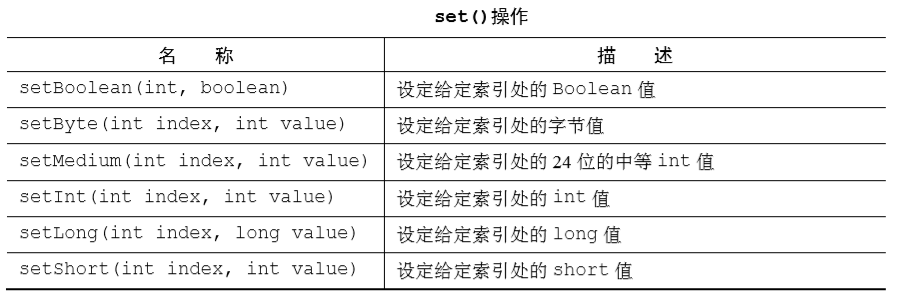
read()和 write()操作,从给定的索引开始,并且会根据已经访问过的字节数对索引进行调整

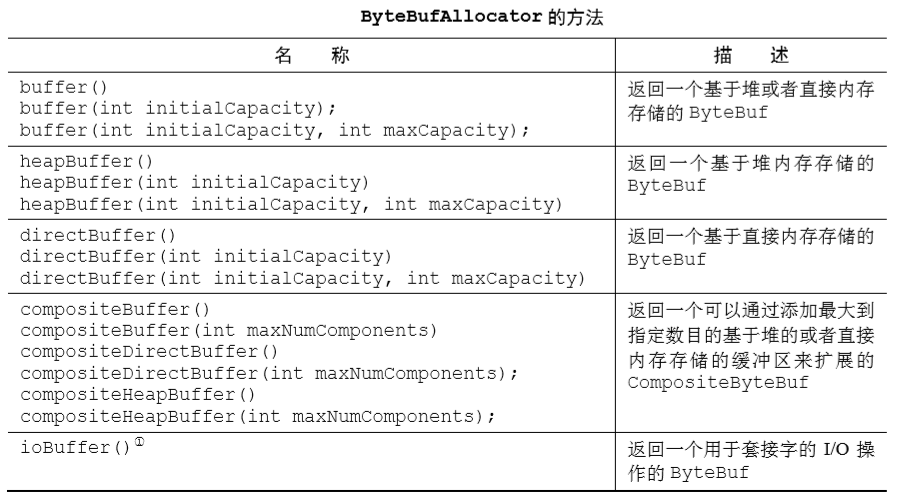
ByteBufAllocator 接口
Netty 通过 interface ByteBufAllocator 实现了ByteBuf的池化
可以通过 Channel的alloc()方法(每个都可以有一个不同的 ByteBufAllocator 实例)或者通过ChannelHandler的ChannelHandlerContext的alloc()方法获取一个到ByteBufAllocator的引用,注意ByteBufAllocator有 PooledByteBufAllocator(默认)和UnpooledByteBufAllocator两种实现。前者池化了ByteBuf的实例以提高性能并最大限度地减少内存碎片,而后者会在每次被调用时返回一个新的实例
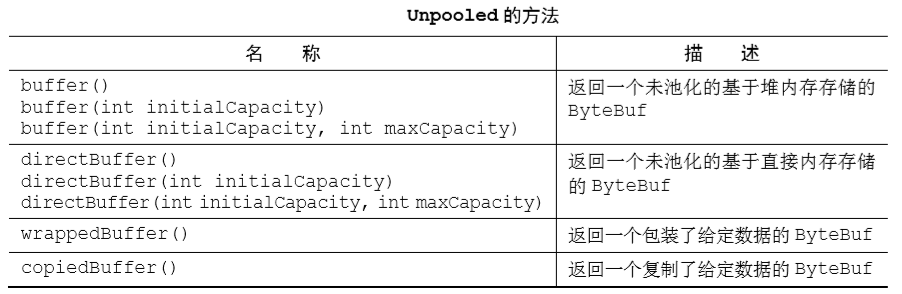
Unpooled 缓冲区
可能某些情况下,你未能获取一个到ByteBufAllocator的引用。对于这种情况,Netty提供了一个简单的称为 Unpooled 的工具类,它提供了静态的辅助方法来创建未池化的 ByteBuf 实例
ByteBufUtil 类
ByteBufUtil提供了用于操作ByteBuf的静态的辅助方法
这些静态方法中最有价值的可能就是 hexdump()方法,它以十六进制的表示形式打印 ByteBuf的内容,另一个有用的方法是 boolean equals(ByteBuf, ByteBuf),它被用来判断两个 ByteBuf 实例的相等性
引用计数
在上面的派生缓冲区中我们已经了解到了reference count引用计数,它是一种通过在某个对象所持有的资源不再被其他对象引用时释放该对象所持有的资源来优化内存使用和性能的技术,类似于linux中ln命令创建硬链接
引用计数主要涉及跟踪到某个特定对象的活动引用的数量。一个ReferenceCounted实现的实例将通常以活动的引用计数为 1 作为开始(refCnt()方法获取计数值)。只要引用计数大于 0,就能保证对象不会被释放。当活动引用的数量减少到 0 时,该实例就会被释放(由release()方法释放一个引用,一般来说,由最后访问引用计数对象的那一方来负责将它释放)
在前面文章SimpleChannelInboundHandler和ChannelInboundHandler的对比中,我们看到了channelRead()方法的源码,最后的finally语句块中,如果msg实现了ReferenceCounted接口,则ReferenceCountUtil.release(msg);会将msg的引用计数值减1来释放msg对象