因为JMeter 2.13你可以得到实时搜索结果发送到后端通过 后端侦听器 使用潜在的任何后端(JDBC、JMS网络服务,Š) 通过提供一个实现类 AbstractBackendListenerClient 。
JMeter附带GraphiteBackendListenerClient它允许您发送指标石墨后端。
这个特性提供了:
- 生活的结果
- 漂亮的图表为指标
- 比较2个或更多的负载测试的能力
- 监控数据存储在同一后端只要JMeter结果
- 一个Š
在本文档中,我们将配置设置图和historize 2中的数据不同的后端:
- InfluxDB
- 石墨
指标暴露
线程/虚拟用户指标
线程指标如下:
- < rootMetricsPrefix > test.minAT
- 分钟活动线程
- < rootMetricsPrefix > test.maxAT
- 马克斯活动线程
- < rootMetricsPrefix > test.meanAT
- 活动线程的意思
- < rootMetricsPrefix > test.startedT
- 启动线程
- < rootMetricsPrefix > test.endedT
- 完成线程
响应时间指标
响应相关指标如下:
- < rootMetricsPrefix > < samplerName > .ok.count
- 许多成功的响应采样器的名字
- < rootMetricsPrefix > < samplerName > .h.count
- 服务器每秒钟,这个指标堆积样本结果和子结果(如果使用事务控制器,应该无节制的“生成父取样器”)
- < rootMetricsPrefix > < samplerName > .ok.min
- 最小响应时间成功响应采样器的名字
- < rootMetricsPrefix > < samplerName > .ok.max
- 最大响应时间成功响应采样器的名字
- < rootMetricsPrefix > < samplerName > .ok.pct < percentileValue >
- 百分比计算成功响应采样器的名字。 将有一个为每个计算值指标。
- < rootMetricsPrefix > < samplerName > .ko.count
- 失败的反应数量取样器的名字
- < rootMetricsPrefix > < samplerName > .ko.min
- 最小响应时间没有响应的采样器的名字
- < rootMetricsPrefix > < samplerName > .ko.max
- 最大响应时间没有响应的采样器的名字
- < rootMetricsPrefix > < samplerName > .ko.pct < percentileValue >
- 百分比计算失败的响应的采样器的名字。 将有一个为每个计算值指标。
- < rootMetricsPrefix > < samplerName > .a.count
- 取样器的反应数量名称(好吧。 计数和ko.count)
- < rootMetricsPrefix > < samplerName > .a.min
- 最小响应时间响应采样器的名字(最低的好。 计数和ko.count)
- < rootMetricsPrefix > < samplerName > .a.max
- 最大响应时间取样器名称(Max的反应好。 计数和ko.count)
- < rootMetricsPrefix > < samplerName > .a.pct < percentileValue >
- 百分比计算响应的采样器的名字。 将有一个为每个计算值指标。 (好和失败样本计算总数)
默认的 百分位数 设置在 后端侦听器 是“90;95;95”, 即3百分位数90%、95%和99%。
的 石墨命名层次结构 使用点(“。”)单独的元素。 这可能与十进制百分位值混淆。 JMeter转换任何这样的价值观,用下划线代替点(“。”)(“-”)。 例如,“ 99.9 “变成了” 99年_9 ”
默认JMeter发送采样指标累计samplerName” 所有 ”。 如果后端侦听器 samplersList 配置,然后JMeter也发送指标吗 除非匹配样本的名字 summaryOnly = true
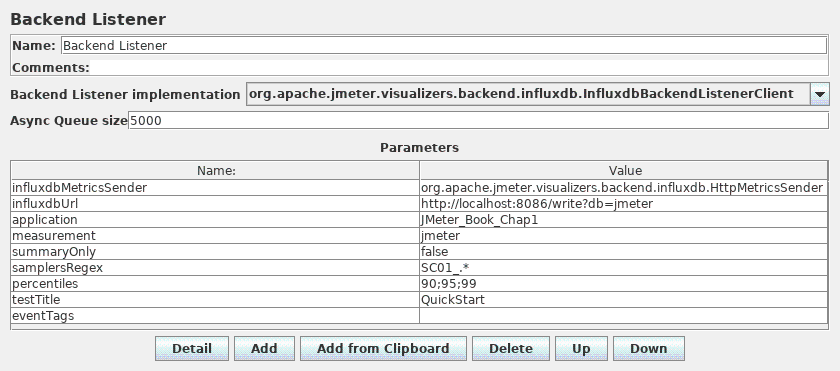
JMeter配置
JMeter指标发送给后端添加一个 BackendListener 使用GraphiteBackendListenerClient。
 石墨的配置
石墨的配置InfluxDB
InfluxDB是一个开源的、分布式的、允许时间序列数据库 很容易存储度量。 安装和配置很简单,读了更多的细节 InfluxDB文档 。
InfluxDB数据可以很容易地在浏览器中查看 Influga 或 Grafana 。 在这种情况下,我们将使用Grafana。
InfluxDB石墨侦听器配置
使石墨InfluxDB侦听器,编辑文件 / opt / influxdb /共享/ config.toml 或 /usr/local/etc/influxdb.conf , 找到“ input_plugins.graphite ”并设置:
# Configure the graphite api
[input_plugins.graphite]
enabled = true
address = "0.0.0.0" # If not set, is actually set to bind-address.
port = 2003
database = "jmeter"  # store graphite data in this database
# udp_enabled = true # enable udp interface on the same port as the tcp interface
为以后的版本InfluxDb(例如0.12),替换 (input_plugins.graphite) 与 [[石墨]]
InfluxDB数据库配置
连接到InfluxDB管理控制台并创建两个数据库:
- grafana:grafana用来存储我们将创建的仪表板
- jmeter:InfluxDB用来存储数据发送到石墨侦听器为每个数据库=“jmeter”配置 元素 influxdb.conf 或config.toml
Grafana配置
安装grafana只是把问题背后的解压包一个Apache HTTP服务器。
读 文档 为更多的细节。 开放 config.js 文件并找到 数据源 这样的元素,和编辑:
datasources: {
  influxdb: {
    type: 'influxdb',
    url: "http://localhost:8086/db/jmeter",
    username: 'root',
    password: 'root',
  },
  grafana: {
    type: 'influxdb',
    url: "http://localhost:8086/db/grafana",
    username: 'root',
    password: 'root',
    grafanaDB: true
  },
},
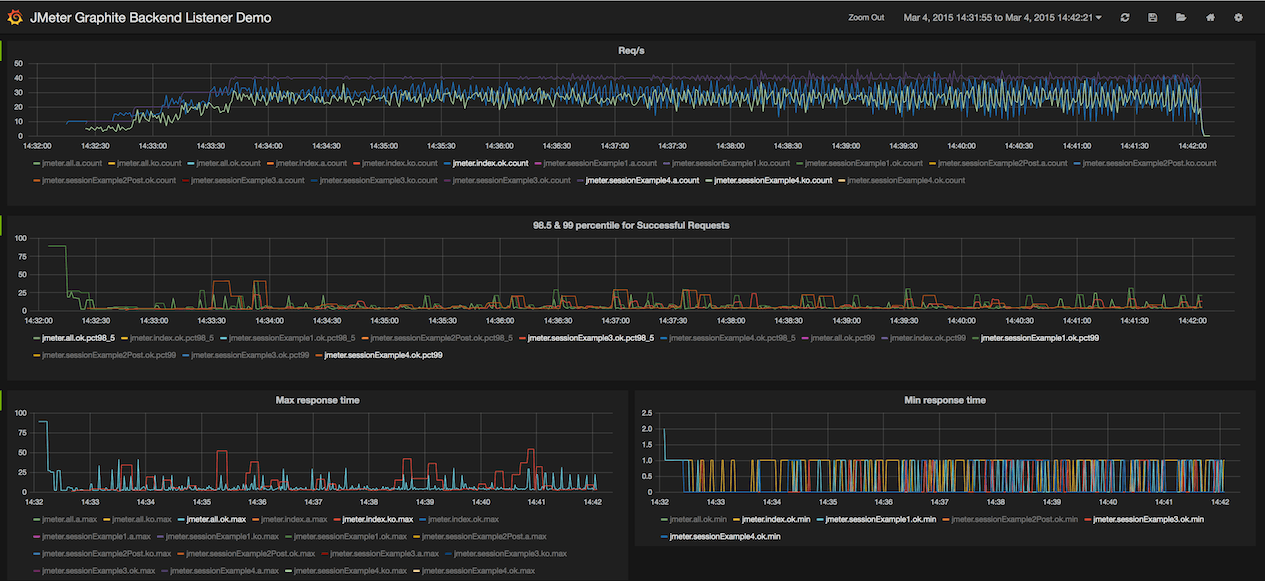 Grafana仪表板