安装nginx
nginx是一个开源的,支持高性能,高并发的www服务和代理服务软件。它是一个俄罗斯人lgor sysoev开发的,作者将源代码开源出来供全球使用。
nginx比apache性能改进许多,nginx占用的系统资源更少,支持更高的并发连接,有更高的访问效率。
nginx不但是一个优秀的web服务软件,还可以作为反向代理,负载均衡,以及缓存服务使用。
安装更为简单,方便,灵活。
1.支持高并发,能支持几万并发连接

2.资源消耗少,在3万并发连接下开启10个nginx线程消耗的内存不到200M

3.可以做http反向代理和负载均衡

4.支持异步网络i/o事件模型epoll
1.安装依赖包
#安装nginx需要的依赖库
yum install -y gcc patch libffi-devel python-devel zlib-devel bzip2-devel openssl openssl-devel ncurses-devel sqlite-devel readline-devel tk-devel gdbm-devel db4-devel libpcap-devel xz-devel


一. gcc 安装
安装 nginx 需要先将官网下载的源码进行编译,编译依赖 gcc 环境,如果没有 gcc 环境,则需要安装:
yum install gcc-c++

二. PCRE pcre-devel 安装
PCRE(Perl Compatible Regular Expressions) 是一个Perl库,包括 perl 兼容的正则表达式库。nginx 的 http 模块使用 pcre 来解析正则表达式,所以需要在 linux 上安装 pcre 库,pcre-devel 是使用 pcre 开发的一个二次开发库。nginx也需要此库。命令:
yum install -y pcre pcre-devel

三. zlib 安装
zlib 库提供了很多种压缩和解压缩的方式, nginx 使用 zlib 对 http 包的内容进行 gzip ,所以需要在 Centos 上安装 zlib 库。
yum install -y zlib zlib-devel

四. OpenSSL 安装
OpenSSL 是一个强大的安全套接字层密码库,囊括主要的密码算法、常用的密钥和证书封装管理功能及 SSL 协议,并提供丰富的应用程序供测试或其它目的使用。
nginx 不仅支持 http 协议,还支持 https(即在ssl协议上传输http),所以需要在 Centos 安装 OpenSSL 库。
yum install -y openssl openssl-devel
2. 编译安装nginx
1.下载源码包
wget -c https://nginx.org/download/nginx-1.12.0.tar.gz
2.解压缩源码
tar -zxvf nginx-1.12.0.tar.gz
3.配置,编译安装  开启nginx状态监测功能
cd nginx-1.12.0
./configure --prefix=/opt/nginx1-12/  # 指定安装目录
make && make install
4.启动nginx,进入sbin目录,找到nginx启动命令
cd /opt/nginx-1-12/  #  cd 到nginx指定的安装目录
cd sbin
./nginx #启动
./nginx -s stop #关闭
./nginx -s reload # 平滑重启 ,修改了nginx.conf之后,可以不重启服务,加载新的配置
nginx的configure参数
下面是nginx源码程序的configure参数:

--prefix= 指向安装目录。
--sbin-path= 指定执行程序文件存放位置。
--modules-path= 指定第三方模块的存放路径。
--conf-path= 指定配置文件存放位置。
--error-log-path= 指定错误日志存放位置。
--pid-path= 指定pid文件存放位置。
--lock-path= 指定lock文件存放位置。
--user= 指定程序运行时的非特权用户。
--group= 指定程序运行时的非特权用户组。
--builddir= 指向编译目录。
--with-rtsig_module 启用rtsig模块支持。
--with-select_module 启用select模块支持,一种轮询处理方式,不推荐在高并发环境中使用,禁用:--without-select_module。
--with-poll_module 启用poll模块支持,功能与select相同,不推荐在高并发环境中使用。
--with-threads启用thread pool支持。
--with-file-aio 启用file aio支持。
--with-http_ssl_module 启用https支持。
--with-http_v2_module 启用ngx_http_v2_module支持。
--with-ipv6 启用ipv6支持。
--with-http_realip_module 允许从请求报文头中更改客户端的ip地址,默认为关。
--with-http_addition_module 启用ngix_http_additon_mdoule支持(作为一个输出过滤器,分部分响应请求)。
--with -http_xslt_module 启用ngx_http_xslt_module支持,过滤转换XML请求 。
--with-http_image_filter_mdoule 启用ngx_http_image_filter_module支持,传输JPEGGIFPNG图片的一个过滤器,默认不启用,需要安装gd库。
--with-http_geoip_module 启用ngx_http_geoip_module支持,用于创建基于MaxMind GeoIP二进制文件相配的客户端IP地址的ngx_http_geoip_module变量。
--with-http_sub_module 启用ngx_http_sub_module支持,允许用一些其他文本替换nginx响应中的一些文本。
--with-http_dav_module 启用ngx_http_dav_module支持,增加PUT、DELETE、MKCOL创建集合,COPY和MOVE方法,默认为关闭,需要编译开启。
--with-http_flv_module 启用ngx_http_flv_module支持,提供寻求内存使用基于时间的偏移量文件。
--with-http_mp4_module 启用ngx_http_mp4_module支持,启用对mp4类视频文件的支持。
--with-http_gzip_static_module 启用ngx_http_gzip_static_module支持,支持在线实时压缩输出数据流。
--with-http_random_index_module 启用ngx_http_random_index_module支持,从目录中随机挑选一个目录索引。
--with-http_secure_link_module 启用ngx_http_secure_link_module支持,计算和检查要求所需的安全链接网址。
--with-http_degradation_module 启用ngx_http_degradation_module 支持允许在内存不足的情况下返回204或444代码。
--with-http_stub_status_module 启用ngx_http_stub_status_module 支持查看nginx的状态页。
--without-http_charset_module 禁用ngx_http_charset_module这一模块,可以进行字符集间的转换,从其它字符转换成UTF-8或者从UTF8转换成其它字符。它只能从服务器到客户端方向,只有一个字节的字符可以转换。
--without-http_gzip_module 禁用ngx_http_gzip_module支持,同--with-http_gzip_static_module功能一样。
--without-http_ssi_module 禁用ngx_http_ssi_module支持,提供了一个在输入端处理服务器包含文件(SSI)的过滤器。
--without-http_userid_module 禁用ngx_http_userid_module支持,该模块用来确定客户端后续请求的cookies。
--without-http_access_module 禁用ngx_http_access_module支持,提供了基于主机ip地址的访问控制功能。
--without-http_auth_basic_module 禁用ngx_http_auth_basic_module支持,可以使用用户名和密码认证的方式来对站点或部分内容进行认证。
--without-http_autoindex_module 禁用ngx_http_authindex_module,该模块用于在ngx_http_index_module模块没有找到索引文件时发出请求,用于自动生成目录列表。
--without-http_geo_module 禁用ngx_http_geo_module支持,这个模块用于创建依赖于客户端ip的变量。
--without-http_map_module 禁用ngx_http_map_module支持,使用任意的键、值 对设置配置变量。
--without-http_split_clients_module 禁用ngx_http_split_clients_module支持,该模块用于基于用户ip地址、报头、cookies划分用户。
--without-http_referer_module 禁用ngx_http_referer_modlue支持,该模块用来过滤请求,报头中Referer值不正确的请求。
--without-http_rewrite_module 禁用ngx_http_rewrite_module支持。该模块允许使用正则表达式改变URI,并且根据变量来转向以及选择配置。如果在server级别设置该选项,那么将在location之前生效,但如果location中还有更进一步的重写规则,location部分的规则依然会被执行。如果这个URI重写是因为location部分的规则造成的,那么location部分会再次被执行作为新的URI,这个循环会被执行10次,最后返回一个500错误。
--without-http_proxy_module 禁用ngx_http_proxy_module支持,http代理功能。
--without-http_fastcgi_module 禁用ngx_http_fastcgi_module支持,该模块允许nginx与fastcgi进程交互,并通过传递参数来控制fastcgi进程工作。
--without-http_uwsgi_module 禁用ngx_http_uwsgi_module支持,该模块用来使用uwsgi协议,uwsgi服务器相关。
--without-http_scgi_module 禁用ngx_http_scgi_module支持,类似于fastcgi,也是应用程序与http服务的接口标准。
--without-http_memcached_module 禁用ngx_http_memcached支持,用来提供简单的缓存,提高系统效率。
--without-http_limit_conn_module 禁用ngx_http_limit_conn_module支持,该模块可以根据条件进行会话的并发连接数进行限制。
--without-http_limit_req_module 禁用ngx_limit_req_module支持,该模块可以实现对于一个地址进行请求数量的限制。
--without-http_empty_gif_module 禁用ngx_http_empty_gif_module支持,该模块在内存中常驻了一个1*1的透明gif图像,可以被非常快速的调用。
--without-http_browser_module 禁用ngx_http_browser_mdoule支持,创建依赖于请求报头的值 。如果浏览器为modern,则$modern_browser等于modern_browser_value的值;如果浏览器为old,则$ancient_browser等于$ancient_browser_value指令分配的值;如果浏览器为MSIE,则$msie等于1。
--without-http_upstream_ip_hash_module 禁用ngx_http_upstream_ip_hash_module支持,该模块用于简单的负载均衡。
--with-http_perl_module 启用ngx_http_perl_module支持,它使nginx可以直接使用perl或通过ssi调用perl。
--with-perl_modules_path= 设定perl模块路径
--with-perl= 设定perl库文件路径
--http-log-path= 设定access log路径
--http-client-body-temp-path= 设定http客户端请求临时文件路径
--http-proxy-temp-path= 设定http代理临时文件路径
--http-fastcgi-temp-path= 设定http fastcgi临时文件路径
--http-uwsgi-temp-path= 设定http scgi临时文件路径
--http-scgi-temp-path= 设定http scgi临时文件路径
--without-http 禁用http server功能
--without-http-cache 禁用http cache功能
--with-mail 启用POP3、IMAP4、SMTP代理模块
--with-mail_ssl_module 启用ngx_mail_ssl_module支持
--without-mail_pop3_module 禁用pop3协议。
--without-mail_iamp_module 禁用iamp协议。
--without-mail_smtp_module 禁用smtp协议。
--with-google_perftools_module 启用ngx_google_perftools_mdoule支持,调试用,可以用来分析程序性能瓶颈。
--with-cpp_test_module 启用ngx_cpp_test_module支持。
--add-module= 指定外部模块路径,启用对外部模块的支持。
--with-cc= 指向C编译器路径。
--with-cpp= 指向C预处理路径。
--with-cc-opt= 设置C编译器参数,指定--with-cc-opt="-I /usr/lcal/include",如果使用select()函数,还需要同时指定文件描述符数量--with-cc-opt="-D FD_SETSIZE=2048"。 (PCRE库)
--with-ld-opt= 设置连接文件参数,需要指定--with-ld-opt="-L /usr/local/lib"。(PCRE库)
--with-cpu-opt= 指定编译的CPU类型,如pentium,pentiumpro,...amd64,ppc64...
--without-pcre 禁用pcre库。
--with-pcre 启用pcre库。
--with-pcre= 指向pcre库文件目录。
--with-pcre-opt= 在编译时为pcre库设置附加参数 。
--with-md5= 指向md5库文件目录。
--with-md5-opt= 编译时为md5库设置附加参数。
--with-md5-asm 使用md5汇编源。
--with-sha1= 指向sha1库文件目录。
--with-sha1-opt= 编译时为sha1库设置附加参数。
--with-sha1-asm 使用sha1汇编源。
--with-zlib= 指向zlib库文件目录。
--with-zlib-opt= 在编译时为zlib设置附加参数。
--with-zlib-asm= 为指定的CPU使用汇编源进行优化。
--with-libatomic 为原子内存的更新操作的实现提供一个架构。
--with-libatomic= 指向libatomic_ops的安装目录。
--with-openssl= 指向openssl安装目录。
--with-openssl-opt= 在编译时为openssl设置附加参数。
--with-debug 启用debug日志。
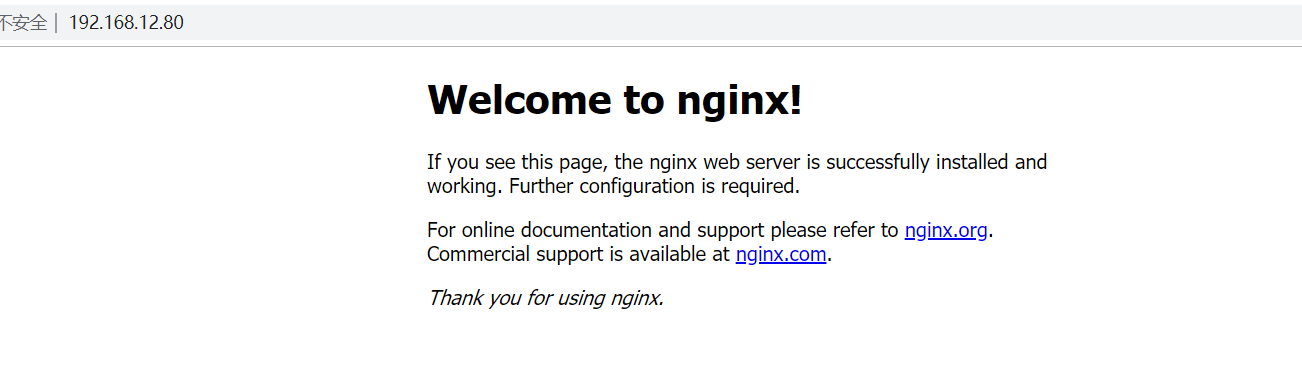
安装成功后,在浏览器中访问服务器ip 地址
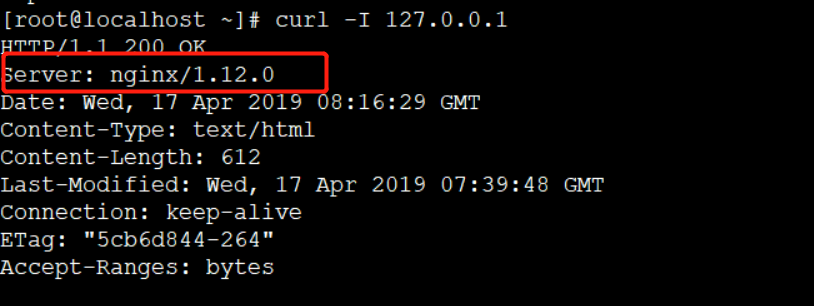
安装完成后检测服务
netstat -tunlp |grep 80
curl -I 127.0.0.1
#如果访问不了,检查selinux,iptables, 防火墙

如果要删除nginx:
yum remove nignx
更多细节参照:https://www.cnblogs.com/tiger666/articles/10312572.html
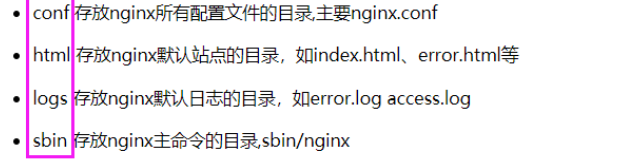
nginx的目录结构

nginx配置文件详解:
# /opt/nginx-1-12
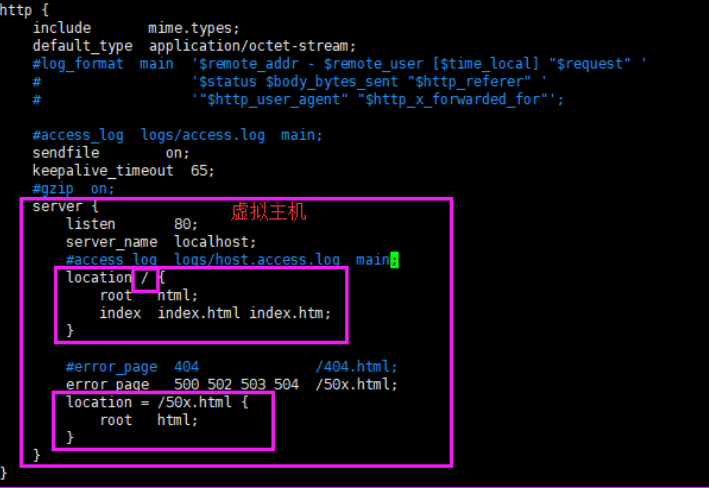
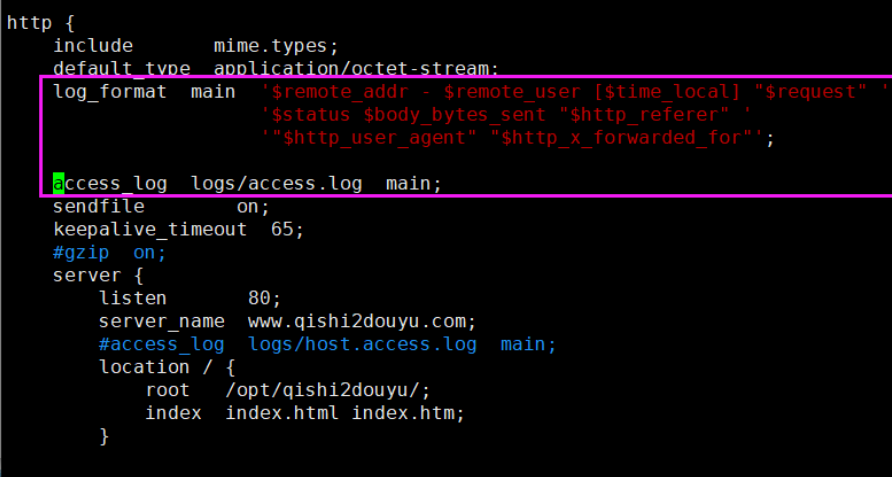
#定义nginx工作进程数 worker_processes 5; #错误日志 #error_log logs/error.log; #http定义代码主区域 http { include mime.types; default_type application/octet-stream; #定义nginx的访问日志功能 #nginx会有一个accses.log功能,查看用户访问的记录 log_format main '$remote_addr - $remote_user [$time_local] "$request" ' '$status $body_bytes_sent "$http_referer" ' '"$http_user_agent" "$http_x_forwarded_for"'; #开启日志功能 access_log logs/access.log main; sendfile on; keepalive_timeout 65; #开启gzip压缩传输 gzip on; #虚拟主机1 定义一个 斗鱼网站 server { #定义nginx的访问入口端口,访问地址是 192.168.11.37:80 listen 80; #定义网站的域名www.woshidouyu.tv #如果没有域名,就填写服务器的ip地址 192.168.11.37 server_name www.woshidouyu.tv; #nginx的url域名匹配 #只要请求来自于www.woshidouyu.tv/111111111 #只要请求来自于www.woshidouyu.tv/qweqwewqe #最低级的匹配,只要来自于www.woshidouyu.tv这个域名,都会走到这个location location / { #这个root参数,也是关键字,定义网页的根目录 #以nginx安装的目录为相对路径 /opt/nginx112/html #可以自由修改这个root定义的网页根目录 root html; #index参数定义网站的首页文件名,默认的文件名 index index.html index.htm; } #错误页面的优化(只要是遇到前面4系列的错误,就会直接跳转到相对目录下的40x.html页面) error_page 400 401 402 403 404 /40x.html; } }
用nginx跑一个斗鱼网站
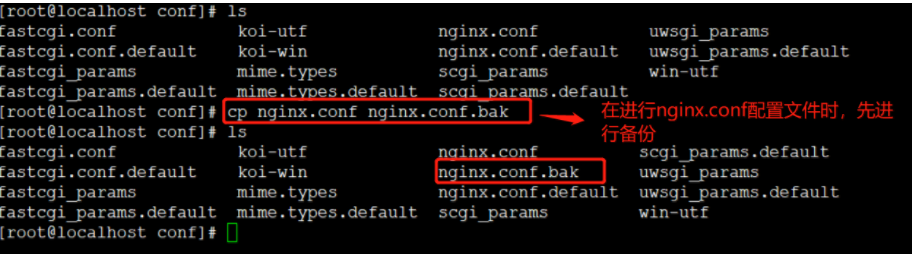
1. 进行 /opt/nginx-1-12/conf/nginx.conf 配置文件的备份。
2. 修改配置文件nginx.conf
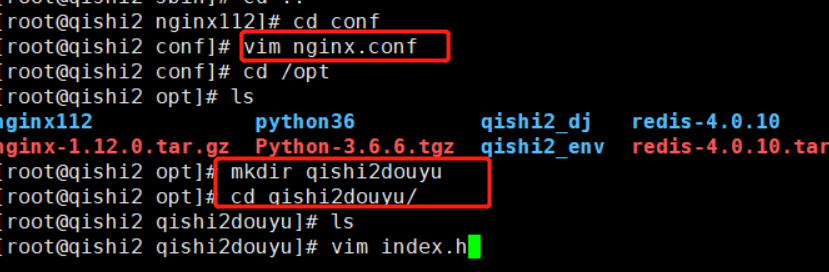
vim /opt/nginx-1-12/conf/nginx.conf
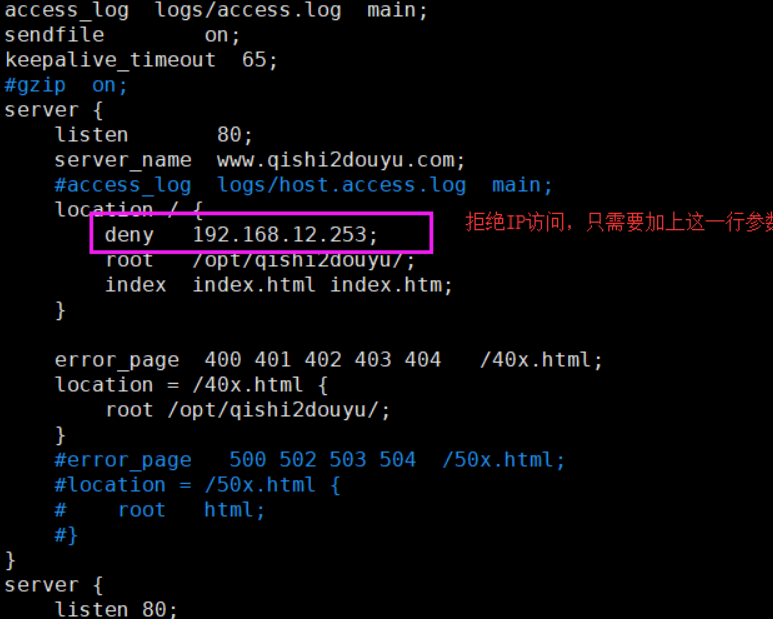
server {
        listen       80;
        server_name  www.qishi2douyu.com;

        #charset koi8-r;

        #access_log  logs/host.access.log  main;

        location / {
            root   /opt/qishi2douyu/;  # 需要手动创建qishi2douyu文件夹
            index  index.html index.htm;
        }

        error_page  404 401 402 403      /40x.html;
         location = /40x.html {
            root   /opt/qishi2douyu/;   # 需改在该目录下创建一个访问错误的页40x.html 文件
        }
        # redirect server error pages to the static page /50x.html
        #
        error_page   500 502 503 504  /50x.html;
        location = /50x.html {
            root   /opt/qishi2douyu/;   # 需要再改目录下创建50x.html 文件
        }
     }
3. 创建配置中所需要的文件夹和文件
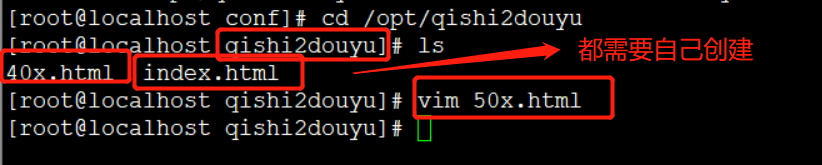
例如:
自定义的斗鱼首页:
vim /opt/qishi2douyu/index.html

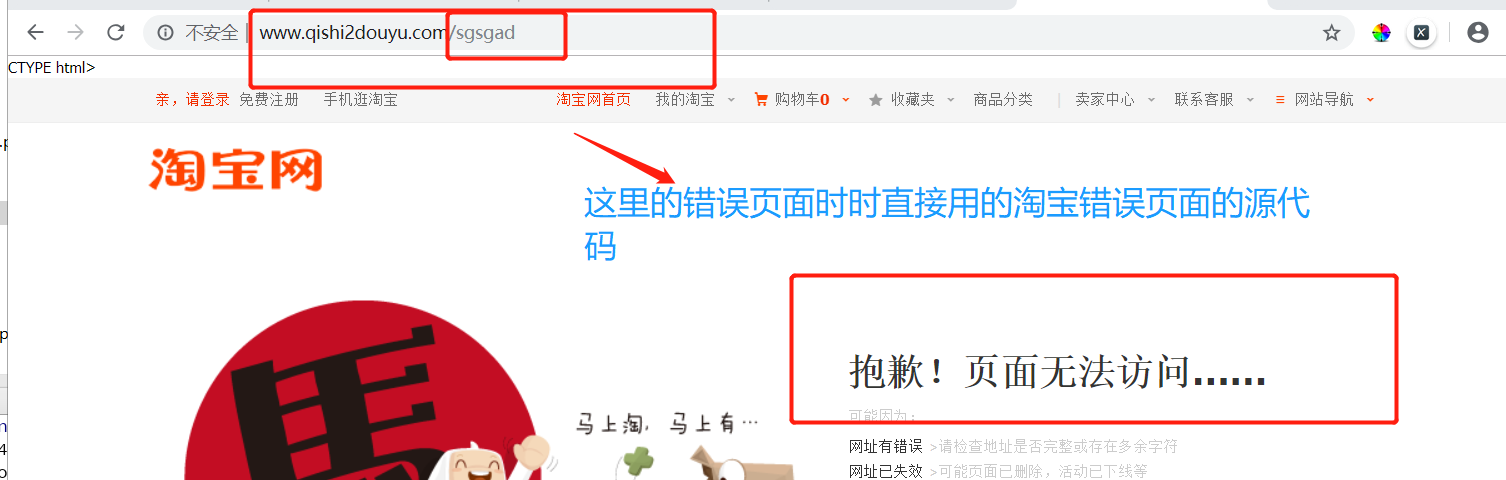
错误页面同理,也可以自己进行编辑。 40x.html 中我用的是淘宝错误页面的源代码
4.平滑重启 nginx
平滑重时,nginx必须是先启动的
/opt/nginx-1-12/sbin/nginx -s reload
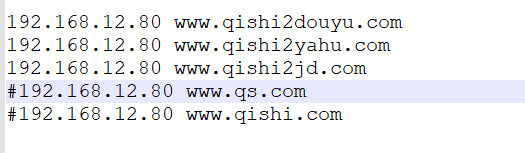
5. hosts文件修改
C:WindowsSystem32driversetchosts
windows 上hosts 文件的修改
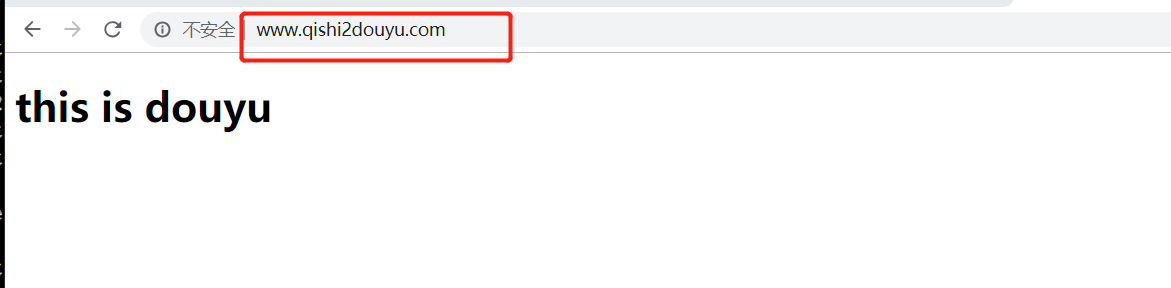
6.前端 访问 :
nginx中配置好的域名:http://www.qishi2douya.com/
就可以访问到 在 /opt/qishi2douyu/index.html 页面中的内容。
访问错误页面:
如果需要在用nginx 搭建 另一网页,可以和 斗鱼页面一样的方式进行搭建。
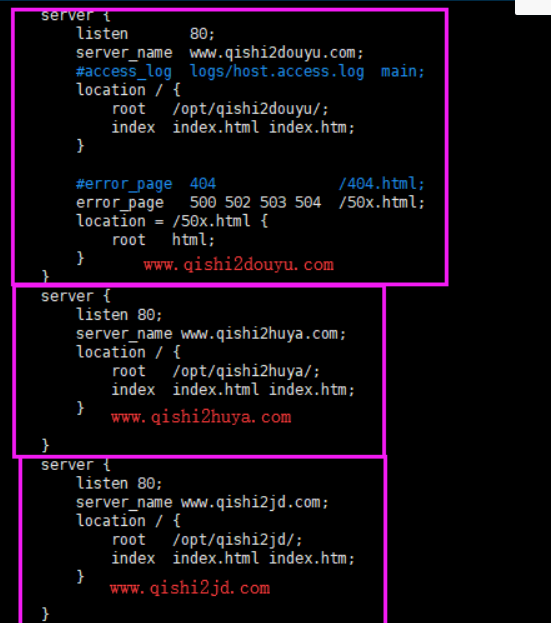
1 在192.168.12.56服务器上,跑3个网站出来
配置文件如下:
server {
        listen       80;
        server_name  www.qishi2douyu.com;
        #access_log  logs/host.access.log  main;
        location / {
            root   /opt/qishi2douyu/;
            index  index.html index.htm;
        }

        #error_page  404              /404.html;
        error_page   500 502 503 504  /50x.html;
        location = /50x.html {
            root   html;
        }
    }
    server {
        listen 80;
        server_name www.qishi2huya.com;
        location / {
            root   /opt/qishi2huya/;
            index  index.html index.htm;
        }

    }
    server {
        listen 80;
        server_name www.qishi2jd.com;
        location / {
            root   /opt/qishi2jd/;
            index  index.html index.htm;
        }

    }
2 分别在/opt目录下创建qishi2douyu、qishi2huya、qishi2jd这三个目录
分别在目录下创建index.html
3 平滑重启nginx
/opt/nginx112/sbin/nginx -s reload
nginx错误页面优化
1 修改配置文件
vim /opt/nginx112/conf/nginx.conf
在www.qishi2douyu.com虚拟主机下添加以下内容(server代码块下)
error_page 400 401 402 403 404 /40x.html;
location = /40x.html {
root /opt/qishi2douyu/;
}
2 在/opt/qishi2douyu/目录下创建40x.html, 把淘宝的错误页面源代码拷贝过来
vim 40x.html
3 平滑重启nginx
4 随便访问一个不存在的页面
http://www.qishi2douyu.com/sladfj243
5 就可以看到我们配置的错误页面
5. nginx访问日志功能
1 打开nginx配置文件nginx.conf
vim /opt/nginx112/conf/nginx.conf
2 修改配置文件, 启用日志功能
log_format main '$remote_addr - $remote_user [$time_local] "$request" '
'$status $body_bytes_sent "$http_referer" '
'"$http_user_agent" "$http_x_forwarded_for"';
access_log logs/access.log main;
3 平滑重启nginx
4 浏览器访问192.168.12.56
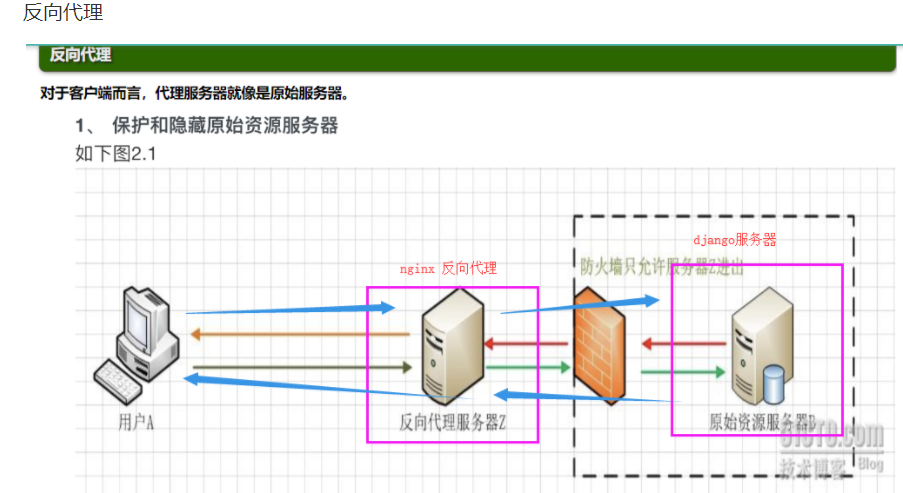
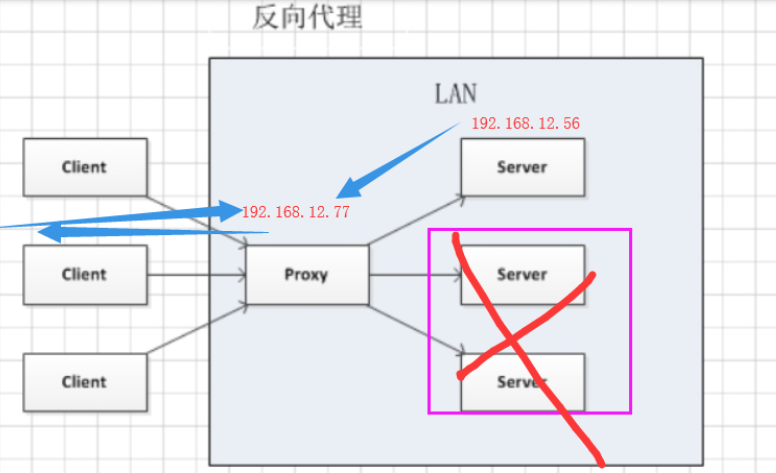
nginx反向代理
1 准备两台机器
  192.168.12.56   # 内部的django服务器
  192.168.12.77   # 代理服务器
  请求数据: windows   ——>   192.168.12.77   ——>   192.168.12.56
  返回数据: windows   <——   192.168.12.77   <——   192.168.12.56
2 修改代理服务器192.168.12.77的配置文件
vim /opt/nginx-1-12/conf/nginx.conf
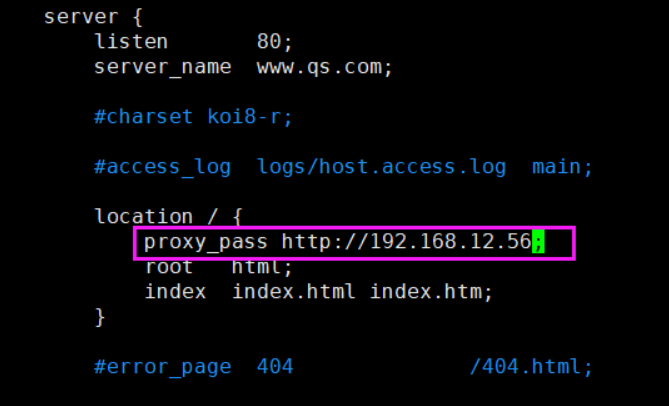
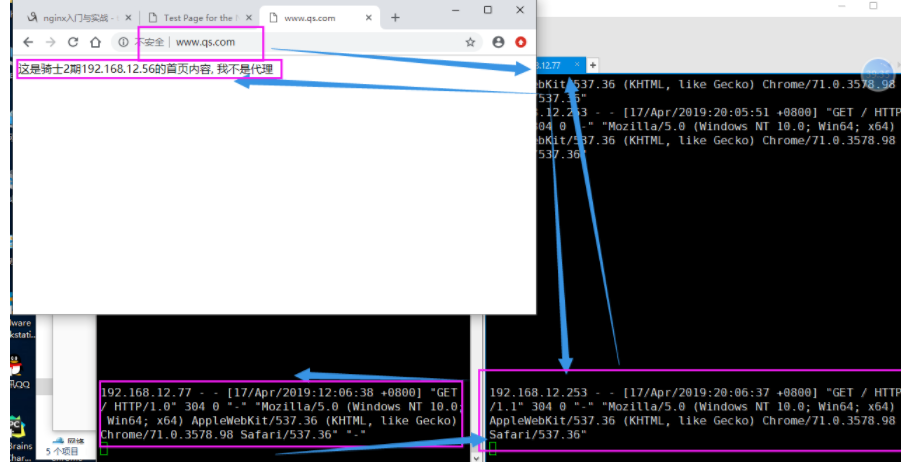
浏览器访问: www.qs.com
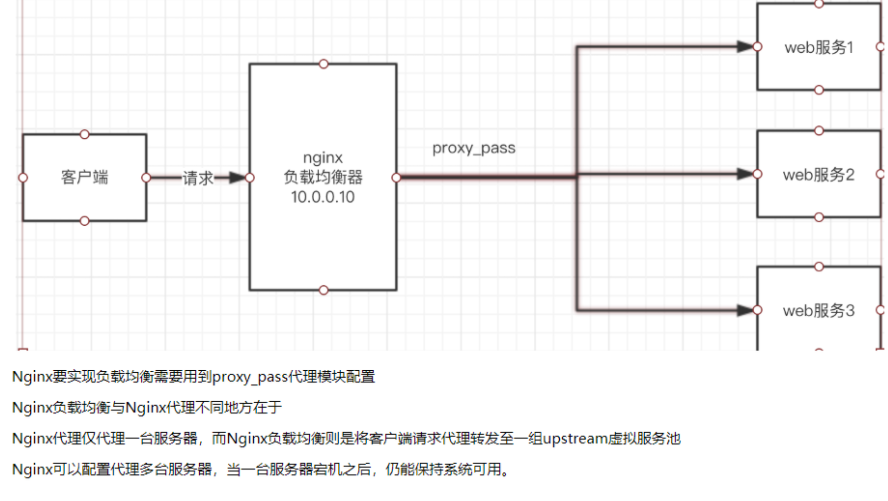
nginx负载均衡配置
1 准备三台机器
  1. nginx负载均衡器(192.168.12.77)
  2  另外两台应用服务器(192.168.12.56 +  192.168.12.65)
2 先确保两台应用服务器能够正常访问
  http://192.168.12.56
  http://192.168.12.65:8001
3 配置负载均衡器(192.168.12.77)
  修改配置文件
  vim /opt/nginx112/conf/nginx.conf
worker_processes 1;
#error_log logs/error.log;
events {
worker_connections 1024;
}
http {
include mime.types;
default_type application/octet-stream;
#log_format main '$remote_addr - $remote_user [$time_local] "$request" '
# '$status $body_bytes_sent "$http_referer" '
# '"$http_user_agent" "$http_x_forwarded_for"';
#access_log logs/access.log main;
sendfile on;
keepalive_timeout 65;
#gzip on;
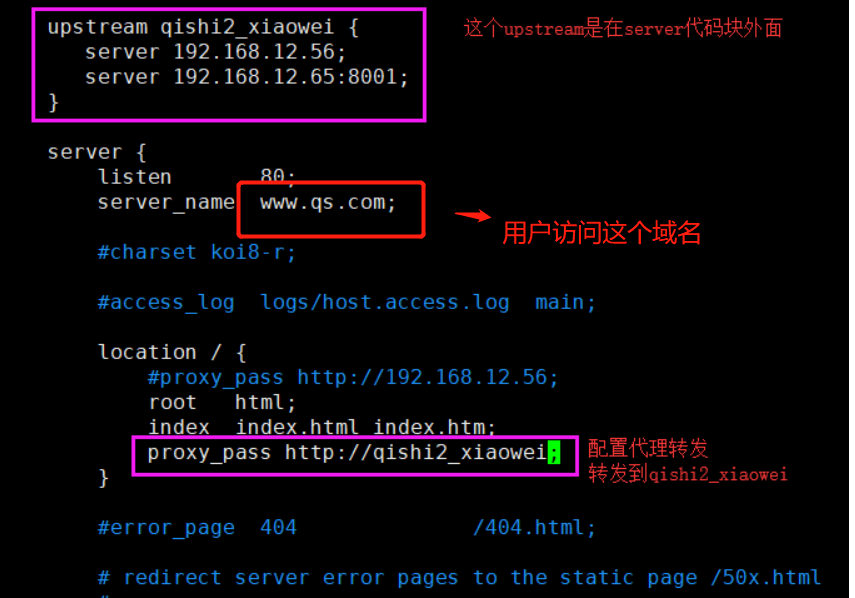
upstream qishi2_xiaowei {
server 192.168.12.56;
server 192.168.12.65 weight=5;
}
server {
listen 80;
server_name www.qs.com;
location / {
root html;
index index.html index.htm;
proxy_pass http://qishi2_xiaowei;
}
#error_page 404 /404.html;
error_page 500 502 503 504 /50x.html;
location = /50x.html {
root html;
}
}
}