1. 认证之APIView
在聊APIView之前, 我们先重温一下django2.x的CBV流程
a. 对于django而言, 当浏览器请求到达之后,按照规则首先会经过各大中间件(Middleware)(process_request, process_view, process_response), 而与CBV挂钩的便是各中间件的process_view方法,以CSRFViewMiddleware为例,django会默认开启全局CSRF验证,而在实际开发中,一部分视图处理类是不需要CSRF验证的,所以我们需要在处理类方法上加上@method_decorator(csrf_exempt)装饰器来取消验证,下面是CSRFViewMiddleware类下的process_view的部分源码,
    def process_view(self, request, callback, callback_args, callback_kwargs):
        if getattr(request, 'csrf_processing_done', False):
            return None

        # Wait until request.META["CSRF_COOKIE"] has been manipulated before
        # bailing out, so that get_token still works
        if getattr(callback, 'csrf_exempt', False):
            return None
b.为什么执行了视图类的as_view(), 便能够处理各种类型(GET, POST, DELETE, HEAD等等)请求呢? 我们知道,视图类是利用dispatch(self, *args, **kwargs)的反射来实现请求(GET/POST......)与处理方法( get(self, request) / post(self, request) )之间的映射,所以实际上as_view()方法是调用了视图类中的dispatch来实现调用具体的请求处理方法的。下面是as_view()的部分源码:


 1     def as_view(cls, **initkwargs):
 2         """Main entry point for a request-response process."""
 3         for key in initkwargs:
 4             if key in cls.http_method_names:
 5                 raise TypeError("You tried to pass in the %s method name as a "
 6                                 "keyword argument to %s(). Don't do that."
 7                                 % (key, cls.__name__))
 8             if not hasattr(cls, key):
 9                 raise TypeError("%s() received an invalid keyword %r. as_view "
10                                 "only accepts arguments that are already "
11                                 "attributes of the class." % (cls.__name__, key))
12
13         def view(request, *args, **kwargs):
14             self = cls(**initkwargs)
15             if hasattr(self, 'get') and not hasattr(self, 'head'):
16                 self.head = self.get
17             self.request = request
18             self.args = args
19             self.kwargs = kwargs
20             return self.dispatch(request, *args, **kwargs)
21         view.view_class = cls
22         view.view_initkwargs = initkwargs
23
24         # take name and docstring from class
25         update_wrapper(view, cls, updated=())
26
27         # and possible attributes set by decorators
28         # like csrf_exempt from dispatch
29         update_wrapper(view, cls.dispatch, assigned=())
30         return view
了解了CBV, 那APIView又是怎么一回事?
a. APIView是View的子类,其处理请求流程与View一致,但APiView内部对原生request对象进行了封装,下面是其封装request的部分源码
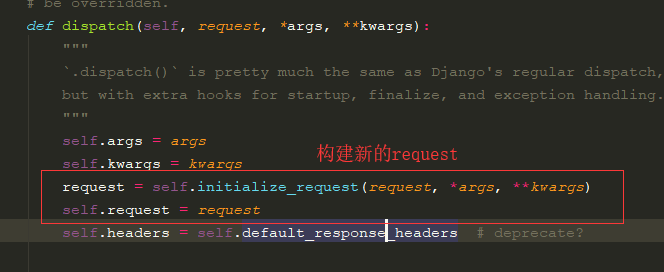

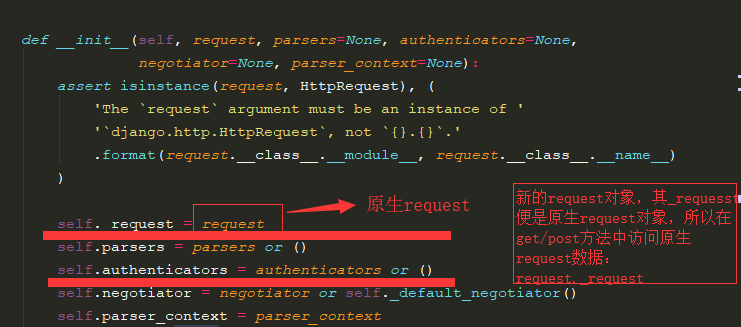
可以看出原生request对象被赋到新建request对象的_request属性中,接下来便是基于APIView的认证了,它又是如何实现的呢?
2.基于restframework实现认证
在前后端分离的项目中, 常常需要判断用户是否登陆, 其登录状态的维持需要借助于令牌(Token),如果在不整合restframework框架的情况下,我们要实现这一功能可以自定义一个校验装饰器来装饰每一个需要登陆之后才能执行的试图函数或者视图类方法,而在restframework中,它变得更加灵活与规范, 具体体现在APIView提供支持多重验证,验证与视图函数较低的耦合度,支持全局配置验证规则等等,下面我们从APIView的源码中详细的了解这一过程:
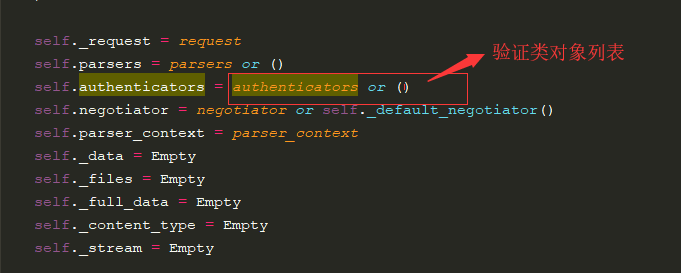
1. 从第一部分对apiview的分析中, 我们可以知道, APIView新构建了一个request,该request对象不仅封装了原生request对象的所有属性(_request),而且扩展了很多针对验证,访问频率限制,权限控制等等新的特性;
2. 就认证(authentication)而言,
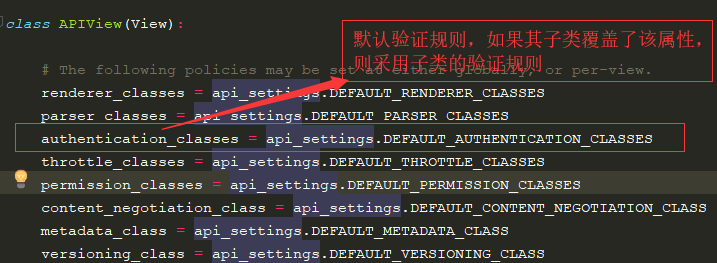
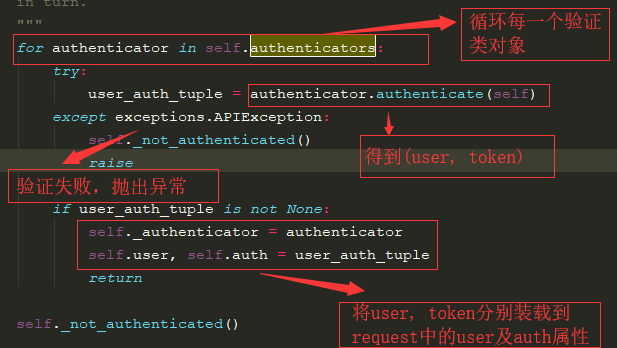
那么子类(基类为APIView)的authentication_classes属性为自定义的验证规则,那他又是如何执行这一规则的呢? 从第一部分的APIView创建新的request对象中我们知道,其request对象的authenticators属性为get_authenticators()方法的返回值,那么进入get_authenticators():

怎么定义一个处理用户认证的类呢?答案位于rest_framework.authentication下的BaseAuthentication。 需要说明的是,继承该类的认证类必须拥有其authenticate(self, request, )以及authenticate_header(self, request)方法
欧克,到这里的话, 我们来实战一下
我们在名为testrestful中创建两张表,一张存用户基本信息,一张存用户token, 并在项目根目录下执行python manage.py makemigrations、python manage.py migrate命令,并手动添加一些用户数据到UserProfile
# models.py (testrestful)


from django.db import models
from django.contrib.auth.models import User
# Create your models here.

class UserProfile(models.Model):
    # user = models.OneToOneField(to='User', on_delete=models.CASCADE)
    username = models.CharField(max_length=32, unique=True, null=False, blank=False)
    password = models.CharField(max_length=32, unique=False, null=False, blank=False)
    level_choice = (
        (1, '普通用户'),
        (2, 'VIP'),
        (3, 'SVIP'),
    )
    level = models.SmallIntegerField(choices=level_choice, null=False, blank=False)
    def __str__(self):
        return '[model: %s]' % self.username


class UserToken(models.Model):
    user = models.OneToOneField(to='UserProfile',on_delete=models.CASCADE)
    token = models.CharField(max_length=64)
    expired = models.DateTimeField(null=True)
在testrestful目录下新建utils包,包下新建auth.py(也可以直接在views.py中创建, )
其流程是: 已注册的用户发起登陆请求 ----> 认证处理 (用户名及密码正确则派发新的Token) ------> 用户保存token 后续请求附上token得到相应数据
from rest_framework import exceptions
from rest_framework.authentication import BasicAuthentication, BaseAuthentication
from testrestful import models
import hashlib
import uuid

def md5Token(user: models.UserProfile)->str:
    """用于生成token"""
    # 用户名唯一, 并将其作为md5对象的salt
    hash = hashlib.md5(user.username.encode('utf-8'))
    cur_data = bytes(str(uuid.uuid1()), encoding='utf-8')
    hash.update(cur_data)
    return hash.hexdigest()

class UserAuthentication(BaseAuthentication):
    """用于认证token"""
    def authenticate(self, request):
        token = request._request.GET.get('token', None)
        u_token_obj = models.UserToken.objects.get(token=token)
        if not u_token_obj:
            raise exceptions.AuthenticationFailed('用户身份验证失败!')
        else:
            # resframework 会将这两个元组返回给request, 以便后续操作
            return (u_token_obj.user, u_token_obj)
    def authenticate_header(self, request):
        """当认证失败的时候, 返回给浏览器的响应头"""
        pass
如果用户通过认证, 则以(key1, key2) 作为执行返回值,并装载到request对象中,key1对应request.user,key2对应request.auth
那么对应的视图类就很好办了,只需要添加验证规则类就欧克
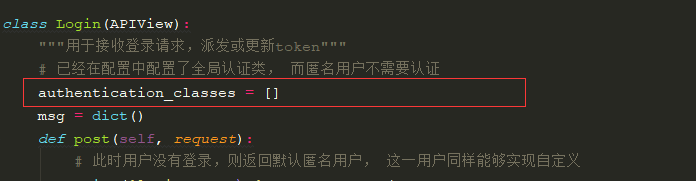
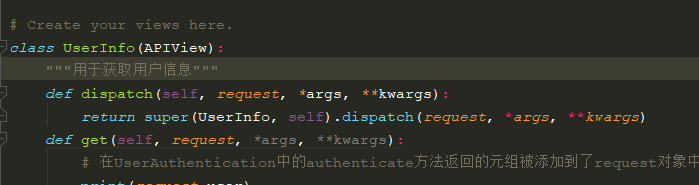
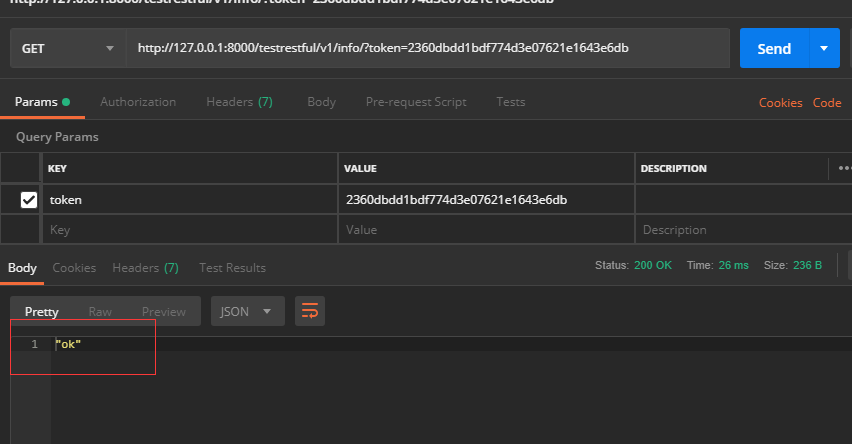
from django.http.response import JsonResponse
from rest_framework.response import Response
from rest_framework.views import APIView
from testrestful import models
from testrestful.utils.auth import UserAuthentication, md5Token

class Login(APIView):
    """用于接收登录请求,派发或更新token"""
    # 已经在配置中配置了全局认证类, 而匿名用户不需要认证
    authentication_classes = []
    msg = dict()
    def post(self, request):
        # 此时用户没有登录,则返回默认匿名用户, 这一用户同样能够实现自定义
        print('login_user:	', request.user)
        username = request._request.GET.get('username', None)
        password = request._request.GET.get('password', None)
        try:
            user = models.UserProfile.objects.filter(username=username, password=password).first()
            # 派发token
            token = md5Token(user)
            # token存在则更新, 不存在则创建
            models.UserToken.objects.update_or_create(user=user, defaults={'token': token})
            self.msg['flag'] = 1
            self.msg['content'] = token
            print(self.msg)
        except Exception as e:
            print(e)
            self.msg['flag'] = 0
            self.msg['content'] = "用户名或密码错误"
        return JsonResponse(self.msg)


# Create your views here.
class UserInfo(APIView):
    """用于获取用户信息"""
    authentication_classes = [UserAuthentication,]
    def dispatch(self, request, *args, **kwargs):
        return super(UserInfo, self).dispatch(request, *args, **kwargs)
    def get(self, request, *args, **kwargs):
        # 在UserAuthentication中的authenticate方法返回的元组被添加到了request对象中,元组第一个对象就是request.user, 第二个就是request.auth
        print(request.user)
        print(request.auth)
        return Response("ok")
    def post(self, request):
        return Response("POST Response")
    def delete(self, request):
        return Response("DELETE Response")
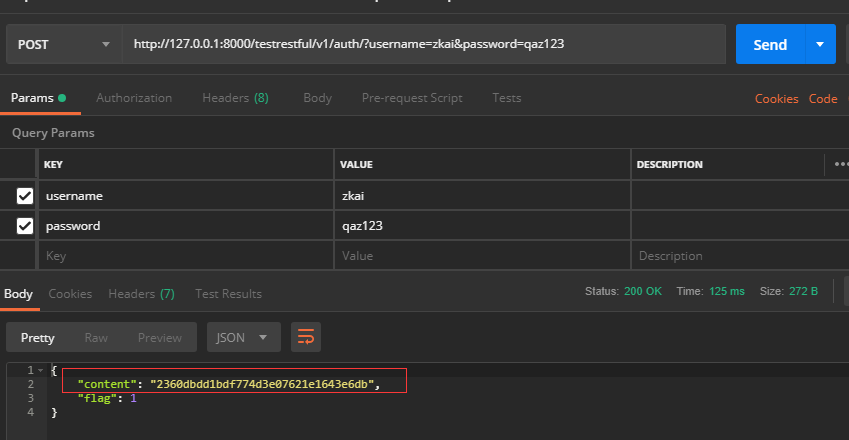
下面以postman做测试:
a. 登陆
b. 获取用户信息(需登陆)
3. 验证规则全局配置
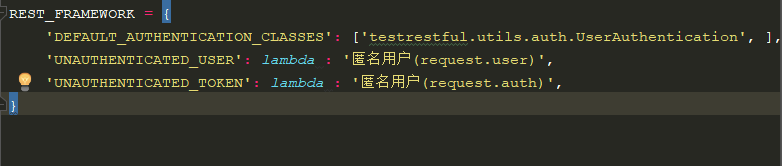
REST_FRAMEWORK = {
    'DEFAULT_AUTHENTICATION_CLASSES': ['testrestful.utils.auth.UserAuthentication', ],
    'UNAUTHENTICATED_USER': lambda : '匿名用户(request.user)',
    'UNAUTHENTICATED_TOKEN': lambda : '匿名用户(request.auth)',
}
配置完成之后, 与CSRF相似, 需要用户认证的试图类就不需要authentication_classes这一行了,不需要用户认证的匿名用户视图类覆盖authentication_class就欧克
拿本例举例: