本文作为使用Axis2创建Web Service的后篇,主要介绍如何使用Axis2调用Web Service。有关准备工作详情请参考前篇的内容。
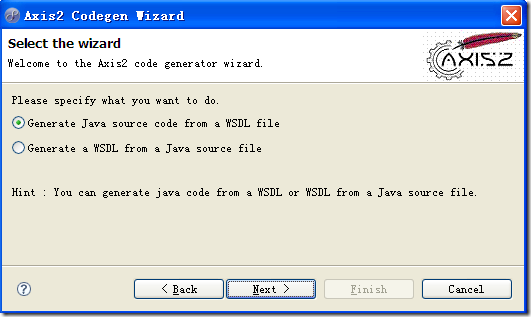
在Eclipse的Packge Explorer中右键点击New,选择Other项,新建一个Axis2 Code Genrateor向导。点击Next,打开向导选择界面:
选择Generate Java Source code from a WSDL file,点击Next。
在WSDL file location中输入WSDL文件的地址,点击Next。
使用默认设置,继续Next。
选择文件输出路径,点击Finish。啊哦,可怕的事情发生了:
于是Google,得知要将Tomcat安装目录下的webapps/axi2/WEB-INF/lib下的backport-util-concurrent-3.1.jar复制到eclipse\plugins\Axis2_Codegen_Wizard_1.3.0\lib目录下,没想到我的axis2的lib下竟然没有backport-util-concurrent-3.1.jar,于是网上下载了一个。至于为什么没有这个文件,至今还没有搞明白。
复制之后,修改%ECLIPSE_HOME%\plugins\Axis2_Codegen_Wizard_1.3.0\plugin.xml文件,在<runtime/>标签中添加该 jar的注册信息。如下:
<library name="lib/backport-util-concurrent-3.1.jar">
    <export name="*"/>
</library>
然后,在命令行下切换至%ECLIPSE_HOME%目录,使用-clean参数启动Eclipse,清除osig cache,如下:
eclipse.exe -vm "c:\jre1.5.0_10\bin\java.exe" -clean -console -consoleLog -debug -vmargs –mx384M
然后关闭Eclipse,使用普通方式重新启动,再按上述步骤重新来过,问题终于解决。
刷新项目,会发现net.kirin.webservice包中多了两个文件(文件的位置由以上最后一步文件的输出路径决定):
之所以会有错误,是因为还没有安装Axis2的类包。
在项目上右键选择Build Path—>Add External Archives,选择Tomcat安装目录webapps/axi2/WEB-INF/lib下的所有jar包。或则选择项目属性—>Java Build Path—>Add External JARs,选择所有jar包。
在项目中新建CalculateServiceTest单元测试类(JUnit),输入如下代码(当然,别忘了添加junit的jar包):
package net.kirin.webservice;

import junit.framework.*;

public class CalculateServiceTest extends TestCase{
    public void testCalculateService()  throws Exception {
        CalculateServiceStub stub = new CalculateServiceStub();
        CalculateServiceStub.Add add = new CalculateServiceStub.Add();
        add.setX(1);
        add.setY(2);
        double retVal = stub.add(add).get_return();
        Assert.assertEquals(3.0, retVal);
    }
}
运行单元测试,顺利通过:
至此,我们完成了使用Axis2调用Web Service的过程。
参考资料:
java.lang.reflect.InvocationTargetException axis2 code generator error resolved


