上一节《spring boot第一个web服务》中我们只是简单的展示了spring mvc的功能,并没有涉及到具体的CRUD的操作,也没有涉及到数据持久化的方面。本节中我们将基于传统的JDBC方式讲解web应用中的CRUD操作,具体内容以用户的注册、登录、详情查询、列表查询为场景来展开(注:文章中的例子只为演示spring boot功能而设计,不能做为生产版本,针对生产版本还需做很多思考和优化工作)。
1.表结构
 /*==============================================================*/
 /* Table: t_user  用户表                                         */
 /*==============================================================*/
create table t_user
 (
    id                   bigint not null auto_increment comment 'id:主键',
    name                 varchar(20) not null comment '姓名',
    password             varchar(20) not null comment '密码',
    primary key (id)
 );
2.构建实体类
为了提高代码的可读性,我们这里用到了Lombok,它能自动生成getter、setter、toString()等常见方法。使用它时,需引入依赖
 <!--lombok-->
 <dependency>
    <groupId>org.projectlombok</groupId>
    <artifactId>lombok</artifactId>
    <optional>true</optional>
 </dependency>
然后使用注解@Data来进行使用
用户实体类User
package com.kinglead.demo.entity; import lombok.AllArgsConstructor; import lombok.Data; import lombok.NoArgsConstructor; import java.io.Serializable; @Data //添加getter、setter方法 @NoArgsConstructor //无参构造函数 @AllArgsConstructor //所以参数构造函数 public class User implements Serializable { private static final long serialVersionUID = -21070736985722463L; /** * id:主键 */ private Long id; /** * 姓名 */ private String name; /** * 密码 */ private String password; }
3.请求Request类
为了方便简单的对表单进行校验,我们引入Validation API依赖,使用相关注解声明校验规则,如@NotNull、@Size等,注解直接加到类的成员变量上即可。
 <!--validation表单校验-->
 <dependency>
    <groupId>org.springframework.boot</groupId>
    <artifactId>spring-boot-starter-validation</artifactId>
 </dependency>
UserVo
package com.kinglead.demo.vo; import lombok.Data; import javax.validation.constraints.NotNull; import javax.validation.constraints.Size; import java.io.Serializable; @Data public class UserVo implements Serializable { private static final long serialVersionUID = -21070736985722463L; /** * 用户名 */ @NotNull(message = "用户名不能为空") @Size(max = 20, message = "用户名长度不能大于20") private String userName; /** * 密码 */ @NotNull(message = "密码不能为空") @Size(max = 20, message = "密码长度不能大于20") private String password; }
4.控制器Controller
用户UserController
package com.kinglead.demo.controller; import com.kinglead.demo.entity.User; import com.kinglead.demo.service.UserService; import com.kinglead.demo.vo.UserVo; import lombok.extern.slf4j.Slf4j; import org.springframework.stereotype.Controller; import org.springframework.validation.BindingResult; import org.springframework.web.bind.annotation.GetMapping; import org.springframework.web.bind.annotation.PostMapping; import org.springframework.web.bind.annotation.RequestMapping; import org.springframework.web.servlet.ModelAndView; import javax.annotation.Resource; import javax.validation.Valid; import java.util.List; import java.util.Map; @Slf4j @Controller @RequestMapping("/user") public class UserController { /**注入UserService**/ @Resource private UserService userService; /** *注册页面 */ @GetMapping("/register") public ModelAndView register(ModelAndView modelAndView){ modelAndView.setViewName("register"); return modelAndView; } /** *注册 */ @PostMapping("/register") public ModelAndView register(ModelAndView modelAndView, @Valid UserVo userVo, BindingResult bindingResult){ //校验参数 if(bindingResult.hasErrors()){ modelAndView.addObject("error",bindingResult.getFieldError().getDefaultMessage()); modelAndView.setViewName("register"); return modelAndView; } //注册 User user = new User(); user.setName(userVo.getUserName()); user.setPassword(userVo.getPassword()); userService.insert(user); //注册成功返回到登录页面 modelAndView.setViewName("login"); return modelAndView; } /** *登录页面 */ @GetMapping("/login") public ModelAndView login(ModelAndView modelAndView){ modelAndView.setViewName("login"); return modelAndView; } /** *登录 */ @PostMapping("/login") public ModelAndView login(ModelAndView modelAndView,@Valid UserVo userVo, BindingResult bindingResult){ //效验入参 if(bindingResult.hasErrors()){ modelAndView.addObject("error",bindingResult.getFieldError().getDefaultMessage()); modelAndView.setViewName("login"); return modelAndView; } //效验用户 User user = new User(); user.setName(userVo.getUserName()); user.setPassword(userVo.getPassword()); User rstUser = userService.queryByNameAndPassword(user); if(null == rstUser){ modelAndView.addObject("error","用户名或密码错误!"); modelAndView.setViewName("login"); } //展示首页 modelAndView.addObject("userName",rstUser.getName()); modelAndView.setViewName("index"); return modelAndView; } /** * 查询用户列表 */ @GetMapping("/userList") public ModelAndView queryAll(ModelAndView modelAndView){ //查询用户列表 List<Map<String, Object>> userList = userService.queryAll(); //返回 modelAndView.addObject("userList", userList); modelAndView.setViewName("userList"); return modelAndView; } }
5.服务接口Service及实现类
UserService
package com.kinglead.demo.service; import com.kinglead.demo.entity.User; import java.util.List; import java.util.Map; public interface UserService { /** * 新增用户 */ User insert(User user); /** * 通过用户名和密码查询用户 */ User queryByNameAndPassword(User user); /** * 查询用户列表 */ List<Map<String, Object>> queryAll(); }
UserServiceImpl
package com.kinglead.demo.service.impl; import com.kinglead.demo.entity.User; import com.kinglead.demo.service.UserService; import org.springframework.jdbc.core.JdbcTemplate; import org.springframework.stereotype.Service; import javax.annotation.Resource; import java.sql.ResultSet; import java.sql.SQLException; import java.util.List; import java.util.Map; @Service public class UserServiceImpl implements UserService { @Resource private JdbcTemplate jdbcTemplate; /** * 新增用户 */ @Override public User insert(User user) { jdbcTemplate.update("insert into t_user(name,password) values(?,?)", user.getName(), user.getPassword()); return user; } /** * 通过用户名和密码查询用户 */ @Override public User queryByNameAndPassword(User user) { return jdbcTemplate.queryForObject("select id, name, password from t_user where name = ? and password = ?", this::mapRowToUser, user.getName(), user.getPassword()); } /** * 查询用户列表 */ @Override public List<Map<String, Object>> queryAll() { return jdbcTemplate.queryForList("select id, name, password from t_user"); } private User mapRowToUser(ResultSet rs, int rowNum) throws SQLException { return new User(rs.getLong("id"), rs.getString("name"), rs.getString("password")); } }
6.用户注册功能详解
从第4点UserController,我们可以看到用于注册的请求有:展示注册页面@GetMapping("/register")和完成注册@PostMapping("/register"),下面我们看看具体的html页面、service实现和JDBC的操作。
register.html
<!DOCTYPE html> <html xmlns:th="http://www.thymeleaf.org"> <head> <meta http-equiv="Content-Type" content="text/html;charset=UTF-8" /> <title>注册</title> </head> <body> <form th:action="@{/user/register}" method="post"> <div> <h2>帐号注册</h2> </div> <div> <!--/*@thymesVar id="error" type=""*/--> <span id="basic-addon0"> </span> <span style="font-size: 12px;color: red" th:text="${error}" aria-describedby="basic-addon0"></span> <br /> </div> <div> <span id="basic-addon1">用户名</span> <input id="user_name" name="name" type="text" placeholder="用户名" aria-describedby="basic-addon1" /> </div> <br /> <div> <span id="basic-addon2">密 码</span> <input id="password" name="password" type="password" placeholder="密 码" aria-describedby="basic-addon2" /> </div> <br /> <div> <button type="submit" style="190px;">注 册</button> </div> </form> </body> </html>
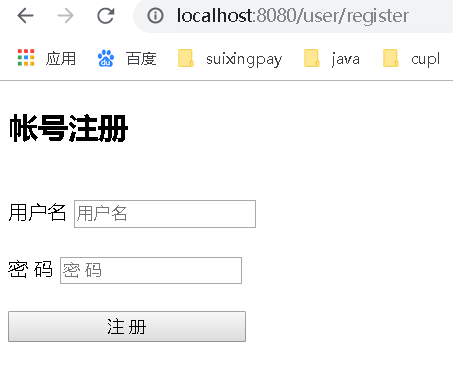
注册页面完成后,我们通过浏览器访问:http://localhost:8080/user/register,URL地址映射到@GetMapping("/register")方法
/**
  *注册页面
  */
 @GetMapping("/register")
 public ModelAndView register(ModelAndView modelAndView){
     modelAndView.setViewName("register");
     return modelAndView;
 }
返回register.html页面,浏览器展示用户注册页面
在注册页面填写用户名和密码后,点击“注册”按钮。
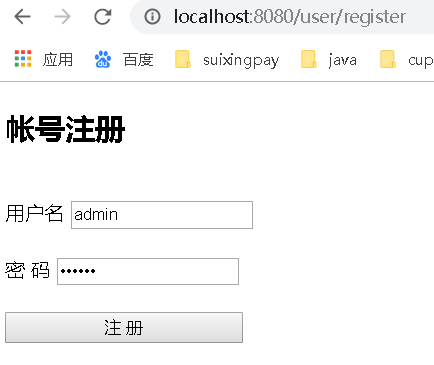
由于register.html中,from的method=“POST”,所以“注册”按钮会映射到@PostMapping("/register")方法
 /**
  *注册
  */
 @PostMapping("/register")
 public ModelAndView register(ModelAndView modelAndView, @Valid UserVo userVo, BindingResult bindingResult){
     //校验参数
     if(bindingResult.hasErrors()){
         modelAndView.addObject("error",bindingResult.getFieldError().getDefaultMessage());
         modelAndView.setViewName("register");
         return modelAndView;
     }
     //注册
     User user = new User();
     user.setName(userVo.getUserName());
     user.setPassword(userVo.getPassword());
     userService.insert(user);
     //注册成功返回到登录页面
     modelAndView.setViewName("login");
     return modelAndView;
 }
通过@Valid注解打开了表单校验,所以如果有参数不符合开始声明的校验规则,会参数错误Errors。如果有参数错误,会返回注册页面,并显示错误。如果没有错误,将会调用UserService的insert方法
 /**
  * 新增用户
  */
 @Override
 public User insert(User user) {
     jdbcTemplate.update("insert into t_user(name,password) values(?,?)", user.getName(), user.getPassword());
     return user;
 }
这里就用到了spring封装的JdbcTemplate。要正常使用JDBC和访问数据库还需要做两件事:
1、引入JDBC依赖和mysql连接驱动依赖(这里使用最常用的mysql数据库)
 <!--JDBC-->
 <dependency>
    <groupId>org.springframework.boot</groupId>
    <artifactId>spring-boot-starter-jdbc</artifactId>
 </dependency>
 <!--mysql驱动-->
 <dependency>
     <groupId>mysql</groupId>
     <artifactId>mysql-connector-java</artifactId>
 </dependency>
2、配置数据库连接
application.yml
 spring:
   datasource:
     username: root
     password: 123456
     url: jdbc:mysql://127.0.0.1:3306/spring_boot_topic
     driver-class-name: com.mysql.cj.jdbc.Driver
通过jdbcTemplate的update方法即可插入数据。
7.用户登录功能详解
从第4点UserController,我们可以看到用于注册的请求有:展示登录页面@GetMapping("/login")和完成登录@PostMapping("/login"),下面我们看看具体的html页面、service实现和JDBC的操作。
login.html
<!DOCTYPE html> <html xmlns:th="http://www.thymeleaf.org"> <head> <meta http-equiv="Content-Type" content="text/html;charset=UTF-8" /> <title>登录</title> <!--<link rel="stylesheet" type="text/css" href="/css/common.css" />--> </head> <body> <div> <h2>用户登录</h2> </div> <form th:action="@{/user/login}" method="post"> <div> <!--/*@thymesVar id="error" type=""*/--> <span id="basic-addon0"> </span> <span style="font-size: 12px;color: red" th:text="${error}" aria-describedby="basic-addon0"></span> <br /> </div> <div> <span id="basic-addon1">用户名</span> <input id="user_name" name="userName" type="text" placeholder="用户名" aria-describedby="basic-addon1" th:field="*{userName}"/> </div> <br /> <div> <span id="basic-addon2">密 码</span> <input id="password" name="password" type="password" placeholder="密 码" aria-describedby="basic-addon2" th:field="*{password}"/> </div> <br /> <div> <button type="submit" style="95px;">登 录</button> <a href="/user/register">注册</a> </div> </form> </body> </html>
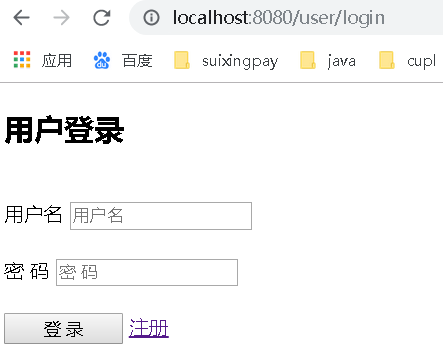
我们通过浏览器访问:http://localhost:8080/user/login,进入到登录页面,URL地址映射到@GetMapping("/login")方法
 /**
  *登录页面
  */
  @GetMapping("/login")
  public ModelAndView login(ModelAndView modelAndView){
      modelAndView.setViewName("login");
      return modelAndView;
  }
返回login.html页面,浏览器展示用户登录页面
在登录页面填写用户名和密码后,点击“登录”按钮。
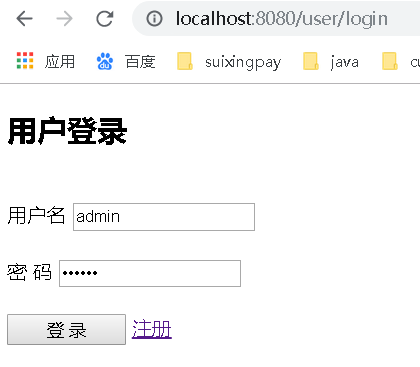
由于login.html中,from的method=“POST”,所以“注册”按钮会映射到@PostMapping("/login")方法
/**
  *登录
  */
 @PostMapping("/login")
 public ModelAndView login(ModelAndView modelAndView,@Valid UserVo userVo, BindingResult bindingResult){
     //效验入参
     if(bindingResult.hasErrors()){
         modelAndView.addObject("error",bindingResult.getFieldError().getDefaultMessage());
         modelAndView.setViewName("login");
         return modelAndView;
     }
     //效验用户
     User user = new User();
     user.setName(userVo.getUserName());
     user.setPassword(userVo.getPassword());
     User rstUser = userService.queryByNameAndPassword(user);
     if(null == rstUser){
         modelAndView.addObject("error","用户名或密码错误!");
         modelAndView.setViewName("login");
     }
     //展示首页
     modelAndView.addObject("userName",rstUser.getName());
     modelAndView.setViewName("redirect:/user/index");
     return modelAndView;
 }
通过@Valid注解打开了表单校验,所以如果有参数不符合开始声明的校验规则,会参数错误Errors。如果有参数错误,会返回登录页面,并显示错误。如果没有错误,将会调用UserService的queryByNameAndPassword方法
/** * 通过用户名和密码查询用户 */ @Override public User queryByNameAndPassword(User user) { return jdbcTemplate.queryForObject("select id, name, password from t_user where name = ? and password = ?", this::mapRowToUser, user.getName(), user.getPassword()); } private User mapRowToUser(ResultSet rs, int rowNum) throws SQLException { return new User(rs.getLong("id"), rs.getString("name"), rs.getString("password")); }
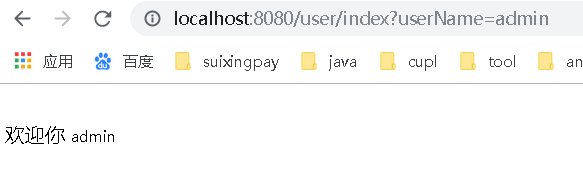
通过jdbcTemplate的queryForObject方法即可查询到数据,然后重定向redirect到首页index.html。
 /**
  *首页
  */
 @GetMapping("/index")
 public ModelAndView index(ModelAndView modelAndView, HttpServletRequest request){
     modelAndView.addObject("userName",request.getParameter("userName"));
     modelAndView.setViewName("index");
     return modelAndView;
 }
inde.html
<!DOCTYPE html>
 <html xmlns:th="http://www.thymeleaf.org">
     <head>
         <meta http-equiv="Content-Type" content="text/html;charset=UTF-8" />
         <title>登录</title>
         <!--<link rel="stylesheet" type="text/css" href="/css/common.css" />-->
     </head>
     <body>
         <div>
             <br />
             <span>欢迎你</span>
             <span style="font-size: 12px;color: black" th:text="${userName}" aria-describedby="basic-addon0"></span>
         </div>
     </body>
 </html>
登录成功界面
8.用户列表查询功能详解
从第4点UserController,我们可以看到用于用户列表查询的请求有:@GetMapping("/userList"),下面我们看看具体的html页面、service实现和JDBC的操作。
userList.html
 <!DOCTYPE html>
 <html xmlns:th="http://www.thymeleaf.org">
     <head>
         <meta http-equiv="Content-Type" content="text/html;charset=UTF-8" />
         <title>用户信息</title>
         <!--<link rel="stylesheet" type="text/css" href="/css/common.css" />-->
         <style type="text/css">
             table {
                 border: 1px solid black;
                 text-align: center;
                 border-collapse: collapse;
             }
             table thead th {
                 border: 1px solid black;
             }
             table tbody td {
                 border: 1px solid black;
             }
         </style>
     </head>
     <body>
         <div>
             <h2>用户列表</h2>
         </div>
         <table cellpadding="0" cellspacing="0">
             <thead>
                 <th>序号</th>
                 <th>编码</th>
                 <th>用户名</th>
             </thead>
             <tbody>
             <tr th:each="entries,stat:${userList}" th:style="' color: rgb(17, 119, 0);">>
                 <td th:text="${stat.count}"></td>
                 <td th:text="${entries['id']}"></td>
                 <td th:text="${entries['name']}"></td>
                 <td th:text="${entries['sage']}"></td>
             </tr>
             </tbody>
         </table>
     </body>
 </html>
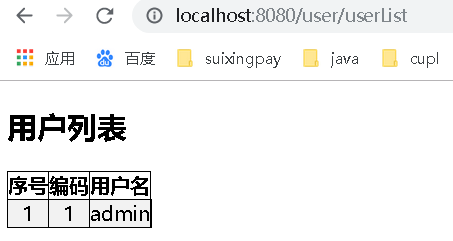
我们通过浏览器访问:http://localhost:8080/user/userList,进入到登录页面,URL地址映射到@GetMapping("/userList")方法
/**
  * 查询用户列表
  */
 @GetMapping("/userList")
 public ModelAndView queryAll(ModelAndView modelAndView){
     //查询用户列表
     List<Map<String, Object>> userList = userService.queryAll();
     //返回
     modelAndView.addObject("userList", userList);
     modelAndView.setViewName("userList");
     return modelAndView;
 }
调用UserService的queryAll方法
 /**
  * 查询用户列表
  */
 @Override
 public List<Map<String, Object>> queryAll() {
     return jdbcTemplate.queryForList("select id, name, password from t_user");
 }
通过jdbcTemplate的queryForList方法即可查询到数据,然后返回到userList.html页面上。
总结
Spring对JDBC的支持主要是使用JdbcTemplate,虽然JdbcTemplate将创建连接、创建语句、关闭连接、关闭结果集和sql异常处理等做了很好的封装,但是还有待完善。下一节我们再聊聊更简单的JPA。
源码地址:https://github.com/kinglead2012/myblog
create table t_user( id bigint not null auto_increment comment 'id:主键', name varchar(20) not null comment '姓名', password varchar(20) not null comment '密码', primary key (id));