这个系列最开始是19年9月份自己第一次使用ROS 也是第一次使用ubuntu写的,很多都是前人用过的 然后帮我调试的过程中告诉我的,感觉所有的存在在这里的都是我不止一遍 用过的;十分OK,希望这个笔记能帮助到不少人 更便捷的使用Ubuntu ;
更新:大哥们跟我说:当你不知道一条命令的含义的时候最好不用运行 所以在此篇中 我写下的每条带sudo的命令行我都进行了注释 共同学习【当然有不对的地方希望能指出】
如果也有想分享的 可以留言 让更多人知道~,此版本同步CSDN的博客,由于CSDN最近的... 广告有点太多了 所以开始一步步把之前的博文转过来
CHANGELOG:
2021/10/31
- 添加新的微信和qq 安装方式
2021/4/25 - flameshot截图软件的加入
- 修改错误的字母
命令行补充【备注记录】
1. ROSCORE WARNING
WARNING: disk usage in log directory [/home/mohammad/.ros/log] is over 1GB. It's recommended that you use the 'rosclean' command.
rosclean purge
==2.ROS小插件 ==
2.1 imu姿态漂移校准
sudo apt install ros-kinetic-rviz-imu-plugin
sudo apt install ros-melodic-rviz-imu-plugin
2.2 查看plotjuggler数据图形
sudo apt-get install ros-kinetic-plotjuggler
sudo apt install ros-melodic-plotjuggler
运行成功看一下:
rosrun plotjuggler PlotJuggler
3. 删除文件夹 ubuntu【慎用 在你不知道你删掉的是什么东西的情况下 请不要用】
sudo rm -rf 文件夹名
4. 单独编译一个包
- catkin_make -DCATKIN_WHITELIST_PACKAGES=
- 【这个情况下会保存只编译此包的指令 如果要返回全局的命令是?】
在https://answers.ros.org/question/54178/how-to-build-just-one-package-using-catkin_make/ 这个链接中,大神提供了另外的几种单独编译某个包的方法:
1.使用 --only-pkg-with-deps
catkin_make --only-pkg-with-deps <target_package>
5.删除二进制包
- 首先卸载包
sudo apt-get purge ros-kinetic-**
sudo apt-get purge ros-melodic-**
- 然后卸载依赖包
sudo apt-get autoremove
6.查询空间
linux -- 查看磁盘空间的大小
命令格式: df -hl
显示格式为:
文件系统 容量 已用 可用 已用% 挂载点
Filesystem Size Used Avail Use% Mounted on
/dev/hda2 45G 19G 24G 44% / /dev/hda1 494
8.Ubuntu查看系统任务管理器(cpu+内存资源占用)
在终端输入:gnome-system-monitor
打开ubuntu下的任务管理器,启动桌面管理,显示系统cpu,内存占用情况,如图所示

9.查看电脑配置——linux系
uname -a查看内核版本与系统cat /proc/version查看内核版本号、编译器版本号、Ubuntu版本号cat /proc/cpuinfo查看cpu信息free -m查看运行内存量
10.复制命令行
-v的含义:Cp command can explain what is being done with -v option:
cp -v foo.txt bar.doc resume.pdf /media/backup/
此句的含义:将 foo.txt bar.doc resume.pdf 文件复制到/media/bakcup文件夹下,并且输出状态信息(就是复制到哪一步了
-r的含义:Pass the -r (recursive) option to cp command.
cp -r ~/Documents/ /media/usbpen/
此句的含义:将整个Documents文件夹复制到/media/usbpen文件夹下
11.解压命令行
As of the options,
c – Telling “tar” tool to create an archive
z – Use “gunzip” compression. That’s why the file extension – GZ.
v – Verbose mode. Tar will log each of its activity into the screen.
f – Allows you specifying a file name for the output file.
x – Tells “tar” to extract an archive
tar -xzvf test.tar.gz -C ~/Desktop/testDir1/
12.解锁文件夹
主要是HDD 机械硬盘装上去的时候,他总是需要sudo权限,所幸直接解锁掉好了
sudo chmod -R 777 *
777是可读可写,-R是整个文件夹下的所有文件都生效
不想每次----
source /devel/setup.bash
在home文件夹下,ctrl+H显示出了隐藏文件(再按一次ctrl+H就能又隐藏了)双击打开.bashrc文件:
不出意外,你可以看到一行
source /opt/ros/kinetic/setup.bash
这就是ROS自身的功能包所在位置,已经在你安装的时候的某个步骤添加了进来,所以你可以直接调用到ROS的自带功能包
最后一行添入
source ~/tutorial_ws/devel/setup.bash
source /mnt/hgfs/Share/Kin_ws/devel/setup.bash
source ~/kin_ws/devel/setup.bash
例如,博主这里就是添加了自己的三个工作空间供大家参考,注意需要将****这里改成自己的工作空间哦
source ~/****/devel/setup.bash
sudo chomd 777 /dev/ttyUSB*
调试ROS的时候开了比较多的传感器,每次开机都得chomd的一次,跟着以前步骤,添加进用户名组即可。
sudo gedit /etc/group
然后可以发现有这么一行:
dialout:x:20:
冒号后面填入自己的用户名,你可能可以看到有些:后面有熟悉的你的用户名,没错,那就是你的,例如:
root:x:0:
daemon:x:1:
bin:x:2:
sys:x:3:
adm:x:4:syslog,kin
tty:x:5:
disk:x:6:
lp:x:7:
mail:x:8:
news:x:9:
uucp:x:10:
man:x:12:
proxy:x:13:
kmem:x:15:
dialout:x:20:kin
kin就是博主的用户名
安装区 --- 强推!Synergy
Chromium Web Browser
这是简易版的,也可以视为精简版
sudo apt install chromium-browser
oh-my-zsh
首先安装zsh:
sudo apt install zsh
然后再:
wget https://raw.githubusercontent.com/ohmyzsh/ohmyzsh/master/tools/install.sh
sh install.sh
建议打开修改一下gitee源:https://gitee.com/mirrors/oh-my-zsh.git
可以看到安装完成后已经设置了默认主题:

参考:oh-my-zsh github官网
主题列表在github上:oh-my-zsh wiki 主题
比较好用的几个插件建议安装:
~/.oh-my-zsh/custom/plugins/zsh-autosuggestions 注意一下这里是自己的路径哈,如果你是按着这个安装的 默认就是这个,不是的话 记得改一下
zsh-autosuggestions :根据你的历史信息自动补全
git clone https://gitee.com/kin_zhang/zsh-autosuggestions ~/.oh-my-zsh/custom/plugins/zsh-autosuggestions
zsh-syntax-highlighting:高亮
git clone https://gitee.com/jklash1996/zsh-syntax-highlighting.git ~/.oh-my-zsh/custom/plugins/zsh-syntax-highlighting
最后:
gedit ~/.zshrc
在plugins的那一行加一下:
plugins=(git z web-search extract zsh-autosuggestions zsh-syntax-highlighting)
中文输入法 - 搜狗
官方介绍及下载链接:https://pinyin.sogou.com/linux/?r=pinyin
官方readme:https://pinyin.sogou.com/linux/help.php 需要补充以下几点:

在完成这步之后,还需要添加:

点击+后,然后消除掉only

然后搜索以下sogou点OK即可

然后按CTRL+空格就能切换英文和搜狗了,搜狗本身内部Shift也可以有英文
微信&QQ
2021/10/28 最新更新:由阿翔推荐的优麒麟 对中文适配极好!
安装地址为:https://www.ubuntukylin.com/applications/106-cn.html
跟着上面地址所示的安装方法(步骤哈 不是任选其一,一步步安装就ok了)


然后到软件目录直接就能看到安装好的微信了。
以前老版:
一开始这个话题我查过很多... 都是说用electronic-wechat 就可以 但是我一直没成功,后面是wine也没成功,再到现在是yq哥告诉我的用docker 才发现
Ubuntu安装QQ/微信(超级稳定版)
docker的安装:【走ubuntu仓库安装 一般都很慢 所以需要换国内的源】
申请阿里云加速器

键盘鼠标共享软件 - Synergy
软件介绍:Synergy允许你轻松地在你办公桌上多台计算机之间共享你的鼠标和键盘。你只要将鼠标(指针)从一台计算机的屏幕边缘移出到另 一个屏幕就行了。甚至可以共享你的剪贴板。你所需要的仅仅是一个网络连接。Synergy是跨平台的(可以运行于Windows,Mac OS X和Linux)。
最新更新:相关bug... 在付费版的更新里都更新过了,连接也更稳定,虽然界面没啥改进 hhhh 没错花了200大洋支持了一下synergy团队(买了是无限制设备的,所以算是终身的)
首先看一下使用效果:

双边的安装包 由链接给出:CSDN段下载链接;BDYP下载链接 -> 对应BDYP提取码:h5de
- 无破解问题 虽然synergy的团队除了付费的但是在1.8.8-stabe的上是免费的
- window这边的安装就不说了 点击安装包安装完成后,打开,会出现如下图所示(这个是配置好了的)

我是window是server【也就是用的哪台机器的鼠标和键盘】 - ubuntu 安装命令:
sudo dpkg -i synergy-v1.8.8-stable-25a8cb2-Linux-x86_64.deb;安装完成后直接搜索synergy打开 - ubuntu的界面(18的安装了 打开总是报错 但是不影响使用) 就是需要勾选client然后在服务端IP填写这边Server的加粗的那个IP地址
比如这样的报错: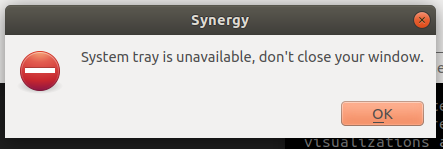 直接点确认之后进入主界面,这里填的服务端IP就是刚刚Server那边的

- 在执行完上面的步骤后,其实还没有成功就是需要在Server这端 有个交互配置 点击设置服务端,然后将刚刚Client那边的屏幕名给添加进来,如下图 1,2,3,4步
- 最后 点击开始 就可以发现键盘和鼠标都可以共享 甚至是截屏的复制到了剪切板的所有东西(文字和图片 单独的复制图片不行 只能从截图端的copy to clipboard才行) 十分方便!【就是一开始设置麻烦点】

这一块我又遇到了:Failed to connect secure socket
这时候请打开ubuntu那段的 编辑 -> 设置 -> 将这里的Network Security给勾选掉。【没错 新的主机重新装遇到的位置 上一个都没遇到啥问题】

flameshot 截图软件
我觉得贼好用,不止是Ubuntu Window也可以【就是没有Ubuntu的设置快捷截屏】
具体的github链接:

真的很爽的截屏软件,滚轮是放大放小哈,然后最新版又添加了可以移动的框(虽然wechat早就实现了 hhh)
安装方式为:https://github.com/flameshot-org/flameshot/releases
然后选择好版本和安装系统就ok,基本上覆盖了所有系统

然后安装就ok了:
sudo dpkg -i flameshot-0.10.1-1.ubuntu-18.04.amd64.deb
RoBoWare 【属于ROS的VSCode】
- 首先给一下github地址 这个地址望周知!太多人去官网发现下载不了:
https://github.com/TonyRobotics/RoboWare
RoboWare下载地址 - 下载流程 千万不要下载完 双击安装,因为那样会失败 正确安装流程
这里要注意啊! 首先是下载的版本,反正我第一次是下载错了的,下载amd64的用的比较多,如果是不确定自己多少位,终端输入命令,虽然我这里吧 是x86_64但是把反正另一个版本我没安装成功。
uname -a

如图是我自己下载的同一个系列的两个版本,我是amd64安装成功了

sudo dpkg -i roboware-studio_1.1.0-1514335284_amd64.deb
注意执行这条安装命令的时候 请进入你的安装包所在位置,或者进入文件夹后,鼠标点右键,在终端打开;执行此命令;
显示,协议的按esc退出,并确认是,就安装啦!
roboware-studio
然后就打开啦!
Jupyter-notebook【分割数据的好帮手!】
参考链接:How to install and execute Jupyter Notebook on Ubuntu 18.04
这个其实没啥坑,我一直犹豫是直接装还是走Anaconda,后面发现还是直接安装快的多
万事第一步:看一看自己的python版本有那些 ls -ls /usr/bin/python*

这是我截图的样子(最新的应该是python3.8 如果你想再装的话sudo apt-get install python3.8)
二
注意这里的jupyter-notebook中间是-横杠(不知道多少人和我一样第一次命令行jupyter notebook hhhh)
sudo apt install jupyter-notebook
三
直接打开即可,就像图中所示
jupyter-notebook

四:附加
运行Notebook里的代码时要添加conda环境,进入自己新加的环境(例如这里的环境名为cs285)
conda install ipykernel
python -m ipykernel install --user --name=cs285
然后再进去jupyter-notebook就可以选择运行的环境了
NVIDIA 显卡驱动
整合到另一篇文章内了 Ubuntu下的NVIDIA显卡【安装与卸载、CUDA安装】
Anaconda Navigator
1.是为了运行这样的GUI界面所需要的依赖:

Debian系列 装依赖
apt-get install libgl1-mesa-glx libegl1-mesa libxrandr2 libxrandr2 libxss1 libxcursor1 libxcomposite1 libasound2 libxi6 libxtst6
2.For x86 systems.
In your browser, download the 官方下载渠道 有点慢

3.下载完成后:
注意名字是要弄自己的,在我的这个时候是2020.11的版本
bash ~/Downloads/Anaconda3-2020.11-Linux-x86_64.sh
4.同意一系列的license 就enter,yes等等等
The installer prompts “In order to continue the installation process, please review the license agreement.” Click Enter to view license terms.
5.Close and open your terminal window for the installation to take effect, or you can enter the command source ~/.bashrc.
6.To control whether or not each shell session has the base environment activated or not, run conda config --set auto_activate_base False or True. To run conda from anywhere without having the base environment activated by default, use conda config --set auto_activate_base False. This only works if you have run conda init first.
5.6就是配置环境变量 和 启动时是否选择base作为默认(我就默认了)
7.打开GUI界面 也就是此节的第一张图所示的:
anaconda-navigator
OVER! (但是好像有这样的错误 ,但是并不影响你打开它)
Traceback (most recent call last):
  File "/home/udi-kin/anaconda3/lib/python3.8/site-packages/anaconda_navigator/widgets/main_window.py", line 1617, in check_package_cache
    repodata = self.api._conda_api.get_repodata()
  File "/home/udi-kin/anaconda3/lib/python3.8/site-packages/anaconda_navigator/api/conda_api.py", line 1860, in get_repodata
    raw_data = f.read()
  File "/home/udi-kin/anaconda3/lib/python3.8/codecs.py", line 322, in decode
    (result, consumed) = self._buffer_decode(data, self.errors, final)
UnicodeDecodeError: 'utf-8' codec can't decode byte 0xba in position 3119765: invalid start byte
这是打开spyder的界面

换源:
sudo gedit ~/.condarc
将下面的直接复制替代原来的:
channels:
  - defaults
show_channel_urls: true
channel_alias: https://mirrors.tuna.tsinghua.edu.cn/anaconda
default_channels:
  - https://mirrors.tuna.tsinghua.edu.cn/anaconda/pkgs/main
  - https://mirrors.tuna.tsinghua.edu.cn/anaconda/pkgs/free
  - https://mirrors.tuna.tsinghua.edu.cn/anaconda/pkgs/r
  - https://mirrors.tuna.tsinghua.edu.cn/anaconda/pkgs/pro
  - https://mirrors.tuna.tsinghua.edu.cn/anaconda/pkgs/msys2
custom_channels:
  conda-forge: https://mirrors.tuna.tsinghua.edu.cn/anaconda/cloud
  msys2: https://mirrors.tuna.tsinghua.edu.cn/anaconda/cloud
  bioconda: https://mirrors.tuna.tsinghua.edu.cn/anaconda/cloud
  menpo: https://mirrors.tuna.tsinghua.edu.cn/anaconda/cloud
  pytorch: https://mirrors.tuna.tsinghua.edu.cn/anaconda/cloud
  simpleitk: https://mirrors.tuna.tsinghua.edu.cn/anaconda/cloud
安装pytorch
请先在.condarc的地方把源换掉,另外NVIDIA的驱动需要装好,请参阅上面步骤,一定要显示看清楚CUDA的版本
channels:
  - https://mirrors.tuna.tsinghua.edu.cn/anaconda/pkgs/free/
  - https://mirrors.tuna.tsinghua.edu.cn/anaconda/pkgs/main/
  - https://mirrors.tuna.tsinghua.edu.cn/anaconda/cloud/pytorch/
  - defaults
show_channel_urls: true
auto_activate_base: true
ssl_verify: true
如果要使用清华源对pytorch进行下载 需要把官方给的安装命令行改一下:
conda install pytorch torchvision torchaudio cudatoolkit=11.0 -c pytorch
将后面从pytorch那边提取的删掉即可
conda install pytorch torchvision torchaudio cudatoolkit=11.0=

然后看到了done!就完成了
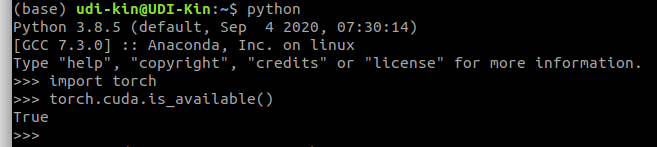
再运行python,import看一下 cuda GPU是否有效可以使用,显示True就OK了
问题合集
ubuntu-derivers devices 没有Output
I had the same problem. Software & Updates > Ubuntu software > check 'Proprietary drivers for devices' option. Then update from gui or sudo apt update
Software & Update 软件与更新不能打开
这个问题是出现在ubuntu16.04不能打开
Ubuntu16.04 的软件和更新,好像需要默认 python3.5来开。将3.5升级到3.6后,就打不开了。尝试将版本链接回退到3.5,可以正常打开。
# 1. 这条指令是进root权限
sudo -su
# 2. 这条指令是移除现在软链接的python版本(16的话是指向python2.7)
rm /usr/bin/python
# 3. 这句话是建立软链接将系统python默认版本指向python3.5 如果想指回python2.7只需改成2.7即可
ln -s /usr/bin/python3.5 /usr/bin/python
然后可以正常打开了。链接更新会3.6就又打不开了,可能暂时没有找到根本原因
Encountered a section with no Package: header" Error In Ubuntu
*号是出现在上面的文件
sudo rm /var/lib/apt/lists/* -vf
/dev/nvme0n1p3 requires a manual fsck
自动修复/dev/sda2硬盘
fsck -y /dev/sda2
The following packages have unmet dependencies:
【有风险慎用 因为他在帮你自动处理依赖 但是这样依赖的链接容易出现问题】
sudo apt install aptitude
sudo apt-get install ***你要安装的包名称***
终端http
export http_proxy="http://127.0.0.1:12333"
curl www.google.com
curl www.baidu.com
docker和wine的不同
WINE is taking windows file structures and calls and translating them to Linux.
Docker containers are isolating Linux commands. If you install Docker for windows it still uses a VM for the Linux kernel, docker then just uses this VM as the underlying kernel. So docker is isolating linux commands to run on linux,
WINE is trying to allow windows commands on linux. You can run Linux containers on Linux, Windows, or OS X.
You can run Windows containers on Windows.
Unable to access 'git/attributes'
I ran into this situation myself. After verifying that it was looking in ~/.config/ I noticed the owner of that folder was root. I changed this to my_user_name and it worked.
cd ~/
ls -al
<Noticed .config was owned by root, unlike everything else in $HOME>
sudo chown -R $(whoami) .config